
Leaderboard


Popular Content
Showing content with the highest reputation on 03/09/2026 in Posts
-
18 points
-
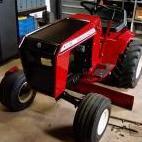
12 pointsI installed homemade hitch. I fabricated one last week
-
8 pointsFinally decided to check the Model No. on the Raider 12 I bought just before Christmas to see what year it was and the tag says 1-6931 which is a 1968 Raider 9 not a Raider 12. The model number decals on the hood stand were completely faded, the only thing legible was "RAIDER 6-SPEED". Apparently someone replaced the HH100 Tecumseh with a Kohler K301 and to that person I say, ! So, I will have TWO 1968 Raider 9's with 12HP Kohlers when my old one is back together. Yeah, I can live with that.
-
7 pointsHmm, first I've seen that. Yes, it could and should be welded. Pretty easy for that one. Jack it up by that 3/4 foot peg bar and it should close the crack gap. Weld it right to the bar inside and out and the crack too
-
6 pointsTonight
-
6 pointsSpring has sprung! Had a couple out today for some cleanup. Used the sprayer on the fences with one machine and cleaned up some debris with the the 523H. Lots of seat time!
-
5 points
-
5 points
-
5 pointsMarch 9, 1961 Soviet flight Sputnik 9 carries and returns from orbit a dog named Chernushka (Blackie), frogs, and a guinea pig.
-
5 pointsBeen working on this hunk
-
5 pointsTemp rose to 70* and the rain finally stopped. So I got about 3 hours seat time on the 312H rolling the lawn and cleaning out some old bluebird boxes and installing a new one. The Sunday dinner,/meeting was at my Amish neighbors farm today. Looked like about 35 buggys with a steady parade on my road.
-
5 pointsCiao a tutti, mi chiamo Andreas e vi scrivo da Treviso in Italia , ho un 420 LSE senza nome e seriale . Ho registrato le foto anche su tractor data . Hi everyone, my name is Andreas and I'm writing to you from Treviso, Italy. I have a 420 LSE with no name or serial number.
-
4 pointsHopefully this is in the right area. I wanted to put this information out there because when I looked this info up I got no answers. So I purchased this 8” Brinly for a whopping $75. In general it was in good shape but the crank and trunion looked like they came off the titanic. They were seized together and I figured any attempt to move them would just disintegrate everything. After a little research I was no closer to figuring out if new Brinly parts would fit an early model. Figured I’d take a chance and order a new trunion and crank from Brinly. I told myself I wasn’t going to try and fix it til after I broke ground on the new garden. Well my ADHD got the better of me and I started messing with it. Surprisingly all the components broke free and didn’t fall apart. So the new handles are a slightly different shape and the threads are a bit long by about 3/4” compared to the old one. Threads are still 5/8-11 as the old ones were. The original trunnion was roughly 1.010. The new one was 1.051 so there’s two routes you can go. Make the mounting hole larger or turn the new trunnion down on either a lathe or a bench grinder. I went bench grinder since I don’t have access to a lathe or any friends with one. Worked out perfect. It’s not pretty but it’s 100% functional. So all in all, Brinly’s new parts can work with their older implements. I hope this helps someone else in the future.
-
4 pointsI found this one on marketplace for $150. Its mostly trash but is a solid foundation. I was able to get it running but it’s a oil burner. IMG_1219.mov
-
4 pointsNever seen that on an older tractor. I have seen a 520 with a 60" deck have a cracked frame. Dem 60" decks is heavy.
-
4 pointsI hope I don't really need to say this but... REMOVE THE BATTERY FIRST.
-
4 pointsLooks good on this side of the pond this morning Jeff
-
3 pointsWe are not dealing with a space shuttle here! Wire brush the area, weld it, it's good to go for another 60 years +. 20-30 minutes of work. A restoration, then it would be all a part anyway so the proper way would be to just change the frame. A worker, not so much IMO. But I'm not retired with all the time in the world either so that may play a part in it too. Add a piece of metal over it to brace it if you're worried about the quality of the weld. Personally, I'd just wire brush it off and use a 7018 rod to arc weld it. I'm guessing the original weld wasn't good or complete so it stressed cracked at that weakest point, the top of the hole is the thinnest part to the top. (Built on a Friday evening right before 5 pm. LOL) The heat from the weld would weaken that section of the rail too if the weld wasn't completed. Air bubble in the weld maybe?? The foot peg 3/4 rod was welded on the inside of the frame so a pic of that side would probably show what's actually going on.
-
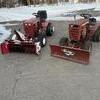
3 pointsI've built five receiver hitches, most about the same braced down to the transmission The other one other one .is braced off the top of the transmisson. Lot of different way to build a rexeiver hitch . This is one of braces for the hitch on the 520-H
-
3 pointsI have to get it off the stand hopefully this week. I want to get the transmission swapped do I can roll it around. Wanting to clean out my shed.
-
3 pointsOh Lawd no he didn't! Not gonna lie- the 701 just needs the hood, fenders, and beltguard finished and painted. And the fuel pump rebuilt. I've been a bit scared of painting it since I had so much trouble with the V14 paint job. I know I'm gonna have to get another spray gun and practice. And I'm NOT good with sheetmetal repair. I should be able to get back on it in a couple weeks. ...Maybe.
-
3 points
-
3 pointsSpent all afternoon working on the delivery door. I took the advice of using wood hardener and it sure sealed the wood and certainly will protect it even though it's kept inside and seldom gets wet. Pictured below is one of the eight "captured nuts" used are 1/4" by 3/4" by 1 1/4" steel that is tapped for 1/4 bolts/screws and held in place with a short roofing nail. They are a bit of a challenge getting them aligned so that took me a couple of hours. The door is hung. and swings nice. It will take another day's work putting everything back together. It wasn't as big of a project was I first thought and I glad it's almost done and get it back on the road.
-
3 pointsIn '74 I was working out west and hauling a 27' travel trailer. As I went through the rolling hills of Nebraska a VW bus passed me on every downhill grade making me waste a bunch of gas passing him on the uphill runs. After four or five of these little annoyances I blocked him from passing going down hill and slowed him down to about 40 MPH at the foot of the next uphill section, never saw him again.
-
3 points
-
2 points
-
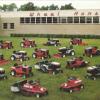
2 pointsThis is part of our collection! We have been collecting about 4 months. Every time they find a deal they leave and go get everything they can get..
-
2 points@ri702bill is right you will need to strip that down to bare frame to fix correctly, if you can try to find someone close to you that has a bare frame.
-
2 pointsYeah, mine is no good except for the steering, engine, and tranny. I'm regretting selling my good 520, but can't keep everything.
-
2 pointsWelcome! One of the big advantages of owning Wheel Horse tractors is also at times a curse. That is the free interchangability of so many major components over a decade or more. You may have one or more "Franken Horses" where failed components - engines, transmissions, steering wheels and such got replaced with servicable parts that fit and are not true to the tractor serial number.
-
2 pointsOK - you have a lot going on there. Are both sides cracked in the same place?? If so, it must ride like a hobby-horse with the frame flexing. Flexing - did the frame take a permanent set, dipping downward - on both sides?? If it is all in the affirmative for my questions - game over. Find a good donor frame. Sounds extreme?? Here's why. There is severe acid corrosion on the frame and in thru the crack. You cannot weld over that - the surface must have all that removed, and the crack Vee gouged out. That requires stripping the tractor to the bare frame. Then the forces that caused the crack need to be spread over a longer area - that requires either a plate or other angle to be inside the frame with the frame inverted and clamped down on a stout welding table.. Short version- - can it be done to properly fix the frame, yes. Is it worth going thru all that, probably no. I agree with the others that if all you want is a short term "field fix", then even the easy way out is not easy. My 3 cents...
-
2 pointsLordy it's great to be retired :::::: I can’t agree more. So much time on our hands. This means take our time to just enjoy the project.
-
2 pointsI'm almost positive that no one addressed the built-in steering angle and changed it to be correct for the shortened wheelbase... That would make for an evil handling twitchy vehicle. And hard braking must make the rear wheels point skyward. But, it's easy to parallel park.
-
2 pointsMarch 8, 1950, The first Volkswagen Microbus rolls off the lines at a VW plant in West Germany. Production lasted over 60 years, with the van becoming one of the most iconic symbols of the hippie counterculture
-
2 pointsI don't know if this will help you, but it's the best I got. 3"×3/8 flat strap. 14" wide between uprights, ends have 2x 3/8" holes on 2" centers. The uprights on D stuff is 3" narrower. I widened one from a D, but haven't made the actual mounts for the center link yet, but they will just be flat bar. I'd have started from scratch but have no way to bend that heavy of material. Mine will be a dedicated loader tractor so there is no provision for a pto. I've been chasing that part for years. It's rare like bigfoot, There is a set on page 2 of the classifieds right now, linked below. I'm trying to buy these, but have no confirmation from seller at this time and dont know that it will happen. I don't restore, so correctness may be more important for you to pick this up. There are only 4 parts that are unique to a 195, the others are same as a D. #109791. (#11 on tpl) #109787. (#1 on tpl) 2x #109786 (#2 on tpl) these are on a 2-1/2 center, the D's are on a 2" center https://www.wheelhorseforum.com/classifieds/for-sale/wheel-horse-d-seriesc-195-3pt-hitch-r14399/
-
2 pointsI better get on it then!
-
2 pointsThat really means 2 or 3 years
-
2 pointsUnder the floor board there should be a Heim joint. You can unscrew the joint making the rod longer and that should bring the pedal closer to you. It does look like yours is to far forward.
-
2 pointsLittle Red Barn has them. https://www.lilredbarn.net/product-p/47-041-15-s.htm
-
2 pointsA friend of mine in Fla has a couple plus a Beetle. All worth big big money now!
-
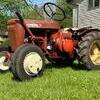
2 pointsI got it cleaned up and ready for driveway duty, Tire and wheel upgraded helped. 1975 D-200
-
1 pointSince I’ve got TONS of extra parts, I have been thinking about what to do with them. I had this idea that I could make a C-Series hybrid tractor. I’d like to have electric clutch, hydraulics, forward swept axle and gear reduction steering, Eaton 1100 or 5091 8spd? Maybe C-195 3pt? I don’t know what else I could do, but my end goal is to have a tractor I can plow, till, harrow, and snowblow with. I’ll get pictures soon of my parts selection.
-
1 point@Joker72 do you have a theory as to what led to the failure? Curious...
-
1 point
-
1 pointHeck yeah! Gonna put one behind that flimsy plastic plate on the 701. No rush of course.
-
1 pointI’ll get around to finish making those dash plates if you still need one.
-
1 pointParticularly the double cab Transporter...
-
1 pointWas hoping nobody would would mention the molasses thing! Need to have a throw down with KP @kpinnc and his 701 project see who gets done first.
-
1 pointHello, sun!
-
1 pointI was considering giving you some grief and perhaps even a snide remark about memory... then I recalled I hadn't posted this yet.


This leaderboard is set to New York/GMT-04:00