
Leaderboard


Popular Content
Showing content with the highest reputation on 01/04/2026 in Posts
-
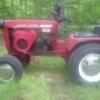
11 pointsWhen I got the 312-8, I searched for Wheel Horse forums. I picked this one & I'm glad I did! Lots of great folks here and there must be a couple hundred years of combined knowledge, I greatly appreciate all the help & guidance I am receiving. Thank you!
-
7 pointsSome of us might bump that estimate up another hundred or so - individually!!
-
7 pointsJanuary 4, 1847. Samuel Colt sells his first revolver pistol to the United States government. This marked a significant moment for his company, which was initially struggling. The first sale was for 1,000 of the newly developed .44 caliber Walker revolvers.
-
6 pointsBeing frugal, this info matters a lot to me, as well. More than a few members here (me included) find that parts salvage and the occasional visits to “out for the trash” piles, is also rewarding! Lots of my tractor rewiring is from discarded appliance wire harnesses--they often have just the colors I’m looking for and are usually in 14ga.
-
6 pointsOnce you drink that prep you’ll have another kind of storm coming in the same timeframe.
-
5 pointsI never did care much for the look of the plastic seat pan/fenders, although this one is flawless no cracks or breaks. I put the wheels and tires of a 520 and I gotta say it makes the plastic look pretty good now. Lol!! I might keep it for a while this way before I throw a metal seat pan on it.
-
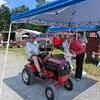
5 pointsThe battle has been won... Ill deliver next weekend and have a double date night. Me, my wife Sue, her Cousin Linda and husband Dave. 20260104_161351.mp4
-
5 pointsA lifting strap went on top of that bolt and was held on by a socket head bolt that threaded into the head bolt
-
5 pointsThat's the only option, give it a tiny shot ever hour when you walk by for several days. tap on the bolt head and give it small open close wiggle to help it work in. Those bolt make come out fine or they make be stuck. Caution from putting the gorilla force on them is all you can do.
-
5 pointsOn Black Hoods I used magnetic tape where the hood meets the dashboard. I got it at one of the box stores, it’s about 1/2” wide and maybe an 1/8” thick. I stuck it to the dash tower, it fits perfectly in that notch where the hood lands. Looks factory and helps hold the hood closed a little bit.
-
4 pointsNot only is there a wealth of information available and freely given. There is also the friendly bantering and camaraderie. it's not unlike sitting around the liars table at the local restaurant. Good group and well run organization.
-
4 pointsIsn't it cheaper to just take the core out of the valve stem? That'll get you air-less tires PDQ.
-
4 pointsI would say that it was time WELL spent. You added to your education, and you ended up with a clear conscience about buying a new machine and recycling the old machine instead of repairing it. Win-win!
-
4 pointsToday I decided to dissect my broken washing machine in the hopes of scavenging a perfectly good motor. The drive shaft connects to a triangular aluminum armature that spins the basket. That broken metal bracket thingy was so corroded it was hanging on by only one of the three arms, explaining the horrible racket it was making (for quite a long while, I might add) before it finally quit for good. Anyhoo, that shaft was fused on there but good and I imagined this is what trying to remove a steering wheel off a Wheel Horse must be like. That juice just wasn’t worth the squeeze - I gave up trying. I did learn I could use some better water treatment, though. The only salvageable parts were a copy of nice weights. With those gone, hauling it to the scrap guy will be a cake walk. All in all, not time very well spent but it was mildly interesting to see how that thing was put together. And I got some satisfaction confirming it was not repairable, having purchased another. Anybody need a perfectly good wiring harness, lol?
-
4 pointsAnd since American history is a favorite of mine ... for your convenience
-
4 pointsDecarboning the combustion chamber, valves & the head actually are recommended routine maintenance items per the Kohler manual. It also gives you a chance for a look-see at the valve seats, valve faces, and to determine if there is too much clearance from valve stem to guide. The exhaust valve & seat have a particularly rough life. Also note the amount of carbon on or missing on the piston. Sooty carbon tells you the engine was running too rich; a burnt exhaust valve reveals a too lean condition. Carbon missing all around the outer 1/4" or so on the top of the piston indicates oil getting by the rings.... if so, it may be time to dig deeper. With the piston at BDC you have an opportunity to ckeck the cylinder bore for size, roundness, and taper - if you hac access to the proper measuring equipment. Do note the overall tightness of the head bolts upon removal. Are they all about the same as far as the force to break them free or not.?? One or more loose ones tell you the head was not properly torqued. If you look closely, the engine can tell a lot.... Head gasket torque & sequence. I cannot stress enough how vital this is. It is not a set it & forget it one time process. Look at the Kohler manual for the correct torque pattern, sequence of progressive steps, and info on re-torquing after a thermal up to temp and cool down cycle, running the engine with no load. The manual tells you to repeat as necessary - it does not tell how many times. My personal worst was a 6 HP Tecumseh - I had to thermal cycle it and retorque the head seven times to get consistent recommended torque reading when cold. This is due to the composite gasket compressing each cycle until it is "happy" between the aluminum head and the cast iron block...
-
4 pointsI worked in Industrial Services. We had 40K psi JetEdge water blasters. We had to lap the valves when they wore down. We used a sheet of glass, various grits of sandpaper, wet with WD40 & sanded using a figure 8 pattern. That's what I intend to do with the head unless directed otherwise.
-
3 pointsI’d like to add 42 years owning, using, fixing, restoring, and collecting Wheel Horse tractors and implements 👍🏻🙂
-
3 pointsI'll chip in 82.
-
3 pointsMore sheet metal repair. The bolt hole in the seat was busted out, fact it was so big the the head of a 1/2 carriage bolt would drop right through it. I used a hole saw to make a washer out of 10ga sheet metal. Welded this washer in place plus took care of a couple of stress cracks. Ground all the welds smooth, Squared the hole to fit a 1/2" carriage bolt. The seat and front rims then made a trip through the blast cabinet. Moved on to the hood which had some cracks around the front mounting hole, plus plenty of dents. Spent a couple hours with a hammer in my hand bouncing back & forth between the anvil, a sand bag, and some hand dollies to get it as straight as I could. It will still need some minor body filler work to be perfect. After it was straitened out I drilled some holes at the end of the cracks, beveled the cracks out, weld & grind. Other than that all I have to show is a bucket full of sand blasted parts.
-
3 pointsThe Toro assembly drawings shows the new style metal fender pan on the 1984 C-145.
-
3 points@Sparky was supplied with a 110v welder. Next time, wire brush or sandpaper that doughnut and the shaft a little bit down to clean metal right where they meet and zap it with a tack weld. You don't even need to remove the shifter! BAM, slide the boot back down and you're in business shifting like a Le Mans race car driver.
-
3 points$75 in new Japanese made tools (always had cheap junk chinese HF versions) and BAM.... the Dog Point looses! No damage to threads! @Retired Wrencher
-
3 pointsRemove the belt guard and check the clutch linkage and pulley. The bearings in that pulley take a beating. Also check the brake linkage to be free and move easily.
-
3 pointsJust a note of caution. The head bolts on either side of the exhaust are know to seize and break. Liberal us of penetrant, time, and a open a little/close a little, repeat are one possible method of removal. But some still break.
-
3 pointsAmazing what a little bit of elbow grease and a good cleaning will do.
-
3 pointsIt’s always good to remove the head and check for carbon buildup. And sand down the mating surfaces. Like this in this picture. Also sand down the head itself on a nice steel flat table. I try to get it as flat as you can, as you go, you can see where the low spots are and the rest is all high spot. Also, I try to use steel head, gaskets like they originally put on these engines.
-
3 pointsLook carefully and you'll see the flanged bushings in the pivot pin. That helped a bunch. To finish the cure for this area I added a couple of rubber grommets to prevent metal to metal contact. Note the wear that's caused on this 50 year old machine. You can get the little bumpers that push in but I went with a part that's available pretty much anywhere.
-
3 pointsI have been reading your other posts and discussion about what is involved, and I fear that I maybe researching for a while to find someone here that is suitably skilled and experienced. I've put it down for a little while as I mull over having to do an engine swap instead.
-
3 pointsKudos to you for the effort and, more importantly, the reason for the effort...
-
3 pointsI remember one of the 1st days of boot camp in the Navy. NCTC in San Diego 1970...80 of us lined up to get our shots. We all walked through the shot statiom and got multiple shots in both arms and then went out and stood at attention on the grinder in the hot sun. Some of the guys passed out, but all were OK. Welcome to Boot Camp "Julius", you look like you need a hair cut. The end of day one, and the start of "Yes Sir, thank you Sir...may I have another?" The smart guys caught on quick, the other guys caught on later...but they caught on also. Some had the opportunity to spend a few more weeks training...I never saw them again. I'd do it all again in a minute !!!
-
3 pointsUsed my new to me vintage drill press to make a pulley key.
-
3 pointsMore expensive more like original and holds on pretty well.
-
3 pointsDecided ol' Johnny needed spruced up a bit, so I slapped a quick paint job on him. AI paint job, that is.
-
2 pointsIt is not. If you cross thread a nut/bolt set the bolt cannot come out the far side of the nut not being stripped. It is not crossed, don't cut it.
-
2 pointsHello all & Happy New Year! Been nibbling away on a 310-8 with plow for my wifes cousin. She saw my C160 and fell in love and wants something similar. She has cancer and im just trying to give her some happiness. Gosh Darn It... I decided to swap out the shifter as it has the non welded ball roll pin version and shifted like you where stirring soup in a pot. I swear... I put a stubby 7/16ths on the lock nut and put .0000001 ugga duggas into it and snap--Have a nice day!! I quit... tomorrow ill argue with it and pray I can get the end piece out without having to pull transaxle. What a P.I T.A that dog point set screw can be!! Who decided forwarded facing in a tight spot was a good idea... Tony
-
2 points
-
2 pointsChoke cable ready to install. Choke cable installed and choke closed. Choke cable installed and choke open.
-
2 pointsI believe WH used either 16 or 14 ga. wire for the primary wiring with 6ga Battery cables. I use 14 ga and upsize the bat cables to 4ga especially on the starter gen models as they take close to 60 amps to start
-
2 pointsMore progress on this beast yesterday. While I was working on engineering and creating a stepped key for Trina's Military Tribute Tractor "Millie", she was puttering on my frame and steering. She started by scrubbing the dust & rust off slightly. Then used rags to lay on some used motor oil. I'd have used Flood Penetrol but didn't have any. The oil will work fine for rust and corrosion resistance. Before: After: Also note in the above pic that the gear reduction steering system is now in. During installation I tightened up the castle nut on the reduction gear to eliminate most of the slop. The forward bearing however is quite loose. I have communications out to @76c12091520h about getting new ones. At this stage it's only a few bolts to pop out and replace that bearing. The only issue we could see that needs immediate addressing is that the rear horizontal gear ⚙️ is contacting the tractor lift arm. 🤔 Either the pillow needs to be moved forward or the arm needs to be trimmed. Possibly a bit of both. I'll also drill and/or resize the 2 extra holes where the pillow block sets. As some folks know, the upper steering shaft from a 520H sets higher in older tractors because of geometry differences. The extra height of the steering wheel is a little odd looking to me but we decided it would be best to leave the height until I get some good driving time to see how it works. Just sitting on the tractor - I LIKE the extra height. A lot. There's a good 2" to 3" of added space for shifting. Also, the vertical position of the wheel is better for me as a tall driver whose height is in the spine, not long legs.
-
2 pointsAmazon.com: AR-PRO Wheel Hub Spacers – Metal 3/4" Axle Spacer Kit, Combo Pack with 4 x 1/2" and 4 x 1/4" Extension Sleeves for Lawn Tractors and Riding Mowers : Industrial & Scientific These are also good to have in stock.
-
2 pointsEric In the bad year of 2011 we had 3 feet down here. Took a while to clean all that snow and clean all the snow off and the roof so it was like double duty.
-
2 pointsNot much help but check out the pusher blade on the skid steer at the end of this short. Ultimate set up ?
-
2 pointsAs a rule I prefer not to use tape on anything that carries oil, but I have used it in fuel lines. Just be sure to allow a thread or two at the edge to be free of tape just to keep it out of the system. Liquid sealers work best in my opinion, but the same rule applies to keep it out of the tip so if doesn't get into the lines.
-
2 pointsJuly 1982 - Going to the Sun Highway - Glacier National Park - Logan's Pass:
-
2 pointsTug Hill is infamous for that deep lake effect snow - Tug Hill is major snowmobil destination that area has been getting hammered past couple of weeks
-
2 pointsOh Don, they do say it’s the mind that goes first ..,it’s a C-85 But yes on the wheels, will be factory color or close to it. No gray or black like I’ve done before.
-
2 pointsI use old seat edging I save from worn out seats. Some people use split gas line.
-
2 pointsI love your AI paint job, and it inspired me. I've been having some fun playing with Photoshop and AI, and I thought I'd see what my GT18 would look like if it had a small V8 with a four-barrel, headers, mags, and racing slicks. Current (real) condition: After some AI-assisted modifications and a bunch more tweaking in Photoshop: And of course, it would be irresistible to the local bears:
-
2 points@Bar Nuthin parking to close to wood pile not a good idea


This leaderboard is set to New York/GMT-04:00