
Leaderboard


Popular Content
Showing content with the highest reputation on 09/07/2025 in Posts
-
8 points1445 helping finish some sand work before forms and grade are set…
-
7 pointsThe 520H runs and drives! The entire motion control system is worn and it's a two hand driver so no video... Seems reasonable. Engine is decent and smooth. Transmission operates correctly. I had the hood off already so I leaned up against a tree. Easily made two nice tire holes in the gravel. Now.... to rip it apart!
-
7 pointsGT-14 getting ready to haul away birch tree
-
7 pointsThe only machine I own that lives in my house, in the basement to be exact (not my living room!) 2002 315-8
-
6 pointsHappy Birthday @stevasaurus, we are all glad you were born.
-
6 pointsThe first Sunday in September marks National Pet Rock Day each year, this year on September 7. For those who don’t know what they are, what rock have you been hiding under? Not a pet rock for sure. Pet rocks are extraordinary pets adopted by hundreds across the country. You might wonder why someone would keep a rock as a pet. Well, think about it. Rocks don’t need grooming, they don’t require visits to the vet, they don’t eat, never get sick, and, best of all — they never die! Amazing right? The pet rock was created by advertising executive Gary Dahl in April 1975. Each rock is a smooth stone picked from Mexico’s Rosarito beach. It was sold in a custom-made cardboard box complete with breathing holes and a straw. Die-cutting and manufacturing cardboard boxes represented the biggest production expense for Dahl. The stones were regarded as live pets and were marketed as such. The inspiration behind this strange creation came from complaints from Dahl’s friends about the stress of caring for their pets. During a discussion in a bar, Dahl joked about keeping a rock as a pet. He emphasized the fact that rocks don’t require walking, feeding, treatment, or other necessities a live pet demands. Dahl, however, didn’t stop at just wisecracking; he did them one better. He went on to write a pet rock instruction manual, which included jokes and gags about how to “care” for the rock. The instruction manual was a popular addition to the pet rock itself, showcasing Dahl’s amazing sense of humor. The pet rock fad came to an end after a slight boom in sales during the festive season of 1975. Gary Dahl made a tidy profit, selling over a million pet rocks before the eventual discontinuation in February 1976. At the time, each rock sold for $4, making it one of the most fascinating marketing schemes ever. If you were to consider the $4 in the context of today’s prices, each person would have to shell out $18 for each pet rock!
-
5 pointsMy Son and I picked this up yesterday.
-
5 pointsKinda related. I can control my train via my phone with a Lionel app and bluetooth. When I first got it I'm running it and trying to control the speed. I ended up getting it running wide open and I couldn't get it to stop! It's flying around the layout and I'm swiping the screen trying to stop it to no avail. Now I start laughing as I have a runaway train headed for Goober Gulch. Finally I come to me senses and turn off the power transformer to the track! I bet I was laughing for a good 2 hours after that!
-
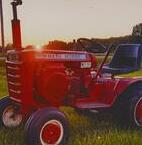
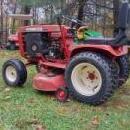
4 pointsMy folks are moving to a smaller home and my dad is unfortunately looking to sell his Wheel Horse. Just starting to do some investigation on his behalf and I found this forum and thought it might be the best place to start. Here's what I know - he picked this up a little over 25 years ago and did some work on it to get it cleaned up and running nice. Currently it only needs a battery as it's been in long term storage. The mowing deck works as far as I know. It's in pretty great shape and he took good care of it. Stored in his shed, covered up with a blanket. We're up in Ontario not far from Owen Sound. Curious as to what he's sitting on, and what would be a fair assessment of it's worth. Thanks in advance! Clint
-
4 pointsI’m currently doing some needed maintenance, adjustments, and repairs to my recently-acquired New Holland GT18 (the New Holland version of the Toro 518xi), which is the new companion to my 522xi. The old steering tie rod ends had a lot of play in them, and one of them even had a washer welded onto it to keep the ball from popping out. The OEM replacements I was able to find were very pricey, so I looked for some lower-cost general-purpose rod ends that looked like they matched the originals. I found some that had the same threads and external measurements as the ones that were on the tractor. However, when I pulled back the rubber dust boots to see if the innards were the same, I found that the old rod end had a larger ball and larger neck on the stud where it meets the ball. I won't speculate as to whether or not the low-cost replacement rod ends would be good enough, but I prefer replacement parts to be as strong or better than the originals, and I didn't have any load ratings to compare them. Thinking about it some more, I thought it might be nice to have greaseable rod ends, and Heim joints came to mind. I found some ½”-thread, stud-type Heim joints from McMaster-Carr that looked like they would do the job (the dimensions, thread sizes, swivel angle range, etc., looked OK to me). I wanted to install rubber dust boots on the joints, and I found some that I thought 'might' fit, although one of the holes was much smaller than the diameter of the female-thread shank of the joint, so it would have to stretch quite a bit…hopefully without tearing. If anyone knows about other dust boot options for these joints, let me know. In the meantime, I'm using these boots. Here’s a photo of one of the Heim joints and one of the boots that I ordered (the boots did not come with the cable ties). Trying to stretch the boot onto the joint with my fingers alone was not working very well. I noticed that some dust boot suppliers were selling four-prong stretching tools/pliers for that specific purpose. These tools appeared to me to be re-labelled ‘goat banding’ tools. Some of you with livestock would know that these tools are used for applying stiff rubber bands to a critter for the purpose of removing certain, shall we say, 'unwanted body parts.' Anyway, I found one at Tractor Supply for about 12 bucks that worked very well for stretching the dust boots. I was pleasantly surprised to see how much the small hole in the boot could be stretched without tearing. I purposely over-stretched one (even farther than shown in the photo) just to make sure it didn’t tear. So far, none of them have torn, but I guess time will tell. After I figured out the best way of using it to install the first boot, the rest were a snap to install. Here’s a joint with the boot installed (cable ties not installed yet): I thought I’d grease the joints before installing them on the tractor, as I wanted to make sure that the grease would go in OK without damaging the boots, and I also wanted to rotate the stud/ball while greasing it so that the initial charge or grease would completely surround the ball. I screwed a bolt (or the end of a tie rod) into the joints and pumped grease into them until it started to ooze out around the openings in the boots. After greasing the joints I squeezed the boots a bit to force out any air bubbles and excess grease, and then installed cable ties on the boots. I don’t know if the cable ties are really necessary, but they at least make the boots appear more secure. I figured it couldn’t hurt. Note: Before screwing the ends of the tie rods into the joints, I temporarily unscrewed the zerk fitting, which prevented air bubbles as well as the excess grease in the female-threaded part of the joint from being forced into the joint and boot. The residual grease in the threads should help prevent the joint from seizing up with rust over time. I had a #@*%! time getting a couple of the old rusted rod ends off. It took several long soaks in penetrating oil/solvent, applications of heat, and a barrage of unprintable language before they surrendered. For future lubrication, I would slowly add just enough grease to see the boot swell up a bit and perhaps have a little bit ooze out. Here are the completed tie rod ends: I installed the tie rods on the tractor, jacked it up by the frame, and checked for binding as I moved the axle tilt and steering through their full ranges of motion. Everything seemed fine to me. BTW, the nut is an all-metal distorted-thread lock nut. Coming up: A second steering issue to deal with.
-
4 pointsI like to tell folks that this will be worth more in your shed, than in your pocket. Don’t sell…
-
4 pointsThanks you guys for all the well wishes. It's not easy to reach 76 years of age. The past few months have been a test to that. I think staying active is part of it. This site allows me to join with old and new friends by helping those that want to learn, by sharing relationships that are worth a million dollars, and remembering those friends that have passed before us. I treasure every minute that I have been a part of this Web Site and I thank Karl, Sparky and all the members that I have met thought the years. I could write a book with all the pictures and names of the Red Square Herd and the stories and memories that go with it. To those that have joined recently...go to the horse shows in your area and meet the members that you talk with on this site. It is a family and it will enrich your life. Thank you for the Happy Birthday!!!
-
4 pointsNice looking machine there Clint. If you want to sell it that probably won't be too hard. I would say it's probably worth getting a cheap battery and throwing it to make it a true "runner". That will increase the value by more than the price of the battery if you can show it actually runs properly. Plenty can go wrong in long-term storage, even when it's done right.
-
4 pointsI've had several cheap valves go bad so I've switched to these: Fuel Flow Valve | Aircraft Spruce ® https://share.google/irsCRAuHCVrHUw2w9 With this grommet: Fuel Tank Rubber Bushing | Aircraft Spruce ® https://share.google/9EwLfvfR5cd4aSCOF
-
4 pointshood is off, but i have it and it is in decent shape, from what i understand this came from Georgia and the previous owner passed away while in process of fixing it. Alot of wiring has been altered ALOT as in does not have original charger plug or jack. charger hums when plugged in as if it wants to work but i could not plug it into my working E 141 because of the altered plug system. Drive motor runs along with the deck motors running very quietly and smooth. so whatever issues it may have will be in the control systems. I really feel like Wheel Horse went ruby goldburg on these things taking the simple task of turning some electric motors on and off and turning it into a space shuttle.
-
3 pointsYour father must be very proud of his Wheel Horse. Have you considered keeping it as a family member?
-
3 pointsLatest update made a battery tray Idler and clutch sorted Starts on the key, just missing a throttle lever! Had to go for a spin! D91CC3A5-8B40-413C-9590-4B2A69D9EA58.mov
-
3 points
-
3 points@squonk who’s the Goober now?
-
3 points
-
3 pointsWe spent a couple hours cleaning and organizing in the barn again this morning. Got a LOT done. We're within a short amount of work to being able to park in there when needed. WOOOOO-HOOOOOOOOO!!!
-
3 pointsHappy Birthday Steve!
-
3 pointsHappy Happy Steve!
-
3 pointsAll my helpers with good intent…
-
3 pointsDitched Facebook. Im free
-
3 points
-
2 pointsI am going to have some new Schnacke Nuts made for Kohler K 90 and 91 motors! I acquired a Schnacke with my latest RJ purchase and the 1 1/2 inch HEX Nut was already rounded which explained why the Schnacke was off the motor and the rope pull was being used! McMaster Carr sells 7/8 HEX rod in different lengths. I bought 12 inches which should make 7 good ones 1 1/2 long. I am also going to have the 7/16 x 20 threads placed on each end so the Kohler HEX Nut can be reversed and used on the other end after wear
-
2 pointsI've been pondering about getting a low end drone just to play around with. Here's a typical example of the level I'm looking at. There are about 4 gazillion similar units out there but this will give you an idea of what I'm looking at. Amazon.com: Drone with Camera for Adults 4K, Upgraded 4.5inch LCD RC Screen, GPS 2-Axis Gimbal Quadcopter Brushless Motor, Auto Return, Follow Me, Waypoint Fly, Optical Flow, Visual Tracking,60 Mins Flight, Foldable 5G Transmission FPV Quadcopter for Beginners : Toys & Games My biggest problem is that the vast majority of them require a phone to be used as the monitor. Ummm, yes, I have a phone but we have very limited use of it unless we are within range of our wi-fi router. That's not going to cut it as I want to walk out back and still be able to use it. One of the units like the one posted has a built in monitor. Problem solved I say to myself. But then I watch a video of one of the options. They mumble something about hooking up a cell phone to get full use of it. There's no one around here that can give me a straight answer so it's time I tap into the best source of information on the internet. The drone I linked to may not be the one with the video I'm referring to but I figure it's a good example. So how about it guys. Is it possible for a unit similar to the one posted going to allow me to fly it around the property, take some pictures and let this old man play without needing a cell phone?
-
2 pointsHappy Birthday @Bar Nuthin we are glad you were born.
-
2 points
-
2 pointsGot the welder out and gobbed the ball hitch adapter together for EJ the 8n's 3 point hitch. Got some finishing work to do on the welds, then on to prime and paint. I've got a cataract in my dominant eye that is affecting my depth perception. Made this welding job kind of interesting. I laid down a couple of really nice beads - right next to the joint
-
2 pointsWOW, good point, we wouldn't want the Chinese government to see @Racinbob's back 40.
-
2 pointsFront weights Rears IH 25 pounds weights, I realize I can mount these on the inside of the rim but I don't think it would look right to have front weights and visibly not look like there are rear ones. Also planning on fluid filling the rears as well.
-
2 pointsOK, I would try to fasten the spring and turnbuckle from the seat bolt to a bolt on the tiller engine. I would do this to not only to reduce the load on the lift lever, but to also reduce the strain on the cable that connects the lift lever to the hitch.
-
2 pointsand the springs to counterbalance the hood weigh as much as the hood.
-
2 pointsI'd guess that your filler caps leak. Seems that most of the newer saws have the fill caps for fuel and oil located on the side. You could always clean the outside of the saw, then set it on a rag to see where the leak is. There will always be some oil drips out from around the drive sprocket.
-
2 pointsWell there's a reason for that. I think the hood on my 78 Olds weighed as much as the whole of my wife's last car.
-
2 pointsI obtained the studded heim joints from McMaster-Carr. I've been ordering stuff from them for about 40 years. Their prices are sometimes very reasonable and sometimes kind of pricey, but in any case, they have great customer service and super-quick shipping. I usually get my items the next day. I ordered the boots directly from the Seals-It website. They were quite a bit cheaper there (6 boots for $34.76, plus shipping). I got the boots with two holes (RERS2B6PK, for studded rod ends) instead of three holes.
-
2 pointsYyyeeeaaahhh..... And that's why I have naked tie rods!
-
2 pointsyeah I bought OE style replacement tie rod ends there also, they had both left and right hand thread, good quality decent price. I did look closer and found those rubber covers. I guess they are proud of them cause the covers cost more than the part they protect. Go figure!
-
2 pointsHave a Great Day Steve
-
2 points
-
2 pointsBoy John, you sure you know you’re round hoods.
-
2 pointsI ate too much. The neighbor had their annual friends and family hot dog roast/pot luck today. Was cloudy, in the 50's, and windy. Never the less, a good time was had by all. Just to feel like I did something useful today, I installed the new primer pump I got on the 18" Craftsman saw. Checked the air cleaner while I had the saw open, too.
-
2 pointsI saw your final FB post…congrats!
-
2 points
-
2 pointsSpent about 4 hours on the Escape today: The welds aren't pretty, but they are solid, and I am very much concerned with function over form here. I still have to drill a series of holes for the pins to attach the rocker trim, but I haven't measured for them yet.
-
2 pointsFabbed up a fan guard for my 875
-
2 points
-
2 points


This leaderboard is set to New York/GMT-04:00