
Leaderboard


Popular Content
Showing content with the highest reputation on 04/18/2025 in Posts
-
7 pointsWorking on fixing the lawn where the shed project happened last fall, bought a bunch of seed, straw, fertilizer etc..cleaned up the truck and car, cranked out a 12.5 mile bike ride. I’ll be hitting the sheets early tonight.
-
6 pointsWe went to Baton Rouge, and ended up driving to New Orleans to the WWII Museum. There are a lot of exhibits, displays, photos, etc. of the war, both the Europe and the Pacific wars. I didn't really take any pictures of some of the interesting stuff, it was so crowded it was hard to take clean images without a bunch of tourists in front of them. It was busy and crowded. I did take some, more as an afterthought, and of the larger displays. They even had displays of what homes in America would have looked like during the war, I.e. kitchen with war time appliances, and a living room complete with a radio next to a fireplace, I.e. Roosevelt's Fireplace Chats. BTW, it isn't cheap including the parking. It's close to the Super Dome in the business district of New Orleans.
-
6 pointsLike I said in the things people toss thread I picked this up on CL under the FREE section. Owner had it since new. Been sitting in his shed unused for over 10 years he told me. Included was the original owners manual. I took it home and found out that the throttle and choke were just stuck. Could not budge them. Penetrating oiled them and slowly got them to move freely back and forth. Took air clearer off and spritzer it with starting fluid and gave it a pull and it fired to life. Doing so it spit out the biggest nest and a cloud of seeds and dust. Tried it with fuel and no luck. Couldn't get it to run on fuel. Ordered a new cheap 12 dollar carb for it that came last night. I will be installing it this afternoon when I get home. Tires hold air. After seeing if it will run I will check the blades and change the oil. Fingers crossed. One man's trash is another man's treasure. PO assumed someone would take it for scrap.
-
6 pointsShe floats!!!!!! Way over thought the belt brake. Removed it and shifts fine... Belt guard bolted right up with couple brackets and a bolt through the original foot rest... Cruisin' the hood!!! IMG_3346.mov
-
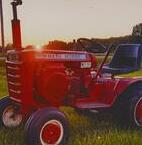
5 pointsI acquired a 1949/50 Mayrath garden tractor last October. After a little maintenance it runs and drives. I'm currently keeping it as original as I can. I did have to rebuild the steering column and had a new decal made based on the remains of an old one. I am gradually acquiring info about it. On the Facebook Mayrath site there is a very poor, mostly unreadable copy of an article about these tractors from the 1990 Sept/Oct issue of Antique Power magazine. The publisher has no copies of this magazine and surprisingly does not or cannot send/sell me a digital copy. I've searched eBay and a few magazine collector sites. if anyone has a stack of old Antique Power magazines, I would appreciate a scanned copy of the article, or will gladly buy the magazine. Any other printed information about the Mayrath tractors is also appreciated. Thanks for any assistance. Here's the story I read bits and pieces of so far: Martin Mayrath invented and patented the grain auger in the early 1940's. He built some machines like this to tow the augers around his factory in Dodge City, Kansas. In 1949-1952 he sold them with a complete line of attachments. One reference says they built them in the slack winter time of the factory. Mine is a "basic Model", and the Deluxe had sheet metal that slightly resembles a jeep. The tractor's spoked wheels are the same as used on the Mayrath grain augers. The front wheel bearings and transmission outlet shaft bearing are FARNIA airframe bearings possible WWII surplus. The Steering wheel was made by Sheller and the steering box was used in the Jeep MB and Crosley cars of that era. The rear end is a Dana 11 also the same as used in Crosley cars. The transmission is a Borg Warner T92 and was used in WWII equipment and many other 1950-60 garden tractors such as the Economy Power King products. Olympic still makes a modern version of the T92 today.. The Basic models engine is a Briggs 5hp Model 14. A Briggs Model 23, 8hp was available on the Deluxe. The Basic model is advertised to do 20 mph and the Deluxe 30 mph. I've had mine to 18 mph and had throttle left, but I was hanging on the steering wheel and that's all I had. Many things are of simple design on it. The clutch action to slack the belt is done by the clutch pedal tilting the complete engine, later versions had an idler pulley and some make have even had an automotive style clutch. The front tie rods are a threaded bolt turning in a threaded nut. Pivot points like the clutch and brake pedal are nuts that have been drilled out and welded to the frame. The red tube running the length of the right side of the tractor is the remains of a PTO for a Sickle bar Mower. Boy I'd love to have the rest of the sickle.
-
5 pointsGot the WHAMMC3PO_ running!!! IMG_3346.mov
-
5 pointsMick ... old news this side of the pond. You oughta see it go on a pulling track. Show we go to every year brought it in two years in a row. Costs like 75k to get it not including transportation cost.
-
5 pointsReverse pedal made up from angle iron cut and bent.
-
5 pointsAlso mentioned was the cable connections. I don't have a real good picture of it but this might help.
-
5 pointsNational Piñata Day is observed on April 18 each year. No one on this planet doesn’t love candy. You don’t have to stop at just one sweet; instead, go ahead and shatter a colorful candy container known as a piñata to get as much candy as possible. Your birthday party and other celebrations would not have been as successful without the colorfully designed piñata containers. Those who haven’t yet attempted to open a paper-mâché donkey may do so on this National Piñata Day. The origins of the piñata may be traced back to the 13th century. The Chinese created piñatas for their New Year festivities to bring good fortune to the growing season. They were usually fashioned like cows or oxen and ornamented with vivid colors and ribbons and were brimming with seeds. The Chinese burned the remnants of the piñata and stored the ashes for good luck after it was shattered.
-
4 points
-
4 pointsSafety first!!!
-
4 pointsStrapped the beams that needed it got 36" straps so they go all the early around. And put some concrete footers in for additional supports that are needed.
-
4 pointsIn / out. Is fine. Up n down or fore n aft is not.
-
4 pointsI like to center the brake the belt tangent point.
-
4 pointsControl rod made up. Rods were roughly cut to the proper length then the first bend was made. Second, third and fourth bends made. Rod drilled for the retaining cotter pin and clip. End of rod threaded 3/8" NF for the heim joint to screw on.
-
4 pointsFoot pedal adapter plate made up. Plate cut to size. Plate scribed and center punched for holes. Plate put into drill press then holes are drilled. Holes de-burred. Plate mounted to pedal.
-
4 pointsTrina's been looking for a more efficient woodstove for the basement apartment for her momma to use. We picked this up this afternoon. If anyone has any information or sources of such, we'd appreciate it.
-
4 points
-
4 pointsThose tires are huge @ebinmaine are they much heavier than the old ones? Today I did this, I got some nail polish containers and paint to touch up the 312 and 308. I still need to get some black paint. I also painted the old hood badge from the new hood for the 312 for a sublimation printer project for a hat. The old art degree coming in handy 😁.
-
4 pointsAs of today, both the 1989 312-8 resto-mod and the 1989 310-8 are now sporting NOS mower decks. No more patching rust or getting dirt in the old eyes while mowing.
-
3 pointsI am making a foot control kit for myself based on Matt's design as he appears to be out of the production of this. None of these parts have been actually tried yet. The 416H that I just brought home will be my test mule. First on the agenda is the self centering bracket. Plate has been cut to size then the two holes were drilled. plate has been scribed. V notch cut out. Relief cut into bottom for clearance.
-
3 pointsThought this might be of interest.
-
3 points@WHX?? tagged me in a wanted ad by @hcminis who is looking for a control lever for a Suburban 400. It didn't seem appropriate to post this in the classified so here it is. When I got my 400 the controls were in pretty bad shape and missing one lever. I was simple to fabricate one using the one I did have. A piece is 3/4" flat stock (I got it at Lowes) roughly cut to shape then, using a fabricated jig I bolted on the new piece with the original and simple ground away the excess until it matched the old one. The jig held them securely and kept the heat away from my tender pinkys. I was fortunate to have the main channel piece that the levers mount to as well as the top plate. The plate was pitted pretty bad but the back side was smooth. Enter one of Terrys decals, knobs from Glen (now Lowell) some hardware and we're off and running. The serial # was gone so I asked Terry to put 'Suburban 400' in its place. I never thought to have him remove the 'off' from it. That was their original way of grounding the mag to kill the engine. I remember my Dad always fiddling with that. It wasn't really a good idea so I put a kill button on the dash.
-
3 pointsI wuzz wunderin about yer wanderin's....
-
3 points
-
3 pointsApparently the tractor was scratch built as none of the 9 originally built have survived. You boys have purdy big fields out there to need such equipment.
-
3 pointsOur 312-8 mowing brigade!
-
3 pointsFirst saw one at the I&I Historic Farm Days in Penfield, IL. have always wanted one. Have about 40 pictures downloaded from internet. Thought about replicating one using Harley rims/tires.
-
3 pointsI hav ethe same Bronco 14. Use Dex/Merc from Walmart. DO NOT use some store-brand name. get the REAL VALVOLINE product.
-
3 pointsCam pivot lever has been cut out and drilled.
-
3 pointsFinally brought the 416 home from the mother-in-laws place. When I got home I thought I would drive the GT1600 onto the trailer to ensure two tractors would fit. They do. Trailer dropped down 1" (from 4" fender to tire to 3" fender to tire) with the weight of the tractors so I am happy with that as well.
-
3 pointsfellow AMT @PapaMorris. Looks like a you have a great project there.
-
3 pointsI drove out the the hill in the field to get a sunrise picture yesterday. Rylee’s boyfriend saw me and snapped a picture too. I think his pic is better than mine!
-
2 pointsFishin.
-
2 pointsIt was a lot of fun figuring out the swap over to manual from auto... amazing how much stuff just "fit"... still gave a bit of tweaking to do, but overall I'm pretty pleased... and I stayed within the rules... you'll note there is no painting, all the Middleville "dust" that didn't fall off is still on there, and the only lube used was liquid wrench... (other than filling the dry transmission).
-
2 pointsI had another PT visit today. Went good. I'm authorized and encouraged to (re)start resistant training. Tomorrow workout will include some body weight movements along with my PT "homework"... The electrician is scheduled to be here tomorrow. Hopefully we can get finished up with both the basement apartment and the power in the new workshop space.
-
2 pointsThanks for that! I see one can get around removing the pin on that! Good design. If I change my mind, I can delete mine with a grinder. I did mine on the cheap. I mounted a tab under the ball to use the pin hitch on my cart.
-
2 pointsI wound up doing this. Fits my needs.
-
2 pointsSelf centering bracket bolted to the angle iron support. Note the 1/4 x 1" bolt, three 1/4" flat washers and a 1/4" nyloc nut used in the assembly Tighten the nut until the bracket and angle iron pivot smoothly but with no extra play. Mark the hoodstand for drilling a 3/16" hole for the self centering spring to hook into. This hole is 1-3/4" from the right side and 1/4" down. Remove these two bolts that fasten the hoodstand to the frame and reuse them to bolt in the self centering assembly.
-
2 pointsYes it would. And in fact if you don't necessarily like the look of the threaded Rod as your tie rod mechanism you can surround it with a piece of tubing.
-
2 pointsThose are the ones I keep in stock. SKF 7410.
-
2 pointsSuper easy repair. As long as the pulley comes off the seal is just sitting there waiting for you right behind it. Measure the shaft and see if it is 5/8 or 3/4 diameter. Tell me what it is and I'll send you a seal. If you're looking for it faster than that just measure the shaft and go in the chart for transmission seals and bearings. You can find a part number there that should be locally sourceable.
-
2 pointsTilt it back a bit further. Like 30 degrees or so off. It might help the belt to have a land as well, so the brake isn’t the only thing holding it up.
-
2 pointsProgress today: Idler pulley on. Belt now stays on track both on and off clutch. Belt brake installed but not fully working... need something for it to lock against... took chunk out of belt top first test... Transmission pulley shaft seal is toast - nice pin stripe on the ground... never changed one of those. Easy? Good source? Pt #? Overall pleased, but this pulley brake do-hickey has Rube Goldberg written all over it... input appreciated...
-
2 pointsThe guy I sold my senior to is a Mayrath fan and has a couple. I don't think he is a member here but goes by Jack Bishop on FB. He's from MN and a drinkin buddy of Lowell's. Maybe get in touch with him he might know a thing or two.
-
2 pointsI'm not Canadian, but I deal in metric hardware a lot more than I do SAE. Yes, you are correct. 8.8 is the metric equivalent of grade 5. 10.9 is a grade 8. The shear numbers are not identical, but they are close enough to be considered "the same".
-
2 pointsI always run my mold board plow across any area I'm looking to till. We have heavy, wet, rock infested red clay here and it can be like concrete. Second if you have a disc set they work well to break clods up and allow the fresh turned dirt to breathe a little. The rule of thumb here is that you don't till until the broken dirt is dry enough that you can't squeeze it into an intact clod with your hand. If it stays together, it's still too moist. It should fall apart in your hand when it's dry enough. Otherwise tilling just allows it to form a concrete that defeats the purpose. When you are ready to till, plan on multiple passes. You aren't aiming for powder consistency, but rather uniform depth and coverage. Tillers leave a 6-8 inch section in the center untouched, so go back over the area with about a foot of offset to the previous path to ensure uniformity. Lastly, your soil is going to have qualities that differ from most any other place. So that means you have to figure out what works best for you. For me, I added all my leaves in the fall and burned them when weather permitted for some semi-natural fertilizer. After a couple seasons my garden area had dark, rich soil while the underlying clay was red as paint. Your soil PH will determine what you need. Most state's agriculture departments have free testing to help you decide what works best for you.
-
2 pointsThough there are many differences, I just want to point out that out that Wheel Horse, before the Wheel Horse brand, was Pond Garden Tractors. Pond started with 50 lever steer tractors built, then 500 Ride Away Seniors. They were built using a Model A transmission, and rear end as well. As rare as they are, I am fortunate enough to have found with the help of a friend a Senior for my wife, and Lever Steer for myself. These are incredibly capable machines, given the massive torque from the long stroke engines, and the big gear reduction portal boxes on the rear. Once you have this machine up and running, there will be lots of noises from the straight cut gears. Enjoy them!
-
2 points


This leaderboard is set to New York/GMT-04:00