
Leaderboard


Popular Content
Showing content with the highest reputation on 01/02/2023 in Posts
-
14 pointsThe grin says it all. This kids got the bug
-
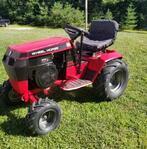
13 pointsHey everyone I thought I would show you what I’ve been working on it’s a c-121 8 speed.It’s the first running tractor from a package deal that me and my brother bought.me and my dad had to rebuild the carburetor and put a new coil on it.we also had to drain the transmission oil but we haven’t put new oil in it yet.
-
12 pointsA few months back I finally came across an old Collins 6lb splitting maul with the axe eye design. I've been holding out for a splitting maul with this exact size and eye for a bit now. Seen lots of the round holes around but wanted the axe eye version. I know you can buy them new still but it's funner for me to save an oldie and get a fun side project for a rainy day. I had split down most of my wood pile with axes, which I prefer to use, but there are number of big knotty rounds that the axes were no match for. So this will fill a nice niche in the splitting arsenal for me. For the handle I had been looking around the last few months and honestly the hardware stores have gotten pretty pathetic over the last 5 years or so. Seems even a decade ago or more I could still get a good selection to hand pick a handle from a large lot. Still could find a cruiser handle, etc too. Now it's not much and they never stock more than a couple of any kind it seems. But I decided to try a Truper handle brand that looked good enough to try. I'd probably grade it a B or high C as it did have a little knot towards the handle end but don't think it'll be an issue. We'll find out though. Anyways...on with the hanging. Marked out the line to cut some off the end. I always leave about half an inch more than you think when you lay the head over it. Wood shrinks when you're pressing it in so don't cut it off too short. But it's nice to eliminate the top inch or so and not have to waste time working that down. Step one was sanding off all the lacquer...worse part of the job. getting it worked down...slowly but surely... I do like to bring them all the way down on the shoulder. It's the strongest point for most of that impact stress. This looks good and will take the head off one last time for final sanding and also do some edge work on the head before final hanging So this head must of been made on a Friday at 4:55pm as the edge was not lined up well and much thicker on one side. I used the grinder to take it down a lot then finished up with the file. Got the edge where I want it so now for final hafting The wedge set nice with lots of curling trimmed it down and left the kerf about 3/8" proud. Filled out the eye nicely! I then set in a metal step wedge and gave it a BLO rubdown and headed off to the wood pile to try it out on one of the knotted rounds Split up the round with ease! I profiled the cheeks down and gave it just enough edge to stick in the splitting stump pretty easily. Turned out really nice and I'm looking forward to putting it to use! thanks for looking! And feel free to post up your favorite wood pile splitter! I'd love to see em!
-
11 pointsBut grader blade. A neighbor asked me to trim up their gravel driveway up to the garage as there was a bug hump on one side and a large crater on the other side leading up to the garage door. He said, "you're the only person around with equipment to do that kind of job" and since I brought my Dad's B-80 back down from Pennsylvania and need to test it out I told him OK I will do it. This morning the 36-inch mower deck had to be removed and the grader blade installed, well the mower deck came right off and just how hard could it be to mount the grader blade? About 2 hours later the grader blade was finally mounted, it seems the rear attachment bracket was bent and around .020 too narrow for the support bar of the grader blade to go into the channel of the bracket. It took a floor jack, a large screwdriver pry bar and of course a hammer to the support bar to get seated in place so the locks could swing into place. I never did find the correct lift link for the grader blade and if I took the time to find it, I would have had to use the B-80's head lights to finish the job! I used a longer lift link that help with down pressure to cut with but only lifted the blade about 1-3/4 of an inch high and made it difficult to spread the gravel/dirt mix. There was a marker stone at the end of the driveway and every time the blade made contact with it stopped the B-80 in its tracks. Anybody who has worked with a Wheel Horse grader blade whether it's a mid-mount or rear mounted version know these blades are tough ..... they don't twist over like a snowblade! Uh yeah, this ain't the first time I have snagged a grader blade on something. The neighbor was happy with the job and the B-80 was treated to pressure wash. I was surprised on how well the B-80 looked after pressure wash too since I don't think it has ever been cleaned before. It is also amazing how well the 8 hp Kohler performed as the engine had no problem moving clumps of gravel and dirt. All in all, it was good to get some seat time in on a 70-degree day! Wild Bill in Richmond VA
-
8 pointsI was missing the dash panel for this tractor. Luckily @WHX?? had one that I could use to get the measurements to make a new one. Old next to new. Moved on to some known challenging things to accomplish. First the steering wheel. The wheel that was on the tractor was the wrong one plus it was a POS any way. It ended up being completely junk after I had to split the hub in order to get it removed from the steering column. Challenge #2, remove the hitch pin. Surprisingly it tapped out with little effort. Bad news is that the right hand tranny case is damaged where the hitch pin goes through. Good news, Jim had a tranny that I can rob the right hand case from. Challenge #3, remove the hubs. The right hand hub was an extreme challenge. I had been soaking the hubs with Sea Foam Deep Creep for the last couple weeks. I installed a puller and rattled the pusher bolt in with an impact until it stopped. Then I switched to a 4ft breaker bar and used a 5ft crow bar to hold the hub from spinning. After giving it all I had and pounding on the outside of the hub with a big hammer I had no movement. I decided to leave the pressure on the hub and soak it with more Deep Creep. I walked away to leave it sit over night in this state, so it could think about how much trouble it was causing me. This morning I went back to work on the hub. A little movement from the breaker bar, more pounding, little more movement on the breaker bar, more pounding, etc until finally a BANG. Woo Hoo on our way. Kind of. This little bit of movement on the breaker bar and pounding method continued every inch of the way, but I finally won. The right hand hub & axle look in very good shape. I was able to rattle the left hand hub off with an impact wrench but the axle & hub do not look as good as the right hand side. Some one tightened down the set screw but never installed a key. Should be salvageable though. Awesome repair on the ball joint for the drag link. When a PO installed the boat seat, they hammered the rear lip behind the seat down flat to fit the seat. In this pic I started to try to coax it back into the correct shape. Got it back into shape after slowly massaging it back into shape with a hammer & dolly. With some of the more challenging things out of the way it was time to move on to some disassembly. Glad to see that the serial number is still in place. After some more tear down it will be time to get things cleaned up and time to get some new parts coming. Let the $$$'s fly.
-
7 pointsMy son in law bought a 1976 El Camino. He bought it from his cousin. It has electrical issues, and I am going to try to remedy that. Some people, like my son in law, and his cousin, ought not mess with things like this. Here is the car, such as it is. Notice the fire extinguisher. That was behind the seat, with good reason I believe. The odometer has 37K on it. If that means anything. With this fancy tach, I guess someone thought they were going to go racing. I'm not sure how well you can see it, but that is the firewall side of the fuse box. It looks a little toasty. He said the turn signals were acting funny, so he replaced the turn signal switch, that didn't help. I'm not surprised. Here is a better look I have the entire wiring harness out of the car. I am replacing it with all new. I was originally going to go back just as far as I thought I needed to, but after looking under the dash, and in the engine compartment, I decided I needed to go all the way. After 50 years of squeezing between seats and dash boards, I wasn't going to do that again. I took them both out. Now I have all the room in the world. The heater core, and theAC evaporator coil will get replaced while I have it this far down. I'm not too impressed with the compression numbers on the engine. They range anywhere from 150 on #1. to 120 on #6. I am trying to determine if this motor is original to the car. If it is, I would like to keep it and rebuild it. If not, I think a crate motor would be the way to go. Then again, I don't know if his budget will allow for either, but if the motor is going to get replaced, now is the time to do it. On another note. A friend and I went together and bought a small storage building. It's just a large shed, sitting on a lot. It was originally part of the local lumber yard, years ago. It is 60 X 25. It has 3 bays in it. He has 1 , I have 1, and we share the other. I have 8 of my tractors in there. My wife told me this was NOT an excuse to go out and buy more tractors. I of course disagree.
-
5 pointsI’m on a mission to plant more trees on my property. My mom has had an umbrella plant since my grandfather’s funeral in April of 2004 and she wanted to top it as it was nearing her ceiling. I got a super cheap water cloning kit and some cups of potting mix, and some cloning gel to promote root growth. Obviously, I can’t plant these umbrella plants outside if they take root because we are not in an adequate zone, but I hope to learn a thing or two about a thing or two. If all goes well, I am even considering starting a small roadside nursery with some ornamental flowering trees, fruiting trees, etc. The drive for my trees is to build a stronger habitat for all wildlife, but especially deer. Details of the entire transformation here…
-
5 pointsWinter has set in, the holidays are over, time for me to get to work on this years rehabilitation. I've posted a few of the repairs that I have done already on a few other threads but I'll post the pics here as well to keep a good record of this resto. Ground Zero. I acquired this tractor from @PeacemakerJack a few years ago and put it on moth balls until a few weeks ago. When I tried to start it the results were less than satisfactory. Fact I thought that the engine was locked up. After I removed the belt from the starter/gen I found that the engine turned over just fine. The S/G was actually locked up tight. This is what I found when I opened the S/G. After some soaking I was able to get the rotor out of the S/G. While I was waiting for the parts to show up for the S/G I moved on to trying to get the engine running. First step rebuild the carb. After the carb was rebuilt I hooked up an IV bottle and pull started the engine with a rope. Took the tractor for a drive & a quick shake down. Engine runs well but does smoke a quite a bit. Transmission works well in all gears. Steering is sloppy. Received the parts I needed for the S/G. After a proper clean up it was coated on the inside with with a self etching primer to keep it from rusting again. Outside. Of the S/G received a couple coats of self etching primer followed by a few coats of gloss black.
-
5 pointsFYI Just in case someone else has a deck spindle with the components "brown welded" as mine did. I'm force feeding Kroil using a rubber tip that came with my grease gun with an extra long red spray can tube that I saved from a SeaFoam treatment kit. I removed the zerk grease fitting and cleaned out the grease in the shaft with Q-Tips. I put the tip to the zerk hole and the Kroil came bublin' up around the shaft.
-
5 pointsThanks Jim. Here's my coal miners daughter. My Granddad came out at lunch time to hold my Mother..circa. 1924.
-
5 pointsI do have a round hood it is a 604 that I use for my plow tractor.it runs realy good
-
5 points25th Anniversary Show- Feature Model- RJ58 dates - Early preview Thursday June 22, 2023. Friday June 23, 2023. Saturday June 24, 2023 location- South Mountain Fairgrounds, 615 Narrows Road Biglersville, PA Bringing three or four RJs and many other items!
-
4 pointsTodays progress report. Tractor torn down to the bare bones. Man there is a lot of tractor left after you tear one of these down. I'm used to there being nothing left but an angle iron frame. A PO must have gotten a new drill and a set of bits for Christmas or some thing. This tractor was littered with unnecessary holes. Some time spent with a welder and a grinder, all the extra holes are closed up. Now I'm trying to decide which hood to use. I have one that is pretty solid other than the hole in the top which would be an easy fix. Problem is that it has had some bad history and fits like a saddle on a sow. The other hood fits well but every mounting hole is busted out, not as easy to repair.
-
4 pointsThat wire was burned on my 1075. He may have the same issue.
-
4 pointsBackyard AND Youtube certified
-
4 pointsOkay.. I had to look up what "watching the ball drop" was. Can imagine one would not stay up for that. Overhere in the Netherlands it's a tradition that (almost) everyone stays up until past midnight. Even little kids get woken up before midnight sometimes to be awake to celebrate the coming of a new year. Traditionally people get together with friends and family to celebrate, eat a bunch of specialty snacks like oliebollen, kniepertjes, spekdikken and rolletjes with whipped cream along with all kinds of your favorite beverages. Then at 24:00 sharp you wish everyone in the house a happy new year and go outside to light fireworks and also to wish the neighbours and their friends and family a happy new year aswell. Then in small towns atleast there's the custom of going around fellow villagers homes and celebrate and enjoy some alcoholic beverages together with them. This can continue late into the night or early in the morning (we came home at 04:00 in the morning this year). Besides the fireworks and drinking there's a custom called 'slepen' or dragging. That is when youngsters go around and move stuff that people left outside to someplace else.. for example you could end up with the outdoor lounge set of one of your neighbours in your front yard, or a garbage bin or well.. anything really. All in good fun and with the intention not to damage anyones property. Besides the nightly shenannigans during the day people shoot with 'carbid bussen' in other words anything that looks and especially sounds like a cannon! Old steel milk jugs are popular although many DIY creations have seen the light. See movie below (not mine).
-
4 pointsMost bulkheads of that era looked like that. They came with a black tar like mole-asses for insulation (Electrically and thermally). Not saying it didn't get toasty but it looks pretty normal in the pic. Someone has definitely tinker toyed with the engine. I see an aftermarket carb and intake manifold. Would not be surprised if that engine has seen life in multiple automobiles. Probably pretty tired. Distributor is way advanced or off a tooth. Old GM guy here.
-
4 pointsI used to have one of those Wile E. Coyote mugs!
-
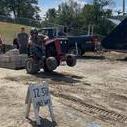
4 pointsMy nephew using my '44 2N and my Ford 706 reversible scoop to move some rock. The ground here is very soft and muddy and he's trying to spread that rock to create a base for the smaller gravel. He needs a few more loads of this bigger rock. Ground is very mushy. They also need to burn that large pile of stuff while the ground is still wet.
-
3 pointsGreat looking C-121, the '78-'79 C series are my favorite too, I think I have 10 of them now, lost count. I'll have to ask "Donkey", he'll know...
-
3 pointsSince we are in the midst of epiphany I would go with the holey hood. Bad joke, hope God doesn't strike me dead! The bolts should pull it into shape for you.
-
3 pointsBlue Richard?!? ... you at EB's place? Study those manuals and pull the belt guard for inspection. New to you thers no telling what could have been done.
-
3 pointsThe tall lever next to the one circled is your motion controller, if it is "flopping around" you will want5 to pull the cover off the other side and see if the tab welded to the bolt near the center og this picture is broken.
-
3 pointsYes, we own the land as well. I don't remember the size of the lot, but plenty of space outside for boats, campers, whatever. Painless. Yes
-
3 pointsSince in maine it's been pushing 50 out latly and no snow even in January I decided to take advantage of the weather and make a burn barrel 2.0 to clear up some of the limbs around the yard from the last few wind storms we had come though before have to do it all in spring
-
3 pointsIs your regulator 3 or 4 terminal. In the picture i can't see a wire from the regulator to the A on the genny...
-
3 pointsDid you check the regulator. I had a 1075 that would charge and the light was on all the time and got brighter if the RPM was increased. I swapped the regulator for the heck of it and the light works as it should now.
-
3 pointsThe tires are slight different size. One on left is new, right one is older, dunno when was made.
-
3 points@GAJoe likin that kroil ! terrific creeping action , also makes a terrific rustproofing spray base creep coating , couple of days out , you notice an oil film on lower seam areas , thats what you want , then over coat it with lubriplate open gear shield , bombproof rustproofing . this what I do to my decks , no rust / rot , sun bake breaks the cycle , pete
-
3 pointsYes another did come out after I removed the woodruff key but the last is putting up a fight. So I'm force feeding Kroil using a rubber tip that came with my grease gun with an extra long red spray can tube that I saved from a SeaFoam treatment kit. I removed the zerk grease fitting and cleaned out the grease in the shaft with Q-Tips. I put the tip to the zerk hole and the rust colored Kroil came bublin' up.
-
3 points@ WHEELHORSE-KID https://www.amazon.com/Rislone-4405-Supplement-Concentrate- use this in my engines , especially good in recovering an older unit , use a small measuring cup , instruction on bottle , would also use a lighter multi weight oil , for quicker change over in low temps , my oil change s were hot and very flushing , engines love the added zink , run smooth and very easy , been using it for years now . your smile says it all ,pete
-
3 pointsI have a set of interchangeable ones that are more trouble than they are worth. So I mainly use Facom tools fixed snap ring (circlip) pliers for all my needs. Better quality and no losing the little tips.
-
3 pointsFor me it's those cheapie changeable type. For the small amount of snap rings I do, it makes sense. Had it for about 8 years now and I can still get snap rings off or installed without much issue (although I did grind the tip edges to grab better) https://www.toolplanet.com/product/Neiko-4-piece-Snap-Ring-Plier-Set/6217?gclid=EAIaIQobChMI5fXP2sqn_AIVFrrICh11AQ0VEAQYBCABEgLa7fD_BwE
-
3 pointsI'm gonna give it a like as the body looks to be fairly decent and rust free.
-
3 points@Horse Newbie make sure you penetrating oil soak those clips , before attempted removal , might even use a small punch to tap it from the open side , to get a slide going , keep it greasy , pete
-
3 pointsBy the time you finish rewiring the El Camino and replacing the heat/AC system your son will owe you BIG TIME. If it was a big block special edition like a Yenko or Choo Choo Cowboy Cadillac then matching number would be a big deal but not so much on a plain Jane one.
-
3 points“Small storage building”…60x25 doesn’t seem small to me! How big is the lot that it’s on? Do you own the land as well?
-
3 pointsI can attest to that… I have a pair of the changeable tip type. They have done most of what I needed them to do, but on some of the larger snap rings they either slip or fail…
-
3 pointsCongrats! The C-1x1 tractors are the best looking "C" models in my opinion. Looks like you're hooked!
-
3 pointsGotta love the 953's gonna make it a plow boss or just a ride around.
-
3 pointsConfiguring some weight for the newly added receiver hitch to help offset the 2 stage on the front and hopefully prevent slippage. Need to weld a 1 inch bar to the shank to hold the stack of weights but this is what it should look like.
-
3 pointsGreat worker you got there!
-
3 pointsNice rig!
-
3 pointsHello All It's been a little while. I got a shout from a friend this morning. I told him I was going to do some work on my 175, and would post pics when it was done. It's done. A while back I mounted the blade, wheel weights, and chains on my 175. I was ready for winter. Or so I thought. It snowed, and I went out to plow. I came waaaay to close to my wife's van. I was kind-a in a hurry. I had to be quick before it melted. Anyway, it did a great job of plowing, but I noticed the brakes were not quite right. I finally got a chance to look at it today. Seems the chain on the right rear tire was playing havoc with my brake pad. Bent it up a bit.I got that straightened out, and noticed the chain was rubbing on the brake drum. I had to space the wheel out some. I used to have a bucket full of wheel spacers, but as I recall, I sold them all to someone up north somewhere. I ordered some today. Hopefully, the snow will hold off until they get here. Not wanting to run into my wife's van, or my trucks, or anything else, I added a couple of things. A back-up camera, and a parking sensor that makes an obnoxiously loud sound when you get too close to something. I need loud, as I am running str8 pipes. The muffler got in the way of the blade turn handle, so I took it off. As I said, it pushed the 3" of snow very well, and I am pleased with that. A whole lot better than a 656 with 2 Lawn Boy snow blowers mounted on the front. Tomorrow I will post some pics of my latest project. Not a tractor, but some might find it interesting. Greg
-
2 pointsYou definitely did this the right way. Often times tearing into the spindles ends up being just that- and pulleys often get destroyed. Congrats!
-
2 pointsYour 1276 did not have a solenoid when it left the factory and your wiring diagram has none. Use this drawing as aguide for wiring a S/G and Solenoid. You will want to use a 103-990 ignition switch.
-
2 pointsExcellent work! Ours is a hydraulic version. 🙂 And a fiskars...
-
2 pointsAbsolutely agreed. I'm leaning towards this set, or one like it. Reviews are good overall. I've bought a few things from this company (not through the jungle site) and had decent success so far.
-
2 pointsOften you need to choose "usable" or "inexpensive" pliers. I have several of the changeable pliers and they are almost useless. If I weren't so old, I would buy a complete set of fixed end. For the large snap rings on axles and hydraulic cylinders, I bought large pliers that are a perfect fit.
-
2 pointsMore adjustable this way too. 👍


.jpg.8ca755f0175140fd974a8b033d7f3501.thumb.jpg.71f06ed90f3a14a3b565d8387e418b61.jpg)


This leaderboard is set to New York/GMT-04:00