
Leaderboard


Popular Content
Showing content with the highest reputation on 07/17/2022 in Posts
-
13 points
-
11 pointsAbsolutely excellent show yesterday!! The weather was great. The turnout was great. The people were great.
-
8 pointsSome pictures from this weekends show at Owls Head Maine. Don't think I have seen a J-10 jeep in this condition for many years and shortbed/ stepside at that. Also some really nice GM square bodies as well.
-
8 pointsMade it home..l to the land of 5.69 diesel and grass needin’ cut!
-
8 pointsHey @elcamino/wheelhorse Waldo.. Uncle Jim says thanks for the NBPI jug!
-
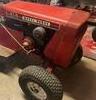
6 pointsHello All, Need some help / thoughts. I bought this sad sack go cart today at Zagrays... why? Well because it's from the 50s and said Sears and Craftsman on it. Does it run? Nope... is it all there--yep except for drive chain. I have a real weakness for Vintage Sears. My plan was to put it back together but not get it running and set it on top of my rollaway tool box to look at. Except---->> after buying it everybody just started looking at it. Then I started hearing what I consider crazy values for this thing. So should I flip it or just put it in the garage... does anybody know anybody thats dying for one of these? I'm torn... its cool as heck but man I heard upwards of $2500.... Thoughts?? Tony
-
5 pointsFound a little time yesterday to continue the Boogie Van a little more. To remember you with what i started ..... this was an inside view from the left rear fender to outside before i start reworking the other side was what is now nearly finished was that bad either. Maybe a little more worse. My plan was to have the right side nearly finished until now, but life and reality and time shows me, just a fract of it is done now. The bigges mistake i did, was not to compare before the outside panel with the rest of Structure. they both have differen radients what was firstly visible after i welded it in. That results in a gently wave of 2 mm and because of my Arm lenght are too short to hammer it out, i must close it with a little Bondo. not much for the most but i would do it without. dang I don‘t like bondo but i have no possibillity to come between the metal parts with the Dolly. But hey this Van has so many dents, so i will accept it also with a little Bondo here and there. New parts repair sheetmetal is here extreme hard to find and the Prices for a complete Panel price is that horrible, so i decided the Van is now 39years old and it can tells it‘s Story from hundrets of vacations over the Time. I believe it is not a real shame if few marks from removed dents will be seen later. It cannot become a brand new car. It should be a honestly Weekender - no more no less. Most will give up that Project, because i found lot more structural Metalwork what must be done, Also the frame is partially rotten in the Front under the suspension springs and so on. That was the revenge of worse care over the years. So let‘s do it Step by step with an eye to the importanst things first. i made a new Panel for the inside I sicked it to enstiff it little more. The holes show the holes for the Bumper. This Panel is made of 1,5mm thickness Sheetmetal. on the left side you can see a before Pict what was on the Right side cutted out allready completely To reimprove my Skills they allmost faded by hammering out dents with hammer and Dolly i tried to remove a dent out of the Rear Sidewall on the right side. I was able to hammer it nearly out. This was one of the bigger single dents, nearly a thumb deep impact on the right side. similar to the left side but a little deeper. The left side looks horrible either, but this height i can reach with hammer and Dolly when the Windows be removed. Sadly a previous owner has hammered it out but very ugly. i hope i can save that Panels. Today i begin with removing the whole inventory Dismounting the Kitchen Remove the old fridge - if it works, it becomes my Workshop fridge. Who in the real World mounts real ceramic in a Campervan? That clears the Weight of the Van a little more. After i removed all the Wirings - whaaaa what shall bring fuses middle in a Van by completely unsecured Wires to them? Wires run partially on unsaved blank sharp Metal without any caution os scratching. A typically beginners Fail. All wire where Attached directly to the Battery without any Fuse... whow, How brave must a man be to do such electric. So removed the Battery and unwired all from the Terminals. Time to unscrew the rest. At least i use an hour or two to remove the Silicon, what sticks the rubberseal arround the Roof. The Gelcoat has some rips and must be als reworked, so a grinder will help me remove the rest of the dirt what silicon remover was not able to do. steady but extreme slowly ...
-
5 pointsLooks terrific! Before you get too far on assembly, though, you may want to pause and think about electrical grounds with all those freshly painted components! Regulator to S/G body. S/G to engine block. Battery negative to engine block. Coil ground wire to engine block. When I assembled my nicely painted K181, I carefully scraped off the paint at key spots and used dielectric grease on the joints. Tested with a continuity buzzer and VOM to be sure they were really solid. Did the same for all the "+12v" connections as I went--especially to the ignition switch and ammeter.
-
5 points
-
5 pointsThanks for the info. I contacted him and he is taking care of me. I've purchased two sets from him before and I like his quality.
-
5 pointsHere's a panoramic pic made by the phone...
-
5 pointsIs it used to file the top of teeth on a handsaw so the are all the same height
-
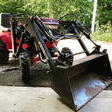
4 pointsThe most obvious would be to put a tach-a-matic on there (part# 1). Was that already missing when you got it?
-
4 pointsMade it home safe and burned out by the time got everything unloaded aND the haulers cleaned up. Get some pics up.tommorow.
-
4 pointsEMPHATICALLY And not only for linseed oil, but for any rags used with volatile compounds.
-
4 pointsSpeak for yourself.
-
4 pointsBe very careful with linseed oil. Rags covered with will spontaneously combust. A former coworker of mine accidentally burned his house down when he left rags covered with linseed oil on the floor of his garage. If you used linseed oil leave the rags outside on a rock or stone wall away from your horse or anything else flammable until trash pickup day. That let's the oil evaporate. If they do combust they won't hurt anything.
-
4 pointsThere are most certainly several of us that would appreciate machinery pics. If it's about tractors but not Wheel Horse you could put it in Other Brands. You could always put it in Non-tractor Related Discussion I suppose as well.
-
4 pointsGoing today hopefully to pick up my grandfathers old wheel horse tractors!!!!
-
4 pointsI think its a keeper... while this isn't the real parking place for the roll-a-way I had to finish my thought on what I was contemplating when I saw this gem sitting there 'Murica!! Excuse the dump... need to throw 25 years of "toss it on bench" out...
-
4 pointsI have bought several sets from Gene through facebook. Very nice too. I used them on my gt14 shift levers.
-
4 pointsWell it was a working S/G... I've never taken a single part ...apart... so many times as I did this S/G last night. Was working and started charging, i looked over those articles, Thanks again for those! I had gotten a front hitch mounted that made a PTO lever, made sure the snowthrower attached and freed it up. The chain broke but that was kind of expected. Went to finally use the tractor to mow, ran out of fuel went to re-start got a half spin out of S/G... and smoke... the cloth sheathing on the windings kept deteriorating and shorting out in other spots. So I re wrapped them with cloth tape (TESA tape awesome stuff) then a solder joint broke on the gen stud.... fixed that after searching for solder and cleaning stud...then after everything is back assembled I must have bent the armature some how... I gave up I ordered a new one last night... 2hrs gone and 11pm patience was non existent.. I'll letter and number the hood today finish painting the fender pan, and PTO lever and put a handle on it.
-
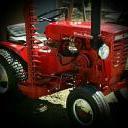
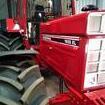
4 pointsFrom today’s tractor/machinery show
-
4 pointsHorse Barn fun, Jim had an opportunity to have his hair done. Isn't he pretty?
-
3 pointsPer @953 nut’s recommendation, I’m going to start a new thread. This is the link to the original tractor, acquired from Sylvia after the Big Show. I delivered him an E-141 and a yard art suburban from PA, and received this machine as fair payment for hauling.
-
3 pointsUs too. We were falling asleep around 4’30 today. Too early for bed and too late for a nap! 7:25 and it’s time to turn down!
-
3 points
-
3 pointsSo... today I started the teardown... and did a good bit of work. Although unconventional... I used the shock ends of the old shocks off of the Ranger... @Jeff-C175 @ebinmaine @Pullstart... you guys know that I replaced the rear shocks on the Ranger with air shocks... well... these are the ends of the old shocks... I cut a piece of stainless rod to run through the holes... drilled some holes in the stainless rod and put some keepers on to hold it all together. I guess that's one way to do a hinged hood... but it REALLY goes to show that with a little work and ingenuity... nothing goes to waste around the funny farm... (sorry this picture is a little crooked... just tilt you head to the right a little... ) The hood itself is much straighter now. I had to physically stand on the hood where the headlight holes are... and twist the top of the hood counterclockwise to straighten it out. That took a little muscle... but looks MUCH straighter... I'm getting pretty good at taking this motor off and putting it back on... anyone think I should try out for the NHRA...? Lot's of parts need sanding and priming. Probably going to have to do some grinding on them... I did repair some frame components and some cosmetic stuff today as well... not really shown in the pictures unless you break out your microscope. I'm not going to get much done tomorrow... gots to chauffeur one of the female lady women to a doctors' appointment... Don
-
3 pointsI hear ya, if I could start all over with the tractor and sickle bar and plow, I probably would have went the patina route. But might as well keep going and just do it all. I had some tires on old 4 lug rims laying around out back from another trailer I own. They aren’t perfect, but they are surprisingly the same size as the bad ones. So I bought new tubes, cleaned up the rims, and swapped tires onto them. Then I primered everything.
-
3 pointsHere’s a weekend video… kind of wraps the whole show up in 8 and a half minutes!
-
3 pointsYou need one of those " weld the stud to the panel and pull it with a slide hammer" kits
-
3 pointsPainted the tie rods - finally - on the C 105 and E 141… Rustoleum gloss black.
-
3 pointsThanks for posting this Jim. The very dark green color of this one was particularly nice. There were several very nice trucks. One was a late 50s vintage that had a 302 cubic inch straight six. Hood wasn't open unfortunately.
-
3 pointsAnd a video to bring us up to speed.
-
3 pointsI plan to give it 4 lug GT14 hubs and 15” wheels and tires but for now they 27-7.50-12’s will help with planning things.
-
3 pointsAnd they DO indeed! This can not be repeated too often, most people are unaware of the danger! I have witnessed it myself, once as a young fella after my Dad refinished some furniture (thankfully I saw the smoldering box and got it outdoors and threw it on the ground at which point it burst into flame), and once experimentally under controlled conditions about a decade ago. It does not take long either, sometimes as short as a half hour if they are wadded up and thrown into a cardboard box in warm weather. Could be as much as a few hours depending on how confined they are. As Linseed Oil dries it creates what is known as an EXOTHERMIC REACTION, which simply means that it creates heat as it dries. If you confine that heat it can self-combust! It doesn't need to get as hot as you might expect either. It can be in the low 100°F range. @Schrumgmc
-
3 pointsI made the engine mounting plate today and positioned the engine where it will rest.
-
3 pointsGeneral shows and events
-
3 pointsRead yesterday of the UK "Red Alert" for temperatures--some places predicted for up to 40ºC. Where folks are unused to, and ill-prepared for, such high heat it can really be dangerous. You did well to pass on the strenuous work and work on different "fences".
-
3 pointsThanks for the pics, Eric, looks a it was a perfect weather repeat! Quite taken with that model of the Road King tractor trailer. What detail!
-
3 pointsLooks to have been a great show, nice weather also. I'm planning to go to a few (non WH) shows in August. Anyone care to see pictures of that? And if so, where should I post them?
-
3 pointsCan anyone tell what this little guy is for?
-
3 pointsMaybe put a spacer on the black plastic doohickey that moves/hits the box? Take up some of that space so it is snug? May do the trick. Just a thought.
-
3 pointsOne of the original problems with the thumb screws was that the lower screw that holds the bottom of the hood (part number 1346) was 3/4 of an inch long in the length of the threads and if a person just threw the thumb screws in place and turned that long thumb screw into the gas tank ..... well things broke! The thumb screws in the gas tank were part number 1345 and had a length of 3/8 of an inch. The thumb screws were used on Wheel Horse round models from the 1961 model 701 all the way till the 1968 Lawn Ranger. Another odd fact was that Wheel Horse used lock washers under the thumb screws only on the models that did not use the aluminum gas tank, the 1964 model 654 would use lock washers but the 1964 model 854 did not. Now here's a story that got a few folks upset at an auction in Pennsylvania, a dealer that I knew was selling out and held an auction to get rid of old inventory. Before the auction I pulled the owner aside and ask him a question, he then took me over to a flatbed trailer full of old parts and pointed to a box. Well when that box topped full of old chainsaw gaskets came up to be auctioned, I just held my hand up for auctioneer to take my bids and I got the box real cheap. Folks started to look at me and wonder why did "Mr Wheel Horse" buy a box full of old chainsaw gaskets???? Because right underneath of the gaskets in the box it was full of 1345 and 1346 thumb screws, some N.O.S. and some old! Wild Bill in Richmond VA
-
3 pointsHad to take the 856 for a cruise around the neighborhood. Still amazed at how well this engine runs. Starting to have a little crush on this one. My others are feeling neglected!!! I'll have to get them out tomorrow.
-
3 points
-
3 pointsSome videos from the show so far…. We’ll do a collage of pictures and videos too
-
3 pointsStand back, a "shade tree" mechanic at work! And the pun was intended?
-
3 pointsFrom Lowell @wheelhorseman! Thank you for hooking me up with the lift cable! I got it put on!
-
3 points198 more miles and husband and I will be there! Got the hitch added to the pull behind seat! So we can pull the cart around in case we buy something lol…


This leaderboard is set to New York/GMT-04:00