
Leaderboard


Popular Content
Showing content with the highest reputation on 11/20/2021 in Posts
-
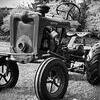
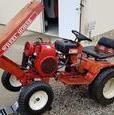
19 pointsAlways thought a C-160 Auto would be the cats meow but ones I found were ridden hard and put up wet. Just landed the "unicorn"! Whoo Hoo! Drove 4 hours to Charlotte to pick it up. Original owner since 1975. He passed years ago and it sat in his shed. Local guy cut the widows lawn for a year with his zero turn and she gave him the C-160. All original including the wheel horse tires. 730 hours, hydro lift, slot hitch, original seat with arm rests, mower deck. I did use plenty of elbow grease / 3M compound and wax to preserve that original finish. I know everyone here loves pictures so attached a few below. I am always amazed at the restorations folks here do but for me, an original worker is just fine!
-
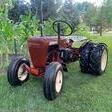
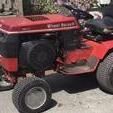
15 pointsGot a lead on a 702 the other day not too far from me. Dragged my feet a little bit on it and decided to take the ride to pick it up. Was found out of an estate and has been sitting many years in a cross base. Has some potential I’d say
-
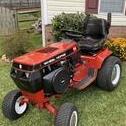
8 pointsReady for winter and now spring. Been looking for a roller for years. Found this at a tag sale in Ct. OOPPS. It only was $20.00 Wow. Lucky day I guess. Is this a model year 77? With the pic up of the summer tractor it had a 42" plow. Much better than the 48" A lot lighter. Hope you enjoy the picks.
-
5 points
-
5 points20211120_143254.mp4 20211120_143254.mp4
-
5 pointsTime for more leaf pick up!
-
5 pointsBeautiful day yesterday 60F and no wind. Not a deer in the AM. Heading for my stand on the 312H I saw a decent buck crossing the fenced horse pasture going into the woods I hunt. I quickly got in the stand with high hopes....nada. Big weather change today, 33F and 15-20 MPH NW winds. I managed to hang in the tree from 5:30 to 8;30., All I got was cold. I debated going back out in the wind, but I got in the tree at 3PM to finish the last day of the 2021 archery season. I just finished off a mini Baby Ruth and was stuffing the wrapper in my pocket when I saw this guy coming down the trail. Got the bow in position in the shooting lane and let him walk into the scope at 18 yards. One small grunt and he froze for me to touch the trigger. He slowly took four steps and stopped, looked left, then right and keeled over dead in about 5 seconds. Moral of this DEER TAIL .... don't give up boys.
-
4 points1994 520H and 1984 Work Horse GT-1600
-
4 pointsGot some neat stuff the last couple days. I've been wanting to change the wheels of my heavy weighted 20 x 8 x 8 fluid filled tires for the front of my snowplow tractor. I've been using the rims off an old crapsmen and there are no bearings. I just grease em up via the keyway and slide em on the stock front spindle. I decided to upgrade to 5 lug front wheels. Those are 7" across the inside. Should be a good stable addition to the front of whatever they're on. Here's the fluid fill kit I'm hoping to use to transfer the Rimguard and refill. In other news... I picked up a parts washer on sale a few months back. Never got around to setting it up. While we were at TS today I passed this Zep cleaner.
-
4 pointsI hope he doesn't get hit by a car. It wouldn't be the first time a boy died from love sickness.
-
4 pointsYou know what they say... iffin' it ain't red... leave that POS in your shed!
-
4 pointsOk so they aren't , but still, they don't look too bad. I just completed the MF16. The one on the left. I have another MF14 (the one on the right) in the shed, keeping the Horses company. Miller Tire is currently out of aluminum wheels, so that will wait until spring. These two will go into winter hibernation today, along with the rest of them.
-
4 pointsGood ol’ H2O
-
3 pointsLearned a bit from a local welder who helped me with the 8/4-speed noname seat bracket. Heck of a nice guy!
-
3 pointsThat is a common reaction to touching green tractors…
-
3 pointsNice find on the C160 and a fine job shining it up !!
-
3 pointsIndeed! Cecil and Elmer envisioned "Working Girls", not "Prom Queens" - did you ever notice they just sound happier when they are working instead of being on parade?? Bill
-
3 pointsEven room for Mom’s car…!
-
3 pointsGet yourself a ROLL PIN PUNCH SET... 1/8-5/16 or so for about $20 bux. Each one has a 'nipple' on the business end which keep the roll pin from 'flaring out' Once you've falred it out with just a standard punch, you'll likely have to drill it out. These roll pins are HARD...so get a good bit and expect to do some work. Get a cold 6-pack too.
-
3 pointsthere are a number of threads with useful info. Try "roll pin steering" in the search bar and choose the "all of my search term words" option. Generally: - VERY SOLIDLY support the steering shaft to eliminate bounce and to prevent damaging the steering gear (I bracketed the shaft to a sturdy wall) - use the correct sized roll pin punch, NOT a straight punch which flares the end of the pin making it harder to remove! - use penetrant that's been given time to work - if it is easier, do as some members have and remove the entire wheel and shaft to bring it to a press
-
3 pointsI have been looking for the original springs to no avail. Have you any idea where I can find the springs? I saved the tractor from the scrap yard. My deceased Father purchased it new. These are the final pieces of the puzzle.
-
3 pointsA little work this AM before he goes in the oven.
-
3 pointsNow that is a more specific question that requires a different answer. When I do that I use a hard chalk/wax that I have in different colors. It can be sharpened like a carpenters pencil to a thin edge. It is hard and will not rub off wood. It is also durable . In this case I usually don’t mind a thicker line since most times I will be perfecting the cut after band sawing it and depending how much of that I want to do I can either follow the outside , inside, or split the line. If it would have to be an absolute precise cut to the template I would then first mark and cut it in the manner described with bandsaw then attach template to piece and route it using a bearing guided flush cutter.
-
3 pointsThis is why when I'm doing a resto, I take just as much care painting the inside of a rim as I do with the outside. From the factory most rims are lucky to get some over spray on the inside, care is not really given to inside protection.
-
2 pointsIn honor of Richie’s @19richie66 new awesome custom cups, I started this thread. I know that some of you have already purchased and received his new cups. These things are quality pieces and he can personalize them to your tastes. You can honestly say, “I have the ONLY cup like this in existence!” I started this thread to showcase that these aren’t just works of art but also very functional. I used mine with a cold drink last night for leading my TeenGroup at church and then promptly left it. So, stopped by first thing this morning to pick it up before it got legs and disappeared. It still had ice in it 12 hours later. I also like the metal lining as it doesn’t add the plastic taste to the beverage of choice that cheaper cups often do. My cup is a “house divided” cup with Wheel Horse on one side and IH on the other with my Avatar “Peacemaker Jack” around the bottom. I requested the Patina look on mine and am totally happy with how it turned out. He even brushed little rivets in the corners to make it look like two pieces of metal wrapped around the cup and held on by rivets. Top notch work and will certainly be a conversation piece wherever you use it. Please post pictures of your custom mug/cup from Richie and tell us about your specific design...
-
2 pointsjust doing a change over , decks look clean and next to nothing residue , fresh soak with chain and cable fluid , spindle soak , base of spindles have oil ring , to deck . will sit over the cold months in oil , zero rust or rot , under deck is stained black with gear oil . plows tomorrow , wait on blower set up . engine oil changes , regular service , pete
-
2 pointsNo, but you can correlate run time to 'heating degree days'. In this way you would be able to say the heater runs x minutes per degree day. I used to have a link to a website that published daily degree days and I'll look to see if I can find it again. Here it is: https://www.degreedays.net/ You're also going to need to go for longer sample times in order to filter out the 'noise' in the data. I would suggest at least a week at a time.
-
2 points@Sailman & @ebinmaine... We are not worthy Don
-
2 pointsA winter themed "horses in the snow" side shot ... heres to a snowy 2022 !!
-
2 pointsI’m heavily envious.
-
2 pointsOh, God, I just about busted a gut... I need an oxygen treatment... Don
-
2 pointsWell, emergency responders will figure it out one of these days, no doubt…
-
2 pointsAhaha! I’ve been waiting for someone to ask about that! NO! My profile pic is that of a flaming Tesla rolling pilotless down the road in search of the 30 or 40,000 gallons of water needed to extinguish it. It happily seemed to include a horse’s head if you look at it just right. Pretty sweet, I would say as an ICE fan, man.
-
2 pointsUncovered the 520. Hooked up the Battery Tender, then covered it back up. It's ready for it's winter hibernation.
-
2 pointsThen and now sells membranes and other parts. https://www.then-now-auto.com/fuel-pumps/ However for about the same money i just go Electric Facet Posiflo
-
2 pointsI know, I know... Hey, Eric, by the way, the front wheels on my '95 JD are 15x6-6, and yes, I agree... around that size for front wheels is very stable... Don
-
2 pointsLooks great just the way it is, mine isn't near that pretty.
-
2 pointsGood stuff guys. Roll pin punch is no problem 7/32 seems to be the closest fit. I normally swing a 2# hammer, but may up it a bit. I will certainly brace it all solid and hope a very solid hit gets it attention. I have a good air chisel as well. I suspect I could machine a chisel bit into proper roll pin punch to get it to move a bit if a hammer won't. I spent a good portion of life rebuilding front ends in the auto field. Hammers and air chisels were daily life for A-frame bushing, ball joints, king pins, and such. I hope this stays simple. Y'all have good ideas!
-
2 pointsAre you going to give me credit for that idea Jeff? You know how brilliant I am... Don
-
2 pointsAn alternative way to deal with stubborn steering wheel removal If you're not actually changing the steering wheel but just need to remove it from the tractor to let's say separate it from the hood stand. Cut the shaft below the hood stand, remove the 3/4" lock collar (Cut that off too if necessary) and it's off in about 2 minutes. Weld the shaft back together when you're ready, DONE. Or you can use a 3/4" shaft coupler and weld or pin that to the shaft as it will perfectly line up the cut shaft. Or, if the steering wheel is junk, cut the shaft as before and grind the weld off of the steering gear at the bottom of the shaft. Replace it with a new 3/4 shaft and weld the gear back on. You can grind off the gear and remove the lock collar to slide the entire shaft out without cutting it in half. Lots of different ways to deal with it but it's totally dependent upon available tools and your tolerance for aggravation Hammering soaking beating and repeating can be a huge PITA with plenty of cuss words. Mother nature can weld those roll pins in pretty good so as mentioned, a correct size pin punch should get it out. But not always because they can mushroom the pin too. For me, cutting the shaft happens fairly quick after maybe 5-10 minutes of trying to remove the steering wheel the conventional way and it doesn't happen easily.
-
2 points@Sailman nice find, I like original workers with a bit of patina so I don’t feel too bad if it gets a ding here or there. After all they were built to be used and used they are. @Wheelhorse616, welcome. If you haven’t already I recommend starting a new thread in the electrical section. Year and model of the tractor are great info for us (312-8 was made for a couple years and they vary a bit) if you don’t know the year the ID number can tell you what year. On your tractor I believe it is under the seat.
-
2 pointsReduction is new steering shaft, midd-gear, and block for sure. I think a different length front shaft with fan gear, too. I might have the regular block on a parts tractor. I'll look tomorrow.
-
2 points@WheelHorse520H my early horse experiences has brought me to that point ,the one issue you are looking at , is surrounded buy the things that got it there . always back check to related movement function areas. that has made me detail the hell out of anything . that standard has made things bombproof , that's just me , pete
-
2 pointsThanks for the search tips. I tried steering, steering wheel, wheel, roll pin, etc but no dice. I think I am applying it wrong and will try again the way you suggest. I figured there had to be some threads but did not find them. I've had both PB Blaster and SeaFoam deep Creep on it for a week, they are my favorites, and I keep spraying at times. I'm certainly with you on the roll pin punch as well. What I will do is brace the wheel / shaft to a solid wall as you suggest, very good idea. I have big presses available to me where I worked if things get ugly, hope to avoid all that. Thanks... ( will do more searching )
-
2 pointsI did this as well for small parts as long as it wasn't below 50°. I took the warm part and rattle-can outside, sprayed and brought the can back inside until the next coat. When done, I brought the part inside in the warm to dry. I never had any issue. I used coat hangers as well. Humidity level is also a factor. If it is too high, the paint can get cloudy if you leave the part outside and don't bring it in where it's dry and warm.
-
2 pointsAnd finally it ends up like this... Yummy
-
2 pointsPfft, what if I want extra weight in the tires?
-
2 pointsI learned to row a small dingy by the time I was 10 with the same unpinned U oarlocks Don mentioned. One of the many benefits I’ve enjoyed living on the coast. I’ve never lived more than 5 minutes from salt water. Sometimes my wife and I consider moving but living near the water is always a factor.
-
2 points"Where did you park the van?" "I don't know, it's all a little fuzzy now"
-
2 pointsYup. I worked in the automotive steel wheel industry for 40 years. The prints called for primer over the whole wheel and topcoat on the face and outboard flange. The corrosion resistance testing was concerned mostly with the topcoated surfaces as well.


.jpg.8ca755f0175140fd974a8b033d7f3501.thumb.jpg.71f06ed90f3a14a3b565d8387e418b61.jpg)


This leaderboard is set to New York/GMT-04:00