
Leaderboard


Popular Content
Showing content with the highest reputation on 04/05/2021 in Posts
-
17 pointsAfter our Easter dinner my nephews and nieces came up to me with that look in their eye. You know the look that says "We would like something but we're afraid to ask" They never asked but I knew what they were waiting for and being the big softy that I am, I got a tractor out for some cruise time. With one nephew at the wheel and a tub full of great nephews and nieces they spent a good hour or so cruising around the neighborhood.
-
16 pointsI did something I never could have imagined myself doing today. Thanks to this forum, the encouragement of the members and detailed instructions from @T-Mo, I rebuilt my carburetor! thank you!
-
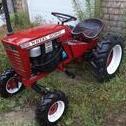
15 pointsI got a GT 1142 a while back, an 83 but it looks about 5 years old, even the oem seat. I didn't barn find it but the guy who did only kept it sitting in a shed, too. It was missing the linkage rod and he stuck a piece of fence wire in there, but connected it wrong. He jacked around with the governor too. I'm still dialing it in but thanks to this site, I've managed to find not only how it's suppose to be connected, but complete service manuals on the tractor. Incredible resource. I'm obliged to join now.
-
9 pointsI have always been a fan of Kohler engines with their Carter carbs. I could probably rebuild one blindfolded. But when it comes to Tecumseh carbs, I'm like fish out of water. I found that snowblowers with Tecumseh engines have a carb that is easily replaced with a $12.00 Chinese knock-off. So it is more cost effective to replace than to repair. But now I have a 1967 REO Lawn Skiff with a Tecumseh V60 engine. The carburetor does not have a Chinese replacement, so I am left with trying to rebuild it. The previous owner claimed to be a small engine service guy, but I'm beginning to wonder. He said the engine ran a year ago, but not good. He could not get it to run before I bought it except with a shot of starter fluid sprayed into the intake. So he told me that he rebuilt the carburetor, but it still would not continue to run after the starter fluid burned up. Here is the carburetor: Carburetor number: 104 5B18 So I remembered that @buckrancher told me years ago that there is a metering rod that sits in a shaft along side the main jet. In order for the engine to run properly, that rod needs to be free inside the shaft. If you can't here it rattle when you shake the carb, it has to be removed and cleaned. This is where the rod is located, under a small plug. After carefully drilling out the plug, here is the rod sitting in the shaft. It definitely was stuck and would not come out, So after spraying brake cleaner in the hole and letting it sit over night, the rod came loose and came out with a little prodding. As my research has found, there are many tiny little holes or ports inside the carburetor that need to be cleaned, especially if ethanol laced gasoline has been left sitting in it. One of those little holes goes through the side of the shaft that the rod is in, and into the main jet area. That hole is accessed by another plug on the side which I had to drill out. Here is a .5mm wire that I inserted to clean the hole. Next step is to find more tiny holes to clean, then continue. I removed the 9/16" Welch plug. The vent hole on the outside goes directly to the bottom (or top as it were) of this cavity. This hole is now cleaned and the new Welsh plug is installed. Next step is to remove the 7/16" Welch plug on the outside, above and to the left of the idle adjustment screw. The hole indicated by the red arrow goes to the idle screw area, and the two holes with green arrows go to the the idle and progression holes located near the throttle shutter shown in the next picture. Holes are all cleaned and a new Welch plug will be installed later. Next step is to remove the float valve seat. This is a little rubber donut. This is removed and the new one inserted with a Tecumseh float valve tool (available from Amazon) One end is a hook, the other an insertion tool. The hook is pushed through the hole in the seat and pulled out Next step is to insert the new seat. This carburetor, being as old as it is, does not have a replaceable emulsion tube (main jet). So the brass tube can only be cleaned. This is the bottom of the emulsion tube. This is the top. Notice the build-up of crusty deposits on the top. This, and the inside of the tube will need to be cleaned. Using a brush and rod, the emulsion tube is now clean. The new float valve seat is prepared for installation, then inserted. Both of the Welch plugs are tapped into place Final assembly is begun. Install the float with new needle, and adjust the float height to 11/64". I used a drill bit for measurement. Install bowl with new gaskets. Set the rough adjustments of the needle valves according to the Tecumseh book. And now we are ready to install on engine and test. MORE TO FOLLOW
-
8 pointsInstalled my tow hook. Things almost complete now haha
-
8 pointsI feed my wife whatever she wants...
-
7 pointsSaw this on the book of faces:
-
7 pointsGot four horses out of their toy hauler winter quarters. All four fired right off. Power washed the winter gunk off the garage floor and got three in for oil checks, fresh gas and maintenance. The flame... new correct steering wheel...thanks @Achto.... 1067 some tie rod work... RJ-59 new belt.
-
7 pointsA little fresh red going on today.
-
7 points
-
7 points@Coulter Caleb had Comanche out to do some yard work this afternoon following church. It was great to see him having fun and getting some work done at the same time👍🏻
-
7 pointsTechnically this counts, right? 😆
-
7 pointsMany hours spent today on placement, fitment, scale and color variations for the new hood ornament... I think it’s perfect!!! Peep...peep...peep...
-
6 pointsI ended up with a HF tool cart I wasn't using and my other welder cart/table wasn't really working out like I wanted, so I converted my tool cart to a weld cart. First I removed the lid and a divider on the left side along with the locking setup. I cut one end down between the uprights for connections for the welder. Covered the edges with some welting from amazon. I used 13" no flat tires from HF and the axle lines up with the bottom holes on the cart, just opened them up to 5/8" and slide the axle in and weld. I will let pictures speak for themselves and ask any questions you may have. It is working out really well and rolls super easy on my rough floor.
-
6 pointsI ate my hood ornament...
-
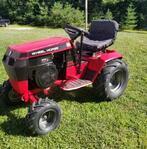
6 pointsAlso picked up and installed a atv rack on the 314-8. Makes it alot more useful around the yard no especially when dnt need or want to hook a trailer up to it all the time.
-
6 pointsSurfing the on line auction sites and found this little beauty. I couldnt help myself and had to have it! I know its not a Wheel Horse made attachment but it was sold by Wheel Horse and can be found on the back of an RJ-35 brochure. Now i thought it has fared pretty good for a 70+ piece of equipment. I'll let you be the judge of that! What the interesting part of it all is it was made not to far from the the birth of the Wheel Horse. I think this will look good behind my late 1955 RJ-35. I dont think I've ever seen one of these at any show. ENJOY THE PICS.
-
6 pointsThe spindles are made and on for a dry fit. Now I know the tires sit correctly I'm going to weld a backbone to the spindles. That will go underneath from the hub stop and wrap up around to the steering arm. I was going to heat and bend some up but I'm about out of Acetylene but I think these will do.
-
6 pointsOnce it hardens, it will out last 2 generations!
-
6 points@Andy N. Caleb’s JackRabbit has proved to be a really decent plow rig with the hydro as long as properly weighted. You may have seen this video before but this is a short one of Caleb plowing with JackRabbit (his 418-C). It didn’t seem to have much trouble getting the job done. Right now he has a weak spark on the front cylinder and needs a new coil. Once that is in place, he’ll be good for awhile. You definitely should come up for plow day, it is a blast for sure👍🏻
-
6 pointsThat’s the way to do it...! Now add a few more trailers...!!! The Achto, Wisconsin and Wheel Horse Northern RR!
-
5 pointsPTO lever all the way off? Don't ask why I’d ask...
-
5 pointsWife. Wire. Autocorrect, Auto not correct, That's just funny right there...
-
5 pointsThe 520 was in hibernation. I had to move 3 tractors in order to get the tub out of the shed, 2 of which were still in hibernation. Surprisingly everyone started with a turn of the key, didn't even need to jump or charge a battery. Each of those tractors got a little play time but not a whole lot. After those tractors were put away I decided to turn the key on my C-141, who unfortunately had to camp outside for the winter. That one also fired right up, so it got a little exercise as well.
-
5 pointsKids and Wheel Horses, just doesn't get any better.
-
5 pointsChanged the engine oil on the Raider and the C160 and greased them. Took the dozer blade, chains and weights off the C160 and swapped out the front wheels with the roller chains for turfs. Serviced the 42" RD mowing deck and now I'm ready for mowing season. Great day to be outside, soaking up the sun 😎
-
4 points@pullstart care to comment? He and I share a cool trick from 1/2 way across the country. I learned a saying from an old mechanic many moons ago. We live in the north.... Rust is a way of life. That tech told me: You can almost never loosen it but you can almost always tighten it. Sounds backwards to some... TIGHTEN a nut/bolt/fastener an 1/8 of a turn first.
-
4 pointsIt's a roller!! The pic makes the front look a lot wider than the rear. Looks that way standing in front of it too. Actually not so. The top of the rear tires measure 41-1/2" across. The front wheels are canted in at the bottom. Front tires measure 41-3/4" top, 39-1/2" across the bottom. Perfect.
-
4 pointsIf you like it, you buy it, it's your money. Buy what you enjoy. Personally I think alot of people waste money "custom" tractors just because someone put a predator engine on it and welded a wrench to it. Honestly I wouldn't spend 1200 on this, but this would be something that would intrest me and fit into my misfit collection. The patina is awesome, it's got a good look to it
-
4 pointsWell I cleaned off the points and put a new spark plug on 875. Connected some jumper cables from my truck to the tractor. Hit the button and it spun around and around and nothing. Pulled the plug and cleaned the points again. Left the plug out to see if I was getting spark and no spark. Disappointed so I turned my attention to the hot rod trailer. Put some fresh paint on it and decided I liked it not so fresh. Taking the tractor to a friend's for help. Keep you updated.
-
4 pointsHate to ask...is PTO disengaged... Has happened to most of us at one time or another. Run a jumper battery + to starter Jim types faster
-
4 pointsWhat did I do to my WH Today? WANTED to repair the hood hinge on my C-160. Managed to accomplish it but not without a RANT! I knew I wanted to use bushings as the hinges on the hood were knackered. Drilled those out.. Had a couple bushings in the drawer but I would have to cut them down. I decided to hit up some local stores to see If I could find any shorter. All the stores with the nice little drawer thingy's. All of them out of the size I wanted. All of them have been out of them for a long time. all of them the drawers are all mixed up so they have no idea what they are out of. All of them will be in the same condition in 6 month's Went to Napa and bought a 675-1246 Dodge door pin and bushing kit for 8 bucks. It has 2 bushings the right size. 2 bushings too small so they go in the drawer. 2 e clips for the drawer and 2 pins for the scrap bucket. 5 stores until I got what I needed. Went to install the new stainless hood pin I got from a member here. He cut the grooves for the clips wrong so I had to use the old pin that wasn't too far knackered
-
4 pointsAin't no denying that! Yeah buddy. Front wheels are ready to be bolted on as soon as I get time. Engine sheet metal is all painted. Next steps on that: Make up a schematic for my own knowledge. Pop the carburetor off because I need to clean it again anyways. Then spend a bunch of time needle scaling the block.
-
4 pointsI got the last of the pile of millings spread out, Started prepping for the second dump of millings due tomorrow. For this second section I have to do a bit of hand digging. Wish I had some sort of cultivator or ripping tool for the back of the tractor, but I will soon enough. Some of the spots, like where I have the white line painted in the grass, I was thinking of trying out the Troy-Built tiller I have. you can probably see it in the first post I made in this thread. I did the garden with it so If I break it at this point, I am good till next spring.. fingers crossed. lol I put my trailer to work hauling the dirt away that I am generating from the driveway excavation. I modified the Wheel Horse factory hitch to accept the spare 2" ball I have so I didnt need to drive the 'yellow horse" on the lawn and make a new project for myself. I was surprised how much this old girl can do! The wheels slipped a bit on the loose driveway with the "full load", but she pulled that trailer well. I was mostly on flat ground when it was loaded, and up hill when it was empty. Once I get all spread out I will rent a tamper for the day and see how many fillings I can loosen up in my teeth. another good day with the Wheel Horse! David.
-
3 pointsIs somebody angry? Where? I dont think anyone agreed with the price? I'm not sure I'd even go that high for a late model 520H with low hours!
-
3 points
-
3 pointsWorked on the shifter a little more got it to where I like it and continued work on the spacer block under the console. Made some wings for it to spread the weight over. Just got to drill the block and bolt them on tomorrow.
-
3 pointsStarted on the new rear wheel centers tonight.
-
3 pointsGlad you were able to do it, as you found out, it isn't all that difficult.
-
3 points@krystolo sure is a warm fuzzy feeling isn't it? Horses are great, 4 legged, or wheeled!
-
3 pointsCome on guys. If the rubber being used a spokes is not even length all the way around, the outside rims are not going to be centered with the hub, and that rubber is not going to give...see the threads in it?? If that is worth $1200 to you, then you probably have owned a Ford Pinto...or a "K" car...or a mini-van, and you ended up putting that much in it before you figured it out. It is a parts tractor at best, and the parts would look best on a 702. Take those wheels off and hang them on your barn...make a wind mill out of them...plant flowers in them in the garden...put them on your D-200 and go creek jumping. You could donate that money to Red Square and start paying the Admins???
-
3 pointsThe points opened and closed. There was a noise that didnt seem to be normal but I dont think it was coming from the engine. It seemed to be coming from behind the drive belt guard on the right side. I tried two plugs. When I picked it up from previous owner the wire from the coil to the spark was disconnected at the coil end. Seemed to be wet in there so maybe its bad coil or wire. I did apply some decals.
-
3 pointsWhatever someone is willing to pay. Off the record I'd say about 50-75ish would be fair. My bad....
-
3 pointsGetting ready to put the snow horses to bed for the summer. Did some straightening of the blower assisted by the New York Central Railroad..Father "borrowed" the wrench about 1930 when he worked at the West Albany Shops (stamped N.Y.C.L)...... Central is gone, Shops are gone Father is gone
-
3 pointsCurse anyone that ever paints that! If it runs and drives I would buy it.
-
3 pointsLooks like the opposite of what happens around here. instead of getting hung up Tractor Trailer drivers routinely ignore the big yellow 11' clearance signs on the under passes.
-
3 pointsThere’s a lot of block on that one!
-
3 pointsI saw the pictures, liked the posts, said hi to Mirror in my head, realized it never got through to my fingers! Hi Mirror! Nice coat!
-
3 pointsYou should do a separate thread on this one of a kind customization of your tractor.
-
3 pointsWow that is in excellent condition for its age, someone or a chain of people really took care of it!!!


This leaderboard is set to New York/GMT-04:00