
Leaderboard


Popular Content
Showing content with the highest reputation on 11/02/2018 in Posts
-
6 pointsso here's a couple of vids i did while back in the spring with my new gretsch guitar and i'm a lefty
-
6 pointsThe best thing about being an odd ball is no one takes you seriously. Ask my wife.
-
6 pointshere's another a old chuck berry tune lol
-
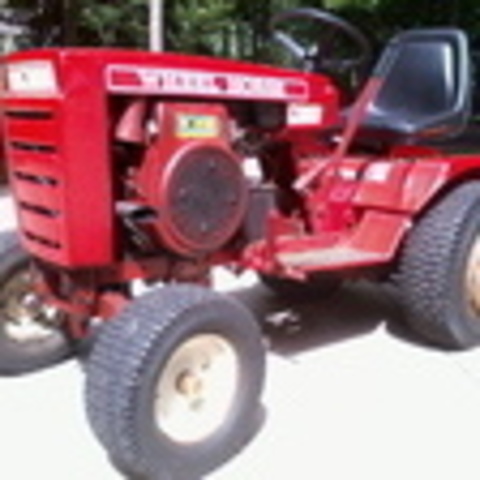
5 pointsGary A few pics of my 654 (or 604?) with original (no you can't have it ) Techy. Thing starts first pull and run well which is amazing for a Techy. I was threatened to be castrated by the fellas if I touched the patina. I was severely admonished just for knocking off the barn dust! Pay no never mind to the 502 belt guard, it was MIA but I managed to find one that worked at the Big Show with matching patina.
-
5 pointsHmmm - not really TucTuc was used in India therefore but - tuc tuc tuc was that sound i have in ear, if i remeber the last try of fire up the Engine so tuc tuc tuc make sense... 😂
-
4 pointsNot sure if this can be proven, but I think the English to German translation of Putt Putt is Tuc Tuc!
-
4 pointsClean it up and see what you have. I would use a Scotch-Brite pad as apposed to sand paper as it won't remove any good metal. Use it with your choice of WD 40 or Boiled Linseed Oil I use PB-Blaster With Scotch- Brite Pads. I'm not apposed to a new coat of Red paint when required to save a Horse from rust. I would also be in agreement with using a 6 or 7 horse K-Kohler as a replacement engine. I'm fixing up my 80 Toyota 4X4 that still pretty much stock but I have been working on a new coat of paint original color Red of course. It's your Wheel Horse we will be happy to see to saved. Just don't use Green and Yellow, I have one of those to, it was my Dad's [ !959 430 farm tractor ] I wouldn't paint it red either.
-
4 pointsHere are my drawings i did ahead, once the FEL once the Collar Bearing with double pulley's. The drawing of FEL was before i was purchasing the Hydraulic Parts at all.
-
4 pointsAs a load is applied to the belt the bottom span will get real tight and the top span will get looser. With the idler on the bottom that will apply a lot of pressure on the idler and the spring holding it there will lose it's tension as the idler is pushed down by a tighter belt. With the idler on the top the spring only has to take up the lose belt that the increased load generates. A V-idler inside the belt at the bottom would still get a lot of pressure but the spring tension would increase in your favor. Problem with that is the amount of belt in the pulley grooves is reduced and increases the chance of belt slippage. A belt guard must support the tight or drive side of the belt when the belt is loose for the clutch to be effective. Doing so leaves the top span of belt with lots of slack so it leaves the engine pulley and ceases to drive. Garry
-
3 pointsBecause of my troubles (oil spill) with the old Onan engine i ordered at Onanengines.com a Gasket kit. It arrives quickly ( thanks therefore) and i prepare for Oilchange. To Change the Oil, i fired up the Engine, but after few seconds a loud ploink sound occurs, and the Engine Stalls. When i fired the Engine again, nothing happen just a tuc tuc tuc - and a lot of oil and a bit of gasoline run's out over the Exhaust. A closer investigation show's, that the Cylinder Head and even the Cylinder self has a rip of about 1,5 cm over both parts. What was the Reason for? It's hard to say, maybe while it was in a burning Barn, maybe about fire distinguisher - who knows. Take a long story short, i decided to swap the Engine. First i ordered a brandnew Engine - Loncin Brand . Today it arrives in qualified enclosure and ready for swap. Additional because i build my FEL quickly, i just try firstly with a Power Steering pump. So far the System can work, (tested by Makita) 😎 but i missed the direction check ahead. So i could not use it without strong workarround. Next Step was to order a right directed Hydraulic pump and adapted it quickly to the Drive pulley of the Gear. My Test results surprises me, with a complete released front Axle, i am able to lift about 700 Kilos, what i stopped urgently, because the little Tractor begins to lift its back. A damn dangerous situation at all, but now i know - there is more than enough Power from the Hydraulics itself.👍 I just wanna Lift about 100-150 Kilos no more. So i reduced the Hydraulic pressure on the Valve. The only issue i have further, is that i coupled the hydraulic pump direct to the Drive pulley. That means - stay on clutch, no Hydraulics at all, not very senseful. To solve this issue, i plan to move the Pump forward ahead of the Seat and mount mount under the Plate a collar bearing. On this Collar bearing i planing a double pulley, where one comeing directly from Engine and the other working as usual with the Original Belt clutch. So i hope all functions can be implemented with a senseful using. I worked now a lot ahead, about measurement and graphical Engineering to solve that. Hope that i can next weekend in my Buddy's Workshop, to finalize the Swap. This WE is impossible... Stay tuned Stefan
-
3 pointsHappy birthday Kate!!! Thanks for all you do to promote the preservation of garden tractors. Hope you have a great day!!
-
3 pointsIf you you ever want to be buried with your money, hand it to me in cash and I’ll send you a 100% honest check in your casket! Sorry, had to!
-
3 pointsI wish the best for him, he was so gracious to my girls at Scott’s plow day!
-
3 points@roadapples yes, youre right, but i want not take the Load on the Axle, therefore i planning also wheelweights. thinkin on old Brakedrums and fill with concrete. But first the implementation must be made, and brakedrums has to be found, they are usable. i got an idea, but must see if it fit's - next time at the scapyard. i think tuc tuc tuc shall be the new name (maybe stolen at put put) 😂
-
3 pointsSave the wish bone! Thanksgiving is near!
-
3 pointsThank you Richie for the nice description and pics of the sundstrand motion control ' what a big help I was lubing the sh.. out of them to no avail. now if will rectify the problem/
-
3 pointsH eres handle for dump bed. Note this trailer isn't going to be a show trailer but a worker. I still have lots of patching to do. One top of a side is bent pretty bad I am going to cut it out and put new metal in.
-
2 pointsSo I recently took this tractor to Tecumseh Trails in Ohio to meet up with a few other guys who also ride all terrain lawn tractors. I made a video about the trip. Enjoy!
-
2 pointsDidn't work well for me. I had the same problem. Clutch would only engage if I played around with the wires. Finally I removed the coil from the housing and tried soldering the wires in the coil, but it just kept shorting at the next weakest place. After soldering several different places I finally gave up. Called a local electric motor repair shop that would make and install a new coil in the old housing but the price was salty. I wanted to keep the machine original, so I was ready to pay to have it done when someone here offered me a used one. That was a year ago and I'm still up and running. Repair is worth a try though if you have a little patients! You could try an electric motor repair shop in your area. Perhaps they might be a little easier on your wallet! Good Luck!! Gary
-
2 pointsI fixed one off an Ariens with that problem, ground the epoxy out around the wire repaired it . Verified it worked and refilled epoxy area.
-
2 pointsWas thinkin the same thing 'fish...it's already broke! Go for it Richard nothing ventured nothin gained.
-
2 pointswell believe it or not i was a elvis vocalist for 25 years i just got out of a 14 year marriage and started to playing again......hadn't picked up a guitar in 3 years and played a piano for a while jerry lee lewis stuff ......i love boogie and rockabilly music would love to get down to the big show and show off the ol'953 lol write a wheel horse tractor song lol
-
2 pointsThere's one way to find out. It's already broke so you got noth'n to loose by pulling it apart to see if you can fix it.
-
2 pointsI just can give you a simple Advice, start a project and learn with it and never give up to solve it. Here in this Forum are such a mass of knowleged Guy's, i' sure include mine everybody will help you as much as they can. If neccessary, ask for help or guidance, it's never too late to learn something. i'm over 50, so my skills are not at beginning present. I started when i was a young guy with simple projects and improve my knowledge. do a lot of try's - somtimes they miss, somtimes they stay, you can just learn about. but don't start a too large project, take it in simple steps - one by one. i'll be sure, you will made it! Go on!
-
2 pointsThanks for compliments, it was firstly just a proof of concept, but while it's working much better then i ever expected, i will improove it. I'm really proud of my Design! Iam also proud that my first WIG Welding is that stable. To be honest, most of Welding did a collegue, but he guides me in WIG Welding and i did 2 of the most loaded parts. The first stability and Lift tests and also the heavy pull, i did with different shorter front Arms, but the both levers are the same as doing the Lift tests. They bend a bit what i expected, but not as much as i fear. Even if i lifted the Back of my own Car on the Trailerhook with released front axle on the tractor, it bend's a bit but gets nearly back to normal. 1mm difference was measured and this can be also a measurement failure. All together it's extremly leight weight ( the complete FEL including shovel and all cylinders) weights actually less than 27 Kilos. and lift's with me in the seat 160 Kilo on the backside on the Shovel fixed by Belts without any added weight. Try it with a rock - think i can say it was " Rock Solid" 😂 It only become a bit instable if i move the weight (more as 100 Kilos) to much sideway's. But that's ok, because i know about maybe solve this issue later on.😎
-
2 pointsI used the compressed air method and it worked but not without great effort and French. Mine was badly rusted tho, so much so the cylinder was pitted and unusable. Lowell http://www.wheelhorsepartsandmore.com/ has parts.
-
2 pointschances are there is some rust on the interior of the cylinder. if you can get the cylinder shaft extended to its full extended position, put the yoke in a bench vise.... slide the shaft inward a ways, then with both hands on the cylinder housing, slam the cylinder toward the extended position as hard as you can. there is nothing internal holding the ends but the threaded elbows or nipple into the end caps. if you then get the shaft end removed, take a piece of broom handle, or something similar, and hammer on the inside to remove the other end plug. I did this with three of them, and all went well.
-
2 pointsHi Low range shift fork and axles
-
2 pointsLooking much better. If the trailer is going to be a worker then a bit of a bend left in is really no big deal. A big dead blow hammer might fix it right up.
-
2 pointsI’ll plan to change this as soon as I get out to the shop again, thanks again for the explanations guys!
-
2 pointsThanks for the info, I will take some detailed pictures and post them this weekend but the blower pictured in the attachment looks similar but is a bit different then mine but I could be missing some parts.
-
2 pointsSuccess in top pic you can see side is bent. I cut it out and put it in a vice was able to straighten the price and welded it back in. I got a Chicago electric 125 amp wire welder does a decent job. In process of grinding down welds. I do little sections at a time to avoid warping in sheet metal when welding. And yes side isn't perfect lol
-
2 pointsLol the first dump cart I bought at scrapyard for 30 bucks (which is now fixed up). At same one a month later I paid 40 for this lol
-
2 pointshey if the shift rails are good and and if yuo can spare 4 pinions i'll buy them from you
-
2 pointsmust be having a on that question!
-
2 pointsI’d save all the parts!
-
2 pointsNice score Ryan!! Every one should have one odd ball in their line up. The Mafia group has @WHX21 . If I remember right those Amigo's had kind of a strange transmission set up. Looking forward to checking it out in person.
-
1 pointGreat job. Love the twang. Also a BIG Ventures fan.
-
1 pointI’ll be cutting one down that size from our front yard this year.My neighbor and I are going to split the wood to make bowls out of it on our lathes!
-
1 pointUp is engaged
-
1 pointThe four stroke cycles as my shop teacher taught me, are suck, squeeze, bang, blow. Give ‘er some fuel and a source of ignition and hope it pulled in enough air to blow it all up and you’ve got an engine!
-
1 pointFor my shop OSB walls I was lucky enough to get 5 gallons of some light colored mis- mixed paint for the first coat (cheap) Then added 2 gallons of white to what was left to make a slightly off white gloss for the walls. PS when I build deer stands all the leftover paint come out to mix and make Camo. It’s a good thing they say deer are color blind!
-
1 pointHey now @WHX21 that 953 is a done deal.. just waiting for Saturday. I am tractor tight after this sound like someone you all know??? ok maybe one more for my narrow front but the way my project are stacking up definitely won't get to that until maybe next year..but I'll make a threat when I get it. BUT my local buddie @PeacemakerJack found this awesome article about demco and the amigo tractors I have to thank him really made me appreciate the work that went into making these tractors. Here it is if you want a good read and thank you Josh again! https://gardentractortalk.com/forums/topic/921-ahead-of-its-time-amigo-article-from-lagc-magazine/
-
1 pointTo all those that have replied, I’m having a difficult time seeing the keyboard, looking through tear filled eyes, reading the kind and respectful words, you all have shared about my brother. He was a good man, and I’m glad some of you got to know him, through this great club. Karl, a sincere thank you for that, because that’s what I’m going to do. Adam really got to enjoy his collection of Wheel Horse tractors, the most I believe, when he lived in Tennessee on a 9 acre piece of land. Between cutting the grass, hauling whatever he needed to, stump pulling, or even grading, he’d tell me about it every time we spoke. There is one tractor that he worked on, as the last “big project”, he finished just before being diagnosed. He dismantled the tractor 100% to the last nut and bolt. He was an excellent mechanic. He reassembled it after thorough cleaning, painting, and replacing anything that wasn’t making the grade. Right down to the last sticker and zip tie, I think the Wheel Horse factory would be very proud of what it looks like. Its a perfect looking machine. At a point in time when he had a good idea of the horrible outcome of the situation, he had asked me to take care of that tractor in particular, because he knew I had a place to store it, protect it and take care of it,.......I’m still having a hard time seeing the keyboard. When I can see more clearly, I will upload all the pictures I took while I was there. From the bottom of my heart, thank you everyone. Scott
-
1 pointNow, what sleep number does that equate too? Is there a calculation for figuring that out? I mean, length and diameter of nail would matter to the discriminating sleeper... X = Length of Nail Y = Length of person Z = Weight of person X + Y / Z = Sleep Number
-
1 pointFinal exam for a nail gun trainee???
-
1 pointHappy Birthday!!
-
1 pointHappy Birthday Tig!!!
-
1 pointLol ... she changed her tune Tom when I told her it operated like a golf cart... next word was "can you paint it candy apple"! Unfortunately no word from seller yet. I'm sorry the person you are calling has a voice mailbox that has not been set up yet..... Not a good sign..... Oh well sometimes you get the horse ... sometimes the horse throws you! Got that gut feeling this one is not going to pan out but you guys know out CL finds go so nothing ventured nothing gained. Thought you guys would like the pics anyways
-
1 pointYou just can't settle with an odd number, can you?


.thumb.jpg.0c495eaa7ff874c741991d7b1de2f119.jpg)

.thumb.jpg.810d1c1614331c1b0991654ba10f1bbb.jpg)


This leaderboard is set to New York/GMT-04:00