
Leaderboard
.JPG.9f2ecb26065c66527b0730084ab7fc7a.thumb.jpg.7dc8a04d9a53d44ee2b23f26ee94496f.jpg)


Popular Content
Showing content with the highest reputation on 07/30/2018 in Posts
-
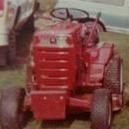
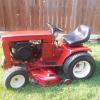
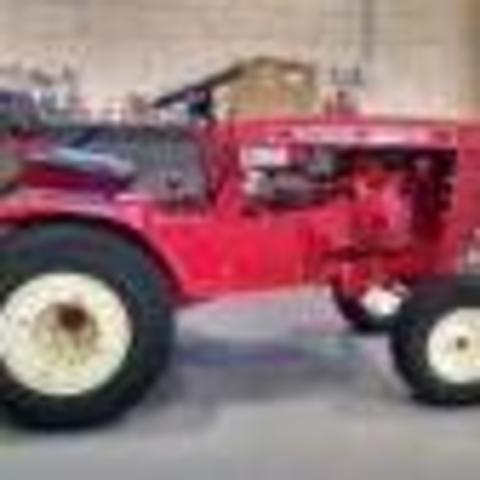
13 pointsSo after a long weekend sat down and pop up Craigslist and low and behold was listed “Pond” walk behind tractor... all original 1953 purchased from the second owner who has been using it for the last 20 years to turn his small garden until this year he found the flywheel was cracked. He had ALL the original paperwork from the original owner who was his neighbor. It came with front snowblade and rear one bottom plow. These machines are still out there gang!! I love the fact it is all original and untouched.
-
12 pointsMore photos of paperwork
-
8 pointsSo this all started back at the end of april. I was sitting at good friends shop and he was looking to buy a old Chevy truck out in Nebraska. He asked if I would be willing to road trip with him and pick it up. I said yes of course. I then started asking are we driving out with a empty trailer. He said yes and I said how about we fill it up and make a stop along the way. He was alright with that, so I instantly started talking to another fellow member here and asked if he would be interested in purchasing some wheel horses out my way and I would pick them up for him. Then we could load them up and stop in Nebraska and drop them off to him. Then we could go load my other friends truck up and head home. We had previously spoke on how he would love the opportunity to scoop a few horses up and trailer them to his home in Nebraska. So after some talks and getting things in order are plans were made. So I started in the beginning of July picking horses up and storing them. Well last Friday I picked the last one up and now there loaded up for the trip this Wednesday. We will be delivering a GT14, 953, 1054, 59 RJ and a D250 with FEL and a bunch of implements.
-
8 pointsEven though... it's only 1/64 scale. It still counts.
-
8 pointsUTC stands for Union Thresher Club. They have a top notch show grounds comparable to Le Sueur Pioneer Power, and they never fail to have a good show. This year there was no exception. There was at least five or better RS members. Not a heavy turn out of there but a few. Again my pics focused more on people and the overload of fun we had more than tractors.Hopefully Dan got some pics of tractors! While this certainly is a family orientated show once the kids get put to bed it's the adults turn to be kids! Thursday nite loaded up and ready to head out in the AM. Lucy not happy, she likes to hound dog howl too much at shows so she has to go to doggy jail. I think she is swearing at me... The Mafia was good in attendance although no tractors were injured in the making of this show. Well maybe a freshly painted Ford that came off a trailer @ 45 MPH....more on that in another thread. We actually had a semi organized Mafia cruise and set out to terrorize the show and campgrounds. At the end we all gathered for fellowship hour. Uniform required to be in this shot, me kneeling and Dan with his hand up giving free whiffs of BO! Even got in some close to dark mowing! Our friend Dale killing some grass and Dan's niece having a laugh. I'm sorry my bad ...for those who don't know what the GT Mafia is ...pretty much a drinking club with a tractor problem...a loosely knit bunch of half brained idiots who is a regular at the shows we infiltrate. Only requirement is to have a shirt and at least one can coozie (we do not tolerate warm beer)! You do not need a tractor to be a member but must be in good standing to one who is stupid enough (no shortage there) to let you steal one of his/hers! Any brand will do but if you have a you might want to guard it closely as they have been known to quickly get parted out...just ask @953 nut. Also must be willing to don baseball caps with fake hair attached and wear other assorted headgear and entertain other members! all in all a great bunch of guys that play well together. We do eat well tho... The Don......err Dan with head of line privileges eyeballing the bacon wrapped venison nuggets with jalapenos and cream cheese
-
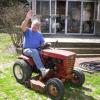
8 pointsMy dad on the left and his friend on the right with their Wheelhorse tractors, picture taken in July 1977. They had others but never made it on film, I guess those were the ones they were the most proud of.
-
6 pointsThanks for the heads up , I will head to I-80 and setup the detour to Kansas City!
-
6 pointsLots of steam running around Dan on a pull... I'll let him explain how that went ...lets just say sometimes you get the bear....sometimes the bear gets you. Maybe it was the bumper sticker I can't show....this is a family site! Musta been the extra weight of that soda bottle hangin off the back! The moon over my hammy... well maybe not Miami but right in back of the grist mill is a old railroad trestle that was hauled in years ago and put over a slough and concrete decked so one can drive a tractor over it. Pretty cool but the pic doesn't do it justice. I like the nite life ...I like to boogie... Good local bands both nites Engraving names on the cedar shingles from the sawmill at the black smith shop. Was supposed to b a glamor shot but didn't turn out well ...wrong lighting. That's really all I got ... @Achto ? @Deadguy ? @Blondeflutterby ?
-
6 pointsMy wife got so nervous with all the Mafia activities she took up smoking! Not really they have an old time candy shop on the grounds where they make old school candies including candy cigarettes.... who remembers those? My nephew showed up with his kids and had some fun... A happy camper! A not so happy camper... hopefully she didn't want to set on another brand! All was well after I let her play bouncy on the air mattress! I have one of @Vinylguy's trading card banners hung up in the tramper and these two little girls were just mesmerized by it!
-
5 pointswent and drove two hours one way today to visit one of the biggest shows of the netherlands and took some pictures(took more but my phone didn't save them) thats all
-
4 pointsWell, @pullstart asked for it. Here's a video of Emory cruising on the D160. I finally put a new needle and seat, gaskets, adjustment screws, and float in the carb. A little adjustment of the float and no more flooding out or fuel starvation. I was tickled with the rear tires at first, but they seem to slide worse in gravel than any other tires I have. Maybe I need to look into a nice set of turfs or ags. What do you guys think? If I put different ags on the rear, what about ags on the front to give it a muscle tractor look something like the old 4x4 Oliver tractors?
-
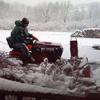
4 pointsLike nobody here can drive... I like about 6-10” of fresh snow under my tires for cruising speed, takes care of all the potholes!
-
4 pointsHey, I’m just doing what my wife says. She got the guys number and told him I’d call... wouldn’t want to let either one down would I? plus I need to get over and visit Jeff again, with an empty truck!
-
4 pointsVery cool find! I've got one of these myself. Ravenna Ohio would be a Harold Pond tractor... Might want to move this to other brands? 😉
-
4 pointsI got more done today. Front tires are mounted. I also got the fuel tank mounted. Made the exhaust and put the 4 speed back in. And it runs again and sounds healthy too.
-
4 pointsI tore it down and wet sanded and cleared a few parts and here's pics of them.
-
3 pointsSo a friend stopped by with his brother in law for me to work on the brother’s truck a few weeks back and he discovered my herd of Wheel Horses. Just so happens he has a C-121 in his garage and had been shopping for a deck for the winters for about 2 months... when he about tripped on a 42” rd. Deck for my C-101. After thinking about it, I gave him a price that I thought was reasonable, probably too cheap. (But it funded that new Charger 12 project!). He came with the ‘121 today and I showed him how to mount the deck, mule drive, tension the belt, etc. He worked at a JD dealership for quite a while, dad raised him in green and yellow. After about 45 minutes showing him “stuff” he didn’t know about WH, he’s thinking he needs to start looking for some red himself! During that time, my wife was in town with family helping with a tiny fender bender (everyone’s ok) she mentioned to grandpa what I was doing, and someone overheard and through some numbers exchanging, I have to make plans to go check out 5-7 more Wheelhorses! What a day!
-
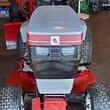
3 pointsWell I picked this suburban up a little while back. But I finally got to getting it cleaned up. I'm tearing it down completely and going through all the mechanical parts. Also I will wet sand and clear it, so I can save the great look it has. Here's what it looked like when I rolled it out of the barn I got it from.
-
3 pointsIsn't that what it is all about? The Mafia members are quick!
-
3 pointsWhen are you leaving ? I'll stand by exit 56 and give 'ya a SAAALOOOOT !
-
3 pointsMy 520H tractors do not roll easily and there is no tow valve.
-
3 pointsThat’s so cool @pullstart! You even turned someone back from the dark side
-
3 pointsWell, we finally got back to working on this trailer today. Haven't touched it for nearly two months because of many other things going on. My honey washed it off and put primer and a coat of paint on some parts of it.
-
2 pointsBoy handles that beast like a pro.
-
2 pointsI did read in the manuals that a 518 Hydro (1100 Eaton) could be pushed easier IF you put the motion control lever in the fast forward position. Sure was hard to load with 2 flats in the front and the rears sliding....THEN I read the manual!
-
2 pointsHow high is the idler pulley? You want that in a position so when it moves forward it will allow enough slack of the belt. If it's halfway down the belt is too short. 11 and 7 should be close to the correct positions. They should be set with about 1/8 th inch of room from the belt when it's engaged. Just did one at the big show and need to set them about 1/16 away. Use 2 screwdrivers if necessary but you can't get any of it to work if the belt is too short. If you have an old belt around. Cut it, wrap it around ALL pulleys and mark the spot where the end meets the belt. Measure it and you are very close to the length you need
-
2 pointsAs the operators manual states as well as a decal that "used" to be on the unit..."HAND PUSH ONLY DO NOT TOW" DAMAGE MAY RESULT!...now let's say you get yourself stuck , yes you can tow it enough to get the unit out of a jam, Jeff.
-
2 pointsROAD TRIP! Any time you want to make a delivery like that to North Carolina I'm ready! NC is about as much of a desert as Nebraska, very few and far between.
-
2 pointsSomeone has Christmas in July! Nice bunch!
-
2 pointsI'm with lynmor, my 520H's don't like to be towed. You can move them a bit, but they complain. No release for towing.
-
2 pointsA mother load of nice Wheel Horse tractors for sure!
-
2 points
-
2 pointsA Rust free Chevy anywhere is great!
-
2 pointsThis is is my coffee machine, it’s from Germany. We even wired a Euro plug for it! Add water and beans, it grinds, presses, makes coffee and spits little coffee pucks into the spent box on the side for easy cleanup. Now if I could remember where I set my cup...
-
2 pointsThat is the same front end that is on that Camino by us. I’ll have to make sure to take a pic for you guys if I get by there again soon. The above car is really tough looking! 1970’s stock car racing at its finest—Saaaaweeet!
-
2 pointsWhoa Kevin!!!! If you keep this up, you’ll have to pm @AMC RULES and figure out how to build a “magic shed” to store your rapidly growing herd!!! Make sure you link me to the thread when you post pics of these 5-7 horses!
-
2 pointsSorry pics posted upside down
-
2 pointsNo but I have seen a "Royal Knight" version in person as well as a Choo Choo Customs, that looks really close to the Chevy Royal Knight.
-
2 pointsWhen I see the G body Elco's I always think of the GMC Diablo that my friends mom drove for quite a while. I really liked that truck & It was the only one that I have ever seen in person. Have you guys ever ran across any of these?
-
2 pointsWell, I thought I had the skids for the engine plate made until I tried to orient the torque converter. As you can see in the second photo it has a 2" inward protrusion. It would only fit above the frame so I had to raise the skids about 4" higher than the original placement. This meant new risers which I made from a Cub seat pan. The 212cc Predator will bolt down on the engine plate and straddle both sides of the center skid. The engine plate is longer than the engine so I can mount it to the skids after I cut out slots so I can adjust the tension on the chain. I extended the seat frame and hope 28" will be wide enough for two, it will be hinged in the front so I can pull start the engine. I also have a quick release steering wheel from Speedway. Just in case I add a few pounds. Drilling is next, bolt it all down and hope everything squares up
-
2 points
-
2 pointsCareful all, don't fall out of your armchairs with shock, I'M BACK. Been a while since I posted but been busy, busy, busy doing lots of little bits, altering other parts, making a trailer plus other non tractor boring jobs. Now where to start since I stopped. ? More little additions first. The easiest were the lights on the fenders. 2 clear and 2 red were obtained from China, where else, for $7.50 including post. Hunted everywhere but these were the nearest to the size I wanted. 12/24 volt LED although non working for now. Maybe later. A printed label can be seen through the clear lens which spoils the appearance slightly. Not so obvious through the red. Back and front bonded together so not easy to remove without damage. The front lights were worked on over approx one year, on and off. Couldn't find anything suitable on the internet. Lots of flat lenses of the right diameter but nothing convex unless I wanted to pay lots of $$$'s, which I didn't. Looked at torches, cycle lights etc but again nothing suitable. Tried various ways of molding them but not happy with the results. Then tried casting in resin using a small quantity which my son had left over from one of his projects. What to use for a mold. First thought was to make one but looking around my garage the very thing, lots of them, were just sitting there looking at me. Sort of. Spray paint cans. The concave base was almost the correct size. A plastic ring, part of an old magnifier, fitted perfectly into the base of the can and reduced the internal diameter to the required size. The resin was mixed with it's hardener, poured, and left to set. As expected quite a few bubbles were trapped, most close to the outer curved face. These were sanded out with very fine wet and dry paper. Took a long time and finished up with an opaque surface. My son used to buff his castings up with polishing compound but while washing off the sanding sludge I noticed the lens was fairly clear while wet. Opaque again when dry. A coat of clear varnish resulted in a clear lens. Getting somewhere at last. Not perfectly perfect but after all this time, they will do. The rims were made up from plastic sheet wrapped around a jar lid after increasing the diameter to the required size. Made oversize first then trimmed down. The inside of the outer edge was built up to form a seat for the lens. Still with me ?. The rims on the full size D-series were rubber ? Speaker. Probably obtained as the nearest ready made unit. Inspection of these at a show in the UK last year showed the word Speaker molded on the outer surface. This was drawn to my attention by someone on Redsquare who was answering another members query. Reflectors. Flat plastic discs were tried painted with silver paint. Not bad but wanted something better. More hunting on the internet using all sorts of search words, plus a few of the swearing variety, then up popped these torch reflectors. $ 2.75 the pair including post, again from, you guessed it, China. Most small items from China usually take about 14 days to the UK. The larger than required opening at the rear was altered using two plastic discs. One with a tapered edge fitted into the tapered inner edge with the other on the outer face. All bonded together using liquid plastic cement. A 12 volt car bulb fitted a hole drilled through the center. Could be made to work if needed. The second photo shows the original flat painted reflector disc. The last is of the two discs at the rear clamped together with a nut and bolt while the cement dries. More on these lights next posting.
-
2 pointsStarting the tear down and getting ready for the sand blaster. I have a couple of spots to weld up and repair. Still on the fence if I will paint her or powder coat her.
-
2 pointsWe brought the D along with 11 other horses to our local show for this weekend. The D started running way too rich when I loaded it. Tweaked the float and she then got starved for fuel. Tweaked her again and finally hit a happy medium. Ran great and started right up and purrs like a kitten. Great sound and tons of power!
-
1 pointYou can move it around in the shop or load it up without a problem but I wouldn't toy it very far without a dolly under the rear tires. Too many internal parts turning without lubrication.
-
1 pointMe too... Absolutely awesome find Steve.
-
1 pointhave to make plans to go check out 5-7 more Wheelhorses! If you need help rescuing a few of those 5 to 7 stallions I would be glad to bring a few back to the Detroit burbs for safe keeping.
-
1 pointThanks for sharing, it's cool to see stuff you don't see around here.
-
1 point3 Wheel Horses chosen for best in show runner up. My 704 was one of them.
-
1 pointStill have not found any identification numbers. But after studying the parts books it looks like a Wheel horse. I’m out of town so my wife and daughter picked it for me. They did a good job of getting it into the suburban. It just fits.


This leaderboard is set to New York/GMT-04:00