
Leaderboard


Popular Content
Showing content with the highest reputation on 05/09/2018 in Posts
-
7 pointsI went to buy a deck for my sk486 and ended up buyin all of it. The guy was selling his deck from a c160. He still had the whole tractor and was scraping it. Also had a mid mount plow and a leaf vac. he tied to sell the parts a few years back. It's ruff been sitting outside for a few years but that's the fun. The controls are frozen, blown engine (broken con rod), seat is cracked, peddles are frozen +++. The tranny seems good though. Sure looks alot like my sk It id's as a 1974. A quick look at the engine I saw the con rod broke in half. Half left on the piston and half left on the crank.no other damage from first look. The wrist pin feels like it has better than 5 thou. play to the con rod. Here she is 😎🐾🐾
-
6 pointsGetting closer.......👍 Really wish I could have sprayed it with automotive paint but this will have to do for a while. Either way she’ll look a whole lot better than her former self.
-
5 pointsWhat do you mean it's not a WH? The wife's early birthday gift. She loved it the moment she saw it.
-
5 pointsNice bike for sure. I still have my Fatboy I had built back in 2006 and have not ridden it in about 4 years. The price on bikes has also come down a lot and a nice bike can be had for a good price. Be safe on it and dont make the wife regret she told you to go get it. Ride safe.
-
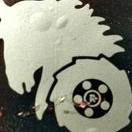
5 pointsHere are a few shots of the things I had on the trailer. One thing I'm not sure about is the sweeper. I know it's incomplete, but the model says R32. Sounds like a wheel horse number, but it's not labeled wheel horse. Any ideas?
-
4 points
-
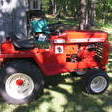
4 pointsThis is my early production 1968 Charger 12, some may consider it a 67. I bought her two years ago from the brother of the original owner. She came with her 42" SD deck, snow thrower, dozer blade and a tub dump. With the exception of some brush painting on the hood and running boards it's originality shines through. I added the caps.
-
4 pointsThe towel racks errrr grab handles look pretty cool on there
-
4 pointsWorked on my 314 with tiller to properly route the lift cable. Noticed that I had somehow routed the cable between the two cross member rods under seat. Easy to reroute with tiller down . Just take cable pin out and remove ball on cable from clevis. Reroute the cable properly and reinstall. Used my 1964 Wheel Horse 854 to move tailer load of yard waste. And mowed with the 1975 B-80 . All before noon. Plus painted an RJ steering wheel I repaired with JB Weld. Used Rustoleum Acrylic Enamel Gloss Black Paint. Two more to do but sanding comes first. The JB Weld Puddy does a great job and dries overnight.
-
4 points@CasualObserver...Jim @WHX17 has that almost complete one . I have one with all attaching brackets but has a broken corner and nothing for the bagger . Sure be nice to see a complete one mounted. Here’s a ad form back in the day if you need it for the files .
-
3 pointsI’ve been looking for a 420-LSE near me for a long time. This one came up for sale about 4 months ago but the seller and I couldn’t agree on a price. Finally yesterday we worked it out and I got it today. It’s not pretty but should be a fun project. It was only about 15 minutes from my house. It doesn’t currently run. Anything other than this model I would never take a chance on something that doesn’t run and the price was right for the condition. Do you think I can save that seat? 😂 The serial number ID tag is missing and the plate on the hood doesn’t have a name engraved in it.
-
3 pointsBack at you Jim! Everything will be as right as I can get it. the hood, fenders and all will not be painted. I will be doing all that sheet metal later. I am trying to get it going and Aldon has some parts for me so it will only get so far. She will still need a seat(Ed Kennel has a pan for me) and various other things. Hope to just get her running and moving under her own power. I don't know when I will be able to get back up there. Just trying to make it Jim. And Kyle will get those tires on the 418 if he wants them.
-
3 pointsTo wrap this up. I went and got an OEM Toro belt 7473 same number as the aftermarket 7473 except it was probably 1/2" to 3/4" longer when held up to the aftermarket belt. I was a little skeptical. Installed the OEM belt and immediately saw I had more clutch pedal travel than the aftermarket belt, Put machine back together and the new belt worked perfectly. Thanks for the guidance to buy OEM. This is apparently critical for this application. Too bad the aftermarket belt got a little dinged up. Can't really return it. It probably works in lots of applications because I saw it got about 4.5 out of 5 stars from most buyers. Thanks to all who chimed in.
-
3 pointsIt is easy to attach if you have the right hardware. There is a bracket that goes in the fender pan pivot but requires holes to be drilled in the pan. I gave it a try before I took it off and it works pretty good. I'd be willing to part with mine for the price of a cup of coffee & would haul it to the BS if someone wants it. I should put it in classifieds.
-
3 pointsIt is hard to believe that we are only about 6 weeks out from the Big Show! I really want to purchase this round hood for @Coulter Caleb but I need to find a way to get it from its current home to the BS. I’m happy to throw one of the members some cash to help me by picking it up and bringing it. You would have to have enough trailer/truck space for the tractor with attached mower and the blade. Maybe you are planning to bring something back from the BS to the east coast but will have that open slot on the way to the show... If you are able to help me with this please PM me and we can discuss the details...
-
3 pointsbetter have your head on a swivel Jim—GhostRider is coming for you! He’s a fan of dark horses...
-
3 pointsSunday 6th of May saw the 35th Heathersgill Vintage Rally. Held at Carlisle Airport, Cumbria. A sunny and hot day for a change, saw an entry of 500 exhibits, trade stand and craft stalls. I took my '79 C-81 with finger bar. (Sickle bar to the US.) '78 C-121 (The Black Horse) Modified for ploughing and my '78 Sears/Roper GT16 with B&S twin. Due to being an official, car steward, general dogs body and fount of all knowledge, (so some thought), I didn't manage to get as many photo's as I would have liked. What I did get are as follows. First some of the things for sale in the auction. Restoration project anyone? It's a David Brown. Or was. Couple of hand implements for when men were men and sheep trembled. Shopping transport for SWMBO. SWMBO on the left and friend with stall of her hand painted pots, mugs decorated with her own art work and cake stands she made from old records. Some old cars. Ford Model T. Imported from Kansas. Complete with bullet holes in the doors. Customised Reliant Robin three wheeler. Citroen 2CV and Renault Dolphin. Honda CX500 Tidy, unrestored BSA and Watsonia sidecar. Norton Trials bike. Ex British army Bedford with low loader. Horticultural exhibits. P1020189.JPG
-
2 pointsLOL ...he's eyeballin those on the horse .... bet he thinks they would make good pulling tires!
-
2 pointsNot sure which ones you are talking about. The ones just above your question are the ones I am running on this tractor. The goodyears on the 418 carcass are just holding it up till I can strip it the rest of the way down. They are tubed and hard as a rock but I will not be using them. The big fatties on the blue Gilson stay on it. I am trying to get a Kubota diesel to stuff in it. Its a shaft drive hydro that my dad and myself threw together.
-
2 pointsI'm damn sure not going to mess with the the two wires, my mama didn't raise but one fool, that would be my brother.
-
2 pointsWoke up old Charger 12 from her winter slumber and we ripped up some grass. Riding this old girl will really give you a backache. Haven't forgotten that.
-
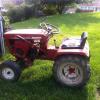
2 pointsHere is my new used c125
-
2 pointsYou want the litter whisk Jason @CasualObserver it's yours for an adult beverage. I can take it to AJ's and send it home with Tom. I am running out of room to store stuff. The bag is ripped but could be easily reproed.
-
2 points@ACman you must mean in person? There's pics of the one Jim @WHX17 picked up mounted in his 1277? topic. There used to also be pics of one on a 633 that belonged to @Rollerman but they are dead photobucket links. I can't even find them in grand old google image universe!
-
2 pointsNice haul for sure. The sweeper is a Litter Whisk. Use that as a search term and you'll find a few other mentions from the past. It was an aftermarket attachment, not a branded one.
-
2 pointsPressure lube is even better. They do sell remote oil filter kits which something could be adapted to for cooling but they're kind of expensive IMO. How about aluminum cooling fins that clamp right onto the filter? Couple of hose clamps, some thin aluminum angle pieces with little slots for the hose clamp bands. Backyard Hammer mechanic style oil cooler!
-
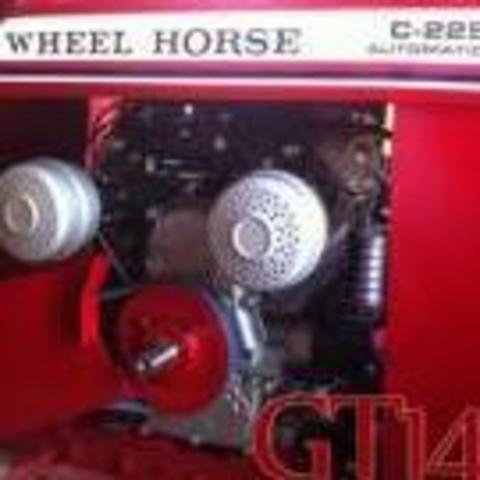
2 pointsThis thread has been about a combination starter/generator that is belt driven off a pulley mounted on the engine flywheel. Later they went to a starter with a Bendix gear that engages a gear around the outside of the flywheel. This system has a stator behind the flywheel that produces AC current that is rectified and controlled by a solid state rectifier/regulator to charge the battery. Two totally different systems. Suspect you have a 1975 model C-160 which uses the alternator stator. The body of the finned aluminum regulator must have a good ground to the battery negative (-). Many add a ground wire from one of the regulator mounting screws to a known good ground. There are two AC terminals on the regulator that connect to the two stator wires coming from the stator behind the flywheel. There is a third terminal marked DC+ and that is the output that charges the battery. With the key ON but the engine NOT running check the voltage across the battery terminals. Now move the red test lead to the DC+ terminal on the regulator. You should have the same voltage reading. If not the wiring is a problem and the charge currant has no way of getting to the battery. Don't forget to turn the key OFF after testing. Make sure all the wire connections are clean and tight. Often the connections at the regulator have been poor and the resistance has created heat that has melted the plastic terminal cover. To test further follow the instructions in the service manual Section 7.7 Let us know what you find. Garry
-
2 pointsSummer duty for my snow machine.
-
2 pointsWell today I have a set of Wheelhorse wind chimes swaying away in the sunshine. Amazing how quick this stuff sets up in the sun. Bake away. And the only thing left as a testament to how ugly this thing was. Someone went through a awful lot of trouble to get it this way. They actuallytook it apart to paint it the various colors. Sad. Oh well. She’s looking better already. One day I will pull her back apart and do it right but for now it will make her look good and last a lot longer.
-
1 pointGot the out front deck installed today. It’s works well even lacking the gauge wheels. It cut very well and it reached far under the trees. I was also able to reach areas into a drainage ditch that typically requires a string trimmer. The only drawback is when I put it into the shed. It’s rather long and I’m afraid that it’s novelty will wear off soon when I need space. Im thinking that the room it takes up is a deal breaker for me. It may need a new home.
-
1 pointXtreme Outdoor Power Equipment. https://xtremeope.com/p/xtreme-replacement-clutch-for-toro-78-6990-with-wire-harness-repair-kit/ Worth every penny.
-
1 pointThe DC lights you have now are running on AC current which sounds odd but works. You have likely noticed they only work when the engine is running and the faster it revs the brighter the lights. They are wired directly to the flywheel stator. Don't know what you could replace them with that would be an improvement. I would not want to use LED lights because they require DC current which you do not have. Garry
-
1 pointSpring was used to put tension on a midpoint idler for a tiller.
-
1 pointDid the first mostly full mowing with it today. I could tell right off that it performs much better in the longer grass with the new clutch. No bogging down like it did with the old one. Very pleased with that.
-
1 pointIf you going with OEM drive pulley you need to go from 1" to 1 1/8" . I made a bushing just wide enough for the pulley and bought an electric clutch with a 1" bore. Or you could buy another pulley with a 1" bore. For the engine mount I used 3/8" flat stock and clamped them where I wanted them front to back then used a straight edge to align drive pulley with with hydro. (mine was about 1" offset} Tested hood clearance. Then marked engine bolt locations, drilled and tapped, welded the flat stock to the frame. Engine runs so smooth vibration is not a problem. Hope this helps.
-
1 point
-
1 pointSo i had a brand new 06 FLHT when i was 19, loved it, rode it. Life started happening, quit my job of 8 years went to school to become a Mechanic, sold my Bike to do it, had a kid on the way all cards were in the air. Im happy to say that my wonderful wife, 5 years and 2 kids later told me to go buy a motorcycle again. 2 days later i brought this home..... 04 ultra classic and im loving every minute of it!
-
1 pointMost often that indicates an ignition problem
-
1 pointI'd like the seat pan and steering wheel and front wheels for one of my Commandos.
-
1 pointI have a few extras kicking around that need to go to a new home, everything is priced to go, not making a killing on anything! 1969 Charger 12 Automatic with nice 48" SD Deck and hydraulic lift. This was purchased last week as a non-running parts tractor. Once I got it running and found out how well it runs and how strong the Sundstrtand automatic is I couldn't bring myself to part it out. It isn't pretty and the deck has a small weld repair but they are solid and work great. The 12 HP Kohler has no smoke at all and starts and runs great. Rear tires are Carlisle and don't show any signs of age cracking, fronts are original style tires and do have some cracks but all tires hold air just fine. The battery is good and strong. SOLD I am picking up a 953 from member Mike's Horse Barn and have no need for the 48" deck that comes with it. One of the blade spindles has a bit of play and I will include a good spindle as well as a new set of blades. $ 75.00 for all. I will be picking up a '68 Commando roller and am only buying it for the transmission, rear tires and seat. Anyone who wants any or all of what is lift can have it for free if you are willing to remove it. First come first served, PM me with your wants. @rjg854 has dibs on these; seat pan and steering wheel and front wheels, everything on the Commando is spoken for.
-
1 pointI worked on my B80 deck. New double pulley, idler pully,blades,drive belt pto to deck belt and deck belt. I found everything here in michigan within 35 miles of my house. The blades and the double pulley were the hardest to find. I did replace the 3 spindles last year. Only the 2 outer pulleys I didn't have to replace everything else is new. I have to give the B80 to my son so he won't ask to use my new rider so I made sure the decks in good shape. After sitting all winter with the charger on it 2 turns on the key and it started up. Love that little engine.
-
1 pointOn my 414-8, which is probably similar to yours, after spending 15-20 minutes looking at that horrible mess with the nightmare of safety switches, etc I quickly decided to rip it all out and just go back with the basics - to start, run and stop! Though I did wire in the headlights.... From that point on things went real smooooth!
-
1 pointNot a problem with my '88. It won't turn at all with the blower down.
-
1 point17 is a weird number.
-
1 pointI'm not really knocking on the Honda - they have always built good quality components and have a proven track record. My complaint is more about the utility/truck sector moving into more car-like statistics and watching people expect them to handle a true truck rating far more often than what was intended. I've looked much closer under one of those Honda truck/cars - the components aren't too bad, but if pushed will start costing some serious coin to repair them. Even half ton trucks now are going to independent suspensions - my Dodge has the links/coils under it but still uses a true rear axle, thankfully. It will easily hit 22+mpg on a tank average in the summer, not bad for a 395hp V8 that is rated to pull 9,000lbs with the right hitch. Honestly, the mid-market between wagons and pickup trucks needed a push - Honda did that but the public just hasn't accepted it. I agree the styling/overall look could have been much better, but it could have been worse. If Jeep ever actually releases the pickup platform again I'm sure it's going to be a direct competitor to the Honda and will most likely use a similar platform design. From my years on the road, and working as a mechanic I'm pretty good at identifying suspension/driveline parts found along the right of way/highways. Since we've ignored the highways in this country for so long, I'd be a bit leery of component strength as the manufacturer's try to attain the EPA mandated fuel mileage averages that are coming into effect soon - it's already looking like a train wreck. The number of broken shocks, bushings, brackets/springs I'm seeing is a bit scary - some of those parts are important to safety. Local tire shops will tell you just how busy they are performing 4-wheel alignment jobs on the smaller SUV's these days - appointments around here are 30+days out on average. Our roads are beating the brake system parts off of heavy semi's, not to mention bending and beating the snot out of these lightweight little boxes that everyone has grown so fond of in the last 10yrs. Something has to give, we need to either fix our infrastructure or start driving tanks, lol. Your ego is rigidly intact - no worries there, just keep your eyes peeled and avoid those motorcycle-swallowing potholes.... I'm seriously considering keeping the old Land Cruiser - it's built to handle this stuff but I'm going need a lot of new parts myself if I drive it much. Sarge
-
1 pointThat thing is really coming along - can't wait to see it finished. Sarge
-
1 pointLittle paint & body work. And my trusty assistant. She likes tools. I keep finding them all over the yard.
-
1 pointIt sounds like your starter/generator or the voltage regulator is not functioning properly. This is some information I have found helpful. Starter Generator Assembly In this article we are going to look at the starter generator assembly, how it is made, how it works, how to test it and how the voltage regulator controls it. This starter generator unit combines two items in a single unit, giving it it's unique name. There are four basic combinations, short frame [about 6 1/8" field housing] low torque and the high torque long frame [about 7 ¼" field housing]. The other option is the direction of rotation. Cub Cadets and some other applications put the drive pulley on the PTO end of the engine instead of the flywheel end. These units rotate in the opposite direction. These can be reversed by installing new field coils in the unit. The short frame units were typically installed on the 8 and 10 HP vertical shaft engines and the long frame units were usually on the cast iron block horizontal shaft engines. The longer frame allows for a longer stack of laminations on the armature and longer pole pieces and field coils, resulting in increased torque and generator output. The starter consists of an armature that is connected in series with a field coil that is wound of very heavy wire. Probably about 10 turns of 1/16 X ¼ inch copper buss. As can be seen in the following sketch the voltage applied to the A or Armature terminal goes through the field coil to the brush to the armature. A generate field coil is also connected to this brush. This coil is wound of many turns of fine wire. The other end of this coil is connected to the [F] or Field terminal. The [F] terminal is normally grounded through the voltage regulator when the unit is not generating. When a high current source such as a battery is connected to the [A] terminal the current flowing through the series [starter] field provided a very strong magnetic field on the pole piece to attract the field created in the armature. [See previous article on motor and generator principles]. Since this is a series field and it has VERY low resistance, it is capable of carrying very heavy currents and the more current that flows through it the more magnetism it creates. The more load on the armature [i.e. the harder the engine it is trying to start turns over] the more magnetism is created in the field because the motor draws more current. To illustrate how a little extra resistance, maybe just in a connection, can seriously affect the performance of a starter circuit, lets examine a hypothetical case and see what happens. Remember the power formula P = EI and 746 watts = 1 horsepower. If the engine being started turns over hard it requires more horsepower to turn it. Since the battery voltage is fixed [12V] and it goes down with load, the limiting factor is the available current and the efficiency of the starter motor. The amount of current is controlled by the TOTAL resistance in the circuit and the current available from the source. [battery]. To illustrate how critical resistance in these circuits is, lets look at an example of what happens. Remember OHMS LAW: E=IR. Lets pretend our starter motor is 100 percent efficient [not possible] and we need 1½ horsepower to crank the engine to starting speed. At 746 Watts per HP the power requirements will be 1119 watts. Lets also pretend that the battery voltage will not drop any from a constant 12 volts under the load [not possible] and we will pretend that the cables and connections have no resistance [not possible]. P = EI, I = P/E. Therefore, the current it will require will be [P] Watts 1119 divided by [E] Volts 12 = about 93.25 amps. To be able to draw this current we must have a circuit with less than __?____ Ohms. To find out, let's use the E = IR, therefore R = E/I. So, R = [E] 12 Volts / 93.25 Amps = .13 Ohms. This is assuming in our hypothetical case that the 12 volts was right at the starter. Now lets pretend that our battery cables had .13 ohms resistance also. If you add this to the resistance we calculated that the starter must have to provide 1.5HP (.13, or 13 one hundredths of an ohm) plus .13 more in the cable, then the voltage getting to the starter would be 6 volts. Half (or 50%) of the battery's voltage would be lost in the cable. Putting 12V into this circuit with .26 Ohms total resistance would result in a maximum current of: E = IR, therefore I = E/R = 12V/.26 ohms = or about 46.15 amps. Since 6 Volts would be lost in the resistance of the cable and only 6 Volts would be at the starter, if we take the P = EI and calculate the power we get 6 Volts X 46.25 Amps = 277.5 watts or about .375 horsepower. When you double the resistance in this series circuit, the power the starter would deliver was reduced to ¼ of what it would produce originally. All of this calculation is not something you would do in troubleshooting an existing system, but it illustrates in these high current circuits how a tiny little bit of extra resistance, can result in serious losses in power and excessive voltage drops. If one understands these principlesthen it is easy to take a voltmeter and identify high resistance areas and trouble shoot your starting system. It is the concept one must understand. Applying the principles of what we just discussed to Simple Troubleshooting will be addressed in one of the next articles. Now, refer back to the figure above and let's see how the generator part of the assembly functions. Now that we have our engine started, the 12 volts from the starter solenoid is removed from the A terminal and the [F] terminal is grounded by the voltage regulator. The pole pieces that concentrate the field coil magnetic field retain some residual magnetism. As the armature turns, the windings in the armature cut the magnetic field of the pole pieces and this induces voltage in the armature. This voltage is connected to the brushes from the commutator bars. These bars are nothing more than a rotary switch. As the armature turns the bars that are connected to the windings that are cutting the flux at the pole pieces rotate out of the field, the bar connected to the next winding connects to the brush and on and on it goes. As the induced voltage is connected from the commutator to the brush this voltage flows to the generate field winding. This is shunt connected [connected across the armature to the field terminal, where it gets its ground]. The resistance of this winding is normally about 8 to 12 Ohms, such that the maximum current that will flow through it is about 1 to 1½ amps. This current in this coil creates the magnetic field in the generate pole piece. As this field increases the output of the armature increases, feeding more voltage to the field coil, reinforcing the magnetic field, and resulting in more output. When the output gets above 12 volts the regulator connects the armature to the battery and the current flows to the battery charging it. When the voltage gets to about 14 volts the regulator starts to interrupt the ground on the [F] terminal. This controls the magnetic field at the pole piece which controls the amount of voltage induced in the armature. The regulator action caused by the vibrating contacts in the regulator happens at a very high rate, nearly 300 times a second. Please see the section on regulators for more details on how the regulator does this. The same thing happens when starting. When the voltage from the [A] terminal gets to the brush it connects to the bar connected to the coil that is just approaching the pole piece and the intense magnetic field there. As it approaches the center of the pole piece where it would want to stop, the brush switches to the next bar [segment] and this magnetizes the coil just approaching. So, it continues indefinitely, constantly pulling and when it just about gets there, it is disconnected and the coil preceding it is connected. The brushes don’t really run on the commutator, but the current is conducted through a microscopically thin (just a few atoms thick) cloud of gas that is created when the electrons flow to the brushes. There are several common problems associated with these units. The amount of current they can generate reliably is limited by the fact that they have only one generate field coil. Regular generators for cars and farm tractors have a fan at the front and the front and rear frames are open to allow cooling air to be pulled through. Since generating electricity creates heat due to resistive losses, the closed design also imposes limits on the amount of energy they can generate. If the commutator gets out of round, the brushes "bounce" and cause the output to be intermittent. One won’t be able to see this as the armature is typically turning about 10,000 RPM when the engine is running at governed speed. This problem gets accelerated if the rear bearing is getting worn. The rear bushing can be replaced and is available in 3 undersizes in .002 intervals. The undersize bushings are not "cut" for the oil wick and need to be before installing. Another common failure is the voltage regulator not regulating properly and the unit running "Full Fielded" and the generate field coil burning out. The field coils are available in complete sets and the generator field separately. The armatures are available remanufactured. The quality varies from manufacturer to manufacturer. We have been buying from the same company for about 18 years. When repairing one of these units the commutator on the armature should be turned in a lathe. After turning, the armature should be undercut. Undercutting takes the mica separators below the surface of the commutator bars. In generators this keeps the mica from shaving the brushes as the copper wears down. The brushes in these units have some copper added to them to reduce the resistance and handle the starting currents. Regular generator brushes out of a car or tractor generator won’t work. The starter won’t have the torque and they will be very short lived. One other thing, regulators from farm tractors or cars, even though they look EXACTLY the same, are not compatible with these units as the current sections are calibrated for 20, 25 or 30 amps of current and would burn the field coils out of these units. Check the front end [drive end] to see that the bearing has not egged the hole out where the bearing seats. Often the bearing will have up to .010 clearance around the outside race in spots usually on the side the belt pulls the armature to. The best fix is to replace the drive end frame, but sometimes they may be saved with some very high grade Loctite, not the regular stuff. Troubleshooting Charging: 1. With the engine running more than half throttle, measure the voltage at the A terminal, it should be 13 to 14.5 volts. If it is 12.5 or less, ground the F terminal, if the voltage goes up to 13 to 14.5, most likely the problem is the regulator. Other possibilities are the wire from the F terminal to the voltage regulator, and the ground on the regulator not being good. If the voltage at the A terminal is 14.5 to 17 volts when you ground the F terminal, the regulator cut-out section is probably not connecting the A terminal to the battery. If the unit is measuring 13 to 14.5 volts at the A [without an external ground applied to the F terminal] terminal, the voltage measured at the battery should be within .1 or.2 volts of the voltage measured at the A terminal, if it is the system is working correctly. 2. If the unit fails the above tests, disconnect it and remove it. Using an ohmmeter, measure the resistance between the F terminal and the A terminal. A normal reading would be 7 to 15 ohms. If it measures less than that remove the end frame and pull the armature assemble out and look at the field coil connected to the F terminal. If the insulation is scorched, or it looks as if it has been overheated it is probably shorted. 3. Inspect the brushes for wear or the leads being loose in the carbon. Look at the sides of the brushes to be sure the sides haven't worn into the indentations in the holders causing the brushes to "Hang Up". 4. With the armature out, use the ohmmeter to check from the copper commutator bars to the armature laminations or the shaft. It should show no resistance, infinity. If the reading is 0 ohms you have a shorted armature. If it is 40 or more ohms, it probably has carbon dust between the commutator bars and the frame or shaft. Blow it out all around the commutator and windings. Be warned this dust is black and messy, so do it where it won’t make a mess. Blow the field housing out at this time also. If these two tests are OK, the armature needs to be "GROWLED." This checks for shorted turns, and shorted bars in the armature. This requires a growler to do this test. Any good starter shop will have one. If the field coil needs to be replaced, one will likely need a pole shoe screw remover. This is a clamp device with a screwdriver bit on a wrench that clamps the bit in the head of the screw to remove the pole shoe that holds in the field coil. Sometimes they will come out with an impact wrench, but when the pole shoe is reinstalled one needs to be sure they it is installed perfectly straight or it will hit on the armature if the curve is not exactly parallel with the armature. At this point for most people, this would be a "take it to the shop" job. 5. Check the bushing in the end plate for looseness. If the bushing needs to be replaced one needs a blind bushing puller which costs $400.00, so this is another "shop job." Troubleshooting Starting: Check that there is 12 volts to the A terminal of the starter generator unit when starting. If not, measure step by step using the principles outlined in the FORK LIFT troubleshooting article. this will explain how to isolate the external problems. The internal problems usually are: short brushes, worn rear bushing with armature dragging on the pole shoe, shorted armature, or the start field shorted to the field housing. Low cranking torque may be caused by someone putting regular generator brushes in, because they fit. Most likely it is a high resistance problem in the power source to the unit. One little, off the subject point, about undercutting. In regular car and truck starters, you don’t normally undercut 12 volt starters, because the brushes have so much copper in them to keep the resistance down that it gets in the grooves between the bars and shorts them out, they are also hard enough that they wear off the mica. On 24 volt starters you need to undercut because they add some carbon to the copper in the brushes to keep the brushes from tearing up the commutators. They are softer and the mica gets them, also with the extra carbon the shorting problem is lessened. In many big truck and heavy equipment starters, the only difference between the 12 volt and 24 volt versions is the undercut armature, the material the brushes are made of and using the correct [12 or 24 volt] solenoid. The windings are different in the 12 and 24 volt solenoids, plus the contacts in the 24 volt ones are usually silver, or silver brazed on the copper faces. Neat Huh! Dealing with the problems of resistance that go with low voltage, high current systems is why the automobile companies are going to 42 volt systems. The automotive industry has recently settled on 42 Volts as the best option to deal with the increased demands for power in the automobile. In our starter trade publications they are saying that in 3 years some of the car companies will have 42 volt systems in the showrooms and in 5 years all will be there. This means they will be able to use significantly smaller wire and cables and to power many more electrical accessories. 12 Volts will soon be as obsolete as 6 Volts is now.
-
1 pointMy first complete restoration. My nice 653 parked next to my dually 753 stock pulling tractor. Both of these tractors have been restored several years ago, and still look good.
-
1 pointPurchased by me from the original owner, with original deck in place, and has worked it's whole life.
.JPG.9f2ecb26065c66527b0730084ab7fc7a.thumb.jpg.7dc8a04d9a53d44ee2b23f26ee94496f.jpg)

.jpg.143ef73c68074a16cedfbe4d7536dc71.thumb.jpg.4896fc9ab6394b781c1c5f6c39deb441.jpg)


This leaderboard is set to New York/GMT-04:00