
Leaderboard


Popular Content
Showing content with the highest reputation on 03/27/2018 in Posts
-
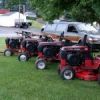
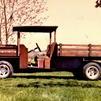
6 pointsA guy that Dan @Achto and I know has this tractor for sale. I think it's a 1277 or 1077?? and would fill in some blanks in my '67 herd if it is either. Dan thinks it may have a 241 in it. Asking 500 with the sweeper which is somewhat interesting in itself. Note both floor boards and stirrups and the condition of the seat. May be worth a look? Thoughts/comments fellas?
-
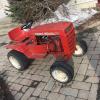
6 pointsRecently bought this lil gem and need some help Identifying possible year, make and such. I have already started getting it apart and having no issues but will possibly be needing some different parts but 99 percent of it is restorable. Engine is only thing shot Any help would be greatly appreciated
-
6 pointsHere is the completed unit with distressed finish minus handles in its final destination. I am not too fond of dark distressed finishes but you got to give them what they want.
-
6 pointsThe bolt pattern on the wheels is 4.5" five bolt just like a Ford. Be aware that the front end on these is very very light. If you plan to have your son drive it be sure to add weight to the front and a set of wheelie bars would be a good idea too. I bought a Suburban 400 for my wife a few years back and the first time she drove it was her last! When the front end went up a couple feet in the air she shut it off and never got on again.
-
6 pointsProbably a silly question, but how do you assemble painted bolts and washers without marring them up? Not quite looking like a tractor? This looks like you could win first place in a show!
-
6 pointsBeen working on assembling my 42" C125 deck. The texture is aerosol bedliner to help cover the years of being outside along with my repair sins. Enamel paint on water based bedliner sure is slow to dry - a few spots are still tacky after 3 days. Red is the same Rustoleum I always use. Oh well, it will get a chance to dry out in the sun pretty soon! Before and after pics:
-
5 pointsIf you're assuming I bought it? man, you really are... a "few eggs shy"
-
5 pointsBelongs in other brands I know but my thread... is a nice tractor, says it's in for a clutchechtomy and jumping out of gear issue.
-
5 points2 light coats of paint maximum when you paint the bolts / nuts, if the paint is too thick it will chip. Don't let the socket touch the washer. Another thing that helps is a 6 point flank drive socket. These used to be a Snap-On exclusive but other companies have picked up on it too. I learned to use flank drives when I was wrenching on Harleys, (heaven for bid you chip a chrome on nut some guys bike ). If all this fails, well then you just touch them up with a brush after they're tight. Thanks for the complement on the appearance. Looking forward to putting this ole girl to work soon.
-
5 points@Sparky...Yeah, Mike's got 'em too.
-
5 pointsI have them on my 417-A. I can get you a better picture later today. Very good tires for all around use. They do good in the sand here. We run them on our 4x4 carts out at work.
-
5 pointsGot started on the wiring. Im not sure yet but I may have got the wrong ignition switch. Made a bracket to mount the start solenoid. Also put the fuses under the seat. Got to find some kind of clips to hold the wires in place and some harness tape. The middle terminal off the regulator I think went to the red light in dash. It wasnt working, but is it supposed to come on with key on then go out when charging? And The left terminal I think went to cig lighter. Is that hot all the time or only when running? When I first got this thing it had a battery cable run straight to the key switch right behind the fuel tank without any fuses anywhere so it should be a little safer now Also drilled the seized screws out of the drive pully and got some new ones.👍
-
4 points...the $240 shower cap muffler that sold this morning on Ebay? Just in case you missed it.
-
4 points
-
4 pointsA couple decades ago I knew a fellow who was doing a body off restoration on a early 60s Vette. I seem to remember hard plastic inserts that would be put into a 6 point socket of the next size up from what you actually needed. Never tried to use them myself but it seemed like a decent idea for low to medium torque situations. I'll have to remember that shop rag trick.
-
4 pointsFor reference Dan's 1076 hood lettering. and a 877 Pic courtesy of Craig @AMC RULES
-
4 pointsYah unruly bikers have been known to kill for less! I cover the bolt/washer with a light clean shop rag.
-
4 pointsI also started the hood repair today. I started with the original 401 hood and a piece of hood that came off a 654. This is why I save all these little pieces. I first removed the lip on the 654 piece of hood. Then I made my cuts and welded them into place, well adding a strip along the inside for support. I just got to fill the old steering wheel hole with a patch. Then I will do some bondo work and priming. I even took a bunch of photos of some steps and the test fitting on the 401. I spent almost a hour sanding around the decals so they could be saved.
-
3 pointsI think he'ss trying to catch up with Craig @AMC RULES, you know 15 and 35 only 20 more to go Jim ...
-
3 pointsCorrect you are sir. These would be the six speed models with a ten pinion differential. The thought was these transmissions would be better for ground engaging attachments. There is a C shaped spring buried between the pinions that would give limited slip and yes handy on hills, especially with turf tires. . Very very seldom are the low range gears used . For me anyway.
-
3 pointsAfter I decarbed mine, it surged badly. It took three carb cleanings, but I finally got it clean and the surging stopped. I believe dirt is sometimes scraped off the inside of the fuel lines when installed on the barbed fittings. This immediately fouls the carb that was just cleaned. Before cleaning the carb, it is best to clean the tank, install all new lines and run the engine with a clean concentrated Sea Foam fuel mixture. Almost forget, Tony. I am a little confused on the ignition module. If it runs when you jump 12VDC to the coil, your ig mod must be OK. Sounds like you have a wiring/ ,connector problem which is quite common on these 520s.
-
3 pointsThis simple diagram may be helpful. As Mr Addison told you the switch you have is not correct. Also there are no fuses shown on the diagram, but they are strongly recommended. Your lights can come off the "A" terminal of the key switch or the "L" terminal of the regulator.
-
3 pointsA couple of Commercial beasts! Is anyone on here running 23x10.50-12 Carlisle all trails on a 3/4/500 series horse? I’m thinking those might be a good look and functional on JR. I’m open to suggestions though...
-
3 pointsThat switch has a "M" (mag. ground) terminal on it, battery run switch has "I" (ign. terminal to coil) #103990
-
3 pointsI was liking how my weights were turning out but I did not like the fact that mounting nuts would be sticking way out in front of them. I was discussing this fact with my friend Bob (owner of the motorcycle shop in town) and said it would be nice if I had a way to counter sink the nuts into the blocks. " Well" he says, "I don't have a cutting tool big enough to do what you want but, if you want to come down Sat I'll let you play with the rotary table on the mill". I had no idea what a rotary table was or how it would help me out but I was anxious to learn. I thought that some here would enjoy a little walk through my experience with this new to me tool. As with any machining process set up is very important. First step was to find center on the rotary table. To do this you move the table until it looks close to center by eye, then I used a coaxial indicator to find exact center. The indicator is chucked into the quill and the gauge part is held still with catch bars. With this set up you then turn the mill on and adjust your X (left / right) & Y (in / out) axis until the needle on the gauge holds perfectly still. Then the X & Y axis's get locked. Now that the rotary table was centered I chucked a drill bit into the quill that was the same size as the hole in my weight and used it to line the part up while I clamped it down. Close enough right? NOPE. Now install the indicator back into the mill and use a hammer to tap the block around until the needle on the meter stops moving again. Now the hole in my part was perfectly aligned with the quill. Now it's almost time to cut a counter sunk hole. I wanted my hole to be 1 1/8", my cutting tool was 1/2". I did the math and figured out how far I would need to move the X axis on the mill to achieve this size hole. Then moved the Y axis ( up / down) and then rotated the table to make a light cut so I could check my hole size. Once I was happy with the O.D. measurement of the hole then it was just a matter of moving the Y axis to make deeper cuts then rotate the table, then repeat, repeat, etc. until I had achieve the depth that I wanted. After the hole was cut I used a round off bit to chamfer the edge on the hole. After one hole was done the entire process was repeated to cut the second hole. Hope you didn't mind my little walk through. Here's the finished part. With this part done I bolted the weights to the bracket and the welded the mounting bolts to the bracket. This way I won't have to try to hold the bolts while I mounting the weights. Counter sinking the holes may have been unnecessary but I sure had fun learning & I think that it looks much better with the mounting nuts recessed. Now I just need to figure out what I'm going to do with the large holes in the rear weight. Today while I was assembling I came to a point where my motorcycle jack kept getting in my way. The lift arms are wider than the tractor frame and interfere when install some parts. This was an issue that I was going to address after my last build but didn't. Well today I had enough of dealing with it so I took some scraps and made a Wheel Horse adapter for my motorcycle jack. It turned out pretty well plus it gave me another 3" of lift. Tabs on the side hold it from moving on the jack, tabs on top hold the tractor from falling off of the adapter. For now I laid rags over it to protect the paint until I get a chance to glue some rubber down on it. Enough machining and fab for this post, I did actually make some progress on my tractor also. I chose to stop at this point because I want to do some wiring before I continue farther. Need to pick up a 22NF battery so that I can get my cables made.
-
2 pointsEasy swap. I put one in a 953, had to swap axles because of their length but that wouldn't be a problem on yours. 5060 transmissions are found in the 1067, 1267, '68 Raider 9 and Raider 12.
-
2 pointsI would think so Tat but might have to do some minor mods. I do have a extra 5060 but not for sale at this time. Projects always seem to get slowed down by anything and everything!
-
2 pointsI've had several valve seats replaced by NAPA in East York. They order in over sized valve seats and machine them down to fit the block. As far as I know they don't order genuine Onan seats, they order after market seats. They do also clean the block up as far as I know. I take the a stripped down short block. I don't know if you would call them if they would give you any info or not, might be worth a try. It's the NAPA in Industrial Highway in East York. Good luck eric j
-
2 pointsI would remove the belt and see how the clutch pulley spins by hand. There is a bearing in it that allows it to spin when not engaged and if the bearing starts to fail it can add drag to the clutch or make it solid if the bearing is locked up. Garry
-
2 pointsI bought one of these off the tool truck at work. Guy said it was too bright, lol. Got it almost half off and it was basically brand new. Love it. Lights up the night for sure. https://www.zoro.com/atec-work-light-1200-lm-oval-led-7-h-12-1037/i/G7116140/
-
2 pointsCould be Randy pics just don't show it well. Never thought of that Bob but if they are the guy at the factory was havin bad day that day as this girl is supposed to be orginal. You were close on the model. Bigger question is why no 1077 on the decal when the 877 and 1277 has them?
-
2 pointsSo today I adjusted the valves. The exhaust was slightly loose and the intake was very tight. Unfortunately I created an oil leak in the process. So....today I learned that gaskets need permatex.
-
2 pointsThats my 77 Mustang II, Mach 1, V-8 4spd with air. Car only has 4867 miles on it......too many projects had to move out of garage for a bit lol
-
2 pointsWell if you buy it you better find another quick. It's bad luck to have an odd number!
-
2 pointsThanks for the info, knew the motor wasnt original and its no good anyways (locked up) but here is how she sits now except ive removed the seat and fenders. Dont feel I did too bad only gave $100 for it just wanna make a good lil rider for my son. I have the original deck as well but dont intend to put it back on. Any good places to look if parts are needed, will def need a steering wheel and do you by chance know what the lug pattern would be it seems from a cpl pics and videos ive seen that you can put 15 inch wheels on it
-
2 points“I know“ that this carburetor is the right piece, as long as it doesn’t leak fuel. As opposed to getting something sent to me from overseas three weeks from now and having the choke lever on the wrong side or something. Also, tossing something out just for the sake of adding more stuff to my junk pile doesn’t make sense to me either. It should also be known, a very good friend of mine has a carburetor shop, so as long as I give him the parts, he can hot tank all the crap out of it, bush any loose shafts to better than new condition, and just generally make it work quite fine and he charges me nothing. So, yeah… I have a leg up in the process already. I just need to get parts.
-
2 pointsJust my 2 cents... A couple years ago I bought a NOS/ "OEM" carb (still in original box) off the shelf from my local small engine shop. Guy told me it was left over from the days just before Tecumseh folded. Couldn't tell the difference between it and the Chinese version (except for the higher price ).. Just saying..
-
2 pointsCorrect Randy ...from what I have learned this tractor was owned by a elderly gent. Only drove it on Sundays ya know! Correct Mike Incorrect Paul ...the only thing I see is the floor board and possibly the steering wheel. Correct Jason...
-
2 pointsI am still thinking 10 or 1277. The release handle for the belt and and foot rest match. 1276 did not have the pull up handle for the belt and the 68 charger went to floor boards. I know it does have a floorboard on one side, but I bet it was added to aid in getting on the tractor. Randy
-
2 pointsI just use the Milwaukee M18 work light and lantern that came with my tool kits. Battery life is very good. Gives you another reason to but power tools!
-
2 pointsI just checked all your post activity that seems to relate to your GT 14 and this mule drive/belt hook up problem you seem to be having. It appears you have been chasing your tail on this dilemma for nearly a year now......beginning in April 2017. You either have to be missing parts, not using the correct length belts, or are misrouting the belt drive. After reading all your posts, unfortunately I'm almost more confused about what you really need to do now, than before I reviewed the posts. I'm not trying to be purposely uncooperative or demeaning, because as you know, we have communicated privately and I've tried to help you. I really want to help you, but I (and probably several others) need some clarity to your situation and what the problem really is. Here's a few pics of the clutch.to deck drive belt set up and it's orientation for visualization, and to help you determine if you have all the parts you need to make the deck operational.
-
2 pointsI. M. H. O. Excellent!
-
2 pointsThese flashlights are awesome. strong magnet and recharges from USB https://www.walmart.com/ip/Nebo-250-Lumens-SLYDE-LED-Flashlight-190-Lumens-Work-Light/198644378?wmlspartner=wlpa&selectedSellerId=7870&adid=22222222227040353817&wl0=&wl1=g&wl2=c&wl3=99165025834&wl4=pla-231620067154&wl5=9005146&wl6=&wl7=&wl8=&wl9=pla&wl10=117437293&wl11=online&wl12=198644378&wl13=&veh=sem
-
2 pointsRemoved frozen tie rods from frozen spindles, frozen spindles from front axle, axle from tractor to check pivot pin (worn) & wheels from spindles. Removed blower housing & head from HH100 engine & found two head gaskets,(both blown) & one stripped bolt hole. Have not checked ign. sys. yet, if system is dead, probably candidate for someone else to build up for their project. I've got three "fresh" Kohlers to test, & that's a good thing to test the hydro with. A day cleaning & reassembly to make it portable tomorrow, & go from there.
-
2 pointsnice save
-
2 pointsThe Lawn Ranger was listed as Cecil Pond’s “favorite tractor” in Michael Martino’s book on the Wheel Horse legacy Cecil help create!
-
2 pointsNice job on the hood.
-
2 pointsGreat work!!
-
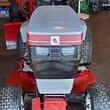
2 pointsWell I assembled everything I could today. Got the engine all gone through. Put new valves and gaskets, tapped exhaust, re surfaced the head and so on. Cleared the patina of the engine as well. Waiting on the new front tires and then the rims and seat will then be repainted antique white.
-
2 points"Shaping Foam for seat" Electric carving knife works good too, (Notice picture of custom truck I built long time ago) (Especially the knife your family would use for Thanksgiving carving) I went 3 years without telling anybody. I'd just sit and think about it when we were having turkey... until I finally dropped the knife once into gear oil by mistake, then I had to come clean...still have the knife... Your honey is AWESOME..... Thanks for the electric schematic also. Progress is looking great, That much snow looks scary... Keep posting Eric!! Chris


This leaderboard is set to New York/GMT-04:00