
Leaderboard


Popular Content
Showing content with the highest reputation on 01/29/2018 in Posts
-
9 pointsBooked my hotel tonight for this years show! Missed the 2017 show because of my 25th wedding anniversary so I'm being pro-active and getting all my plans locked in for the 2018 show. Already told the boss (and my wife!!) that I need the time off. Just need the next 5 months to whiz by!!
-
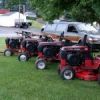
6 pointsSearched for months but never could find a factory set of LR 18" turf rear tires. Had a set of ATV tires so I mounted them. Actually not a bad look. No worry about traction........still stock and will stay that way.....just need the WH badged 18" rear tires.
-
6 pointsIt depends entirely upon the PA laws. With our move from Florida back here to Indiana I had a mess with my trailer. The VIN on it was just a decal and it had come off. Fortunately I had taken a picture of it and had all the correct paperwork, including the bill of sale. I kept it in the truck in case I needed it. When I tried to get it registered here the folks at the DMV had no clue what to do because the VIN was no longer on the trailer and the manufacturer was out of business so a duplicate couldn't be had. I sat there for over two hours as they poured through the regulations and made calls. Finally they said I had to apply for a new VIN and that was a complicated process. Thinking I had no other choice I started the process. Pictures, forms, paperwork, call the county sheriff out to look at it, etc. I finally caught a break when the sheriff came out. I explained everything to him and showed him the documentation I had. After going through everything he chuckled and said that i gave the idiots at the DMV too much information. he said I should have given them nothing and said it was homemade. Then he had a better idea. He filled out his form using my current VIN and said to just start over with them and not to give them any more information. Just my Florida registration and the form he just filled out. He said it was stupid to have to apply for a new VIN when I already had one. It worked like a champ. In and out in 10 minutes with new plate for my trailer. Moral of the story......homemade trailer.
-
5 pointsJust about 3 weeks ago got a call that dad had been in an accident and was in the hospital, seemed he blacked out/ had a mini stroke or something and ran off the road and hit an electric pole. He was supposed to be on oxygen but for whatever reason would not do it just like he wouldn't wear a seat belt. He broke 5 ribs and with his COPD was having a hard time breathing. seemed to be doing better Wednesday night when I got to the hospital, but Wednesday night about midnight the hospital called my brother and wanted to put him on the vent. my brother made the decision to put him on the vent. I knew with my experience with my daughter when she was born and had to be on a vent, that you can only be on it for so long. Me and my 2 brothers decide we didn't want to keep him around if he didn't have any quality of life left. So we made the decision to take him off the vent instead of doing a trake and letting him just lay there. He has really missed mom since she passed away a little over 3 years ago, they had been married for 58 years when she passed. So Friday we took him off the vent and he passed away about an hour and a half later with his boys around him peacefully in his sleep. Dad is the reason I'm into wheel horses in the first place. He bought the first 112 AUTO wheel horse in 73 and shortly there after bought the D200 that I still have. In 86 or 87 he traded the 12 AUTO in on a 417-8 with electric lift, witch I still have also. The other year I found a one owner 73 12 AUTO and added it to my collection Two years ago he gave me his prized 1993 Dodge W250 that i use to pull my trailer to the shows I will miss him very much. he was a good man. god bless you James Edward Johnson or as his family knew him ED and his work buddies knew as Jim. he is in a better place now and back with mom, probably vacationing in sunny Florida. while he liked the snow in his early years he was tired of the cold and snow as he grew older and bought a camper to go south as a snowbird in the winter. Being a professional truck driver all my life also made him tired of winter too. I want to thank @Big_Red_Fred for trying to start this thread but apparently somebody mistook me for another Eric on here. it's all good life is too short to get mad at someone over a simple mistake eric j p.s. he had turned 81 Dec 6th
-
5 pointsI will be celebrating my wife's birthday at the Big Show; She will be celebrating at home!
-
5 pointsNot much exciting to report. I took advantage of the near 40 degree day on Sat. and sandblasted all of my large parts. I did get another "sandblaster surprise" on the hood. Classic example of what will happen sooner or later when two pieces of metal are sandwiched together. A couple pics of the repair. I will have to do some filler work to clean it up, but at least it's solid again. I decided to freshen up my plow along with this project, the warm weather allowed me to spray some satin black on some of those parts.
-
5 pointsI went out today & bought a Nice Camera, i will post many picks of the equipment to share with all square members, maybe even buy some parts if available ? Have Roadapples pose with them hahaha
-
4 pointsHave an extra drink at happy hour tonite, WC would be 138 years old today. I have a poster on my workshop door of him and a quote "I note the derogatory comments regarding my use of alcoholic stimulants and lavish life style...it is the penalty of greatness" My 30 something neighbor saw it and asked who WC Fields was My other fave "I never go out on New Years Eve...the bars and grills are filled with rank amateurs"
-
4 pointsWhat the ones in the background ...
-
4 pointsOnce, during Prohibition, I was forced to live for days on nothing but food and water. W. C. Fields
-
4 pointsIf you are not tearing the engine down completely then I would just clean it up good with a wire wheel on a drill and a wire brush. After you get as clean as you can with the wire wheel, spray it down with brake cleaner and blow it off with a blow gun to remove any oil residue. I repeat this process multiple times. If you are tearing the engine down completely, then I would degrease the block and sand blast it. After blasting, clean, clean, clean, no sand left behind. With this process I paint every thing before assembly. I usually clean all of my cylinder heads up by blasting them with a glass bead media.
-
4 pointsA little more seat time today. Still no snow.
-
4 pointsOr forget the title, license, inspection, plates, and the BS. Just put one of these on, use the back roads, and save a couple hundred bucks
-
4 points@ebinmaine Here is a read on your throttle repair. Short, Flat Bronze Throttle Shaft Bushing for all Carter/Kohler #26, #28, #30 and early Walbro WHG #52, #60, #64 carburetors with a counterbore that's used on Kohler K-series and early Magnum engine models K241/M10, K301/M12, K330/K331, K321/M14, K341/M16, K361 and KT17, KT17 Series II, KT19, KT19 Series II, MV16, M18, MV18, M20, MV20. All Carter and Kohler #26, #28 and #30 carburetors have the counterbore to accept the short, flat bronze throttle shaft bushing. If there's a [worn] rubber seal in the counterbore, this bushing will replace it. Dimensions: 1/4" i.d. x 7/16" o.d. x 1/8" height. NOTE: Apply clean motor oil or clean motor oil, gear oil or lubricating grease on throttle shaft before installing for smooth throttle operation and less wear to shaft, bushing or carburetor body. Go here to learn how to professionally remove Carter/Kohler throttle or choke plate retaining screws without breaking them off. High quality aftermarket. Precision-made in the USA of compressed sintered bronze. Very hard material. $4.50 each, plus shipping & handling. OEM Kohler part # 25 158 02-S. $10.75 each, plus shipping & handling. Installation Service: Install this throttle shaft bushing in your carburetor. $30.00 each for bushing, new screws and labor, plus return shipping & handling. Please contact me if you're interested in this repair service. An innovative concept by Brian Miller, because nobody else advertise this service. Installation Instructions: The above È bushings makes contact with the upper unworn 1/8" portion of the throttle shaft. The original throttle shaft can be reused with the bushing if it isn't severely damaged. To install the bushing, first of all, to avoid breaking off the soft OEM brass throttle plate retaining screws, use a Dremel or equivalent small rotary grinder chucked with either a small grinding stone (chainsaw sharpening stone) or an 1/8" high speed steel end mill to grind away the flared threads at the end of the screws, then the screws can be removed, and then the shaft can be removed from the carburetor body. If the throttle (or choke) plate retaining screws breaks off, they can be successfully drilled out. Clean out the counterbore and depending on size of carburetor, slide the bushing on a 3/16" or 5mm screw (for the Carter #16, #18, #20, #22 carburetors) or a 1/4" or 6mm screw or bolt (for the Carter/Kohler #26, #28, #30 and early Walbro WHG #52, #60, #64 carburetors) and insert the screw or bolt in the counterbore hole (to align the bushing straight with the counterbore) and use small hammer or bench vise to drive- or press-in the bushing, and then reinstall the shaft. Additional Note: Usually the short, flat bronze bushing will snug up a worn throttle shaft. With oil for lubrication and a felt or foam seal to keep out dust and dirt (available below Ê), the bushing and shaft should last a long time. If the bushing fits somewhat loose in the counterbore, lightly tap the sides of the counterbore with a hammer to make the counterbore slightly oblong or egg-shaped. The newer Walbro's and the Chinese-made carburetors have no counterbore for the bushing, and sometimes in these carburetors, the [upper] throttle shaft hole will wear. When this happens, just installing a new shaft won't fix the problem. The upper hole must be precision-bored perfectly aligned with the [unworn] lower hole, and a bronze sleeve bushing will need to be installed along with a new throttle shaft. On other makes of carburetors, if the original shaft is worn and a new throttle shaft isn't available, then a new throttle shaft will need to be machined/fabricated. The throttle lever can be reused and welded to the new machined/fabricated shaft. And if necessary, a slightly oversized throttle shaft can be installed instead of the original diameter shaft. I can do all of these things for $50.00± each for parts and labor, plus return shipping & handling. This is from http://gardentractorpullingtips.com/a1miller.htm
-
4 pointsSome hooked up at night
-
4 pointsThe volt gauge turned out really nice with the fresh paint on the trim ring. Now that we have all of our dash related items prepped and ready, Caleb can put all the pieces on to the dash panel. I investigated the steering wheel a little closer and saw that it indeed has a center cap and so I peeled that out and began to soak the top of the shaft with penetrating oil. I’ll probably do that all week before I try to crack it loose again...
-
3 pointsGood night in the shop tonight although rather abbreviated in between b-ball practice for Caleb and bedtime! Caleb started by removing the two remaining “clip nuts” on the tower rails for the lower dash panel and replacing with new ones. Obviously he installed the necessary four pieces. This thing evidently had some sort of a cab on it at one point. We removed the long bolts out of the tower where the “IC” is above the word “AUTOMATIC” and replaced with the correct length carriage bolts with nylocks on the backside. Once those couple of easy tasks were done, Caleb assembled his dash with the new ignition switch that we got to replace the old one and the voltmeter from Richie. It’s ready to install once the wiring is sorted out... Now for the big project of the night: first I want to thank Sarge for his encouragement to keep at this steering wheel. We worked on it for about 20 min with seemingly no results. I didn’t want to damage the steering wheel or anything else for that matter. We had been soaking it with SeaFoam Deep Creep for several days now. I tried beating on the end of the shaft with a big hammer on a solid brass rod. I tried prying up on the steering wheel with my knees while hitting the center shaft with the brass rod hammer combo—no dice. Caleb was pretty discouraged by this time but I told him that we would get it if we had patience and kept at it. Then I had this idea... I clamped a good Vice Grip to the shaft and placed a 2x4 between it and the tower, grabbed the steering wheel and gave it a turn and it moved We couldn’t believe it! Caleb was stoked and it was a great teaching moment for him. I’m not saying it would work in every application but it worked for us and I’m thankful to be over that hurdle. I need to order a fuel shut off and a grommet next and get back on the wiring. We are getting close to having this thing together...not restored YET but hopefully running and functioning much more like it should be...
-
3 pointsThis is what will be happening for now. for your help! I spent some time sanding the head down last night and tonight. Started with 220 cuz that's what I had handy yesterday....... nope. Not happenin'.... Bought 100 and 150 today and went to work. sanded for a while with the 100 and it just wasn't going like I thought it should so I took a few minutes with the nasty stuff... 60. Went back to 100 then to 150. Pretty happy with the results. I took another look at it tonight and I think it's gonna need to be replaced. The throttle blade is looser than it should be... you're right. I'll pop it off and figure out the right one. Thanks Jeff.
-
3 pointsAs mentioned I have two more. A C-81 that that was given to me by a friend of the family and a Raider 12 that I picked up near the NC SC line. The C-81 runs and drives good but needs major wiring work and the raider came with a rebuilt 14 hp Kohler that broke the cam when the PO tried to start it. I swapped in my trusty HH 100 and it works great.
-
3 pointsSounds nice but at least a 3 1/2 hour drive each way. No trailer or trailer hitch on any vehicle. Wonder if I could tie it to the top of the Volvo wagon ?
-
3 pointsEvery once in awhile I hear of someone using an alternative bait for fishing. Something weird I would have never thought of. An old carburetor has never yet been one of them!
-
3 pointsKnowing you Jim, you’ll have a spot set up in your ice shanty someday where you can fish AND rebuild old carburetors at the same time!
-
3 pointsWe hear ya EB and I would too if I had the dang time to do so! At this stage in my life and with the ease of getting a new one. I throw all my old ones in a box and say when I'm retired and the fish ain't biting I will go through them all rebuild them which probably won't happen either. I recently spent 10 bucks and four hours of my life I'll never get back trying to bring back and old Carter from the dead off a vintage Clinton. Never could get it to run right due to a worn throttle shaft and body. These do not have a replaceable bushing so one must bore and ream and fit a bushing. I just didn't have the time so I replaced.... for now. Food for thought. Nothing wrong with that either!
-
3 pointsIn PA if you want to go the homemade route it will have to be inspected before you can get i licensed Not just any Auto inspection station ether. Has to be a guy certified for trailers....
-
3 pointsHere is a picture of the oil pan we are talking about.
-
3 pointsDo you really expect me to have a positive reply to that question???
-
3 pointsOur local club is planning to visit again so Lord willing I'll be there.
-
3 pointsAll of the above x 2 Prayers
-
3 pointsYeah - looks like the typical problem, water has gotten inside and rusted the heck of out of that joint between the wheel's steel center and the shaft. I've had a couple that were so corroded I had to chip the rusty flakes out of the way to get a decent shot at putting the thrust screw for the pulling tool on center and getting some Kroil to the joint itself. The tools will have one of two different styles of ends on the thrust screw - either a centering point or a flat bearing face to push against the shaft. If the shaft doesn't have a center divot in it - putting one on there with a small drill bit helps to prevent it walking as you increase the pressure against the shaft center. 1/8"-3/16" is plenty and especially a 118* bit versus using a 135* angle. Using a 2-point beam style puller can be a challenge to keep it equal and straight - just takes some trial and error to get it right so it pulls straight and true to the shaft. If it doesn't pull dead straight, the angle will cause a fight and you lose the pulling power quickly - same thing for pulling hubs and it's why a hydraulic press works so much better. Again, a lesson in patience for all...lol. Sarge
-
3 pointsIf you would wish to rebuild your whole tranny, here is a link for a rebuild kit.https://www.wheelhorsepartsandmore.com/transmissions.html#!/Kit-4-with-2-1533-&-2-7202-Bearings/p/85721191/category=23548039 He also has other sets that are a little less complete.
-
3 pointsI have a NOS shift fork # 48 (with pin #49) part # 3503. Also have a complete 10-pinion differential, w/out axles. send an email to me for further info. my email is: daveoman@windstream.net
-
3 pointsTo keep bare metal from flash rusting you need to keep it dry, dry, dry. For me, this is where having a 4 bedroom house with only 2 people living in it and a very understanding wife comes into play. With the exception of the tranny, engine, and gas tank this whole tractor is currently sandblasted and sitting in a spare bedroom in my house. The day after I paint the parts for the tractor I will return them to the house where they will sit & cure for at least a week before I start the assembly process.
-
3 pointsDan, when you’ve blasted the large pieces like that what do you do to protect it from flash rusting until you are ready to paint it? Things are looking good so far—nice to see those plow pieces in the black!
-
3 pointsThanks for the interesting back story on your Raider. It sounds like one of the keys between an axle and hub may have sheared.
-
3 pointscheck underneath the bolts come up from the bottom and thread into the oil pan.
-
3 pointsFrom your decription, you have a C-160. The motor mounts on the right hand side come up from the frame into the oil pan. Check underneath the frame to see if they are there and tight.
-
3 pointsSorry to hear of your loss, you will have fond memories of your dad when driving his /
-
3 pointsVery sorry to read this, he sounded like a great father.
-
3 pointsMy thoughts and condolences are with you Eric. "The other Eric"
-
3 pointsSorry for your loss Eric. Your Dad would be proud of your heartfelt write up and understand the difficult decisions you and your brothers had to make. As painful as it is I truly feel that you three managed to set your feelings aside and do what your Dad wanted you to do. Our prayers are with you all.
-
2 pointsWell, I started in on the project today. Took off the seat cover and foam. I'll need both if someone could direct me to a source? Removed the gas tank, lines, filter for cleaning/ replacement. Took off the shift plate and vacuumed all around in there. I got the engine side cover mostly off... but... how do you remove the fan shield? Tips or tricks? The phillips head screws are not wanting to move, I did spray them with Kroil. Took the cylinder head off so I can replace the gasket and resurface the head.... It looks good to me but more expertise is Always appreciated ! The shift plate is damaged at the ends due to the shifter being WAY out of adjustment for Many years. Hopefully I can adjust or fix the extra play.
-
2 points
-
2 pointsHello...1st off...if your transmission is slipping and that spring is not broke, there is nothing slipping in that rear end. Those pinions are not turning when you are going in a straight line. Only the differential bull gear is turning...the axle and axle gears would be in essence locked. Those pinions only allow one of the axles to turn at a different speed when turning the horse. The kind of slippage you are talking about, almost, has to be wood ruff keys either in one of the axles or the other...your input pulley or your engine pulley. If your axle gears are OK, it, almost, has to be wood ruff keys. Also, there is probably nothing wrong with your differential end plates. The axles are supposed to be very loose in those plates. If that bushing is snug in the #1533 bearing, or plates are just fine. That bushing rides on/in the #1533 ball bearing. That bearing carries the whole differential in that bearing. The axle uses the axle gear on one end and the out axle bearing on the other to hold it in place. Can you give us some pictures to verify what I am telling you...or check out this video...or both. One other thing...your transmission is a #5060. The #5060 had aluminum end plates on the differential. The #5071 came with steel end plates...unless someone has been in there and changed them out since your horse was new...or that is not your original transmission. You might want to check your serial number...you just may have a 1968 Raider. 1968 was 1-6231. Late 1968 and 1969 is 1-6241...(steel plates)
-
2 pointsThe finish line is in sight but a few details are making the home stretch a real challenge. I figured I needed a little kick in the behind, so I thought posting my two 551 Suburbans will get er done. Getting the right belts and making them fit with a rockshaft is one of the details that is now consuming me. I'm considering an idler pulley either fixed or spring loaded on the long belt. It's part of the fun of making my own creation. I corrected the steering arms, and again I must thank wallfish for telling me about the Akerman angle.The Ross steering column is a vast improvement with the only downside being the low clearance. With the extra weight of a snow blade, steering is almost impossible with the Wheel Horse fan gear set-up. Although the little guy pushes snow better than my 100 Cub, this spring will be the end of his snow duties. This is not my last post. When she moves on her own I will detail how I made it with your help.
-
2 pointssounds like a big case of BTDT! I know I have...
-
2 pointsGo to any parts store and tell them you need a solenoid for a 1980 Ford truck. Very heavy duty and will probably be the last one you'll ever buy. Fits perfectly too.
-
2 pointsOne thing about this forum is there’s always time for family talk too !
-
2 points
-
2 pointsI'm always a phone call away Brother, He's doing much better now, better then any of us !
-
2 pointsI've never really felt applying decals was that much of a challenge. Might just be all the experience I've acquired applying the old water slide decals during my scale model building days... that gives me the confidence? I typically only like to use factory originals whenever available...regardless of their age. To my eye, new vinyl, and the modern printing process just can't compare to the originals. I remember taking a chance on Ebay auction, obtaining an over 30 year old NOS factory original T-stripe for the hood of my AMX. Everyone told me there is no way it would ever work, don't waste your money...let me tell you, that thing turned out sooo nice.


.thumb.jpg.affe7d34ead61ae3c7684997c39109d8.jpg)


This leaderboard is set to New York/GMT-04:00