
Leaderboard


Popular Content
Showing content with the highest reputation on 12/02/2017 in Posts
-
17 pointsGot this one through a buddy - it was slated for the scrap pile . Some other really interesting things out there in the middle of nowhere such as a horizontal mill and an old gear driven/flat belt lathe . Pretty good condition little '64 , hood will need some work but everything is there except the lift cable and brake shoe and the air cleaner is buggered badly . Engine moves fine and has compression yet , glad it was stored inside ... Probably won't even get time to mess with it until spring - we have a major weather shift coming early next week and I'm still fighting to get the D working correctly without puking oil , need that to plow/work with around here . Sarge
-
12 pointsTwo years ago I modified my 414-8 to reduction gear steering and swept forward front axle. My plow frame had to have frame extensions added to it in order to be able to angle the plow. The plow extensions meant that there was added leverage on my manual lift. As I am now 79 years old and have arthritic hands the added weight was almost impossible to lift the plow. I measured the dead weight of the plow and it was 113.5 lbs for a 48 inch blade. After spending time thinking about it I decided to try to relieve some of the weight with springs. I found on the McMaster Carr website the following corrosion proof extension spring 94135K92. My plow travel measured at around 3" and I wanted the spring to have some pressure to hold the plow in the up position so I determined that I wanted a spring with a total travel of 5". The above spring has a break out pressure of 11.62lbs and a spring rate of 6.25lbs/inch which means that if I could support the spring just under the frame and suspended from the hood hinge pin I would have an up pressure of almost 18lbs and a pressure up of 36.62 lbs when the plow was down and still have one inch of travel remaining tin the spring. I purchased two of the springs (around $20.00 + ship) and installed them simply as shown in the attached pictures. The 1/2" steel rod I had in my stock and it was 14" long so I found that to be just about perfect. With the mounting method shown the only thing retaining the rod is the pressure of the springs. Note that one of the springs has to go between the angle wire and the frame. The mounting is very quick and easy With the plow in the up position place one spring between the angle operating rod and then feed the 1/2" rod through the lower eyes. Cock the rod so that it fits under the frame and then lever the other end under its side of the frame. plumb up and straighten the rod and adjust the springs so that they do not rub and it is ready to go. I measured the amt of weight the springs relieved and it is more than half. Without springs the weight on the blade was 113.5 lbs. With the springs installed the weight was 48.5 lbs. This was much lighter and it gives the side effect of less wear on the plow actuating linkage. I store the tractor with the plow in the up position so there is less static stretch on the springs. I have no idea how this will last or if operationally it will be successful but initially it is promising. I'll let you know after the first snow if it is working ok. Picture 1:Springs hanging loosely from the hood hinge pin. Picture 2:Shows how the 1/2" rod (14 " long) slips through the springs. Picture 3: Shows how the rod is cocked at an angle and levered underneath the frame ( note the position of one of the springs positioned between the angle actuating rod and the frame. Picture 4: Shows the final installation
-
10 points
-
10 points
-
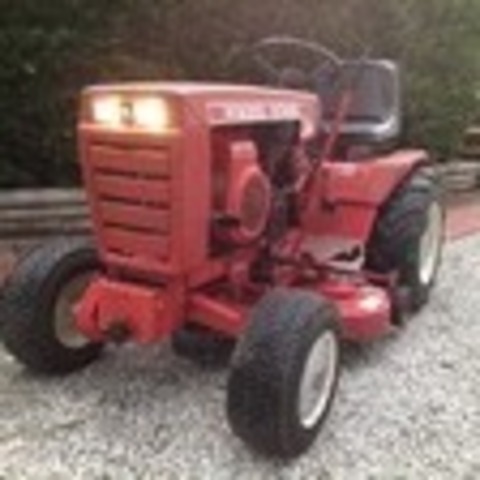
9 pointsPicked this up about a hour away from me today. Put a battery on and gas in and fired up with out even choking it. Needs a lift cable and some very minor things. So over all super happy with it, guy even threw in a old bead breaker for changing tires. The gentlemen I bought it from said his dad bought it brand new and up until a year ago he mowed with it.
-
8 pointsI was able to bolt the sub frame back in place and installed the weight holder this morning. The holes still matched up nicely after all the final welding so I was happy about that. I still may brace the weight holder directly to the sub frame but it is surprisingly stout since the hitch also ties to the sub frame with the rear axle sandwiched in between.
-
7 pointsThat is a well engineered mod. But when we reach level 7 {70-79} we need to go with hydro lifts.
-
6 pointsI hope you enjoy this video I truly enjoy doing this my self. To me it never gets old. A hobby I found that still moves me after all these years.
-
6 pointsThe bar is not attached. I just angle it and lever it underneath the frame and it goes very easily. It is held in place solely by spring pressure which also holds it centered. A couple of test runs I did and it seems to work fine. Only a good session working the plow will tell whether or not there are any problems. Eric
-
6 pointsI do have the ability to make this thread go away
-
4 pointsThanks @Dhodge Dennis for you selling me my first Wheel Horse tractors (RJ and 702) and introducing me to this little forum we call . It truly did make a difference in my life. I learned a lot that night about these tractors (how to hide 50 tractors on a lot in town for one) and yes you did warn me about the addiction that would I surly catch. You’ve always been fair and honest with your prices as you been downsizing your herd . At least now you can put your beautiful little shop to use now (it’s a very cool setup) , even offering out help to fellow Horse-A-Holics keep to their machines running. You’re truly are the definition of what a RS member should be . Thank you ACman
-
4 pointsYa the seat is different then the normal square seat pan. But I'm gonna see what I can do to make a new pad for the back and keep it on there. The shift Plate is really well made and the previous owner said his father built that to help them learn were the gears were. And as far as the bead breaker I been looking for one for awhile. Cause they work great on these old tractor tires. It's made by speedmaster in Oakland California.
-
4 pointsHey, where did you get that pic of Ole Fred and his honey? Reminds me of how I feel after being gone for about 20 hours yesterday! Somehow though, I don't think that's the horse we really wanted to see!
-
4 pointsWe added ours to "the wall of small antique tools" See photo center top of goose 3D pic. It'll have it's own nail soon.
-
4 pointsThose aren't runs, those are "Paint flow indicators"! Randy
-
3 pointsTwo lengths lifts. Easy to make from flatbar.
-
3 pointsNice score !
-
3 pointsReally nice looking well cared for worker. Congrats.
-
3 pointsI like the safety handles on the seat , kind of hard to fall off the tractor . That is a heavy duty bead breaker.
-
3 pointsI have electric lift kit for the 416-8 but got it too late to install before pushing leaves required , o well spring is coming.
-
3 pointsYep Jim, I've been doing my own taxidermy since harvesting my first deer with a bow in 1965. I do have time to relax....I fact I'm sittin in the recliner now Sippin on some shine and talkin to some friends. What could be better ?
-
3 pointsThanks to Guys I got it working .
-
3 pointsThat's right Jim, I gut after skinning. I hang it by the rear for skinning and for gutting. When I open the body for gutting, I start at the neck and work up to the rear end. Everything rolls out into the bottom half of a plastic barrel. Obviously, this process should only be used if it can be completed within several hours of the kill. After the butchering is completed, everything but the meat is returned to the woods and usually is completely consumed by the critters in several days. I have the boned carcass in the field close to the house trying to attract two bald eagles close enough for some photos. They were on it yesterday, but left before I could get the pics. I finished caping out the head yesterday and ordered the form for mounting. This will be my non-tractor winter project.
-
3 pointsYou can also use a short piece of chain instead of the bar. Chain would connect plow lift hole to hole in lift arm.
-
3 pointsYou are missing the small bar that goes between the plow frame and the lift arm. See pics...
-
3 pointsIt is Deere season!! Did you harvest that one Steve??
-
3 pointsLots of study and research. I got the bearings removed and looked up the part numbers in the deck parts manual and went from there. I found a Stens replacement number on RCPW and tracked down some on ebay. I have a digital caliper to measure the thickness, I.D. and O.D. to verify what I'm ordering. I shop around to find the best deals. I ordered some of the larger shaft bearings from Walmart.com too. I also got info from past threads here on RS. The Spindle ID chart is very helpful also, found in the manuals section, once I figured out how to understand it. I've done my homework on this one. It's been fun, interesting and educational working on something new to me. I'm enjoying it. I'm pretty much learning as I go here. I did get one incorrect piece of info from and old thread though. The Harbor Freight pulley remover tool would not work on these pulleys. I found this out after purchasing one and then returning it. The groove on the pulley shaft is too far down on the shaft for the tool to reach. I removed the pulleys with a bearing separator I got from HF and it worked very well. It's the only way I can keep track of stuff. I had to keep the parts separate after I realized the spindles were not all the same. This is a side project I've been working on for about a week and a half now, a little at a time. I work full time and play music on the side so I don't get as much time as I like to! It's an extra deck I'm going to keep for backup and mowing leaves in the fall. I mow regularly with a RD. I like the SD deck to blow leaves in rows and then mulch with the SD deck.
-
3 pointsWhen we had the antique shop, these were good sellers. I saved a couple like this one for my tool box. They make great spring pullers.
-
3 pointsWOW!! This thread somehow managed to hide from me. That is awesome! I'm looking forward to seeing the finished machine.
-
3 pointsI have the pic saved on my google drive!
-
3 pointsHe must have been abducted, obviously being tortured in the photo.
-
2 points
-
2 pointsI recently bought a c161 8 speed manual, came with plow, mower deck weights and chains. I've been itching to use it and because our weather is in purgatory-no grass to cut, no snow to blow- I said eff it and plowed some leaves. After raking them into large piles I plowed them ******* right into the woods. It rated as one of the ten moments of my life. I love this tractor.
-
2 pointsI did my C-81 with a pair of headlights for a common Sears Garden Tractor and it work out great.....! Even used the plastic lens (2 pieces) for the front lens.... cost me zero.....
-
2 pointsPicked up a couple more Subarus this last week, they are 2.2 single overhead cam cars with 5 speeds, got 2 spare complete transmissions and another empty case, so I can play around with adapting the Subaru trans to the buggy some day... or building another car!
-
2 pointsSo now we all know who to blame thank for bringing Jeff to us!
-
2 pointsBoth engines run great. The only problem is neither one came with the complete oil bath air cleaners. Ill probably convert to paper filters.
-
2 points'73 Auto is a great Horse! You'll never regret keeping that Stallion well groomed.
-
2 pointsMaybe idle circuit is clear and high speed jet is dirty? Never worked on Renaults but most carbs do the same thing. A good carb cleaning is always a good place to start. I bought a small Harbor Freight Ultrasonic cleaner and love it. Even when you think you have the carb parts clean with spray and brushes, you put the parts in turn it on and clouds of varnish start clearing off. Presto! Clean carb. *Tip* If you use the ultrasonic cleaner, it’s on a timer. Run it for at least a few cycles. *Even better idea* Buy the Ultrasonic cleaner for your wife for Christmas to clean her jewelry then “borrow” it. 😂😉
-
2 pointswe had that same bead breaker on the farm when I was growing up, I can remember it as far back as the mid 60's and it was old then, worked great.
-
2 points.....Great score Chris and it looks to be all there too in it’s original working clothes . Even has the correct starter/generator belt guard . Make sure to check to see if the dealership is listed or you could add photo to th dealer list . http://www.wheelhorseforum.com/topic/64506-dealer-list/ My only questions to the experts is the metal shifter gate off a different model as I haven’t seen one on a 702 . Also the backrest , is that a aftermarket or off a Massey Ferguson (I think Massey used the same seat pan) or other brand ?
-
2 points@ebinmaine I hope this helps. 612 RPM at the compressor pulley.
-
2 pointsSteve bo has been spotted ! Not sure what's going on 🤔🤔
-
2 pointsWhile looking at your pictures, it reminded me of the "Cruelty to dogs and pet commercials" that we see on TV. It puts tears in your eyes and saddens your heart to see it. This one was lucky, but it makes you wonder how many are not. Nice save Tony.
-
2 pointsJust take it to the car wash (do it yourself) and a few quarters. Use the soap button...you must dry good and wipe oil on the inside of the block when done, but it does a great job fast. Plus...nothing to clean up and get rid of.
-
2 pointsI have an all original compressor very similar to yours I can check the rpm on if that would help you.
-
2 points@roadapples did, but nobody listens to him!
-
2 pointsHello Logan, I also have a 73 12 Automatic, unfortunately for you I'm new at all of this, but if your tractor with the engine running and the brake lever in the down position the tractor should stop when the foot brake is pressed or the transmission forward/reverse lever is in neutral just as 953 nut says. The transmission is actually stopping the tractor. However if your talking about a brake when the park/brake lever is in the up position and the tractor is on a hill then there is a pawl in the transmission that is to engage in a gear to act as a brake or the same as the park gear in a car. If your tractor is like mine that pawl is broken off inside the transmission (at least that's what I think) and I have no parking brake. I've learned for now to park on the level or carry a small wheel chuck! Gary
-
2 points
-
2 pointsJeff, they truly are awesome up there. The red is Rustoleum Red Metallic Speck. $40 shipped off of eBay for 6 cans. Had to hold two of them upside down to get them to spray. Somehow they were defective, but did fine. I really like the color, but you have to clear it or it has almost a purple look from the metallic particles. Looks awesome in the sun after clear!


(800x673).jpg.cc3aefcd170c6bab1f22408014a1eb53.thumb.jpg.37c62115dec7a1fc65b8e86afd6af643.jpg)

.JPG.9f2ecb26065c66527b0730084ab7fc7a.thumb.jpg.7dc8a04d9a53d44ee2b23f26ee94496f.jpg)


.jpg.143ef73c68074a16cedfbe4d7536dc71.thumb.jpg.4896fc9ab6394b781c1c5f6c39deb441.jpg)
.thumb.jpg.810d1c1614331c1b0991654ba10f1bbb.jpg)
This leaderboard is set to New York/GMT-04:00