
Leaderboard


Popular Content
Showing content with the highest reputation on 10/30/2017 in Posts
-
7 pointsThen, a quick polish using Mothers mag&aluminum polish... will keep 'em looking that way for the long term. Here's the before, and afters...
-
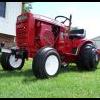
5 pointsAfter an hour of figuring the cab out in the garage I got it all put together and on the 416 and it's very nice, seems to get pretty warm inside as well. Winter will be the true test of that though
-
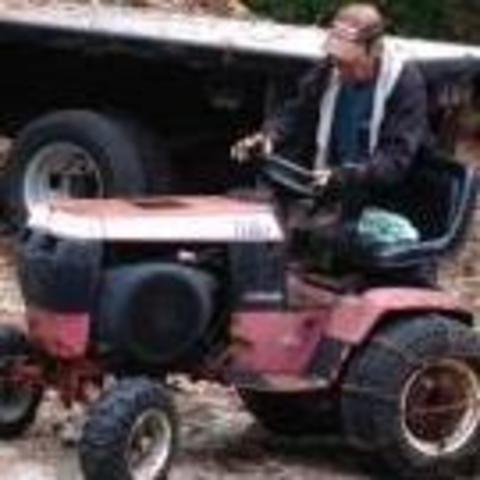
5 points@Terry M and I went for an early morning horse rustle. She's tight and rusty but will stay as original as I can make it.
-
4 pointsI'm in NY between Rochester and Buffalo and I see them listed for a average of about 150-175. But there has been several times i've seen them listed for almost double that. But at the end of the day id say the value is in how bad you need or want them.
-
4 pointsWell, the procedure has been scheduled for November 10th. See you all on the flip side.
-
3 pointsHi ( for those not familiar with the title it translates as 'Here in Sunny Devon') Thought I'd better join being as I've just rescued a wheelhorse complete with rotavator/tiller attached that has been left in a field for the past 5 years!. When I get my head around this forum I'll upload some pics. It's in a bit of a sorry state but looks all there. This is my first Toro but have read that it has a good solid reputation - plus I like to find knackered old agricultural stuff to bring back to life. ( I'll introduce my wife later 😳 We we have a Smallholding near Crediton where we live an organic, self sufficient lifestyle. Being closer to 70 than 60 I really appreciate machinery on the farm. righto, my find is: Toro Wheelhorse 416-8 8 Speed model 73440 serial 3900125 engine Power Plus 16, pressure lubrication obviously I don't have any manuals so would love a dialogue with anyone who can help with this aspect.
-
3 pointsThe market demand/or lack thereof, and seasonal/regional circumstances will determine the value and price. The seller is free to find where those thresholds are established at any given time. Seller perception of value is one thing, selling price reality maybe be entirely different.
-
3 points@JAinVA here are pictures of my $40.00 vice , love the flea market in Blair Co Pa. Don't look at the mess on the workbench. I think the bench is there under the piles.
-
3 pointsUsed to be $1 a pound. Now 125-150 is considered reasonable. Always seems to be one unscrupulous out there trying to get $300 for them. Hope ya haven't run into that guy.
-
3 pointsI guess this would fit into the "Tips & Tricks" section too but I'll post it here . ( Mods can move if they see fit ) Anyone who knows me knows little things drive me up a tree . A Zip - Tie with the end still on it , People not using their turn signal ...etc .. Here's another : Fall is fluid change time for the 4 wheeler and differentials and gearbox refills are especially difficult as a length of tube has to be added for access . With a fresh bottle , there are no problems but with an opened one that's oily , the hose just won't stay on the tapered nipple of the plastic cap !!!!! Here's my solution : Cut the tapered part off leaving a hole . Insert a barbed end fitting ( I think this one is 3/8 NPT ) Screw the summon-a-gun in and PRESTO ! No more hose squeezing off as you squash the bottle !!!
-
3 pointsThe spring in the first photo is for the PTO arm and lever just like mine in the photo
-
3 points1. Yes, the clip is attached to that bolt and nut. 2. The spring (as far as I know) is to keep the arm from rattling. 3. Someone else will have to answer that one as I don't have that model tractor.
-
3 pointsWelcome to the forum. Click on each picture below to take you to the file descriptions. You can also download the files from there. Garry
-
3 pointsC-121 1978 Norway
-
2 pointsA long long time ago there was a thread here about which wheel horse would be on your "wanted hit list". One of them was a GT-14 which thanks to Neil, one came my way.. A great machine which has now moved to pastures new.. The other I'm sure you can guess from the title was a D-200 Nigel bought this machine from Harry with the thought of changing the engine (which had a knock according to the bloke Harry bought it from), to something a bit different.. Then Nigel made the mistake of saying something along the lines of "I expect you will end up owning the D eventually". Which got me thinking A bit of a play with the wiring (The PTO switch had been badly by-passed) and the engine had a spark, and a temporary gravity fed fuel tank sorted out the fuel side of things.. Much to Nigel and my surprise the engine fired right up and sounded good with sign of any knocking sounds! The trans is a bit noisy but that may sort it's self out with a bit of use as the Big D hadn't been used in a very long time.. A few photo's for you.. And of course a video.... I hope to get an engine running and driving vid edited today, but for now here's an intro vid.. The D gets better each time she is driven. The engine always starts first time every time Speaking of the engine, a new vacum fuel pump was fitted so I could get rid of the "tank on a plank" that was clamped on the front and use the D's original tank.. The engine was also missing a cover, so I quickly folded one up from a bit of sheet steel.. Not pretty but does the job. The D's first official duty, carting some steel panels up from the scrap pile
-
2 pointsMy wife bought this for me last Christmas. After finishing a C121 I thought this would be a fun project. Little did I know at the time it would take 11 sometimes extremely frustrating months. This one was truly an education but I had lots of help from the folks here at Red Square, Stevasaurus in particular. My neighbors father who is now 92 came to my rescue when I "couldn't see the forest for the trees" with the ignition. So...... Here she is!
-
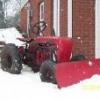
2 pointsHappy SVS I Had My Only 3 Horse’s Out Today A RJ59 A 1968 500 Speical & My 1989 312-8 For My Lawn Care Services & Snow Removel Buisness & Of Couse Dirt Work Also Lol The RJ Will Be Plowing My Driveway In The Winter Times Only
-
2 pointsThank you!!!!
-
2 pointsIt’s not in my opinion unscrupulous to list them for sale for what ever value seller places on them. If it’s too high, then don’t buy. 175.00 is getting to be the average buying them ala Carte in these parts. but if you try and get them in late fall/winter the price will be inflated. i find getting them in a package deal with a tractor I need or one I plan to pull parts for is most cost effective. I agree with @953 nut on cost for 953/1054/GT14 Weights. Usually well into 200plus range. and if that seems high, don’t even look for the C195/Case style 15 inch weights
-
2 pointsAfter I got the wiring done...then came time for new rear tires. I opted to go with Hi-Run 23x10.50-12 ag tires for the rear. Picked them up at Tractor Supply for $89.99 a piece. Here is one of the new tires beside the tractor, and one beside the old rotted original 23x8.50-12 turf tires It turned out to be quite a chore discounting the old tires from the wheels. They were rusted on so badly I ended up having to cut them off. These pictures are from that fun filled afternoon. After all the trouble I went through getting the old ones off I decided to go ahead and have our local tire shop mount the new ones. Charged me $20 for both of them, money well spent in my opinion. I them loaded them with 6.5 gallons of winter blend windshield washer fluid per tire. Did this step myself, started with one of those little inline pumps that runs off a drill. Burnt it up on the first tire, ended up using an old RV water pump I had laying around to finish them. A couple after the first one was on the tractor to compare it with what was on there. And finally with both new tires on. Haven't got to really work her yet but I think I'm going to be really happy with these
-
2 pointsLooks good . Definitely a plus in wet windy weather. I actually have to open the door once in awhile to cool it off. I have a flexible dryer pipe coming off of the cylinder block fins near the exhaust valve area for heat. Kohler 16 model. Nice and toasty. You will like it.
-
2 pointsSame idea as most, but I put my chain block on a 10 foot trolley. Back saver. When I build my new shop I will probably get an electric hoist.
-
2 pointsThis pic should explain the piece your talking about.
-
2 pointsDoes it stall out when it gets hot? Is it getting gas at carb? Thinking maybe starved for fuel? Vent cap plugged on gas tank?
-
2 pointsWelcome to the forum. First thing I would do is try a new pair of spark plugs designed for this engine and properly gap the electrodes. Spark plugs can fire out of the engine but fail when in the engine under compression. Spark plug gap is critical in magneto ignition systems. Too small a gap results in weak spark. Too wide a gap can compromise the insulation on/in the ignition coil because it will release that energy somewhere if it can not fire the plug. If new plugs don't make it run remove them and save for the next time Garry
-
2 pointsThey do make pumps for the qaurt sized bottles Gear oil pump (walmart link)
-
2 pointsAfter looking for a suitable steering wheel on the internet without success, one was made up. Lots of ready made wheels but too large, too small, near enough the correct diameter but with a rim much too thick for scale etc. A local metal fabricator advertised various scroll work items for gates, garden furniture and so on. A visit was made expecting them to have a ring rolling machine. "Never heard of one" was the reply from one staff member. He called another older person, same answer. When I asked how they made the scroll work they advertised, "We don't, we buy it in ready made from China". Chris, Mr Showman, Sutton had previously mentioned that a friend might be able to roll a ring up. Within a few days I had a 7:1/2" ring x 3/8" section. The hub is a previously drilled cap screw with the spokes from flat strip jammed between two nuts after having a bend made at the inner ends. After trimming the spokes to length and clamping down Chris welded all the joints up. Thanks Chris. I keep thinking I ought to buy a welder but it probably wouldn't get much use. Grinding the welds down was easier than expected, especially around the hub, using a Dremel. A slot was cut in the cap screw head for a roll pin which together with a nut held the wheel onto the column. Two short pieces of tube were pressed / hammered over the nuts and all the joints blended in with filler. The last photo shows the pin resting on the head of the cap screw which is the column bush. This still needs a sleeve over it to finish off. Also a cap made for the wheel center. I should have made the spokes with a steeper angle but too late now. My great grandson, pictured above, liked it anyway.
-
2 pointsI bought this years ago on the big auction site - have never seen another one since and seller had it listed as out of the WH factory in South Bend . Unfortunately , old dead fingers dropped it once too often and it's cracked badly . There is a process to weld with special filler rod and the tig , but I don't want to damage the logo on it and keep it original . Sarge
-
2 pointsI asked Terry @Vinylguy if he could reproduce a dealer advertisment from one of my Dealer Binders into a decal, this is what i sent him And this is what he came up with ! Not only did he make the decals like i wanted he made them into his awesome aluminum signs too! Cant wait to hang it up! Again THANKS TERRY!
-
2 pointsSome ideas here... always loved these old classics Terry.
-
2 pointsHere's a fun trick. Take an empty antifreeze jug. Drill a hole in the cap and install a male air hose fitting into it and put a nut on the inside of the cap to keep it together. Connect an air line to the jug and wait for an unsuspecting friend, wife or brother-in -law to come in the shop. Plug the opposite end of the air line in, wait like 10 seconds and then BOOOM!!! For even more fun. Put a quart of water in the jug. Amaze your friends, Loads of laughs.
-
2 pointsI'm working on something for all support members. Time to upgrade your mugs and tumblers. I'll see what I can come up with.
-
2 pointsI suare... I'm due for a new one too Terry.
-
2 pointsJim wishing you the best! My father had a bout w cancer if the bile duct 7 years ago. Duct was removed and intestine tied directly into the liver. Liver had some cerosis, this is all due to having Hepatitis c. About 30 days post op he began collecting fluid on his abdomen. Approx 10 liters were removed every 10-15 days for 4-8 weeks via a shunt. Finally the surgeon recommended a procedure. A line was run from low pressure side of heart to the abdomen. A "primer" was used inline and installed by his hip. He would "prime" just like a small engine 2x a day while lying flat in bed. He pushed the button 10x to prime. Then the fluid would get pulled from abdomen thru heart and give his kidneys a chance to get nutrients from fluid and filter it out via urine. Crazy as it sounds worked! The pump was left in between 30-60 days. Dr said it could've been romeved aroubd 30 days. It gave the liver enough time to heal from surgery and chemo. I really thought my father was going to die. A year later they came w a cure for hepatitis c. $35000 month for 6 months. There were grants in place to cover the costs, we didn't have the $$$$. Today he's hepatitis free. His liver hasn't been this good in 20 years. And he's still here. I hope you're as lucky as my father was!
-
2 pointsI remove all the paint on mine. Gas will remove almost all paint if it gets on it. I would clean off the paint that's on it. I think bare aluminum looks good Just me I guess. Or you can paint it . I have seen them painted and they look fine.
-
2 pointsI would like to send out a big Thank You to @gwest_ca for all of the excellent responses he makes and the great job he does with our Manuals section.
-
1 pointFred , A unit with a FEL would be very nice . When can you deliver ? Thinking about the d-250 they came with a Renault engine ( I had 1957 Renault which was one step below a Yugo ) . Has anyone ever replaced the French engine with a more modern water cooled unit ?
-
1 point@Big_Red_Fred Fred with all your money , I will take a D-250 , I will even let you deliver to my house
-
1 pointI had a 416h that would run good cold then it would start to surge when it got warmed up. It ended up being the float in the carb.
-
1 pointNice find Jim.Now for a rattle can paint job.If I could have found one that good when I was looking for a vise, I would have snapped it up.Junk on the bench makes me feel at home.LOL.Luck,JimAnderson
-
1 pointI think Indiana is far enough away from that guy!
-
1 pointPerhaps you can put it back together. Garry
-
1 pointI have so many tractors it is becoming disease. Having this 8HP and doing anything to it, is not possible with the amount of work I need to do on my good ones I plan to keep. I will keep it whole and prob let it go cheap. I too would hate to see it parted out as it is overall good. I cant do pics on the forum here as even with my lowest camera resolution, each pic is more than 1.94MB. My photobucket account has also been affected to not allow third party hosting. I will need to get a photo compression program to shrink my photos.
-
1 pointdid it run okay after doing all of the work ? or has it developed this problem after doing the work ? What do you call stuttering ? You could try to loosening the gas cap when it does that. You could recheck the valves,but they should haven't moved. Pete typed faster then me. good luck eric j
-
1 pointI would drain the gas,put in all new rubber fuel lines,check the screen on the fuel tank pet cock.Fill with fresh,non-ethanol gas,put in maybe like 12 oz. of seafoam and try it out again.Without seeing the tractor,it sounds like a fuel problem to me.Also make sure the fuel cap vent is operational.
-
1 pointWish you the best and let us know how comes out.
-
1 pointHa! Made ya look! So my new Northern Catalog came in the mail a couple weeks ago and these snow shovels caught my eye. It’s a 5 minute job to assemble and feels pretty sturdy. It’s made to push snow as well as to “dig” it. Hope I don’t need it 🙄 but I’ve been in my house 30 years and have never had a snowless winter.
-
1 pointDear Lord, Craftsmanmowerfreak’s Father has a medical condition that needs your divine intercession. Please guide the surgeon's hands to be steady and effective to do the task at hand, and not create any further damage We pray against any infection or complications. Calm the heart of his family. Give him your peace so his body can heal under the best conditions. In the name of Jesus, bless him to be healthier after this procedure than before. Lord allow this temporary trial to bring this family closer to you and each other. When he is coming out of surgery, let the side effects be minimal. Work a miracle in this whole situation and bless it from beginning to end. Thank you Lord for your blessing on this family. We praise you as we know we are in good hands- the very hands of God. In Jesus name, we thank you for each day. Amen.
-
1 pointSun. January 5 in central Il. ...its a cool -9 on my temp. gauge. Expected to get to -20 by to night. snow started at 9pm. sat. and has not stoped yet, wind started about 12am. So far we have about 6 to 8 inches but hard to judge with it all blowing? Just finished getting my 414 ready for winter,put chains and wheel weights on this am. New muffler and first start in 6 to 8 years... fired right up these tractors are amazing! heres some pic I took a few mins.ago ...
-
1 pointis this kriminail as in acdc its kriminail there ought too be a law teeth are for weed eatin


This leaderboard is set to New York/GMT-04:00