
Leaderboard


Popular Content
Showing content with the highest reputation on 10/29/2017 in Posts
-
13 points@Terry M and I went for an early morning horse rustle. She's tight and rusty but will stay as original as I can make it.
-
11 pointsHappy SVS I Had My Only 3 Horse’s Out Today A RJ59 A 1968 500 Speical & My 1989 312-8 For My Lawn Care Services & Snow Removel Buisness & Of Couse Dirt Work Also Lol The RJ Will Be Plowing My Driveway In The Winter Times Only
-
9 pointsI guess this would fit into the "Tips & Tricks" section too but I'll post it here . ( Mods can move if they see fit ) Anyone who knows me knows little things drive me up a tree . A Zip - Tie with the end still on it , People not using their turn signal ...etc .. Here's another : Fall is fluid change time for the 4 wheeler and differentials and gearbox refills are especially difficult as a length of tube has to be added for access . With a fresh bottle , there are no problems but with an opened one that's oily , the hose just won't stay on the tapered nipple of the plastic cap !!!!! Here's my solution : Cut the tapered part off leaving a hole . Insert a barbed end fitting ( I think this one is 3/8 NPT ) Screw the summon-a-gun in and PRESTO ! No more hose squeezing off as you squash the bottle !!!
-
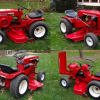
6 pointsToday my two diesel tractors finished this year's mowing season. With leaves covering the ground, I needed to fertilize for the last time this year. A portion of my front lawn was torn up a few weeks ago due to having an underground fuel tank removed. Because of where the tank was buried, the contractor's two trucks and backhoe made two routes to the tank's location. A lot of the lawn needed to be reseeded. I added 10 yards of topsoil to help the new grass along. Of course, we had 22 days without rain so I needed to sprinkle every day! Using "Paladin", my 523Dxi, I first mulched the leaves so that the fertilizer would be applied to the ground and not the leaves. It is nice having power steering as I ran wide circles amongst my trees so that I wouldn't tear up the new grass. Then it was my DC-105's, "Dillon", turn to pull my broadcast spreader. Some nice seat time! Now to get the 523Dxi ready for winter. Of course, I was supervised the whole time.
-
6 pointsEarly morning rustle with @Terry M while @WHX12sleeps
-
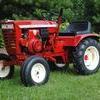
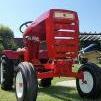
5 pointsA long long time ago there was a thread here about which wheel horse would be on your "wanted hit list". One of them was a GT-14 which thanks to Neil, one came my way.. A great machine which has now moved to pastures new.. The other I'm sure you can guess from the title was a D-200 Nigel bought this machine from Harry with the thought of changing the engine (which had a knock according to the bloke Harry bought it from), to something a bit different.. Then Nigel made the mistake of saying something along the lines of "I expect you will end up owning the D eventually". Which got me thinking A bit of a play with the wiring (The PTO switch had been badly by-passed) and the engine had a spark, and a temporary gravity fed fuel tank sorted out the fuel side of things.. Much to Nigel and my surprise the engine fired right up and sounded good with sign of any knocking sounds! The trans is a bit noisy but that may sort it's self out with a bit of use as the Big D hadn't been used in a very long time.. A few photo's for you.. And of course a video.... I hope to get an engine running and driving vid edited today, but for now here's an intro vid.. The D gets better each time she is driven. The engine always starts first time every time Speaking of the engine, a new vacum fuel pump was fitted so I could get rid of the "tank on a plank" that was clamped on the front and use the D's original tank.. The engine was also missing a cover, so I quickly folded one up from a bit of sheet steel.. Not pretty but does the job. The D's first official duty, carting some steel panels up from the scrap pile
-
5 pointsWeld a nut on the end of the stud...
-
5 pointsFinally got it finished except installing the plate light . Way too many large projects this summer..... Need to take it to the car wash and clean off the overspray on some of the wood decking - I re-used the original stuff as it was in pretty good shape for being 7yrs old already . We'll see over time how well the Rustoleum with hardener added will hold up - probably should have went one more solid coat on it but hey , it's a trailer and not a show car . Sarge
-
4 pointsTo get more plow lift on my 312 H, I removed the 6 " wheels and installed 8" leaving the long spindles in place. This raised the front axle almost 2". I also made an anti-sway/lift stop that stops the blade just before it hits the front axle. I also use this to limit the low position for plowing the stone road. With this arrangement, I get 7" lift. Jeff is correct, the front axle limits the max plow height. Sarge is also correct, by lowering the rear of the frame, the plow will lift higher, but only by 1/2 the amount you lower the rear.
-
4 pointsAfter looking for a suitable steering wheel on the internet without success, one was made up. Lots of ready made wheels but too large, too small, near enough the correct diameter but with a rim much too thick for scale etc. A local metal fabricator advertised various scroll work items for gates, garden furniture and so on. A visit was made expecting them to have a ring rolling machine. "Never heard of one" was the reply from one staff member. He called another older person, same answer. When I asked how they made the scroll work they advertised, "We don't, we buy it in ready made from China". Chris, Mr Showman, Sutton had previously mentioned that a friend might be able to roll a ring up. Within a few days I had a 7:1/2" ring x 3/8" section. The hub is a previously drilled cap screw with the spokes from flat strip jammed between two nuts after having a bend made at the inner ends. After trimming the spokes to length and clamping down Chris welded all the joints up. Thanks Chris. I keep thinking I ought to buy a welder but it probably wouldn't get much use. Grinding the welds down was easier than expected, especially around the hub, using a Dremel. A slot was cut in the cap screw head for a roll pin which together with a nut held the wheel onto the column. Two short pieces of tube were pressed / hammered over the nuts and all the joints blended in with filler. The last photo shows the pin resting on the head of the cap screw which is the column bush. This still needs a sleeve over it to finish off. Also a cap made for the wheel center. I should have made the spokes with a steeper angle but too late now. My great grandson, pictured above, liked it anyway.
-
4 pointsDebbie Downer
-
4 pointsHere's a fun trick. Take an empty antifreeze jug. Drill a hole in the cap and install a male air hose fitting into it and put a nut on the inside of the cap to keep it together. Connect an air line to the jug and wait for an unsuspecting friend, wife or brother-in -law to come in the shop. Plug the opposite end of the air line in, wait like 10 seconds and then BOOOM!!! For even more fun. Put a quart of water in the jug. Amaze your friends, Loads of laughs.
-
4 pointsIf the choke works backwards so what. Put a sticker on the dash board up/out becomes run in/down choke. I have at least 3 that work backwards. Two i labeled...on the third it functions as an anti theft device as she won't start if you use the normal settings
-
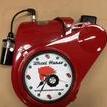
4 pointsDecided it was time to update my Wheel Horse Coffee Mug. Now I'm ready for the long winter.
-
4 pointsI use carb cleaner to remove all the paint.
-
3 pointsWell, after thinking it over, and a drive around the yard on the Cub, I made the smart decision. The AG tires are off the Cub and on the Wheel Horse, and the plow is where it belongs. All dressed for winter.
-
3 pointsGot the top tranny plate made and welded into the rear main support. Still have to trim off the excess at the rear of the plate. Should be nice and strong now.
-
3 pointsYou can also eliminate all those parts that push the pto bell out if you replace the outer pto shaft in the outer bearing to a newer design that used 2 snap rings - one each side of the bearing. Then the pto lever and rod will pull the pto out. Pto shaft item 33 2 snap rings item 34 If you do this just cut the broken stud off flush. http://www.partstree.com/parts/toro/mowers-lawn-garden-tractor/31-12k801-312-8-toro-312-8-garden-tractor-1990/pto-clutch-and-control/ Garry
-
3 pointsWhen I happen to open Facebook I often see these posts with useful hacks. Maybe someone should start a thread called Helpful Wheel Horse and shop hacks.
-
3 pointsYeah, it's all fun & games... until someone gets their eyes put out.
-
3 pointsWe had a 5' x10' utility room where I used to work. In it were a big honkin air compressor and a brake lathe. Also some assorted junk. Not much room. I was turning a brake rotor and unbeknownst to me under the lathe was an antifreeze jug half full of water with an air line plugged in. I'm making the final smooth cut and getting the cutters dialed in and the rascals plugged the other end of the line in. The compressor was running so I can't hear anything unusual. Then BOOM ,SPLASH! Water and brake lathe shavings all over me and my ears are playing "God Save the Queen! Sorry to derail and hijack this great idea on this thread but seeing that nipple in that bottle brought back many fond memories of hi-jinx in the shop!
-
3 pointsShe's a cheddar country pick.
-
3 pointsWho ever imagined the role a Wheel Horse can have in shaping the next generation. The grandkids love these machines! So much healthier than their new technology toys.
-
3 pointsYou drop a stripped carb into Berryman's and fer sure you're gonna lose the paint. Just my 02 but I personally do not care if the the carb is original or in red as long as it carburats! Alway thought it would be cool to have a polished & highly detailed one on a trailer queen. BTW those are fine lookin motors Jack & Ed...
-
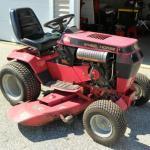
3 pointsI am very new to finding old tractors so I am not 100% sure if I got a deal or not. Today at an estate sale I was able to pick up a Work Horse GT-1100 for $65. It needs a lot of clean up, and as of right now I am not 100% sure of the working condition. It did come with the snow thrower attachment, and even though it isn't pictured, I also got the mowing deck as well. Not sure what these are worth, but any info would be much appreciated! I have attached some photo in its current condition. Thanks!
-
3 pointsDon't think a chain saw would help much in mounting a loader. You could mount a loader on any garden tractor if the proper sub frame for it was attached to your frame. Here are a couple of pictures of one. If you do a search on here for Front End Loader installation there are lots of threads done by folks who have done it.
-
3 pointsGreat Deal. The chains and weights are worth 65 to the right person. If you can't get it to work, you should be able to part it out and more than recover your money.
-
3 pointsI Well, after sleeping for 3 hours after getting back from an overnight camp out with a couple of other dads and their son, I finally got a little more done on Emory's tractor. I managed to clean the dash tower and frame rails, knock a few dents out of the hood to mount and adjust it, and reassemble the sheet metal for a dry fit. I also cleaned the engine a little and ordered a set of custom decals from @Vinylguy. Emory asked if he could sand "my" tierods and of course I said yes!
-
3 pointsC-121 1978 Norway
-
3 pointsStevebo's manual, and electric start '56 Ride-Away Seniors.
-
2 pointsLooks like the wheels are scrap anyways... I had the frame blasted and then I managed to get some priming and painting done.
-
2 pointsUmm...Mike... I don't recall you... ever using a knife when cutting your "cheese".
-
2 pointsHappy to help, you have to know the right people,
-
2 pointsIf the ignition module in either one works they are worth well over $100 each. I did find one test other than cranking and seeing if there is spark.
-
2 pointsTom—did this one come from Cheddar Land or was it local? With the sleeping comment, want sure if you came over here to rustle and head home under the cover of darkness... NICE SCORE!
-
2 pointsSounds like the relay isn't relaying or the grounding wire became unhooked. Look fro a wire from under the f;ywheel hanging in mid-air.
-
2 pointsWith the B&S powered models the ignition is self-powered and the ignition wire is simply grounded to the chassis or battery (-) to shut it OFF. Normally the ignition switch is a magneto type to accomplish this. The B&S tractors at the time used a different battery style of ignition switch and the I terminal that normally powers a battery style of ignition is used to power a relay. Key ON the relay contacts open and allow the B&S to run. Power OFF the relay grounds the ignition wire shutting the engine OFF. Your wiring should be similar to this Garry
-
2 pointsI'm working on something for all support members. Time to upgrade your mugs and tumblers. I'll see what I can come up with.
-
2 pointsOver the years there have been some very obscure recalls involving brake/fuel lines on many vehicles - but they are not easy to find nor easy to find a dealer willing to tackle the work . GM should have been forced to replace all those low-nickel lines back in the day - including the nicely engineered steering hard lines that ran under the engine which require removing the lower cradle assembly , what a joke . All of the Big 3 as well as Toyota have had their share of line rust far too fast and easily - but they got away with it mostly unscathed . Using stainless is not a perfect scenario either - it can get brittle over time from vibration and start cracking and it is no fun to work with when trying to bend it even a little . That Ni-Cop is worth every penny - I bet I've used up at least 10 rolls in 3/16" size alone since it's release . Best line to bend tightly in small spaces where there is a lack of clearance - such as the old Land Cruiser's dual rear wheel cylinders and the link line that runs between the two cylinders on the rear backing plate . There is almost no clearance between the spring u-bolt plate and the backing plate to the brakes - those bends have to be bent very tightly to make it fit with no flattening of the line . Both cylinders need equal volume or the rear brakes are useless on that truck . Same thing up front on the 4-piston caliper - it is a very complicated bend in the hard line between the rubber flex line's mount and the caliper head itself and that one is a really odd shape to clear the birfield joint ball on the axle . Most overbuilt brake system I've ever seen for something that only weighs around 3,500lbs stock . Sarge
-
2 pointsYou got a good deal! If you're the slightest bit handy with engines mechanical things, or a just a good learner, you'll find your new Horse to be remarkably simple and straightforward to work on. Only thing to watch out for is that, like all 90s-era garden and lawn tractors, there's the extra safety switches and their wiring. A good scrubbing ought to help get the crud off so you can find the gem underneath.
-
2 pointsI agree with that Steve You told me that a while back when I had the 606/607 and the 657 I started them a few times a week made a difference. The 606 and7. where 1or2 pulls with new key ways and Timing was dead on. Bttatro It is raining today so a good day to help you out.
-
2 pointsThe original 7434 has been replaced by 112436 and is 3-1/4" OD. It is flat so the wide back side of the belt is what runs on the flat pulley. http://www.partstree.com/parts/toro/parts/112426/ Garry
-
2 pointsYes, you got a good deal. Clean it up, get it running, and have fun! Welcome to Wheel Horse Country.
-
2 pointsI also like the Aluminum look. I clean mine with brake cleaner and polish with SOS pad. Then rinse real well in HOT water and then Acetone.
-
2 pointsI have used a couple of them and am very satisfied. Be sure the choke lever matches your application, some pull up and some pull down.
-
2 pointsWith a welder and talent, anything's possible.
-
2 pointsOldarmy's 1977 B80 8 speed
-
2 pointsJust thought I'd pop on my '79 C-81 fitted with '62 finger bar.
-
2 pointsHave been prodded by Craig and Bryce to enter, here goes. My great grandson having seat time on my half size D - 160. 7=1/2 months old and he loves being in the workshop.
-
2 pointsMy 1964 lawn ranger that I have had since I was a kid pulling a wheel horse tandem disc


This leaderboard is set to New York/GMT-04:00