
Leaderboard


Popular Content
Showing content with the highest reputation on 11/21/2016 in Posts
-
11 pointsPicked up this nice 4 wheel wagon on Saturday. 2nd trip to Wisconsin in a week. Pretty stoked to add this to my collection .
-
9 pointsAnyone remember these? For sale on ebay for $499. I must have destroyed $10,000 dollars worth of these when I turned them into ash trays by tapping the top of the cone with a ball peen hammer till the cone was inverted down into the can.
-
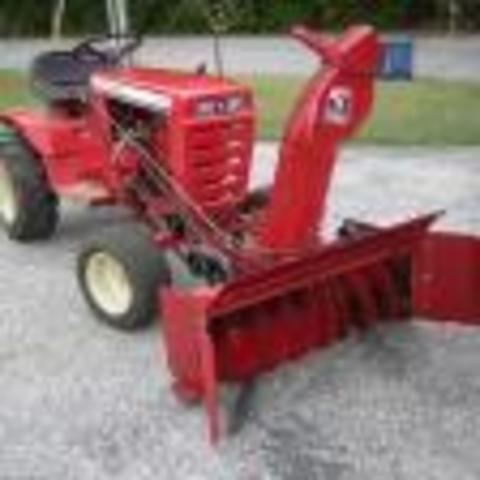
8 pointsFound a parts blower for short money to convert my short chute that I reconditioned last year into a tall chute. Very easy to change over. I ordered a new chute gear ring and retainers as there was too much play in the chute to rotate smoothly. Also got a set of wheel weights with the deal, 50# a piece.
-
7 pointsI was finally able to talk my wife into a wood stove a few yrs. ago. I'm all about not having to rely on the man to keep my family warm.. My dogs and the cat really enjoy it as well. I get and split all of my wood myself. This is something you really need to enjoy or you will hate a wood stove. (you could call the man for wood, not me) its all part of having and enjoying a wood stove for me. It brings back great memories of fetching and splitting wood when I was a kid with my Dad with our 64 Ford F-100.
-
5 points*update* I allowed the member number to be seen by all, so you know what your member number is.
-
4 pointsI'm asking for help to identify what year and model this tractor is. 1978? C-121? Any guesstimates on its dollar value would be appreciated as well. It has recently been given a lot of TLC and is in perfect running condition.... although it leaves a little to be desired in appearance at the moment. Appreciate your input.
-
4 pointsWe are needing some advice! We have a model 104107 and do not know the year. From what I have found, it's early 70's, I think. We've been doing a lot of work on it (decals, paint, new battery-starter-fuel pump-3pc set of blades). The muffler is almost new. It's a beauty! We also have 2 look-like-new attachments: snow plow and grader. Ok....so that is what we have.....and it's all set to go to someone who will appreciate the power and the awesomeness of this machine. We want to get this listed (Locally? Across the States? Ideas?) and sold before the snow flies here in Iowa. So I'm asking for knowledge on what year this is, what y feel the complete package should sell for, and suggestions on placing an ad. I have more photos, if needed. Thanks much!!!
-
4 pointsGrowing up we had a bit larger unit that shelled and cracker the corn, it was powered by a goat on treadmill. I wish I had a picture of that operation, Every Saturday that was one of my chores; gather corn from the bin, get the goat in place and convince her she was going to get those carrots. Life was good!
-
3 pointsToday while reading through the threads that I'm following to gain knowledge for future use I seen a picture in Lagersolt's snow blower auger bearing replace thread. And since I have been meaning to post this idea I have used since entering the work force I seen it as perfect time to pass it on. This setup makes it easy for me to find tools and also when putting tools back after working on a project a open slot keys me in to a tool I over looked while picking them up. I take wire trough cutting it to the length I need to hold the number of tools I want to organize. I then cut it to heigth needed to clear when closing drawers. Once those 2 steps are done I widen the slots that wires went though to fit the tools I've chosen. I split the trough for use with wrenches and used scrap for boxing in the side cutters and snap ring pliers. Though the years I have learned that once these steps are done it is best to set the tools up and position the whole setup were you plan to mount it. I originally used 2 sided tape this is okay but may need to be repaired if glue drys out. I now drill a hole in each end and pop rivet them from under side so rivets don't interfere with anything below the drawer. Some times the length will dictate the addition of a second or third rivet for stability. I spent majority of my career in industrial settings allowing me access to used wire trough for free so I can't say what it would cost to buy a length of it.
-
3 pointsSome of you wanted to see a short Video of this Muffler here you go. HDV_0002.MP4 HDV_0002.MP4
-
3 pointsMy young co-worker and friend brought in some more pieces for the BIG TEN today that he rounded up in his barn this weekend. The 42" mower deck is nice and solid. The magic penetrating oil solution of ATF/ Nexgen metal and mold cleaner already has rusted parts freed up.
-
3 pointsNot only "for sale" on ebay, but SOLD today for $499. Anyone from Pennsylvania knows Rolling Rock, but I can't believe that someone is crazy enough to spend that much on a can of beer that's probably skunky tasting. Reminds me of the wine collector who spend $5000 on a bottle of wine that he opened and it had turned to vinegar. Some people have more dollars than sense. But then I can't believe that someone on ebay is asking $110 for a WH generator belt guard, when I bought two of them at the WH show for $20 each. Jim
-
3 pointsAlive and well since 1939 in Latrobe, Pa. Jay
-
3 pointsWe use to have a John Deere when I was a kid we used to shell and make crack corn for the chickens . Got knocked over and shattered the cast iron housing .
-
3 pointsYes, most likely. Many mid to late 60's tractors had cig lighters. Our 875, GT-14 and Gilson S-14 all have factory cig lighters.....that still work!
-
2 pointsI'm not getting any younger and everything I work on gets heavier.... picked this up the other week for £30 ($33) and with some recycling of an old bike rack brought back from the US that was built like a tank. I've got this A handy crane with a 4ft boom that swings inside the workshop (the axle is for my 3rd 4x4 I'm designing)
-
2 pointsOn the dash of my 875 wheel a matic i have an empty hole to the left of the steering wheel. Was that for a cigarette lighter?
-
2 pointsI am not a serious collector (or a marketing expert), but I follow the CL listings in Missouri, Iowa, Nebraska, and Kansas. That is a really nice setup, and I am curious about how much you want to ask. I see similar setups listed in the 1200-1500 range, and I think they look reasonably priced. I have also seen a very nice restored Wheel Horse with lots of attachments listed for over 2k, but the seller has been walking the price down over time. In my opinion, I don't think your market is collectors. Your market is the guy getting ready to drop $1800 on a box store riding mower without attachments. You just need to persuade him how much more awesome it would be to own this! I would consider putting it on a trailer with a for sale sign and showing it off.
-
2 pointsIn the old days it was steam, but the high pressure was dangerous. So in the interest of safety, now we use low pressure smoke. 😂 And if you will buy that..... Mark.
-
2 pointsNo problem! Can you please explain why they build electronic stuff with that magic smoke? Every time it gets out, nothing works again!
-
2 pointsThe solenoid has no bearing on the ignition other than to activate the starter.
-
2 pointsWith a double acting cylinder, the difference in fluid volume to the reservoir is the same volume as the rod since fluid flows out as fluid flows in. The rod takes up space in only one side of the cylinder when retracted. The change in fluid level from fully retracted to fully extended for that rod is about 3.5 fluid oz. Volume of 1" rod x 8" long = 6.28 cu inches--6.28 cu inches converts to about 3.5 fluid oz. There are plenty of online calculators to confirm this. So not much change to the fluid level. Make sense? Much different for a single acting cylinder. It's the total volume of the cylinder and not the rod
-
2 pointsAnd further more. don't care!
-
2 pointsWho cared.
-
2 pointsNever watched it and still don`t know who shot him...
-
2 pointsJust dug this corn sheller out. Goes to show how far things have come. 20161025_184740.mp4
-
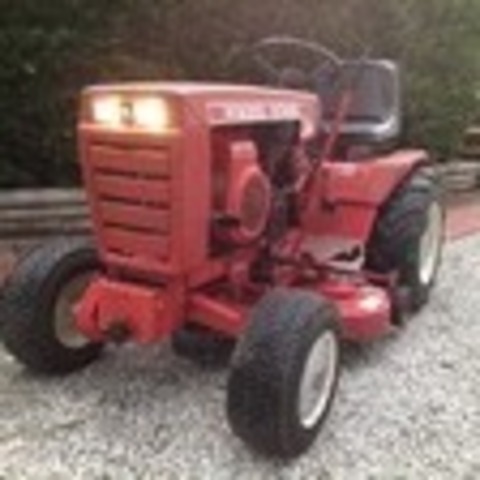
2 pointsAnother pictures of my 1054
-
2 points1964 Wheel Horse 1054
-
2 pointsOne VERY important thing to know before disassembling a starter, starters REQUIRE sufficient amperage to operate properly. Poor battery connections, poor solenoid connections, poor starter connections all reduce the amperage fed to the starter. I recommend all the above be checked with an OHM meter BEFORE taking a starter apart. Cleaning and lubing a starter is relatively simple, but why waste time when that is not what was needed? If you don't own an OHM meter, get one and learn how to use it. It will become one of your best friends when troubleshooting electrical problems.
-
2 pointsShynon Nice wagon. Around here these go for up $400.0 if that condition. They are handy but not for that price. Enjoy it looks like it will haul just anything want with it. Made very well.
-
2 pointsThat's a Nice one , Tom
-
2 pointsI like this thread. Unfortunatly..I don't have a picture handy. We live in a ranch, and have a fireplace insert in our living room. It's a Pacific Energy Vista stove. Take 18" logs. In the ceiling above it, I ran three 12inch pipes back to the supply side of our central air unit. (I put in blockers for the normal supply setup during the winter). Heats the house pretty evely. I'll try to get some pics for tomorrow.
-
2 pointsThere are many manufacturers of this muffler. I have seen high quality and I have seen junk. The higher priced ones "usually " are heavier /made out of thicker metal. Some are nothing more than tin cans. Even the Primeline Brand (which Napa sells) isn't what it used to be.
-
2 pointsI'm new to red square. Been reading forums from here for years off and on when I had a question and I usually always found it. I have two wheelhorse's one is a 1978 c141 and the other is a 1995 416-8 that my dad bought new. I still have the owner manual and bill of sale for the 416-8. As well as the service manual. I just bought a used snow cab for it. Can't wait for snow now.
-
2 pointsIt is a plastic channel used in industry to contain wiring. the slotted sides allow wires to enter and exit at any location along the length of the "trough. It has a removable snap on cover
-
2 points56-57-58-59-60 RJs
-
2 pointsI used international red myself.
-
2 pointsHere's some photos of my stove in the kitchen, just doing some breakfast. the rack above lowers down so i can hang my Wheelhorse parts up for drying ( when the wife's out of course)
-
2 pointsHere's mine! 1 July 4th at the Lake!
-
2 pointsYou got the first step of the 3 steps done, in becoming a Wheel Horse veteran of stubborn part removal. The next step is the frozen hitch pin removal. Once you have conquered that you will graduate to the ultimate test. The dreaded stuck steering wheel removal. After you have accomplished all of these three feats you will be awarded the badge of frustration. You will have learned and used every cuss word known to man plus invented a few more along the way. You will have earned the right to have joined the many that have come before you and walk down that hall of fame of the most frustrating Wheel Horse parts to remove. A very lofty goal indeed. Remember many have tried only to have their sprit ripped from them in a very heartless fashion. Very few have succeeded and those that live to tell about it are scarred physically and emotionally. That's why they are held with the highest honor.
-
1 pointI had a few starter issues on the B-100, so I decided to tear into it and see if I could un-broken it. This is more for those who have never taken a starter apart. This starter is found on the 10 - 16 Kohlers I think...but they are all pretty much the same. This one is called a "high mount" starter because the mounting bolts are underneath. From right to left...end cap assembly (with brushes)...frame...front end cap. Second row...armature...drive pinion...shield retainer...spring...pinion stop...hex nut. On the bottom are the through bolts. I should have read this sticker before I lightly tapped the starter with a hammer. Note to self...only tap on the end of the starter. Three pictures of what the inside magnet should look like and what some of it looks like now. I am going to clean it and put it back together. It may not work because of the broken magnet or it may have a dead spot. Better shots of the end cap with brushes...there is a spring under the brushes, which keep the brushes up against the bottom of the armature. The hard part in putting this back together, is to hold the brushes in place while trying to place the armature. I fabed up four clips out of sheet metal for this purpose. Place the frame over the armature...line up the bolt holes and put on the front end cap...bolt together. Only things left are the pinion, washers and spring, and hex nut. Now it should look like when I started, with no parts left over. Need to put it back on the tractor and hope. I do intend to switch out this starter, because of the broken magnet, but I may have bought a little time. Most of the starter problems on the Kohler engines can be fixed by taking off the starter and cleaning the shaft the pinion slides on with WD-40. When the pinion starts sticking, that's when you start wearing things out . You can usually see if the pinion is operating correctly just by looking down at the starter end. Hope you enjoyed and hope this will help some of you.
-
1 pointI brought this home the same time I picked up the 856. I really love these little tractors. It had the wrong engine but i managed to also acquire a correct Kohler k90 for it and promptly installed it . Needs a few minor things but I'm happy to have it.
-
1 pointPer "the Sqounk", that would be more cents than scents.
-
1 pointThat is a great score. Your wagon looks original and in very good condition. My dad had a 4 wheel wagon when I was a kid. He never used it. It sat in the barn filled with scrap lumber. He eventually sold back to the local dealer. I think it was part of a trade-in deal on a new tractor. I sure wish now that he would have kept it.
-
1 pointI will be very interested in this one. My GT-14 with loader has a good hydro, but when you are switching from forward to reverse (or visa-versa) at wide open throttle; as needed for a hydro; while the bucket is loaded and in the air it can be a thrill ride! A clutch that could be allowed to slip a bit could be a good thing.
-
1 pointHi 953 NUT thanks for your reply I had to question myself on this possibility before posting this question ,I am turning the engine anticlockwise when looking from the drive belt side of the engine I also observed the engine rotation when operating the starter motor.
-
1 pointWhat type and size of lathe tooling do you use? I have a couple of boxes of mill and lathe tooling in garage I will never use up. Would love to get rid of the majority of it. I'm just not into dealing with the BS of selling stuff on CL so it will just set there till I die. But if I have some items you could use their all yours if we can figure out easy way to get them to you. Depending on weight of items i'd give ya we may have to use Fastenal to ship them.
-
1 pointGet it....Wood Stove..
-
1 pointShaky video here, I know... but shows all those missing pieces in action.
-
1 pointIn June you'll see my new tractor. It is a 1054 that was re-engined with a 10 hp Clinton. Very rare engine. This has electric start and a fuel pump which is possibly 1 of 1. We got the engine for 50 bucks and tore it down. SUPRISE!! The engine was bored 10 over and was barely used!!! Good Buy. We ported it A LOT and now it can breathe. The engine has a longer stroke than a 12 horse Kohler and a bigger bore than a 10 horse Kohler. We needed a lot of parts for it so we went hunting at dealerships on our way out to Iowa for Christmas. GOLD. Some of the hardest parts were found thanks to our 1971 dealer directory. I'm expecting 16hp+ out of the brute. For all of you 953/1054 guys I know where to get tires. M.E. Miller tires has ag tires in 15x7.60 size. They will work on the stock rims. He wants I believe 90 bucks a piece for them which isn't bad.


This leaderboard is set to New York/GMT-04:00