
Leaderboard


Popular Content
Showing content with the highest reputation on 02/05/2016 in Posts
-
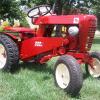
10 pointsshould be good to put the rest in the garage now. have 3 to pick up at the p.a show this year! the rest stay in the cellar ! room is valuable and its running thin. @AMC RULES @1978c81of your shelves !
-
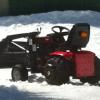
6 pointsI got tired of getting stuck and having the C-120 get through a month of accumulated snow. So I hooked up the blower to the 520H with wheel weights. Got done fast!!
-
6 pointsNowadays it would be amazing if people could even angle park correctly! I've crawled out my back window of my crew cab pickup in a parking garage because the coupe cars on either side of a parking space were both over the lines... just to prove a point that they park terrible. I admit it was kind of a jerk move but it was painful to see how bad they both parked and ironically I blocked both of their driver's doors the way they were pulled into the spots.
-
5 pointsAfter pumping up my one leaking original Titan turf one too many times on the 518xi, I splurged and purchased a pair of Kenda K502 4-ply tires in the 23x10.50-12 size. They are a bit cheaper than the Carlisle All Trail that is popular but I feel is a more aggressive tread. It was the first time I purchased tires from GCT Wholesale and was a bit disappointed when I took them out of the box.They were triangular in shape! But I let them warm and some gentle persuasion with my size 12 they were sort of round again for mounting. They are not too aggressive so they should accept chains, but with the blocking may be able to cut through light to medium snow. I still need to put the wheel weights and suitcase weights on as they look like they have too much pressure in them. Trying them out may be a problem as I looked at the long-term forecast to mid-March - and no snow is forecast. I may try the next size up on the 523Dxi if these work out. Also, check your hubs for tightness. I had the wheels off to install the lug nuts about four years ago with about 40 hours use since then. This last year it wasn't used because of having the diesel. They were just beginning to move on the axle. In fact originally when I checked I thought they were tight.
-
5 pointsGot 1 set of RJ side plates ready for paint today. I wanted to install all the bearings before paint for obvious reasons. I had a few burrs where I had to tap out the old bearings. I hit these with a punch and tapped down anything sticking up. I also filed any burrs on the side plate where the bolt holes are and used a hammer on each side to smooth any bumps. In the above picture, something got caught under the differential gear for a while. You can see the worn circle. Cleaned up and ready for the bearings. I'm not sure if I have to do anything about the wallowed out bolt holes yet. They may be OK...this sits on the gasket. If anything, I would fill with JB weld and use plastic wrap for where I did not want it to stick. ??? OK...there are 4 S8K open bearings, and 3 NICE 412-35 closed bearings that go in these side plates. The difference between open and closed bearings is the machining of the bearings themselves. I would call the open bearings on the sloppy side, and the closed bearings more refined and tighter. These bearings have the same ID 3/4" and OD 1 5/8" , but the thickness is different...S8K is 5/16" and the NICE 412-35 is 3/8". When you look at this picture...the left side plate shows where the differential carriage rides at the top...moving down shows an S8K where the brake shaft goes through...below that is the closed bearing that holds the cluster gear shaft...then at the bottom, the open bearing that holds the spline shaft with the fork gears. The plate on the right is a mirror image. The top is the differential carriage, below is the closed bearing that holds the large end of the mushroom gear...right and below that is the other closed bearing for the cluster gear shaft...and then you have the 2 open bearings that hold the input shaft.. I know...that is a lot to chew on, but the picture shows the correct placement of the bearings. Many times, I have opened a case to find different configurations. To seat the bearings, I tap them 1st with a ball peen to start them and then work my way around with the hammer until they are flush with the rim of the plate. You do not want to seat them all the way down, as they will bind...flush is what you want. The bearing should turn freely when seated. ] Now comes the bronze axle bearings. These come in the correct length...the differential carriage ones need to be cut to length first. I take a piece of 2 x 4 to tap in the bronze. Cleaning out the axle housing and a little oil on the outside of the bearing goes a long way. Get the bronze bearing down to flush with the 2 x 4 and then use an arbor to tap the bearing down the last 1/8" to accept the SKF 9815 seal. We are going to double seal these axles. A quick shot of the bronze bearings (both sizes) and then the outside of the RJ plates are primed. Paint was still wet.
-
5 pointsThe least you could do is pull down it's skirt!
-
5 pointsYes to what maynard sez, but I have to agree with squonk about an electric - one of the first things I usually do is get an electric pump. With our old tractors usually sitting for long periods of time and along with their advanced age (like me!) the fuel system is almost always in a mess.
-
5 pointsI bought a new reducer bushing and re-plumbed the output side of the pump tonight. NO LEAKS! Here's a video of the running 1982 Kwik-Way loader on my 2003 522xi. YouTube Link to Video of Running Loader
-
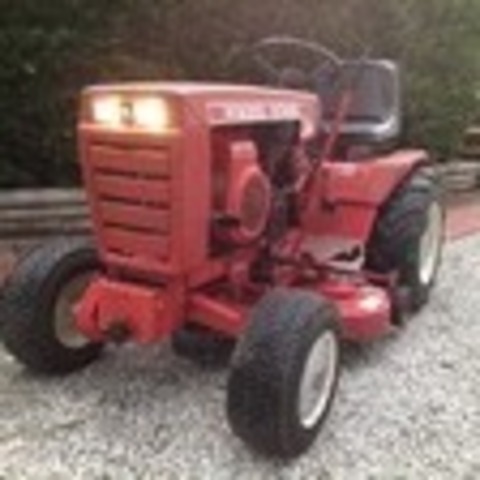
4 pointsBesides the gold lettering , gold badge in front and the gray plastic hub cap which I don't have what else was special about Anniversary 520 H? What spark plugs do these P220Gs like the best? One other question for now, I'm sure I will have more... Is straight 30w engine oil the best for these? I will only be using her in the summer. The Hydro oil looks clean but I am going to change it and I will put 10w30 in it. Here is a few more pictures.
-
4 pointsGoing to head out around 7:00 in the morning to pick her up. Talked my dad into riding up with us. Thought it would do him good since we lost Mom. Been a while since he has had the chance to go very far from home. Losing her has drawn us even closer.
-
4 pointsSOME ONE HAS TO GO OUT THERE AND PAINT THAT THING RED.
-
4 pointsHere's mine Terry. Recognize the Decals? Thank You!!!!!
-
4 pointsCrap! I was reading this thread thinking it was new then I saw it was almost 3 years old. I guess nothing ever happened.
-
4 pointsHey all, sorry for the lack of posting but things have been a bit ... well as Im sure you can guess, crazy. But here is where we stand currently ... The insurance company has settled with me, mostly. There are some issues in their estimate for things like removal of the old structure ... and replacing the foundation... but other than that I think we have it just about settled. Should be wrapping things up in the next 7-10 days .... then comes the tedious process of replacing everything and them issuing the checks to cover the difference between the Actual replacement cost, and the depreciated value they assigned all the possessions... I'm focusing on the warmer months, a new home, and the Big Show (I have a few things I want to bring home with me this year Hopefully!)
-
3 pointsPut the green and yellow thing out side with a For Sale sign and you will have more room.
-
3 pointsFuel line and choke cable is done , just need to paint the choke braket
-
3 pointsThey would rather sell you a knew tractor then let you buy an $80 bearing to keep your 60 year old Wheel Horse going.
-
3 points
-
3 pointsI don't knooow about that...looking awful clean for an everyday mower! I think we have a closet collector here...
-
3 pointsI determined in another thread with the help of fellow forum members that the lug bolt size in the manual is listed incorrectly. Wasted 20 dollars learning that lesson. The correct size for my 3 tractors and for other owners is 9/16-18 by 1 inch full thread. (This is fine thread) I decided to order longer straight bolts which I will mount from inner side and use Lug nuts to fasten rims to hub. I ordered my bolts from McMaster Carr and my stainless lug nuts from Summit Racing. The nuts will contrast very nicely with the newly power coated Creme colored wheels. Now I am itching to get the rims back soon:-) pic of nuts:
-
3 pointsIt was certainly entertaining.
-
3 pointsNo worries Steve. I am documenting the restoration/modification so that others who may want to work on their GT-14's have reference material. The tangent actually adds information on GT-14's so it's all good.
-
3 pointsLooks very good. One of the first things I added to the loader on my larger diesel tractor was a bucket level indicator. That will make it very easy to ensure the bottom of the bucket is flat to the ground. This is very useful for getting a nice flat surface scraping up gravel, snow, dirt etc. Maybe you can see your bucket good enough to tell but I could not with the cab etc in the way. This is what I made after copying the factory setup on a Ford loader. The other thing I use a lot is the two hooks for lifting things. With the loader around, no use pulling out your back lifting. You are going to love having that loader around, I use mine all the time. Cleat
-
3 points
-
3 pointsDrove it right up the stairs. Good thing it wasn't a diesel!
-
3 pointsInstall an electric:
-
3 pointsThanks WNYPCRepair! I'm really happy with how it turned out. I'm going to wait for some milder weather to get the Kwik-Way decal on the boom. I also got a whole sheet of replacement safety decals from an implement dealer near my house. These will make my loader really look legit. The Rhino company makes loader attachments too and they used to make a smaller loader that was about the size of my Kwik-Way. When I was breezing through a Rhino manual I noticed that the manufacturer will provide replacement safety decals free of charge through their dealer network. You just have to pay shipping. Any who, I ordered these last week and they came in today. I probably won't use them all, but several of them aren't specific to any one model or size of loader.
-
3 pointsYou just park the truck, then build the garage around it. If you've ever parked a truck in the city, you know how to get it into tight spots. Lots of maneuvering, and cheaper than parking lots.
-
3 pointsMay I be as plagued as you are
-
3 pointsHi Wayne. That is what Wheel Horse did when they came up with this set up. I'm sure it was a cost effective deal. I've seen 3 of these so far, and they all have been OK. Here is a short video on these differentials and bull gears. I'm also going to add this video, which shows the difference between the other 2 types of differentials that Wheel Horse used before they got to the separates. I do have a loose bolt in the one I have here, so I will take some better pictures of it when I take it apart.
-
3 pointsI too came to the realization that while it was awesome to go down in the shop and gaze at all my tractors, the practicality of it was ridiculous. If I had a large storage building like SteveBo's I would have never sold any of them. But having to do a huge shuffle every time I wanted to pull one out or do a restoration was getting to be a pain. I slowly sold them off one at time till I was down to 3. I was happy there. Then I was able to buy another RJ58 from another member. I wanted just a plain one seeing as I had modified the other I had. So now I sit at 4 and I'm really content there. I do still look around occasionally just to see what's out there. I think the bulk of them have been stripped from our try state area but I know there are some real collectable sleepers lurking out there just waiting to be discovered or sold. Now the only problem is to beat the other guys to the punch (which is real hard to do with the crew in CT!). These guys have their fingers on the pulse and are ready to go at a moments notice. But that's ok. The way things go around here the tractors usually make it into all their garages at least once and then sometimes back again . I'm content with what I have. (For the moment!)
-
3 pointsI'm in this year, can't wait 'til June. Thank you Terry for all you do.
-
3 pointsI don't know exactly what the bracket was originally for but I modified it to work originally in the front attach-a-matic when running the tiller or using the box blade then when I got the 2stage blower I figured I'd make work on the rear the weights were "green" lol, then the cast wheel weights I decided to close the hole up to keep grass clippings and snow out so I machined the custom logo caps at work (I'm a machinist),Jeff.
-
2 pointsMarch 1969 Wheel Horse advertisement. GT-14 $1,495 with free mower deck. That's about $8,900 in today's dollars. These were premium machines in their day.
-
2 pointsI'm lurking Steve and enjoying this thread You're doing an incredible job with it. I don't see the wallowed out holes as an issue at all but it is strange that it happened to only three. It looks like they are back by the differential so I wonder if whatever was being dragged around beat the snot out of the protruding bolt nubbies?? You probably already do but I used thread sealant on the lower boles that stay immersed in oil. I'm looking forward to the new pictures on what will be huge
-
2 pointsNot a tractor, a Stallion!
-
2 pointsI saw it was from 2013...but thanks for the like Bob. Took you long enough to like what I said.
-
2 pointsNice! That is in great condition. I use Champion RS17YX plugs, .025 gap Mobil or O'Reilly synthetic 10W30 oil Wix 51762 (NAPA 1762) oil filter Amsoil synthetic 10W30 in the hydro TORO 108335 hydro filter, though Wix 51410 (NAPA 1410) should match I run in very cold weather in the winter. straight 30W should be fine for those of you in the sunny tropics
-
2 pointsTry a set of these...with the gap set @ .025
-
2 pointsKeep a cover on that green thing
-
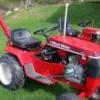
2 pointsoops forgot to put second sheet on lol. its my x320 everyday mower :/ to get them on I load it on my truck then use ramps to ramp. my ceilings are low so it just fits round hoods .
-
2 pointsHow do you park a truck sideways? The wall on right is solid, with no door. Is this Austin Power's house? Maybe the question should be WHY?
-
2 pointsAll your work has paid off, a job to be proud of...
-
2 pointsBrought it up from the basement, like Craig`s magic shed...
-
2 pointsSteve: None of us can take what we collected with us for ever! You have done a tremendous job of collecting and saving the heritage of a lot of great machines and work that went in to them. What I call pivoting in life as a strategy requires you to rethink priorities and be willing to take the next plunge! I will always remember you participating in the Jacksonville, Illinois Show with your dad and tractors in September 2013 ! I am glad our paths crossed and wish the best to you as you make all your future decisions !
-
2 pointsI took that transmission case out of the E-Tank today...it has been in there 6 to 7 days. You are not going to believe these pictures!! The gears cleaned up, the shift rails shift with the shifter now, the case cleaned up nice. I also took a wire wheel to the differential housing (this has been sitting in my parts washer tank a couple of days), and I wire wheeled the side plates to get ready for paint. A little spot cleaning, filing, paint and this is ready to go back together...need to weld one bolt nubbie though. I am going to show before and after pictures here, so you do not have to go back through the thread to find them. Check this out!! AFTER. the fork gears, spline shaft & pinion, reverse idler and forks and shift rails. Before and after on the differential housing and bull gear. And the side plates...before and then after.
-
2 pointsThe Wheelhorse OEM belt 8334 is 85 x .625. Parts Tree has it for about $45. I would suggest paying a few bux more for the OEM and be done with it for the next 30 years or so.
-
2 pointsCheck this site out http://www.tirechain.com/ They have about every size & type chain imaginable. Good prices & fast shipping. Enter your tire size and they will tell you what chain will fit your tires. Be prepared for some custom fitting once you get them as they tend to run large which is better than too small. I got the 2 link spacing for better ride and did not need tensioners. I deflated the tires and fit them tight then reinflate to 10 psi, not going nowhere. Heres a link to another thread on them http://www.wheelhorseforum.com/topic/61022-need-new-tire-chains/?page=1
-
2 pointsHi Terry. Can you make a custom banner for me with my dad's 502? Very much appreciate it. Looking forward to attending the Big Show again this year. Thank you.
-
2 pointsmy 702 when I got it and my 704 after restore, hope this helps


.JPG.9f2ecb26065c66527b0730084ab7fc7a.thumb.jpg.7dc8a04d9a53d44ee2b23f26ee94496f.jpg)

This leaderboard is set to New York/GMT-04:00