
Leaderboard


Popular Content
Showing content with the highest reputation on 07/13/2015 in Posts
-
4 pointsWho said I'm lookin' for a "real" truck?
-
4 pointsWas A great little show. Got to meet Tom & Jason and see some neat stuff. Lots of cool Cases if thats your thing. Definitely will go to next years and hopefully breing a horse or two. Missed meeting Stevasaurus tho .... somethin about havin to go back to IL cause they needed his Cutler jersey for (target?) practice at Bears training camp.... Here were a few of my favorites.
-
4 pointsYour brother would look good on my 520H w/60" deck!!!....yep, I've still got it in the Horse Barn....could be one of your "six" (trailer load)
-
3 pointsI only have approximately an acre of grass but the Super C made really quick work of it today. So the beta test is a success. This is thing really is bigger than the standard version. I imagine you guys with the 520's and others with 60 inch decks have same experience. This may end up being more mower than I need but for now, it's great! Here is a after mowing pic.
-
2 pointsFinally finished the 417. The seat came back from the upholstery shop late last week. (50 bucks and he did a really nice job on it)! Finished the rims in Rustoleum Metallic. Had to use the old tires though and I found I have two different tires up front and surprisingly, two different rims on it. I need all four tires on it and will wait a while to do it. I added pliable cups to the spindle tops and cut out the area where the cotter pin moves. This will help keep them clean. The governor still revs it up some at idle mid and full throttle so I have to delve into it next. (Not certain what that is all about). I think the PO has a NAPA belt on it and it grabs on the clutch release. It's just a hair too short. It turned out nice but now I have to put it in service! All I do is mow with the rain and temps we have had and the two I alternate with need a little break. (Doing three big lawns).
-
2 pointsPurchased from a Red Square member a few months ago then hauled all the way from the big show by another Red Square member this 1045 serial #21858 is now making it's home in Minnesota. She looks tough but will get the full treatment, new heart is already awaiting to bring this one back to life.
-
2 pointsThat is just glorious! If I had to give up my 520's, I would want a C-195.
-
2 pointsWhen the points are open the voltage at the coil (-) should be battery voltage. When the points are closed the voltage at the (-) coil side should be 0 volts. Remove the spark plug so you can turn the engine over by hand and watch the voltage. The voltage should cycle once for every two turns of the crankshaft. If it still stays at 0 volts while turning the engine over the points are not opening or shorted, the wire from the coil to the points is shorted to the engine block or tinwork or the condenser is shorted internally which can be heat related. Garry
-
2 pointsPersonally, if I had gotten a NOS onan, I would unbolt the pan and both heads to visually inspect it. Don't run it until you have to. There will be fuel sitting in the carb and oil getting old sitting in the pan (yes oil breaks down with just time and no use). I would open it up, spray it all with a light oil, close it up wrap it up and put it in climate controlled storage until you decide to use it. Have a set of new gaskets on hand and open it up one more time before you use it and check it all over for surface rust then throw your new gaskets on, torque the bolts, fill'er up and go! You can run through the proper break in period without a huge amount of time passing. I have no scientific evidence for this, just my thoughts.
-
2 pointsWell I'm the new owner of a 314H with 278 hours on the meter Sent from my XT1080 using Tapatalk
-
2 pointsYeah, you're gonna want to bolt that sucker down! There was a thread a while back in "engines" regarding bench testing an Onan. Do a search and it will show up.
-
2 pointsand only 2 doors!
-
2 pointsAfter talkin to Shynon (Tom) and Jason this past weekend I have decided NOT to restore it but leave as is. Going to get the cloride out of the front tires and replace them. Very carefully powerwash as to not blast anymore paint off and get the motor running. Hopefully got some motor essentials coming from a guy in Idaho. Keep ya'll posted with plenty of pics! Thanks for the tip on "oiling the horses" Tom, will definitly do it to the deck. Keep in touch...if I should happen to die in a motorcycle crash come and get it, It's yours free, I feel maybe just a little bit guilty about rustling it across the border & It would look nice in your fine herd.....
-
2 pointsI got lucky and found this beautiful 701 at the Garden tractor daze show in portage wi. It is complete with a few minor wrong parts. Looking forward to restoring this one seeing how I have been trying to peice one together for a couple years now. I guess that means I'll have spare parts
-
2 pointscheck your oil level I think this machine has the oil switch in the motor base that is the only thing that will make your relay click the relay is normally closed for starting the oil level switch is normally open if the oil switch closes and allows 12 volt to go thru it to the single connector on the relay it will open the points inside the relay that's the clicking sound you hear try unplugging the single connector on the relay and see if she starts Brian
-
2 pointsIf it's anything like my 416-H, there is quite a bit of disassembly required to remove it or even get a wrench in there to snug fittings. The front plate where the fuse block and relays mount prevent even visual access. Don't know what the engineers were thinking when they designed the 400 series.
-
2 points
-
2 pointsGuys count me in! I would also really like to see more WH at my plow day, 2 hrs from where this meet and greet is being held. Ill drag mowing man and a few others with me!
-
2 pointsThe tractor was almost a hour away and I was not able to work on it but I have it at home now and I will be able to use it and work on it when I want.
-
1 pointI need some help identifying this WH. I'm working on learning the details to look for, so here's what I see! The hood stand is solid. The front axle is swept across the width and swept back. The lines on the top of the hood seem to fade out and not go all the way back it has a solid seat pan. The extra frame space in front of the hood looks too long? so would that make it a 1960 Suburban 400 or 401, or could it be an RJ? it's in poor shape, but maybe a parts tractor, or the start of an RJ restore. is the hole to the back left of the hood not factory? it's been for sale for a while, and I'm about ready to check if the price is getting a lot more negotiable
-
1 pointI just picked up this gt 14 from another current member its all straight but been repainted many years back . I am going to give it a refresh . Hope you all enjoy my pictures Did some weldinat the shop to both fenders same spots stress cracks . Prep time Paint time . Im happy with outcome !
-
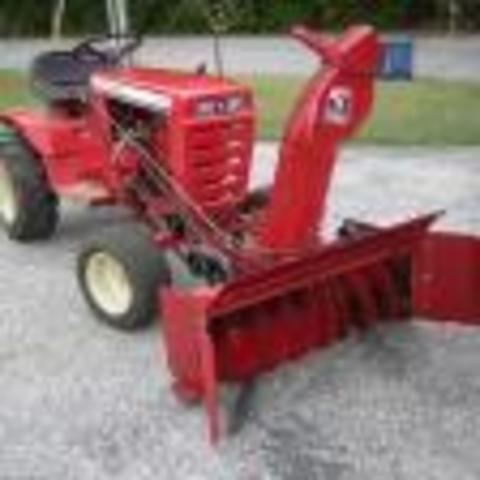
1 pointCouple weeks ago I saw something I could not pass up. 1998 Sovereign that had been garage kept. Came with the rear collection system, all belt shields, and deflector shields, 42" snow blower, chains, weights, and all manuals. I used the bagger system twice, works great, but I noticed the left side of the deck drooping a bit, so I took the bagger off. Washed, waxed, and detailed, and now it is ready for a parade. It is a (2) owner, me being number (2), tractor. The original owner had an acre of land it was used on since new. I am guessing it may have around 500hrs total. It cleaned up very nice, but I did notice some areas he had probably never cleaned. Around the right rear diff. it was caked with built up dirt and grease. < I am guessing he just kept putting grease in and never wiped off the excess. Also the outer air element was loaded with debris. The actual air filter was not as bad as what the outer looked. Runs like a champ. I am looking for a cab though. Anyone have any leads! Rob.
-
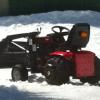
1 pointEureka! Lawn cutting succes with the super C. Albeit only a couple passes. The real test will be in a few days when the lawn requires a cut. I replaced the Clutch and bearings on the PTO. Also found an old thread where Baerpath suggested roughing the friction material as it had glazed appearance and followed suit. Now the deck cuts like a dream! Still getting used used to the higher center of gravity. I am starting the thread by i-phone for first time and will try and upload the pic of the C195 at work....since lawn was under control. Also my c161 and one of the GT14's.....
-
1 pointThat may be part of my not charging issue also. Thanks!
-
1 pointWhat you have is a 1960 Suburban 400. The rear hole in the hood is not supposed to be there and it looks like the frame has been lengthened, not sure.
-
1 pointfinally got around to putting the pictures up, as you can see the gearbox looks pretty heavy duty and heavy duty it is! I've just got to get that steel plate cut and bent now. with regards to my hitch lift who can spot my stupid mistake? no prizes by the way! thanks for looking, callum
-
1 pointWhen I was a kid Dad had a David Bradly - that's what he made garden with for years and also pushed snow - think I was about 10 years old when I started clearing snow around the sheds, barns and D-way with guessing the 3 hp model. They would really push the snow .
-
1 pointAs a kid I pushed snow in the Upstate NY snow belt with a 6 HP Tecky. Of course I ruined a few along the way.
-
1 pointThere were several models that were 4 and 5 HP, and they could all push a blade. Mostly it depends on the Wheel Horse you're talking about. If you're talking about something hydro, then no.
-
1 pointM151A1 hit it! Door edge guard works perfect. I removed the clips (what a PIA). Installed sections of door edge guard. Installed covers. I did have to "adjust" the tension on two of the caps by flexing the lip out making the fit a bit more tight, but these things don't budge. Without prying them off, there is no removing them. Nice thing is they tapped in as secure as they would with the metal clips. No silicone or glue needed. If they fall off or come loose, I'll post back. Thanks for all your input and to M151A1 for saving my wheels!
-
1 point
-
1 pointNo way! I understand the whole brand loyalty thing but sometimes you have to take the blinders off. I'll bring my JD 318 over to SteveBo's meet & greet and let anyone who wants to try it. I would say it compares to the 520 & 522XI. The big advantage is the real live hydraulics. I've driven a ton of garden tractors of all types and brands and as far I'm concerned the 318 is the overall best. Even used beat up 318s with like 1500 hours are still selling for over $1500 all day long. Ones in the condition and low hours like mine are commanding like $2800! No green junk at my meet and greet.... lol
-
1 pointMore pictures from the show, This was a great show I think total count was around 550 garden tractors in attendance. I am planning on attending next year again. Would be great to get some more Horse's to show up next year. Thanks for looking.
-
1 pointNow that's using the old noodle. Great idea and not cheesy.
-
1 pointLike you Bob, I'm also in the market for a truck (sold mine a couple weeks ago). Whatever you do don't "under-buy". If you can afford to go with a Tundra with a V-8 do it! If you load up a 6x12 with 4 "C" series machine you have a very heavy trailer. You'll be glad you have the available power. Mike.........
-
1 pointSo, sell that green thing... for profit instead.
-
1 pointLove the new led lights
-
1 pointYeah, What's up with "The Ohio State" colors?
-
1 pointI might be able to swing down there as well! Keep us updated as time gets closer.
-
1 pointThanks Van, it's good to know I come above Benny Hill As promised a photo of the finished steering box mount. Only tacked on in this photo, it has been fully welded on now. Time to chop the column down a bit. The part sliced off the top of the outer column has a bush in the top so I need to reuse it. I also need to graft this bit of the old steering column onto the inner bit of the new column.. The hole is for a massive roll pin that makes sure the steering wheel will never come off without the aid of a large hammer and punch No action shots as I was busy getting on with doing it.. One chopped column, a little over 1 ft has gone from it's height. A test fit.. The angle of the steering wheel has changed. A bit more upright than it was but not by much at all.. Working out the new Pitman arm... Yes that is a box spanner.. But it's more than strong enough and is a nice tight, straight fit on the steering box splines.. So why not use it The new column finished and almost ready to be bolted back in. The mounting bracket at the top bolt's in just behind the dash surround.. The new steering is now bolted in place, no photo's I'm afraid but the steering feels much improved (well, as much as I can test it on the bench) and it's now a tad over two turns lock to lock which is way better than the old 3rd of a turn lock to lock. And I also have a bit more lock now With Why Not booked in to her first show in a months time, it's going to be a busy few weeks!
-
1 pointhere is the belt arrangement.
-
1 pointWasn't that when the ol' Kohler... sneezed, and you lost twenty laps?
-
1 pointThe mystery steering box from Chris turned up.early last week Thanks mate The mystery part turned out to be Austin A30/35, thanks for that Max if your reading this Getting the Pitman arm off the steering box is a whole story in it's self.. Involving a hub puller, zip ties and a huge amount of heat! Once the arm was off the splines the next challenge was getting a large nut off the shaft, this didn't quite go according to plan when the end of the threaded bit on the shaft sheered off right where the split pin holes are/were. As the shaft needs extending a little bit this wasn't a problem. So will it fit? with the aid of a pair of scissors this were looking good.. New and old steering box.. The box bit of the new one is certainly a bit smaller.. Trial fit time. The box is at the right height it just needs to go back a bit or there wouldn't be any room for the new Pitman arm to swing. To get the column up though the top of the dash I needed to make a hole a bit bigger, so I quickly spun up this bung on the lathe. It fit's like so.. The small hole is for the "drill bit" bit of the cutter to slot into. Letting the dash cool down halfway through the cut. The amount of swarf that came out was amazing! A big hole.. With a bit of the body mount sliced out.. And the bottom of the dash surround notched a bit.. The steering box ended up right where I wanted it.. The steering box mount taking shape. That should work well The mount has now had two captive bolts and one captive nut added.. Both ends have been boxed in and the welds cleaned up, I just forgot to take any photos of it.. Likewise I have made a start on shortening the steering column but also forgot to take any photos.. I'd best remember tomorrow
-
1 pointThanks Pullstart, your daughter has great taste in machines I think there is a long list of people wanting to have a drive at the couple of shows I'm taking WN to this year... Maybe I should start selling tickets Thanks dude. WN went back up on the bench something my back is very much regretting! Even though there were three of us lifting! So I spent that day doing some gentle paint stripping and knocking out a few dents on the front of the hood. I managed to get a bit more done the following day, the fender pan this time. as you can see the fender pan does not quite reach the foot plates! Some more recycling, this was part of a Spear and Jackson sign. Two plates tacked on.. Both sides done and on the bench to be fully welded. As you can see a little trimming of length is needed.. The new metal on the front of the fender pan has now been fully welded up, mostly shaped and the welds ground down.. Just in need of a splash of red oxide in these photo's. .
-
1 pointI will gladly join when the debit card/credit card payment option is viable. Since it costs money to pay by card I would be open to a two tiered price schedule. $15 for debit/credit and $10 for cash or check if $10 is still the membership fee.
-
1 pointYea I had this big guy for about 15 years now. This was a remission gift to myself after a long battle with stage 4 cancer at age of 20. It's truly a cream puff it has only 49k miles on it and never seen a winter.
-
1 pointThanks guys ......I got mine off of ebay Pacer... you can find them just about anywhere tho, Just google or ebay the part no 110513. I thought i saw a bearing & seal cross reference chart by a member on here but can't find it now, don't know if the were on there or not. I think they were about 15 bucks for four of them. Quality not the best tho, made in china all over them. Make sure you ask if they are sealed tho if thats what you are lookin for. These the Inner seals pop in & out real easy with a dental pick and the inner one is pretty cheesy. Definitely not high speed so don't put them on your drag racing tractor. Next time i'll pop for the better 10 clams a piece ones that doc724 mentioned. I can't believe that a grease gun would push them out Garry ...I had to pound the snot out of them to get them out Maynards got a good point too, I wash or at least hose down my 246h damn near after every mowing and this is one of my work tractors. Toro guy i used to get parts from loved me cause i was always in for stuff that was rusted because of water infiltration from my analness. I even put the deck wash fitting on a couple of my machines. Probably not a good idea less ya like changing spindle bearings... damned if ya do and damned if ya don't kind of thing.
-
1 pointI use sealed bearings on all my show tractors to keep the hubs clean, but regular unsealed bearings on my workers. My reasoning is that the workers gets down in the snow and mud and having the entire hub filled with grease keeps the water out. Having no grease inside the hub invites water and ultimately rust.
-
1 pointi had no idea,,,,you could get sealed bearings..... Wow,,,,,,,,,,,,,,,,,,now i gottah find them..... no more greasy front wheels....anjd i like the allen plug screw in the zert hole..... first thing on my tractors ARE the front wheels...... thank-you Horse people...good advice,,,,i just hope they come with chips and a drink.......
-
1 pointAnd chasing one of the little balls across the garage floor trying to stop it before it finds the exact geographic center of the truck parked in there.


.JPG.9f2ecb26065c66527b0730084ab7fc7a.thumb.jpg.7dc8a04d9a53d44ee2b23f26ee94496f.jpg)


This leaderboard is set to New York/GMT-04:00