
Leaderboard


Popular Content
Showing content with the highest reputation on 07/05/2015 in Posts
-
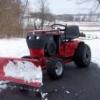
9 points1st, this is proof that the Flamingo did follow me home from the Big Show. 2nd, I wanted to take a picture of the Afghan that Squonk won and gave to my wife Chris. Karen (kthack657) made and donated this to the raffle at the Big Show...which makes it that much more special. Thanks Karen and Mike. 3rd, the 876 that I picked up from SmokinJoe. It is sporting it's new choke cable, lift lever adjustment and flywheel / generator guard.
-
9 pointsFinally got one....on the 4th of July!! My 11 yr old boy was rather excited!! Thad
-
7 pointsGetting ready to load for Portage WI thought I would snap a few pics of the herd (not all were able to make it). Enjoy Thanks for looking Tom
-
5 pointsJust wanted to share a couple pics from a beautiful Western NY 4th of July weekend with the boys - n - girls of Red Square . Slipped the brush-cutter head on the old trimmer & hacked about 15 feet off the shoulder to park for next weeks ride . Foxglove is in full bloom ( way late this year ). Stopped for a break along one of the oil roads . Smile Rene'
-
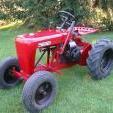
4 pointsHey guys picked up these two little awesome tractors for my dad and I at the wheel horse show this year! What do you all think? And if you went to the wheel horse show this year what did everyone think about it?
-
4 pointsI agree with Ken on this. It is too bad for you that you couldn't score a good project, but the love of this herd is what keeps him going. I would hope he has a friend or two who will act on behalf of his estate to find new homes for them. We lost a member of our antique tractor club this spring and several of us have helped his widow sell them off slowly.
-
4 pointsIf the tractors keep the old timer happy that is what matters. I think the sad thing is the poor old guy needs to drag around an oxygen tank...I'd be willing to bet that when the times comes he has some good old buddies that will want his tractors...
-
4 pointsFinally got the Bronco 14 running....the boys entered the 4th of July parade at MiTeJo Campground Milton,NH.
-
4 pointsHappy 4th of July, everyone!
-
3 pointsWhile on our road trip Friday, we stopped at several yard sales and flea markets. While at a yard sale on ILL 1 near Oliver, Ill, I noticed some Wheel Horse tractors at the neighbors. I asked the yard sale people and they said the guy wouldn't sell them for anything. I went over and asked about the horses and the elderly gentleman (dragging his oxygen tank) said he "just collects them" and nothing was for sale. I got a few photos of the ones I saw outside, and was told the "better shape" ones were in the garage. It is sad the way these poor tractors will have a slow painful death! There were 2 more that I didn't get a picture of...1 was a "nut roaster"!
-
3 pointsLooks like you were camping on the hill this year. Very nice round hoods you found BTW. I was there...the show was fantastic, even with the Saturday rain.
-
2 pointsI just completed a hub conversion on my 312-8 with 520 front end. Being unable to find 520 front wheels, I decided to go with trailer hubs. I could not find a good write up on the swap, so I am posting this for anyone who wants to do this swap. All parts (minus tires) came to about $100, so the conversion is around the same price as a set of clean 520 rims. Parts List -Trailer Hub Kit, I bought this off Ebay From Elgin Trailer Parts, This includes 2X 1000lb 4 bolt trailer hubs, bearings, 1" x 1.25" seals, and dust caps. (Fits BT8 1" spindle) Cost- 57$ shipped -Wheels, I ordered 5-3/8 x 8 rims (standard for 400 series). A big benefit to trailer hubs is that they accommodate a wide variety of rims/tire sizes. These hubs use a 4 x 4" bolt circle. Cost- 32$ shipped -Spindle Washers, 1" x 1.5" flat washer, 14ga or 18ga. I bought these from lowes but These can be sourced anywhere. Qty 2 needed. -Hub End Washers, .75" x 1.25" flat washer, 14ga or 18ga. I bought these from lowes but These can be sourced anywhere. Qty 2 needed. -Bronze Sleeve Bearing, 1" ID x 1.25" OD x .5" Long, I bought these from Mcmaster-Carr P/N 6391K281 Qty 2 needed. -3/4-16 Slotted Lock Nut, Mine were missing. I bought these from Mcmaster-Carr P/N 95030A270, Qty 2 needed, Sold in 10 pack. Installation is straight forward. The pictures pretty much sum up the steps. The bearing need to be hand packed with grease before assembly. Install the inner bearing before inserting the seal. The hub nuts are not intended to be torques very hard. Just snug them up and install the correct size cotter pin. The hubs are very smooth and solid. I am very happy with the results. Thanks, -Justin
-
2 pointsStevasaurus's tricycle during the annual Boy Scout parade circa 1957, It was with a heavy heart that Steve sold his prized possession for his first Wheel Horse.
-
2 pointshaha yes I did camp on the hill this year. And thanks! These were the only 854's I seen there in good running shape. And yes the show was fantastic even with the rain! Going next year is a must! You must have missed my sons 854 at the show, it runs Primo... Nice Horse's...
-
2 pointsPost 'em up here... any picts to share of your 's flying the ol' RWB glory today.
-
2 pointsclub and 608 i would like to ask all of you with an onan twin cylinder to join the yahoo onan club. ( google it ) just say you want to join to learn how to work on your onan engine. the site has the P series parts and service manuals, as well as most of the other twin cylinder engines. then you can learn how to do it correctly. ( set valves, and torque ) thank you. boomer ( the used onan engine parts guy,also NOS and new )
-
2 pointsOne for the Dino(Steveasaurus)here...
-
2 pointsIt sure does not take a whole lot to get the clown car out and going.
-
2 pointshaha yes I did camp on the hill this year. And thanks! These were the only 854's I seen there in good running shape. And yes the show was fantastic even with the rain! Going next year is a must!
-
2 pointsHey Tom, which one holds the golf bag? I happen to have another horse on my trailer for you, and an engine...don't forget the license plat please. Nice herd Tom.
-
2 pointsHell no...
-
2 pointsSweet pictures guys show those American flags and be proud!!
-
2 pointsEnough already... quit hogging the computer. Hard for me to get a post in these days.
-
2 pointsI can now say it's completed! Even cut the grass with it today.
-
2 pointsPrecisely why I got it Mike.... for, you know...that off brand guy next door.
-
2 pointsHere you go Mikey... enjoy your holiday bro.
-
1 point
-
1 pointJohn Fisher and I live about twenty minutes apart and for the past ten years or so have conveyed together to the Big Show. It gives you peace of mind knowing that if you have mechanical problems there is help nearby and a couple of times there were problems. This year the trip was uneventful if you don't mind driving the four and a half hour trip home in a driving rain. After we split up a few miles from home John had a near tragedy. As he turned on a back road about three miles from home, his trailer jack drug on the road. He thought that he had forgot to raise it when we pulled out so he pulled over to check. What he found was scary. The whole receiver had broken loose from his motorhome and was hanging down. The rear metal plates when the receiver was welded to the motorhome chassis had rotted away. The front ones were holding, barely. The part that was hanging down was also where the safety chains attach so if the front plates failed the trailer with five 'Horses on it would have come loose and been a runaway missile. The consequences could have been deadly, at the least the trailer and 'Horses would have been wrecked. Lesson learned? Get under your tow vehicle and check the welds, condition of the metal, etc. Basically the structural integrity of the receiver especially if you tow a boat trailer and/ or live near the seashore. John was lucky, you might not be.
-
1 pointWell this one is all done... was hoping to have it to the Big Show but decided to leave her home... maybe next year! If you watched the build... Thank you! The final vid is linked!
-
1 pointLooks like the herd will enjoy a nice outing. While you are on the show grounds remember
-
1 pointCool Beans. I got one of those little Travelocity gnomes too! Glad the Flaming Mingo made it home. I was worried it would end up in Dukes Snow Chucker! Glad Chris is enjoying the afghan and top notch paint job on the belt guard! Now all you need is the lighter! You can get one of those 12V heated seats for winter duty.
-
1 point14-16 ft-lbs for the graphite based gaskets. There probably is a preferred pattern for tightening, but I just criss-cross. Tighten snug, then half tight, then to 14-16 ft-lb. I usually double check to make sure.
-
1 pointHey Steve, wunna hear something pretty neat? My 1968 Electro 12 had the exact same sticker on the rear. Lincoln Tractor and Equipt. Co RockFord Illinois.. our tractors came from the same place! I'm in Mansfield Mo though, mines traveled a little further than yours lol
-
1 pointHey it's my old Chebbie!
-
1 pointyou are not getting enough fuel i would start by cleaning the carb
-
1 pointI think you found a couple of nice GT's! We were there and had a good time Thursday & Friday...Saturday not so much because of having to load up in the rain!
-
1 pointWow !! That looks like a beautiful place to ride an ATV.
-
1 pointThe mystery steering box from Chris turned up.early last week Thanks mate The mystery part turned out to be Austin A30/35, thanks for that Max if your reading this Getting the Pitman arm off the steering box is a whole story in it's self.. Involving a hub puller, zip ties and a huge amount of heat! Once the arm was off the splines the next challenge was getting a large nut off the shaft, this didn't quite go according to plan when the end of the threaded bit on the shaft sheered off right where the split pin holes are/were. As the shaft needs extending a little bit this wasn't a problem. So will it fit? with the aid of a pair of scissors this were looking good.. New and old steering box.. The box bit of the new one is certainly a bit smaller.. Trial fit time. The box is at the right height it just needs to go back a bit or there wouldn't be any room for the new Pitman arm to swing. To get the column up though the top of the dash I needed to make a hole a bit bigger, so I quickly spun up this bung on the lathe. It fit's like so.. The small hole is for the "drill bit" bit of the cutter to slot into. Letting the dash cool down halfway through the cut. The amount of swarf that came out was amazing! A big hole.. With a bit of the body mount sliced out.. And the bottom of the dash surround notched a bit.. The steering box ended up right where I wanted it.. The steering box mount taking shape. That should work well The mount has now had two captive bolts and one captive nut added.. Both ends have been boxed in and the welds cleaned up, I just forgot to take any photos of it.. Likewise I have made a start on shortening the steering column but also forgot to take any photos.. I'd best remember tomorrow
-
1 point384 hours. Looks like number 143 of 200. The plate on the hood is missing, so it looks like I will need to get one made. Thad
-
1 pointOven cleaner works good to clean heads.I have used Super Clean purple with good results as well.Not sure about the piston tops other than light scraping. Luck.JAinVA
-
1 pointto the I don't know if it was just coincidence, but It seemed much easier to find Craig this year. Oh, for transporting my dinner tray back to the kitchen on your new ride.
-
1 pointIs there really... any other forum?
-
1 pointThat brings back some memories.
-
1 pointFor everyday use I find a combination of MMO and Marine Stai-Bil in my fuel mixed per manufacture recommendations works well. My C-105 always amazes me with how it turns over on the first crank! I do find it handy though to have a can of Seafoam and a can of spray Seafoam on the shelf for different situatiuons.
-
1 pointI really gotta find a book to start studying these tractors.. Whats this one? Value to it? I'm guessing somewhat due to it being older, but not sure if there are certain models that are not etc. Thanks!
-
1 pointI am happy with my can of Berrymans, but it is about 8 years old now. I would not be surprised if I found out that the current recipe was "watered down" in comparison to the old stuff
-
1 point
-
1 pointOK T-shirt maker dudes. There's an idea that will sell.
-
1 pointPicked up this Boom Box today. And Manual
-
1 pointI do body work for a living, for the last near 30 years, I don't paint at work, but have in the past, my old Divilbiss siphon feed guns, were worm out, so I bought a few cheap HF guns the purple HVLP ones with coupon about $4 each, and have used the crap out of them, do they spray like a $500 gun NO, but with a little trial and error they work just fine, I bought the warranty on one of them, no serial no. so they don't care what one I bring back, that cost $2 they even said covered if I leave paint in it, so I have a spare in the box just in case one craps out on me. This was painted with one of them.


This leaderboard is set to New York/GMT-04:00