
Leaderboard


Popular Content
Showing content with the highest reputation on 07/03/2015 in Posts
-
7 pointsI just completed a hub conversion on my 312-8 with 520 front end. Being unable to find 520 front wheels, I decided to go with trailer hubs. I could not find a good write up on the swap, so I am posting this for anyone who wants to do this swap. All parts (minus tires) came to about $100, so the conversion is around the same price as a set of clean 520 rims. Parts List -Trailer Hub Kit, I bought this off Ebay From Elgin Trailer Parts, This includes 2X 1000lb 4 bolt trailer hubs, bearings, 1" x 1.25" seals, and dust caps. (Fits BT8 1" spindle) Cost- 57$ shipped -Wheels, I ordered 5-3/8 x 8 rims (standard for 400 series). A big benefit to trailer hubs is that they accommodate a wide variety of rims/tire sizes. These hubs use a 4 x 4" bolt circle. Cost- 32$ shipped -Spindle Washers, 1" x 1.5" flat washer, 14ga or 18ga. I bought these from lowes but These can be sourced anywhere. Qty 2 needed. -Hub End Washers, .75" x 1.25" flat washer, 14ga or 18ga. I bought these from lowes but These can be sourced anywhere. Qty 2 needed. -Bronze Sleeve Bearing, 1" ID x 1.25" OD x .5" Long, I bought these from Mcmaster-Carr P/N 6391K281 Qty 2 needed. -3/4-16 Slotted Lock Nut, Mine were missing. I bought these from Mcmaster-Carr P/N 95030A270, Qty 2 needed, Sold in 10 pack. Installation is straight forward. The pictures pretty much sum up the steps. The bearing need to be hand packed with grease before assembly. Install the inner bearing before inserting the seal. The hub nuts are not intended to be torques very hard. Just snug them up and install the correct size cotter pin. The hubs are very smooth and solid. I am very happy with the results. Thanks, -Justin
-
5 pointsPost 'em up here... any picts to share of your 's flying the ol' RWB glory today.
-
5 pointsNow that's calendar material right there ^^^^^^^^^^^^^^^^^^^^^^
-
5 points
-
4 pointsYour neighbor's must love you!
-
4 pointsI'm interested in participating. The show before this last one, my brother came to the show without a tractor so we bought all the parts at the show and built one. We did it right in the dirt road in front of our display area. It did take some time away from doing other things around the show but that kind of stuff is fun for me. We had a couple of spectators and few hecklers as we did it plus quite a few people stopped by to check it out so there was plenty of interaction going on. After getting it all together and dumping about a quart of water out of the engine, we had it running and driving. It actually ran pretty good without cleaning the carb and didn't smoke. Cost was about $375 but Jdogg (Jordan) hooked us up with some real good prices on the engine and MANY of the small miscellaneous parts which made it possible. We could've just bought a $250 or $300 tractor and drove away with it but doing it this way was MUCH more fun!
-
3 pointsThe wheat harvest was in full swing today in SC Pa. With 2 JD combines w/30' heads, 2 grain haulers, 2 balers, and several grain trucks. I know this is a small operation for you western guys, but this is a pretty big operation for the rolling hills of SC Pa.
-
3 points111-6 with 30" single blade deck 416-H with 48" deck and bagger 520-H with 42" deck 520-H with 60" deck 520-HC 520-HC is still awaiting his arm rests but is otherwise complete. The 48" deck that came with it is partly restored and will be ready for next year. Thanks, Cleat
-
3 pointsI can now say it's completed! Even cut the grass with it today.
-
3 pointsGreatr video Craig!
-
3 pointsloojs like this "bloody" horse needs to find a vet...lol
-
3 pointsPrecisely why I got it Mike.... for, you know...that off brand guy next door.
-
3 pointsHere you go Mikey... enjoy your holiday bro.
-
3 pointsAt the show we walked around and took a few pictures of custom/modified Wheel Horses, what we looked for mainly is what need/ reason was this machine built by the owner. Now keep in mind that a "custom built" Wheel Horse could just mean the owner added two cup holders but I think what Eldon and others would like to do is build a custom/modified Wheel Horse that can do a special work task that a stock Wheel Horse could not do. Some of the "rat rod" Wheel Horses are neat and well built this can be easy to due being that one can bolt any part to the frame . My Mighty Lawn Ranger Six Speed was built to have the extra gears to get the most amount of work from the 6hp Tecumseh engine and the rear axle brakes were added so the tractor would not spin the rear wheels while working in the culvert in my front yard. The 1/2 Wheel Horse Lawn Ranger I built was for driving around the Portland, IN, by welding two frames together I could haul parts and people at the same time in the show grounds. On another note the put together/ scrap parts Wheel Horse could be done but even then time is an issue. Years ago I gave two brothers a (I think it was a Raider 10) a running Wheel Horse, drove it off the trailer Friday night took it all apart, cleaned it, painted it and put the tractor back together (running and tuned) by Sunday night. .......... it's more parts then you think. I do love my restored Wheel Horses but I'm a hot rodder at heart and like the custom/modified Wheel Horses too. It will be interesting to see just what shows up at the 2016 Wheel Horse Show
-
2 pointsIn a previous post of my Commando 8 redo, I discussed repairing the wallowed out key way in the axle. Instead I replaced the 3 speed with one I had on the shelf. Today while rooting out some potential items for the SHOW, there was that 3 speed. So today I made a stab at the repair. I made a dummy key from a piece of 3/16 brass , welded around it, and ground/filed it down. Only time will tell if the weld will hold up to the torque.
-
2 pointsIt was great to finally meet so many of the great Red Square members at my first Big Show! Everyone was so friendly and there were so many great tractors and things to see and do-it was really a fun day! I actually got so caught up in the excitement of the show that I bought my first tractor from JayinNC- a WH A-81 mower - within 10 minutes of getting there! Thank you very much for your hospitality! Sincerely, Mrs. Rules (Linda)
-
2 pointsI just bought myself a 16th birthday present and it isn't a truck its an rj35, I have been looking for one and asking around shows for awhile now and am very exited to have found one In this good of shape but I am not that familiar with the rj's yet, what do I have? from what I have learned so far its a late '55 to early '56 and is mostly complete except for a belt guard,cast steering wheel,reverse pulley and air cleaner. it came with the on/off switch and throttle cable, I cant wait to start up on getting this going!
-
2 pointsI managed a few... Here is Squonk at the bus stop... A great shot of Zeek Mike sitting on this year's Raffle Tractor Bob Maynard taking a spin around the ground...stopped to talk with me and my wife Chris This is Howard.....857 Horse from Virginia. Terry and Lola with Granddaughter...that's buddy under the table. Howard and Don ...varosd Vinsrj RacinBob...Bob and Nancy...it was excellent spending time with them this year. Jay in NC, Jack (wishin4a416) and Bob Maynard SteveBo Nylon (Karl), Fireman (Jeff) and Vin RWilson, Stevasaurus, KenB and RacinBob... Me and Cas (formariz)...holding up a couple of plates for Koen... Me, Birdie (RedBird) and Brian (Buckrancher) The rest are various attempts at getting a good group picture for this year...hope you enjoy.
-
2 pointsPretty busy at the show with the great unexpected weather on Friday. didn't get a lot of people pics as most were off wandering the show as well. Thursday night I realized I never took the phone out once. Tried to make up for it Friday. I hope someone got a pic of me trying to "Hitch Hike" during the cruise: Mirror shot when I left home. Where's The Dino? Here he is out at dinner! Got Racinbob's wife Nancy in a candid shot! Great people by the way, awesome meeting you! I took a pic of my tractors in case no one else did! RS First Dog Pepper! Karl at the controls! Tractors lined up Comin at Ya Steve campaigning again. I think with R Wilson A Wallfish inspired Hot Rod Zeeks Masterpiece. My favorite tractor at the show! Well done neighbor! Steve's Heavy Hauling! That blower and tractor fit like a glove on the vintage trailer! Looks like Lane snagged someone's skivvies during the parade! YIKES! Bringing up the rear of the parade. Pics from my Hitch Hiker seat at the cruise Lights are on but nobody's home!!!!
-
2 pointsLets see some burnouts with the flag waving! So far my independence display consists of sweeping the dead grass off of the yard now that's it's finally dry enough to do it and picking up dog poo. Oh and cleaning the tractor after I missed some. I' ll have my tractors and flag out tomorrow providing the weather man is right this time.
-
2 pointsGreat pictures Steve. Nancy and I had a wonderful time hanging with you and Chris as well. We sure had some good eats too! The internet and phone service was so bad in the Tennessee cabin we went to after the show I gave up and was RedSquareless for a few days. Still had fun and survived everything. Gotta bail the hay today but I'm looking forward to looking at all the pics and videos. I had such a great time meeting so many RedSquare members at the show.
-
2 pointsWelcome Mrs Rules ... most of us have sheds, but not one that totally engulfs wheelhorses'. Beware of anyone willing to store it for you. Rick
-
2 pointsstill pretty big operation for me, i'm used to see one smaller combine with two tractors with trailers that go directly to the farm
-
2 pointsGuess we all use unleaded gas but.............there was the day, long ago, lead was added to gas to help lubricate the engine. I don't use a lead additive but do add on occasion Berrymans or Seafoam to my fuel. Recently started using only non-ethanol gas in all my engines; 2 and 4 cycle engines. Tired of too many carb issues. One 16 hp Kohler in my '85 was runnin' not so good. Seafoam down the carb throat and non-ethanol gas fixed the issue in a jiffy! I couldn't believe how easy and how well the '85 engine is running, like new. Same routine for the '90 520-8 Onan. Fixed. Lucky me! When 1st pouring Seafoam down the carb's throats, smoke like a diesel. Then, like magic, clean exhaust, engines purring. Lucky me!
-
2 pointsThis was my 2nd trip up there to the "big show" and it was just as awesome as the first time I went. I didn't bring any tractors home, but I saw some cool stuff, and got a lot of miscellaneous parts for the ol' WH shelf, and most of all I got to see some old friends and meet new ones! big 12" meats on the back Cool vintage bicycle headlights. Pretty much the most awesome vintage sign ever. This was for sale at Dale's. I'll have one one day! White walls!! Shoo-fly pie! Mmmm! Craig test driving/cutting his wife's new A-81 from Jay. This is John's (wallfish) 401. I got to ride it around a little bit and it was so cool! Ice cream social Friday A little sun set action This is what it looked like on Saturday morning at 6:00am Looks like Rich's 953 was following me in bumper to bumper traffic on I-95 going home!
-
2 pointsBuddy and our granddaughter Taylor getting ready to head out to the Big Show, she was sitting in his seat.........lol Buddy stole a hat as soon as we got to the show, his friend from 2 years ago came by to see him. Buddy wanted his hat so he gave it to him lol This is the gentleman that came by to see him........I think Buddy remembered him from 2 yrs ago Getting everything set up and looking handsome.............Taylor was looking cute to... had another friend stop by and see Buddy, she met him 2 yrs ago also and was hoping he would be here..........I think he likes her this sweet little girl just wanted to give him kisses................. he loves our granddaughter Taylor........................
-
2 pointsI had a great time and even enjoyed walking around in wet socks for a change! Rain did not dampen any spirit at this year's show! The variety of tractors and attachments were great ! Glad to reconnect with old friends and make some new ones Too!
-
2 pointshere some pic's the wife took Mike ,Steve and me Steve ,Mike ,Karl , Steve and Doc me and Vince guess who sneaked in this shot My wife Jo on the 854 Brian
-
1 pointAs some of you may know there has been some discussion about having a meet n greet at the family farm in western NC. I wanted to make it official that this will happen and it will be Sat-Sun of the first weekend in oct The address is 242 Mcmurray Road Rutherfordton NC 28139 There is plenty of room for RVs and trailers. However there is no provisions for water and power to plug in. I will rent a porta john and water is available. This is a first for us so any suggestions are appreciated. Thanks Bert
-
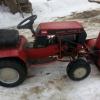
1 pointHi all, I'm new to this forum but I was lurking around researching before I bought my first Wheelhorse a couple of weeks ago. I bought a 520h and am really impressed with it. I don't know what year it is but it has the swept front axle.
-
1 pointNice AMC, thanks for the link. I did use a plate some years back with a similar setup. I did, hate to say, break a hub long ago using a 3-jaw puller. Ouch! While the hub is off, you might try a quick little change. 7/16-20 x 1-1/2" long bolts, 7/16-20 open ended acorn lug nuts. A little blue Threadlocker where the bolts sit in the hubs.
-
1 pointI think you stand a higher risk of breaking your hub using the type of puller you have there. For reference... http://www.wheelhorseforum.com/topic/55557-wheel-hub-puller-needed/#comment-515679
-
1 pointLet me be the first to say We can come up with thoughts on how to make this a great success and an ongoing event. LOVE IT!
-
1 pointCraig, looks great. Americana at its best. My display will be the same as last months, the 854 up by the street with the flag tacked to the split rail fence. Glenn
-
1 pointWelcome
-
1 pointAnything I've ever read or heard about using unleaded gas in an older engine is as follows.Unless you're running an engine at full throttle and under a constant load,no damage will result to valves or valve seats.How many of us here run an engine at full throttle and constant load for hours at a time? I know I don't.
-
1 pointI like the idea and would be more than happy to participate on a team. I'm not all that knowledgeable on all the aspects of building these tractors, but what a great learning experience it would be. I'd like to know a lot more about rebuilding the kohler engines and transmissions. The frames, steering and bodies are fairly straight forward. I've come to really like Wheel Horse, and the more experience I could gain would only fan the flames of this addiction.
-
1 pointMade short work of that job didn't they. I have never seen the mid mounted disc setup, looks neat.
-
1 pointearly K's did not have valve seat inserts they used the cast iron block Brian
-
1 pointKarl, This was a subject that was on my mind to speak to you about but we didn't get enough time together. Years ago at the show we tried to get teams to put back together a model 656 and see what team could do it the quickest, sort of like at the county fair were a group of guys rebuild a model T in 10 minutes. Well what happened was nobody wanted to attempt this project at the show. I had a model 656 taken apart (except the engine and transmission) with the parts laid out. What ended up happening was Ed Mayhew and I put the tractor back together with taking challenges from the crowd as to just how fast we could do it (and a whole lot of heckling too). Times of 1/2 hour to 45 minutes were figured but it did take us only 18 minutes (tractor running and no power tools). AT the Florida Flywheels Show I attempted to build a pulling tractor from parts found in the flea market and enter the tractor in the pull ........... I got close but the cost was too high and this with no hi performance parts. I ended up borrowing weights and putting them on my 854 for the 1,000 pound class, with me on the 854 and borrowed weights we weighed in at 600 lbs BUT we still beat a John Deere in the class ! Fabrication takes a torch, a welder and a engineering mind with lots of time. Wild Bill
-
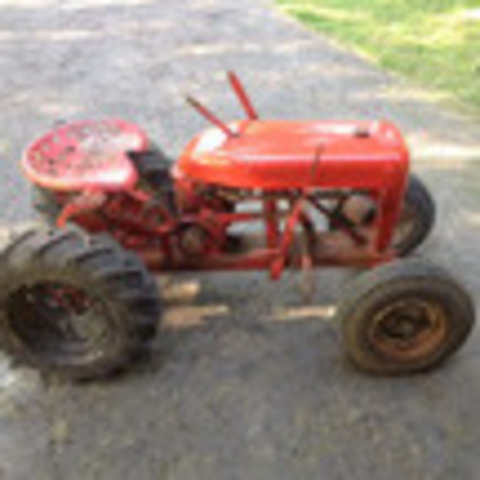
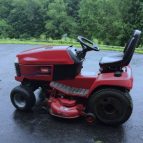
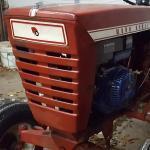
1 pointHi all, I have question that only you guys can answer for me. My name is Tony and I am from Australia. I live on small acreage and I need a ride on that will pull heavy loads, like the log cutter, log splitter and the tandem trailer loaded with split hardwood and still cut grass. I have killed my 5yr old MTD 20hp 42in cut, it will cut grass but only if it is real short and on the flat.As I am an ex Canadian so I know of the wheelhorse lawn tractors and I have found one down here, it's a TORO WHEELHORSE 312-8 RIDE-ON MOWER, 38" CUT, MANUAL TRANSMISSION, year unknown. I have loaded a photo of the wheelhorse below that I am looking at and a photo of it needs to do.So my question is this wheelhorse up to the task or will I kill it as well?All advice is greatly appreciated.Regards Tony
-
1 pointBeing all caught up in the WH mania, I forgot and left my camera in the truck... so these are the picts my Mrs Rules captured. Here's the prodigy himself, Jake Kuhn...and his meticulously restored RJ and 401 Mrs Buckrancher(Jo) and Jay Holt(JayinNC) just before the start of Friday's WH parade. The Squonk(Mike), JayinNC(Jay), and myself(AMC RULES) checking my Mrs Rules new A-81 mower purchase. The reason why everyone calls me Bob at the show...Me and Trouty56(Bob)hamming it up. The RJ-35 guru himself VinsRJ(Vin)diggin' my new "Where's Craig" shirt. Steveasaurus, Jusgettingby, Racinbob, Trouty56, and myself all just chewin' the fat here. Me with the stainless steel master himself...Buckrancher(Brian) Mrs&Mr Woodchuckfarmer(Wayne)enjoying a cruise with one of their adorable granddaughters. Me and that Clintonut(Charlie)caught doing a little catch up. End of the day...Me& the Zeek after successfully loading up the Cheese Grater. ...and finally, a new RedSquare member here...Mrs Rules waving bye, as she rides off into the sunset on her new A-81 mower. I just wanted to say thanks again to all of my wonderful RedSquare family who gather every year at the big WHCC and help to make it such a glorious event.
-
1 pointI use lead additive in all my older tractors. The motors where designed at a time when lead was the norm in gasoline. I remember correctly it had to do with engine temp and valve lubrication. For what it cost for a bottle it sure can't hurt.
-
1 pointHere are some pictures that my girlfriend took while at the show! I'll have to get her to join the forum!
-
1 pointOkay, I'm going to be the old wet blanket. Here is the drawback as I see it. A similar idea was floated a couple years ago to have repair seminars and fix it/build it challenges. Though it sounded good, it never got traction. Mainly because there are only so many hours that you can spend at the show. I personally like to participate in or watch the parades, walk around taking pictures, looking, buying, selling, and talking with friends without having to be engaged in a time consuming project. I do not want to spend my time building a tractor. I do that 6 months out of the year before the show so that I can relax at the show. Just my 2 cents worth.
-
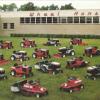
1 pointSo, here are mine. Not many human interest pictures like Stevasaurus posts, but this is mainly to give those not able to attend a feel for the "sea of red" at the show. I'm not sure what happened Saturday, but my pictures were taken after we set up on Thursday, and Friday morning. The first couple are of our campsite. The "Maynard Hotel", with Zeek's hauler/camper in the background, and Brian & Jo's Wheel Horse hauler/camper. The "uptown" campers Karl walking his dog. Stevasuarus talking to Racinbob and his wife, with Steve's wife Kris talking to Terry (vinylguy) in the background Don Varos in red discusses pie. Vinylguy's setup before they moved him to the barn. Bob Maynard's Wheel Horse Stuff. Yup, that's my display. rwilson. wallfish. woodchuckfarmer, and Jake And then the rains came. Off came the shoes and it was swim time. These next pictures are Friday's. This year they had a safety seminar for tractor drivers 15 and under. Wild Bill had a course set up for the kids to drive. If they passed, they got a red wristband to say they were safe drivers. I think every one passed. No thanks Steve, I'm trying to quit. He worked at the teeter-totter all day and finally SUCCESS. And here is everyone that showed up for the group picture...
-
1 pointGlad i didnt bring a trailer. Lol.
-
1 pointWell since retiring MJ has had me pretty busy so we elected not to go to this years show. One because of the time, and the other is because we have been spending a lot of money on building materials for the projects we have been doing around the house. At Last years show I talked to Rich Wilson and he told me he had a tall chute blower for sale. After the show we talked on facebook and we agreed on a price and I paid him for the Blower. After a couple transports fell through I asked Stevasaurus If he could transport it to my place on the way home. My buddy came through for me as always! Thanks Steve. Him and Chris came by and we had a GREAT VISIT. MJ and I enjoyed that very much. It's always good to see our Pals. After unloading the spare back up blower. I showed him around the DUKE"O"MINIUM and of course he had to get in and fire up the Ole Snow Chucker and hear that Onan Purr. Here are some Pics. Oh by way.... one thing that I didn't like was this Looney Tune FLAMINGO he brought with him! Darn thing went over by our pond and tried to violate our Blue Heron Crane!! And if that wasn't enough that thing tried the same to our Peacock and my Horse's!
-
1 pointGreat to meet you Mike. Thanks for letting me have some of that rhubarb pie!
-
1 pointAll good suggestions. If you ran the tractor for 45 minuets without any issues by cleaning/leaving the cap loose search no farther. If you lost your keys and found them, you wouldn't keep looking for it so leave it alone unless you have more issues then dig a little deeper. A lot of times fiddling with many things at once will only get confusing and you will never know what the cause really was, not to mention it may cause other issues and more frustrations. There are a lot of great guys willing to help you out on here if you get stuck. If you do ever remove a spark plug to check for spark, keep it away from the hole you removed it from, spark + fuel air mixture equals flame. Not to mention you may have to clean your shorts afterwards :-). And be careful, coils have a nasty bite so make sure you have it grounded good. Or even better go to your local auto supply store and they should have a test spark. It looks kind of like a spark plug but has an alligator clip so you can ground it, just have to remove the wire and you don't have to worry about either of those two conditions. another way is to buy an inexpensive inductive timing light and you will know right away what you are loosing if you run the tractor and know when it is about to shut off.


.JPG.ef4f4e37c6517f95bd36dbf5a1dfe0f6.thumb.JPG.2f2f4facf8a15b67d67829dcbaa787c9.JPG)


This leaderboard is set to New York/GMT-04:00