
Leaderboard


Popular Content
Showing content with the highest reputation on 06/27/2015 in Posts
-
20 pointsSo, here are mine. Not many human interest pictures like Stevasaurus posts, but this is mainly to give those not able to attend a feel for the "sea of red" at the show. I'm not sure what happened Saturday, but my pictures were taken after we set up on Thursday, and Friday morning. The first couple are of our campsite. The "Maynard Hotel", with Zeek's hauler/camper in the background, and Brian & Jo's Wheel Horse hauler/camper. The "uptown" campers Karl walking his dog. Stevasuarus talking to Racinbob and his wife, with Steve's wife Kris talking to Terry (vinylguy) in the background Don Varos in red discusses pie. Vinylguy's setup before they moved him to the barn. Bob Maynard's Wheel Horse Stuff. Yup, that's my display. rwilson. wallfish. woodchuckfarmer, and Jake And then the rains came. Off came the shoes and it was swim time. These next pictures are Friday's. This year they had a safety seminar for tractor drivers 15 and under. Wild Bill had a course set up for the kids to drive. If they passed, they got a red wristband to say they were safe drivers. I think every one passed. No thanks Steve, I'm trying to quit. He worked at the teeter-totter all day and finally SUCCESS. And here is everyone that showed up for the group picture...
-
10 pointsPretty busy at the show with the great unexpected weather on Friday. didn't get a lot of people pics as most were off wandering the show as well. Thursday night I realized I never took the phone out once. Tried to make up for it Friday. I hope someone got a pic of me trying to "Hitch Hike" during the cruise: Mirror shot when I left home. Where's The Dino? Here he is out at dinner! Got Racinbob's wife Nancy in a candid shot! Great people by the way, awesome meeting you! I took a pic of my tractors in case no one else did! RS First Dog Pepper! Karl at the controls! Tractors lined up Comin at Ya Steve campaigning again. I think with R Wilson A Wallfish inspired Hot Rod Zeeks Masterpiece. My favorite tractor at the show! Well done neighbor! Steve's Heavy Hauling! That blower and tractor fit like a glove on the vintage trailer! Looks like Lane snagged someone's skivvies during the parade! YIKES! Bringing up the rear of the parade. Pics from my Hitch Hiker seat at the cruise Lights are on but nobody's home!!!!
-
7 pointsHad a great time at Wauseon Ohio Show Fri & Sat. Well worth the 150 mile one way trip. Thanks. Pat, Bill, Carl, Rod, Steve & John. You really made me feel welcome & took good care of me.
-
6 pointsHere's a few of mine. A little wet today, but yesterday was beautiful and made it worth it. A pretty fair amount of people stuck around today. Awesome time and great seeing everyone again This is the camping area (some of it) with buckranchers rig and hotel Maynard Hotel Zeek Squonk and Steve. Since everyone always asks Squonk where Craig is, he decided to just get a shirt. Craig has his own custom that says "Here's Craig" Me . . . I missed the official Red Square picture because I was 10 deep in the lunch line when it was taken Mrs. Buckrancher and Mrs. Zeek Mrs. Zeek and Rocuski's mom Nylyon (Karl) videoing the safety class BPJunk doing the safety class Rocuski's dad hard at work . . . My Raider project . . . .
-
4 pointsNeed a tin roof on it. It says premium because it has stronger legs to hold more water.
-
3 pointsI am so fortunate to have been able to make it to the WHCC show. I spoke with a lot of you, both members and non-members of RS and one thing we all agreed on. The WHCC show is really a first class production. No one could think of another show which is as well run as this one is, from Bill and his famous white pants and red shirt to the church ladies serving us our food (and everything in between). So if you've ever attended I think you'll agree, this is THE event to attend. That said, this is really important.... The show is FREE for us to attend.... that's right FREE! BUT it is NOT free to put on. Where does the money come from? The sale of raffle tickets, shirts and of course WHCC membership. What's that, not a member? I'll make it easy for you.... download the attachment today and send in your $10 for a year of WHCC membership! Better yet, go to the 2016 show and show your support, the shirts are absolutely the best quality with a breast pocket. You MUST mail in your application with a check or money order as PayPal and Credit Cards are not accepted. Please support them, if you've ever attended the show, you know why, and if you haven't, supporting will help insure the show will still be there when you can attend! WHCC_MembershipApplicationForm-v2011.pdf
-
3 pointsAnd I want to thank Jo Marion (Mrs. Buckrancher) for taking the group picture for me again. She always does a great job. Thanks Jo.
-
3 pointsIt's thinning out, hope that there's a great cruise night.
-
3 pointsSince the weather forecast was looking ominous, I was all packed up and ready to go home after the campfire. Many others had already left, and still more were securing their stuff or moving into barns or under pavilions because of the forecast So here are a few pictures that I took just before I left last night. I don't know how many more showed up, but before I took off, the campfire was great.
-
2 pointsWheel Horse B/C/D Tractor Dash Panel Restoration Tutorial How to properly restore a Tractor Dash Panel Wheel Horse Dash Panel Restoration Tutorial Originally posted by: MikesRJ - 03/06/2010 Click any picture in this article to view a larger version of the image Restoring old tractors (garden type or full-size farming equipment) presents the restorer with many challenges. Not so different from automotive or aircraft restorations, certain little tricks-of-the-trade are learned along the way which every restorer should have in their basket of tricks. The older a restoration subject is, the harder at times it is to locate a suitable "show-quality" part to complete the restoration. Sometimes you simply don't have a choice but to restore the part you have in hand because a replacement just simply does not exist. This how-to presents one of those tricks. The best part about this particular restoration technique it that it can be used on any part made of plastic, PVC, vinyl, leather, cloth or wood. The images above are of the Dash Panel before it was removed from a Wheel Horse C-160 Tractor, and after this restoration process was performed. Yes, boys and girls, that is in fact the same dash panel shown in both pictures. Excellent results can be achieved if you remind yourself to be patient, take your time, and follow the process presented here. Practicing the method on anything with raised letters beforehand also greatly enhances your chances of success. Simply follow this process on a "scrap" item and you should be ready for the actual piece in no time. PROCESS OVERVIEW: As restoration quality and New Old-Stock (NOS) Wheel Horse Dash Panels are harder to come by, it becomes necessary to restore what you have rather than replace the part entirely. This page is dedicated specifically to the restoration of an otherwise "good condition" dash panel that has been time-weathered, and return it to its original luster. Before moving on to restore your tractor restoration Dash Plate, it is HIGHLY SUGGESTED that you read through this entire article and perhaps try this method on a spare or "sacrificial" part beforehand. You only have one chance to do it right on your final piece, and a million ways to do it wrong along the way. As a side-note: This process can be used with very little variation on any tractor part which is made of vinyl, plastic, PVC, cloth, leather, or rubber. The VHT line of products is extensively used in the automotive/aircraft restoration worlds for returning anything made of these materials back to near original appearance. See more details concerning VHT Vinyl Dye products at this website: http://www.vhtpaint.com TOOLS REQUIRED: 1. Small bristle brush and Dawn Dish Detergent 2. 1/8" Metal punch and heating source (if making repairs) 3. 800 grit Wet/Dry Sand Paper 4. 0000 (fine) Steel Wool 5. Common Automotive Brake Fluid 6. Paper Towels 7. VHT Vinyl Dye, Gloss Jet Black (p/n: SP941) 8. Elmer's "Painter's" Opaque Paint Marker (fine & wide tip) 9. Dental Picks, Tooth Picks, and/or Exact-O Knife PAINTING TECHNIQUE: The white borders, letters, and symbols on the dash panels were originally manufactured using a screen printing roller technique. This method produces an extremely thin, opaque layer of material which is extremely strong and relatively long lasting. Since reproducing this technique is far more difficult for the "home restorer", the method presented here is relatively easy, and mimics the original process quite well. The technique I use is pretty straight forward and quite simple to do at home. In order to apply the thinnest coat of paint the tip of the paint marker should be as "dry" as possible, but still contain enough material to deposit on the surface. This technique is called "Dry Brushing" and is used by painters and modelers as a method for adding subtle details to whatever they are painting. For the purpose presented here we are using this method to apply the thinnest coat of material we can, in each successive pass over the surface. Once the paint marker is prepared for use per the package directions, the tip of the marker should be touched to a paper towel and dried off as much as possible before touching it to the part to be painted. When moving to the next paint area on your subject piece, re-load and re-dry the tip, then proceed. When painting with the white paint markers, insure the tip is about as wet as when using an artists "dry-brush" technique before touching it to the part. Apply the paint so it thinly "flows" over the surface, and use a paper towel to keep the tip "almost dry" of wet, runny paint between individual characters on the plate. Apply the paint with a very light touch in single passes only. Don't cover any more than a single pass at a time, building layer thickness with each additional coat. As always, follow the package directions for all of the products used in this process. When applying the paint, you are NOT wiping it onto the surface like a paint bush. You are also NOT trying to cover the surface completely in a single pass, rather you want to build successive layers, allowing each layer to completely dry, until an even and completely opaque coverage is achieved. If you attempt to wipe the paint onto the surface, you will produce "edge roll-over" and the paint will either bulge over the side edge of the surface, or run down the side, both of which conditions are undesirable. You should apply the paint in a very light tapping, or patting, manner where the tip is ever so lightly tapped onto the surface, moved over half of the width of the paint marker tip and tapped again; and the process continues from one end of the detail to the other. The only exception to this is when you are applying paint to long, continuous details such as the two border lines around the Dash Panel. These features should be lightly glided over using the dry brush method, from one end to the other end, and the tapping method is applied to finish the strokes at the very tips of these details. Aside from the method of application, the most important factor to keep in mind is that you are NOT trying to completely cover the underlying black dye color in a single pass. What you ARE trying to do is build-up multiple, very thin layers of paint until the white completely masks the black underneath. If done in this manner you are left with very sharp, crisp edges and an overall very thin opaque paint coverage of these raised dash panel details. The second most important aspect is that you insure your panel is well supported, i.e.: will not move during the painting process, while the heel of you painting hand is firmly planted on the work surface as you apply paint. This will insure the steadiest hand, and you will therefore have better control of the paint marker tip and where it touches while you apply the paint. Of third importance, as in any paint application process, starting off with a well prepared surface ALWAYS results in a higher quality final appearance. Complete and thorough cleaning, drying, repairs, and re-cleaning are all painstaking and necessary steps before applying any dye or paint to the surface. The instructions below go into greater detail where necessary, and if followed closely will result in a "better than new" looking part for your tractor restoration. Step 1: Thoroughly Clean the Dash Panel Here's where it started! Once removed from the machine, the entire dash panel should be thoroughly cleaned of all dirt, grease, oil, and old marking paint on all sides. Automotive Brake Fluid is a good paint and marking ink softener, but care must be taken to insure the brake fluid does not "melt" the plastic. I normally test the brake fluid method on the back side of the part, or on any surface which will not be seen when the part is re-installed, in order to insure the brake fluid will not attack the plastic material. Use the brake fluid sparingly, and allow it to sit on the surface at least 1/2 hour, to "loosen" any foreign materials (paint, ink, or hard stains) from the surfaces. Then with a combination of 0000 steel wool (try not to scratch the plastic), gentry scraping using the edge of an exact-o knife, and/or dental picks and tooth picks, you can easily remove all of the unwanted debris. Once all of the foreign matter is removed, the plate should be thoroughly scrubbed with a small plastic bristle brush and Dawn Dish Detergent. This will remove any remaining oil and dirt from the plate, the corners, and the edges. Rinse with warm water and allow the piece to thoroughly dry before continuing. Once it is completely cleaned it should look similar to the image below. Starting Point Step 2: Repairing Surface Blemishes This is the tricky part. If any surface blemishes exist, you need to make a choice whether to make a repair or leaving it as-is. Obviously, starting with a high quality unblemished panel is more desirable, but you may not have a choice but to use a "less than desirable" piece due to replacement part availability. Attempting to repair any surface issue may only result in a far worse appearance than leaving it alone. Choose wisely based on your abilities. Only one surface blemish was corrected on this example (the second "N" in "IGNITION"), the second blemish (the "wiggle" in upper left corner of the Electric Clutch "OFF" arrow-bracket) was left alone as it was too dangerous to attempt repair without further damage. The right side of the "N" was smashed down and the right "leg" of the "N" was partially split in two. A small round punch was used to "re-form" the letters edge by heating the punch tip to just below the melt point of the plastic, and "pushing" the letter back into shape. The split essentially closed up and re-bonded to the adjacent part. Care must be taken to not overheat the punch as you do not want to melt the plastic, only make it soft so it will "move". Once repairs are completed, re-clean the part as you did in Step 1. Step 3: Restore Plastic Color and Shine Many products exist which are designed to restore vinyl and plastic to their original luster. I have used many of them with varying results. VHT (A division of Dupli•Color, Inc., a Sherwin-Williams Company) produces a vinyl dye which comes in several colors, and in Gloss and Flat finishes. The product is NOT A PAINT, it truly is a dye designed for vinyl, plastic, cloth, leather, and wood. The vinyl dye, when applied to plastic, forms a polymer on the surface which actually transforms the plastic material surface into a new material matrix. I prefer the look of the hi-gloss finish as it makes plastic parts look more realistically like a "new part" than does the satin finished dye. VHT Vinyl Dye, Gloss Jet Black (p/n: SP941) in the 11 oz. aerosol was used to treat this Dash Panel, which only required a single, light coat to restore the dash panel to its original appearance. NOTE: Allow the dye to absorb and surface-dry at least 4 hours before proceeding to the white painting process. Step 4: Applying the First Coat of White Paint Applying the white paint is rather easy, but does require a little technique and a steady hand. For this step I used Elmer's "Painter's" Opaque Paint Markers (available in most craft and hobby shops). The markers come in several tip-sizes, I used the fine and wide tips here, and is composed of an opaque acrylic paint. The acrylic paint bonds extremely well to the dyed plastic, and holds up to temperature variations and the weather quite well too. LARGE PANEL DETAILS: When using the paint markers, do not press down with any significant force while painting. The driest tip (artists "dry-brush" technique) and the lightest touch (the least amount of downward force) on the plastic produces the best results. Using the wide tipped marker, dry the tip on paper towel and very lightly cover the large borders with a single pass. DO NOT go over them a second time, as doing so will leave "brush marks" in the paint. The result should be an almost see-through appearance of the white paint. Several coats will be necessary, so if the black shows through, leave it alone. Also, "paint" any large details on the face area; such as the choke symbol, large letters, rabbit and turtle; using the wide tip paint marker, but use the "PATTING" paint method described below for these smaller details. SMALL PANEL DETAILS: As before, you are applying a very thin coat, so make sure the marker tip is almost dry and apply only a very thin coat on the first pass. Using the fine-tip paint marker for lettering and small details, use a patting (or tapping) technique to apply paint to the tops of the letters. Begin at one end of the letter and overlap your taps, moving toward the other end of the letter. Don't wipe the paint on, PAT it on! Especially at the ends of the letters. This keeps the paint from "rolling over" the edges of the raised detail. Dry the tip on your paper towel frequently, and between every new detail painted. NOTE: Notice the black showing through the white in the image below. Keep the first coat VERY, VERY light. Step 5: Apply Additional Coats of White Paint ALLOW AT LEAST 4 HOURS BETWEEN COATS The application of paint continues as described in Step 4 until all of the painted areas are completely opaque and covered well. With each pass you will see the paint begin to almost "pool" on the top of the surface. As the paint dries it will flatten out to a nice even coat. The desired result is normally accomplished in just two to three coats of white paint. If you have blotchy or spotty coverage, you can use 800 grit wet-dry sand paper to lightly sand the white faces flat and even the paint coverage, then apply a final top coat after re-clean and dry the part. Make sure you allow the paint to dry thoroughly before sanding, and re-clean the part before applying the next coat of paint. Make sure all surfaces are evenly covered without brush strokes. The image below shows good coverage with very little over-painting or edge "rolling" after only two coats have been applied. Some letters and small details will need to be scraped and cleaned up prior to applying the last coat of white paint. Step 6: Finishing Up The final step in the process is to clean up any mistakes or over-painting (edge-rolling). This step is normally done BEFORE the last coat of white paint is applied, so that any scrape marks or edges can be covered on the final pass. I normally use dental picks, tooth picks and/or the tip of an Exact-O Knife to clean any edges which were over-painted or where errant paint has been deposited between letter lines. Any over-paint on the panels surface can be covered up by spraying some of the VHT dye into a small cup and using a fine tipped artists brush to "dry-brush" the paint drip into oblivion. Once the final coat of white marker paint has dried for at least 24 hours, crumble-up a piece of regular kitchen paper towel and buff all of the white painted details. The paper towel material is just course enough to polish the top surfaces and burnish the edges of the white details, giving your panel a "finished" look. The polishing will also remove any specs of dust which may have settled on the surface during drying time. Your piece will now be remarkably similar to an original new part, and is ready for installation on your pride and joy machine. The completed piece is now "Show-Ready" and looks like the images below. My thanks go out to Bob Maynard ("RMaynard"on the Red-Square forum) for the use of his B-80 dash panel in the creation of this How-To. Bob mentioned somewhere on the bulletin board that he was in the market for a NOS Dash Panel for his B-80 restoration. He also mentioned that he had an old usable one in-hand, but did not think it was show-quality enough for his restoration. I offered to restore his old panel for this tutorial, with the thought that he could perhaps use the result on his B-80 should he not find a suitable replacement. I hope you enjoy the tutorial, and Bob; Thank You for allowing me to use your panel for this example.
-
2 pointsDefinitely, a first class production... well worth the minimal cost of membership.
-
2 pointsProbably a better chance of seeing God.
-
2 pointsYou can say that again!
-
2 pointsI started taking pictures on Thursday and when I reached number 26, that camera said "no more storage". It was a 16 GB card, so I knew I had more than 26 pictures available. So I promptly decided to find someone with a laptop and a card reader, save my 26 pictures and then reformat my SD card. So I opened camera and much to my surprise, there was no SD card. DOH!!! That is when my friend Steve came to the rescue and lent me an extra SD card that he had. Dino, you're the man. Pictures will be posted as soon as I do a little editing.
-
2 pointsYes, and fortunately the only copy remains in my possession.
-
2 pointsBeen there, done that! Only mine was with the old school (I think called it "film" ) and realized that it was still winding at #39. Steve, really is 'Dah Man!
-
2 pointsWhat I am going to say is my opinion, but I know it is shared by many. Always select a machine shop that has experience with small engines, specifically Kohler. Always have a copy of the Kohler K-Series service manual and rebuild manual on hand. (available for free download on this forum). Always read completely how to rebuild an engine if you are going to attempt it yourself. Always follow Kohler's instructions in the manual. The commonality that I see here is the "professional mechanic". I have known many professional mechanics that I would not let touch the inside of my engine. There is a big difference between a mechanic and a machinist. When a cylinder is bored, you should always have the replacement piston and rings on hand for the machinist to check specs as the bore is being cut. Without it, he is basically just guessing at a size. There is nothing wrong with Stens parts. Even if they are slightly out of spec, a good machinist will adjust to compensate for differences. Kohler recommends using straight SAE 30W, SF or better oil for break-in.
-
2 pointsGrandsons needed to sweep one section of the bank barn. Rides out. Pennsylvania Panzer Wagner Allis Chalmers B-10 Work Horse 416-8
-
2 pointsElvin Bishop Old School and Can't Even Do Wrong Right http://prairiehome.publicradio.org/listen/?date=2015/06/20&identifier=apm_audio:/phc/segments/2015/06/20/phc_segment_11_20150620_128.mp3
-
2 pointsOk Callen Lucky for me you were right. I pulled the weight off and noticed I could stick my finger in the whole, so I gave the wheel a good tug and it popped right off almost knocking me over. I ran my finger inside the hub and noticed that neither set screw were tightened enough to even feel them. Lucky for me that it didnt fall off when my son was out riding it. I pulled the hub off the wheel and tightened BOTH set screws as tight as I could get them. then reassembled it and did a test drive in 3 Hi and held the wheel all the way to the left at full throttle. Got a little sketchy at times, felt like the machine was on one rear wheel a few times. Then I tried some grades side ways to get the wheel to slip. When I get it back in the garage,,, nothing no more than 1/8 of play on the axle..even with me pulling with my feet against the machine. So trans seems good ... so it appears I am back to it being a tire issue.
-
2 points
-
2 points
-
2 pointsMan, did it rain last night. Hoping for a reasonable day today. Weather looks like it's going to cooperate until this evening. Probably going to start another downpour just as the "cruisin' to the oldies" gets started. Then, the rain starts again after midnight, and is expected to continue very heavy all day Saturday. 2" over 8 hours is forecasted. I think today (Friday) is going to be the best day. I've got lots of pictures, but can't upload them until I get back home. This is a shot from the poor man's camping area, as opposed to the shot from Karl, taken in the "uptown" camping area.
-
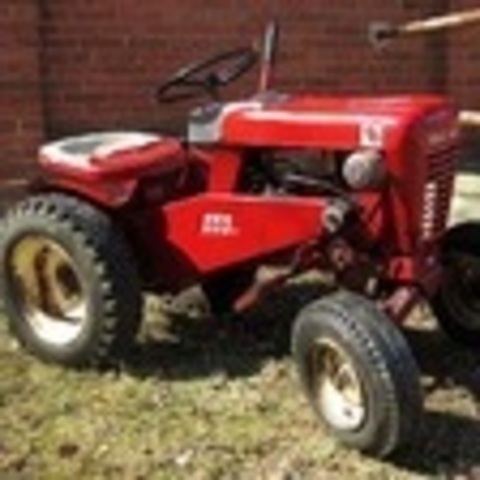
1 pointThanks guys for your input on my shirting problem with my A-81 project. It is now cutting grass again- It is kind of a MUTT , but some of the best pets are. It is basically a 1979 A-81. It has been repowered with the 12hp engine from my Dads old MTD mower. Some of the pulleys are from there too. Then I replaced the rotting front wheels and tires from the MTD on the front of the A-81 giving it more ground clearance and making use of the better tires. Gas tank is also out of the MTD- tank holder is from a 656 WH. Steering wheel was smashed, so I Epoxyed it together- (it had plenty of time to cure, its been hanging in the garage for 5 years). A little welding and cussing fixed the deck- and the shifting was fixed by putting in a rod next to the drive belt to provide a "Pucker Point" for the belt so it would move away from the motor pulley when the clutch was applied. Got belts from TSC , Deck wheels at Mentone. Still a little fine tuning to do- but this is just a worker so no paint. 12 hp Briggs gets so much better gas milege than the Kohler on my C-125A, so this is my mower now. Still looking for the correct gas tank-lays alongside the Briggs- then I can put a wire mesh hood on it. In researching this project, I could see where the Wheel Horse Engineers changed things in later models, for easier use for the consumer. Thanks again- time to cut grass!- Al
-
1 pointI drove a few hours out to the Poconos from Central PA to pick up a 417-8 Speed a gentleman had here on RedSquare in April. I've been putting hours into it and fixing/painting/shining it up. Bought a set of decals for it from Vinylguy and have the engine purring real well with a new set of points and a condenser, carb cleaning, new fuel lines and filter and new plugs. Some wires and ends fixed. A new tie-rod end and front bearing and the seat is getting reupholstered. The muffler lost it's chrome except for the tip which I tried to save! (Not sure I like that yet)! Compression is 97 - 96 PSI. It's a 1986 with 1280 hours on the working clock. Still need to do the rims and swap tires with a better non-cracked pair of turfs. It actually looks too nice to mow with but it will be a worker. Maybe just not as hard as my 310 and 416! I like knowing this KT engine has some oil pressure inside it! Before and Afters. (Picture heavy). I chopped the resolution a little so I didn't kill anyone's weak broadband. Wanted to get to the big show since I'm a hair less than 2 hours away from it but it isn't going to happen this year! Again!
-
1 point
-
1 pointHe was getting to the real scary part and that's when I left.
-
1 pointWell done!!! Thanks for sharing!!! It was my first time in the red square group photo too.
-
1 pointI wanted to personally thank Wild Bill for taking time with each kid to go over the tractors and walk them though the course. A+ in my book Bill !!!
-
1 pointThat's an awesome prize! I was wandering about the drawing but heard nothing about it so I figured I didn't win...haha. Thanks for the wonderful popcorn, we are going to pop some shortly over a family movie night!
-
1 pointI wouldn't pay the $200 for a new coil so I went to some local small engine repair shops and looked through their used stuff. One person had a 5 gallon bucket of coils and said I can look for one in it. Out of all the coils I found one that had the right spacing and the holes looked large enough for the bolts to go through. After checking it with a meter I took it home and tried it on the engine. I couldn't adjust it to the right gap so I drilled the holes a small bit larger and had .008" gap. Put on a new spark plug cable and fired it up. Just got done mowing the upper yard and it works great. $22.38 for the coil and plug wire.
-
1 pointI got to say a BIG thank you to Terry for this cool prize......for those who picked up their popcorn Terry hosted a raffle for this cool item.... A 1956 Ford F-100 Pickup truck modified with some custom decals featuring a 1956 RJ......how neat is this???
-
1 pointWell all the bodywork paid off. The paint turned out fantastic on the fender and hood. It took a long time to get all the dings and dents out of the hood but it paid off! I'm pumped!
-
1 pointI have been going to the show for a couple years now but never did the cruise night until last night. loads of fun. I cruised with another Work Horse side by side for awhile. gotta put a little Grey in the sea of Red!
-
1 pointGlad you didn't have to get into the gearbox. If you tightened the hub where it is in your pic, the key can come out. You really need to move it out flush with the end of the axle shaft. The setscrew over the key will force the key to rotate the outside end of the key up into the key way in the hub. If it comes loose again it can only move in and won't be able to come off. The hub on the other side looks like it needs attention, also.
-
1 pointThat is how you do it! Good score!
-
1 pointCallen I hope you are right ..... I will try to pull those tonight... and I will post picts of what I find
-
1 pointI've got the spirit! Next best thing to being there.
-
1 pointThe link worked for me. I really like the idea of a kid safety/cert program. I have seen a few young hot-rodders there rippin the place up! Mike.....
-
1 pointpulley has a one inch bore. see pictures of mine, see the set screw between the splines?
-
1 pointThanks Karl @nylyon and Terry @Vinylguy for making this all happen! It's been a tremendous thing that we can add to the forum for all the folks who haven't or can't make it out to the show! You guys are awesome!!
-
1 pointAbout three weeks ago, I started having a starting issue with my C-100 it was obvious that the battery was weak. She just wouldn't turn over. When I hooked up the Schumacher charger/starter for a jump start, it took right off. I did this the following two weeks. Last Tuesday, I took the battery to Wallyland and they charged it and said there wasn't anything wrong with it. The battery is three years old. Yesterday, I took the rectifier/amp meter off the tractor, lightly sanded the male plugs and rinsed them off with electrical cleaner. I did the same with the female electrical couplers. Twenty three years ago, I had the same type of problem and the WH dealer solved this problem by doing this method. The dealer explained to me how he fixed the C-100. This owner/dealer was a great guy because he took visible pride in all of his work. Also, he respected and treated you as a person. Now, I'm not saying this is a cure all for this type of problem but I thought this would be a good starting point with the charging system problem. Around 7:30 this morning, I started the C and she took right off.
-
1 pointTruck all loaded with parts and trailer with the RJ and 704 Wednesday 11:00 A.M. leaving shortly. My next transmission will be from the Dino Stomping grounds in Chambersburg!
-
1 pointBrian, Do you want me to tell one of my scary Wheel Horse stories ....... like the Tecumseh that wouldn't start ??? Wild Bill
-
1 pointJust been here last week, swapping flywheels between two k321's. made a big puller and kept bending it, bought a big harmonic puller... bent that, turned it around... Heated the flywheel...Bent it the other way reversed it, heated up the flywheel and then hit the bolt with a 4lb hammer (real hard) and it loosened. did the same to the other flywheel and that popped too. I think the secret is in hitting the puller hard and square!
-
1 pointi'm still in Niangua MO hoarding wheel horses
-
1 point
-
1 pointGot the new canopy on Monday, but it's been raining ever since. No chance to put it up. Wife stopped me when I started dragging it up from the basement last night. Said you can't set it up in the living room... What? It's not like a greasy old tractor. Anyway, I wasn't going to leave it there. Guess I'll wait for better weather.
-
1 pointThe forum support member's discount for 2015 has been lowered to 20% from 30% but that is not bad news for supporters of this great forum. The good news is your discount will always be on top of any store wide discounts or sale prices. Starting January 26th we will be initiating a 20% discount on all items in the Wheel horse Category for all customers at redoyourhorse.com a 20% store discount on top of your support member discount (which is visible any time you are logged into your account on the web store) will give you a total discount of 36% off retail prices that non-support members see when viewing the store. (example) a $55 retail item will show priced at $44 for support members when logged in. When you put the item in your cart and view your cart, any current store discounts will be in addition to your member price. ie $44 member price minus 20% sale discount = $35.20 a 36% discount. This change allows us to offer discounts and specials to everyone who visits the website. Discounts will always be at least 5% or more and will change from time to time. Feb 1st the storewide discount will drop to 5% which still gives paid support members a healthy 24% actual discount. If you are a forum support member and have not registered on my site you can REGISTER HERE make sure to enter your forum username when creating your account so i can verify your support status. Also this year we are continuing free shipping on all orders to anywhere in the US If you would like to take advantage of the support members discount and the many other benefits of being a forum support member simply go to the forum STORE and pick a support plan that works for you. Thank you all for your continued support of this largest and best Wheel Horse Forum in the world. We look forward to seeing you at the 2015 BIG SHOW this year. Sincerely Terry, Lola & Buddy
-
1 pointA few up dates drive shaft and clutch set up


.JPG.9f2ecb26065c66527b0730084ab7fc7a.thumb.jpg.7dc8a04d9a53d44ee2b23f26ee94496f.jpg)


This leaderboard is set to New York/GMT-04:00