
Leaderboard

Popular Content
Showing content with the highest reputation on 04/24/2015 in Posts
-
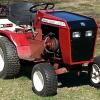
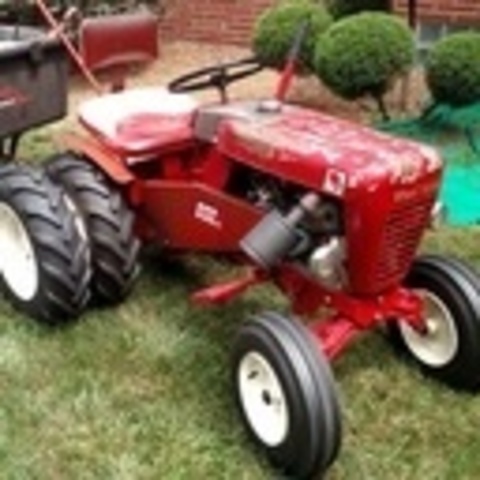
10 pointsI have always wanted a C-195 and now I have one thanks to good buddy Stevebo. I plan to use this tractor gently for chores around the house. It runs awesome and it sounds awesome. My wife came home yesterday and I had the 195 parked in her parking spot. She later asked why is that Big Red tractor parked in her spot. It instantly had a name..
-
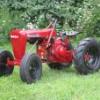
9 pointsI have been lurking here for a while, gathering information and using it to bring this machine back from the brink. It is a 1980 C-175 Auto with hydraulic lift. It does have a couple strikes from what I have read here. It's a series 1 KT17, with the Sundstrand hydro, but so far everything looks like it had been well maintained, at least early in it's life... later, not so much It was pretty ugly when I got it, rusty hood, cracked fender (plastic... REALLY?!?!), flat tires, big honking mouse nest in the engine shroud... the nest turned out to be the biggest challenge so far, it must have been there for a while because the mouse "waste" actually ate into the aluminum case of the engine and eroded the upper starter mount tab completely! thought that was the end of this experiment... But being a Machinist, i created a new starter mounting bracket, drilled and bolted it to what was left of the block, made spacers to get the correct starter distance and voila! works great! Next was the fuel system, tank shutoff was clogged, removed that and ended up taking the screen off to get it cleared, new lines, cleaned the carb, put it all together and all I could get was a few seconds of putter. Seemed like it just wasn't getting enough fuel still. Read some more here and decided to add an electric fuel pump. I found one of those HEP-02A pumps on ebay for ~$14, had a relay from a late 80's mustang harness I have laying around, got a couple fuse holders and boy that thing sounds sweet purring away there. ditched the plastic fender for a steel one I got from a member here, a little "rattle can rebuild" and there it sits. this thing runs like a top! everything seems to work well, starts immediately, and it's just a blast to drive! Thank you Wheelhorse community! I'm sure there are other guys like me who are using your knowledge base for their projects one other thing, if anyone here is considering the electric pump, your wasting time thinking about it. you should just do it! thanks again for all the help! Jack
-
5 pointsIt's the one in the middle. A 314H returning to its original home in Wolcott CT is just what I need! Thanks Bro KenB.
-
4 pointsYesterday I picked up a really clean C-145 Automatic. It is originally from Maryland so the score remains the same. I also received the original manuals and registration card which was a plus. This makes my third "Blackhood" as I seem to collect in "3's." It has an original plastic fender so to preserve it, I am going to put a metal fender on as it will be a worker. Overall the paint is in good shape but will take more work than I spent today using polishing compounds. The fender may end up on the classifieds as it is too nice for me with just the paint finish worn. There is also the maintenance sticker under the seat which I had never seen before. A really nice find!
-
4 pointsMade a new tail shaft gear for the output shaft on the transmission I bought a gear that was longer than the original and cut It down to the length I needed then I had a coworker who runs our wire EDM machine cut a internal spline to fit the output shaft here's the old gear that I cut off the output shaft new gear this gear now takes up the space that gave me the slop in the original trans setup I will use a harden washer and bolt to attach to output shaft Brian
-
3 pointsjust finished this up my new toy "RAT TRAP" RJ58 RAT ROD
-
3 pointsSeveral weeks back I was searching the net for a thread that might address the question: Will a chrome 520 muffler heat shield fit a smaller series machine? I found a few bits of information here and there, but nothing that really answered the question. With that said, I hope this thread finds some of you well. Here’s what I initially gathered from reading the net and various conversations: the 520 guard is too long, it needs to be modified, they still offer the chrome guard new thru Toro and all guards are the same. Let me give you the accurate answers based on my recent experience. The 520 guard is a bit longer (illustrated below), depending which guard you get, it does not need to be modified at all, the chrome guard is NOT offered new thru Toro – only the black, and the guards are definitely not all the same. There appears to be 2 different chrome guards and 1 black. One of the chrome guards has mounting holes on the outside edges and the other has the mounting holes set in a few inches from the edge (mine pictured below). I imagine they differed based on the engine – obviously. The black guard (as far as I can tell) is only offered with the holes set in a few inches from the edge. When I bought my 310, the muffler was totally smooth with no mounting tabs welded to it for a guard. I was able to get a muffler from a 414, which was exactly identical but did have the tabs. I then took a gamble and purchased the chrome shield you see below (from a 520). I only needed to make one bracket for this to be a direct bolt-on without any modifications to the muffler or guard. 1) Piece of mild steel cut to length with three holes drilled. 2) Bracket blasted and painted with high temp black. I slipped sheetmetal fasteners on the 4 muffler tabs and used stainless 8/32 hardware. 3) I used the factory mounting location(s) for both the guard and the muffler. 4) Both are factory muffler tab locations. On the shield, the 8/32 screw fits thru the horizontal slot without modification. Sure, its not the “correct†mounting location for the shield, but personally, I think it’s fine. 5) Attaches the factory shield mounting point to the homemade bracket. On this screw I have a stainless lock washer and nut (vs. sheetmetal fastener). 6) Is there a length difference? Yes. It is approx. 1.5â€-2â€. Quite honestly, it doesn’t bother me one bit, but that’s me – and I’m pretty picky about this stuff. I’ve never claimed to be an expert about these later model WH’s, so if anything I’ve noted above seems to be in error, please feel free to comment. My hope is that this info helps others out in the future.
-
3 pointsHappy Friday, gents! Excellent tip, Jake, thanks for the sage words of advice! Thanks too for shipping those gaskets out, I appreciate it. Brandon, great idea. I wondered what the heck those little crowns were beneath some guys avatars. Thanks for the link, I'll get right on it! Cool, crisp Autumnal-esque morning here, looking forward to it warming up so I can just laze around the front porch in the sun like the old dog I want to be. Although, with the forecast calling for mostly cloudy and wind chills in the mid 20's to 30's today may just be an inside day. The last couple days up on my feet of and on at Jeffs' has my leg fighting back. Maybe head over to check out the progress on my wheels, then go see the sandblaster. Head Home and take it easy. Youngest daughter is Home, down for a Spring Break visit from where she lives on the cape. Leaves again tomorrow so it'll be nice to hang out with her for a few hours today. You guys with kids still at Home, love on 'em. Despite how much trouble they give you, how much they argue and push back, no matter how many times the Police become involved or they go off to rehab draining every single penny from your accounts and have you leveraging your very Home to try and keep them from dying. Before you know it they'll be grown and gone. Hopefully and through the Grace of God, clean, sober and most importantly, alive. And you know, maybe just maybe, they'll come Home one day after not seeing or hearing from them in two years, stop everything, share with you their milestones of accomplishments, apologize for putting you through hell and just say thank-you. Love on 'em. Grace and peace, my friends here at RS. Enjoy this glorious day!
-
3 pointsThere are show tractors, work tractors and parts tractors. If you get there on Thurs. you might get lucky and see Wallfish bulid a tractor out of a pile of junk and drink gas doing it!
-
2 pointsBought this cool little machine today. I do have some fence to install but only need about 10 - 12 post holes and just happened to see this while searching for a hand held post hole auger. It just looked so cool so I made the call to go look at it and came home with a lighter wallet. Another impulse buy. This thing should make quick work of those holes. 4WD (steers like a skid steer), custom trailer, Onan CCK engine and 2 auger bits (6 & 8 inch). Everything works like it should and no leaks so it should be fun to play with tomorrow! A friend who also needs some fence installed is going to be my first customer. If anyone in central New England area needs some holes punched, let me know! I need some jobs for it to help pay the bill. It can come with an operator or be rented by the day. Bet it's fun to use!
-
2 pointsPicked up this 857 this morning just 8 miles from my home
-
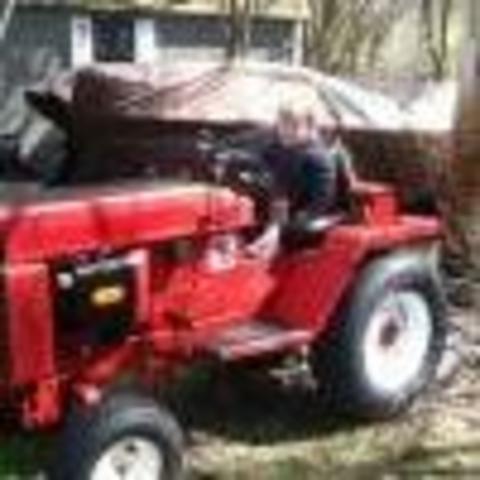
2 pointsHere is a pic of my new to me D180, and my youngest grandson
-
2 pointsDirty carb By closing the choke you are restricting the amount of air intake to the engine. It runs better because you are matching the amount of air to the amount of fuel. Less fuel is usually caused by a dirty carb and a GOOD cleaning should solve your problem. At least that's where I would start. Water in the fuel system or a clogged gas cap vent could also be an issue. Restricted fuel flow from clogged screen in the tank or collapsing fuel line, Float level setting or Fuel pump not pumping enough fuel. Does it run good for a while and then it sputters or does it happen right away?
-
2 pointsTilled mine the first of the month. Have had a hard frost the last 2 nights so planting will wait.
-
2 pointsAs a side note, if you become a supporter of the forum you can upload more and bigger pictures... http://www.wheelhorseforum.com/store/
-
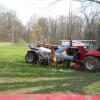
2 pointsSo, now that I have the trailer I need to put it to use. Today I picked up a 1981 C-145 with a 48" SD deck. It is very original, well maintained, and flawless plastic seat pan (other than being faded.) I'll cut the grass today and polish it up tomorrow for some portrait photos.
-
1 pointI'm starting a project, but it will take time, as time to work on it is limited, this may take most of the summer, with that said here is some progress. As most of you know I bought a 25hp V twin diesel china made, I plan to install it in one of my C-195's, I'm also putting power steering on it, and other neat little things but more on them as I go, this will someday be my loader tractor, I don't have fancy equipment to build this with, but I know how to use what I have. On to pictures with captions. Engine China V twin 25hp Tractor it will be going in, this was after a test run on the trans to be sure it was good, all checked out I like BIG tires so new meat was ordered for the rear, Tru-power 29x12.5x15 and to except the larger tires wide rims are in order, so I bought a set of new rim shells and cut the centers out of a set of rims to install in the shells. Ready to weld them up ready for color I found a guy near me that does powder coating and had a few wheels done. New rubber mounted, with my son Ryan, sorry for the crappy pictures. Now I can't have them setting around doing nothing so I put them on my other C-195 for now, I like it, need bigger fronts, rears clear the fenders by 1/4" I hope to get more done with the long weekend, we will see.
-
1 pointWalk into the light, ALL ARE WELCOME, ALL ARE WELCOME if they're WH All of the tractors I bring are rough and always cruise around on a heavily rusted 401 barn find. Even some of the restored tractors might look rough when they're sitting next to Buckrancher's stainless RJ! Bring any WH tractor so you have something to cruise around on too.
-
1 pointFigures a Buckeye would run Coopers...
-
1 pointLove the belt cover !!
-
1 pointRough Stuff is show stuff if you are proud of it, great conversation starters too. Having read many of your posting I am sure you will fit right in.
-
1 pointThe 520-8 is a great Horse! Always Kohler, I had doubts 'bout Onan. No longer. Maintenance is the key, Change filters and oil regularly, the Onan will wo.....wo......work!
-
1 pointLooking forward to seeing some of you guys tomorrow! Hope to be there at around 8, will have a b80, and a couple other parts for sale. Hopefully the weather will hold off!
-
1 pointGood evening Neil & fellow forum members, The points arrived today & after fitting, the RJ fired up. I also removed the air filter & found it was simply the wrong way up already having the large hole in the upper part. Fresh oil in there & sump along with another plug aided its run along with a tune of the carb. I had taken the bowl off fearing the worst but it was pretty mint. I did however fit a new bowl baffle. Regards, Philip
-
1 pointI didn't know that Steve. I see they have all sorts of them including stainless. I also see that WW Grainger has them. An old Wheel Horse bag of them made the trip when we moved down here and I'm sure I'll never use all of them so I dropped one in the mail to Sam this morning.
-
1 pointThanks Doc. I could have sworn there was earlier talk of it being North of town as well.
-
1 pointIf no one is BS'ing about their location, then no. The tractors are in Kansas City and he's in PA...just a little bit of a walk from each other.
-
1 pointDang!! I thought there for a minute I was reading a post I made! I just finished a 175 with almost identical problems ... Plastic fender - gone, fuel system all clogged - add electric pump, several machining jobs - yes, No mouse nest (amazingly!) but had dirt dauber built a nest in front cylinder spark plug hole and a mess of other fixes. But like you I like my black hoods, I now have 2! Enjoy....
-
1 pointThe actual extra throw ins (meaning special brotherly love) were done at the time of the deal. There was some mention of someone owes someone a lunch but I'm not quite sure who.
-
1 pointI haven't started yet but will be putting my new to me tiller on the 418-8 this weekend and doing a first pass on 2 new gardens.
-
1 pointAh, the prodigal tractor returneth! Congratulations, seldom if ever hear stories about them (anything, really) coming back to us.
-
1 pointJohn I was thinking you must have picked up the British model because the ammeter was on the wrong side of the steering wheel... And then I realized the pictures were taken in a mirror...
-
1 pointNot tilling, but turning the soil in preparation too!
-
1 pointAnother trick to mention on these trannys that some do and I like to do when I rebuild is flip the axles around when you put it back together, you just need to drill the end for the roll pin hole. This gives you a nice non worn surface for the bushing and seal to ride on.
-
1 pointLooks like some very nice progress is being made on this one and trans looks pretty good besides the diff gear and reduction gear but that is very common on these. Pretty sure what cause them to do that was the axle bushings would wear and then they would rock back and forth with each other. Finding good ones can be very tough, what you have will probably work, but as you said, if you can find better I'd replace. Also see Jeff ordered some gaskets from me, they will be on there way tomorrow.
-
1 pointIt somehow seems unfair that you have better toys than me. As usual, great job Brian.
-
1 pointI have one that looks almost identical that I converted to work on my GT 14 rear 3 PT hitch (with an adapted 2 inch trailer hitch), the blade was originally from a Sears Suburban. When the weather gets a bit brighter I will add some pics. Note be a bit careful when you use in reverse i.e. just do the final grading or you will probably bend or break something.
-
1 pointI bought this blade to fab it up to a mid mount plow.I decided to try it on the rear hitch and move some dirt to see how it worked.I like the fact that I can swivwl the blade to push instead of pulling.
-
1 pointJust about packed and ready to roll!!! Heading up tomorrow afternoon. Spending the night in the truck on the grounds. See you Horser's soon. Can't forget my rain coat!!! Just about packed and ready to roll!!! Heading up tomorrow afternoon. Spending the night in the truck on the grounds. See you Horser's soon. Can't forget my rain coat!!!
-
1 pointIf it's windy, Might want to put your face into the wind instead!
-
1 pointInteresting. I find most of his stuff to be on point. Just a little skeptical about this though. As to Craig's inspection point...should be said for any de-carboning method to see if whatever you are doing works or not. I think when things have gotten way out of hand, no "snake oil" is going to substitute a good scraping/scrubbing.
-
1 pointI have been known to jump onto a trailer once or twice in the past... I plan on being there on Saturday... I think the Panzer will be making the trip...
-
1 pointYeah don't be a tractor blocker Matt!
-
1 pointHe is. He's old enough now to take care of himself! ....I think!
-
1 pointI love reading and following this post.....but I hate it as I won't be there this year!!!! The last 3 years out there have been a blast and will definitely be thinking of all of you while you are there. Who is in charge of keeping track of Steve's mug this year????
-
1 pointI need an overall pic to tell if I like it or not
-
1 pointNow we can get serious. Actually it won't be long until it gets its first load. It is a Sure Trac 6'x12' Tube Top Utility..
-
1 pointYep, if you can not find parts...send a PM to Racinfool40 (Mike). Looks like you are correct. The bolt got caught under that small gear...that is your reverse idler. The spline shaft is worn where the reverse idler engages it. That washer is a "thrust washer"...very thin and probably is the victim of a chip from the bolt...it would have gotten caught under the large part of your 11 / 44 tooth gear. When you go to put it back together...the reverse idler should have the bevel end facing up. You want to change out those nuts on the differential bolts...nylon lock nuts. I would replace that spline shaft, reverse idler, one differential housing, all the seals and that bearing under the mushroom gear, and any others that may look suspect. Take a good look at all the gears. There are some guys that will advise you to put in hardened bolts in the differential...I don't like that idea...can you imagine the damage to your trans if one of those got loose in there??? Just my 2 cents. Nice pictures...thanks...it makes it much easier to help you out with those.
-
1 pointHello and The best way that I found to tighten the drain pipe is to remove the engine mounting bolts and raise the engine enough to be able to remove the pipe and elbow. Remove the elbow. Then, if the threads inside the pan are not stripped, wrap yellow Teflon tape around the threads of the first pipe and tighten into the pan. Then install the elbow the same way using yellow Teflon tape. Then install the extension pipe and cap. If the threads are stripped in the pan, you are better off finding another usable pan.
-
1 pointBelieve me, I'm tryin'!!! Lol I'm telling you, I'm sure I don't have the best Wife in the world, but I definitely have the best Wife for me.


.JPG.9f2ecb26065c66527b0730084ab7fc7a.thumb.jpg.7dc8a04d9a53d44ee2b23f26ee94496f.jpg)


This leaderboard is set to New York/GMT-04:00