
Leaderboard


Popular Content
Showing content with the highest reputation on 03/06/2015 in Posts
-
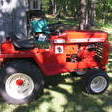
6 pointsGoing through some old pics and ran across this from 1965 ---- Wheel Horse was virtually unknown down here (N La) in those days, still is far as that goes, but I already had a love of the budding lawn/garden tractors that were popping up. Got this little guy for $100 sitting in the back lot of a IH dealer that had started carrying the Cub line and had taken it in on trade. Engine ran but was very weak so I replaced it and used the little tractor for some 20yrs - sure wish I still had it!..... and wouldnt mind having my 35 year old body either :)
-
4 pointsThat beautiful 10" blanket of snow yesterday was marked with a lot of critter activity today. The squirrels were looking for the acorns and hickory nuts they buried last fall. The rabbits were searching for a meal of green bark on a sapling. The fox was hoping to feast on the squirrel and rabbit The deer were working hard last night tilling up those morsels of corn the picker missed last fall And BIGFOOT was just enjoying the walk
-
4 pointsAn unidentified US pilot stands up in the cockpit of his plane on the tarmac on Mllldway Islands, 1942. A group of Curtiss P-40 Warhawks escorted a pair of Consolidated B-24D Liberators on a Lokflight near the Aleutian islands, Alaska, 1944. A group of Curtiss P-40 Warhawks escorted a pair of Consolidated B-24D Liberators on a flight near the Aleutian islands, Alaska, 1944. A pair of servicemen and a quartet of schoolboys sit on bridge over the Thames, Henley-on-Thames, England, May 1944. American servicemen drive in jeeps through an unidentified and nearly completely destroyed town, Italy, May 1944. The crew of a B-26 Marauder outside their plane, nicknamed Ginger, 1944. Supreme Allied Commander American General Dwight D. Eisenhower, his deputy, British Chief Air Marshal Arthur Tedder , and the principal commander of Allied ground forces in Europe, British General Bernard L. Montgomery, stand in a US armored vehicle as they review a tank exercise, Salisbury, England, 1944. The flight deck crew prepares planes for launch from the USS Lexington (CV-16), en route near New Guinea, early April, 1944. Close-up, in-flight view of a Douglas SBD Dauntless piloted by American Lt. George Glacken (left) with his gunner Leo Boulanger, near New Guinea, early April, 1944. Pair of American servicemen moving a large bomb at an ammunition dump in 1944. American troops unloading supplies on the shores of Guadalcanal Island in 1943. A soldier sleeps in the sun. An unidentified American soldier sits and eats his meal (which includes chicken, mashed potatoes, bread, and pineapple) atop rows of a stockpiled ammunition shells, England, May 1944. American Army trucks parked next to the St. Lucia fountain in 1943. A worker at Electric Boat Co. in New London, Conn. in 1943. British and South African soldiers hold up Nazi trophy flag while combat engineers on bulldozers clear a path through the debris of the bombed out city of Cassino in 1943. A US Army Corps of Engineers solider packs 1/2 pound tins of the explosive TNT under one end of an abandoned German tank in preparation for detonation during military operations in the El Guettar Valley, Tunisia, early 1943. An American gun crew in camouflaged emplacement awaiting orders to fire during the desert fighting between German and American forces in the El Guettar Valley in 1943. El Guettar Valley, Tunisia in 1943. Members of the flight and ground crews of a B-17 bomber named 'Honey Chile II' make adjustments to their plane prior to a mission, Polebrook, Northamptonshire, England, fall 1942. The crew and plane originate from the 97th Bombardment Group of the 8th Bomber Command (later 8th Air Force) which was stationed at Polebrook from June until November of 1942. Cadets at Corpus Christie Naval Air Training Station. Curtiss Wright's chief test pilot H. Lloyd Child (center) writes on a clipboard as he stands with other pilots on a tarmac near the company’s manufacturing plant, Buffalo, New York, 1941. An American soldier sits behind the wheel of a Willys MB jeep, shortly before the United States joined World War II, 1941. Three American Marines in dress uniforms talk aboard an unidentified ship during the US Navy's Pacific fleet maneuvers near Hawaii, September 1940. Crew removing plane which has made a slight crash landing aboard the aircraft carrier Enterprise CV-6 during the US Navy's Pacific Fleet maneuvers in 1940. Crew aboard the aircraft carrier Enterprise CV-6 listening to instructions during the US Navy's Pacific Fleet maneuvers around Hawaii in 1940. Photographers standing in front of Pappy's Pram, a B-26 Marauder at base, 1943.
-
3 pointsHope you packed your Jack Links Ed. Check this out...
-
3 pointsI ran into someone yesterday from Canada, he said up there they call it 9 months of winter and 3 months of road repair. Food for thought.
-
3 pointsSNOW SUCKS! I can't wait to mow my grass.
-
2 pointsI thought I was the only one that was thinking this. The Grandfather wants only the best for his Grand kids, I can't blame him for not wanting a crappy box store tractor. I taught my son a long time ago that these tractors aren't toys but you can still have a ton of fun with them without beating the crap out of them. Who knows, maybe Gramps will teach his grand kids the same value's. Maybe the guy that restored it would love to see some kids having fun on his tractor. We bought this 854 off Buckrancher almost 3 yrs. ago at the Big Show. Once in a while my son takes it in the woods where there are some trails near our house. In almost 3 yrs. of ownership Cole hasn't put one scratch on his tractor..My son is only 13 but he already has plans to one day pass the 854 down to his kids.
-
2 pointsI'm thinking, at this point... if the weather ever does decide to turn a corner... it's gonna run into an eight foot snow bank.
-
2 pointsNever had a bit of trouble with the B-100 pushing snow since I got it back in 1993, but this winter I couldn't keep her running. Had to keep choking it and adjusting the main jet needle. Got real tired of that so I rebuilt another carburetor that I had and put that on. Did the same thing. So I ordered one of those $75.00 Chinese carburetors on eBay, and installed it yesterday. Right out of the box, with no adjustment necessary, it ran like a race horse. Pushed 10* of new snow today for three hours with no problems. Still can't wait till spring.
-
1 pointHere is the 1075 that went up for auction this past Saturday. Trust me, the photos do not do it justice. This was a total restoration and it looks beautiful. Unfortunately I was NOT the high bidder. I went to $875 and it sold for $900. Had I not have 5 other tractors I would have bid higher. I did talk to the new owner today on the phone and he told me he bought it to drive through the woods and let his grandchildren play with it. He mentioned one of the reasons he bought it was that it does not have a mower deck on it to get snagged on rocks...Gulp! At that point I offered to trade him a Honda 3813 (water cooled, twin) with a plow and a front mount snow blower (rare)...He said he would get back to me. The previous owner had passed but it saddens me at the thought of all his hard work going down the drain. Surely he is the new owner and it's his to do with it as he chooses. I was just going to pull a wagon with it during the 4th of July parade and keep it covered in the garage.
-
1 pointas just mentioned when you drag them they get full of dirt,this makes your chain saw go dull much faster,i would use a decent sized trailer and cut the logs to fit and trailer them,this leaves a lot of the mess in the bush,and the trailer can be used for other things not just a logging tool
-
1 pointI guess I got lucky!
-
1 pointTruly sorry for your loss... sounds like an incredible man. https://en.wikipedia.org/wiki/USS_General_George_M._Randall_(AP-115) http://www.navsource.org/archives/09/22/22115.htm http://www.uscg.mil/history/webcutters/G_Randall.pdf
-
1 pointI hear Nessie has traveled as Lake Michigan. Lots of guys getting winter tans trying to wrangle that rascal!
-
1 pointLOL! For once someone took a picture of Bigfoot that wasn't blurry!
-
1 pointIf it warps from too much heat, you have to shrink the metal to un-warp it. Use a planishing hammer with a wooden block for a backer. This will shrink the metal.
-
1 pointI bet the first thing you did was look around to see if anyone saw you. That's what I did when I flipped the Commando. Nevermind that I was hurt, I didn't want anyone seeing me being stupid. Anyway, I'm glad it wasn't more serious. Get well quickly.
-
1 pointGreat pictures Ed...you gotta love winter (once in a while). Nice snow shoes.
-
1 pointHow do you open the hood to check the oil or can you get to the dipstick with out opening hood??
-
1 pointMike, Bring it to the show and we can do some sort of "Survivor" stunt where you have to drive around in it in the hot June sun. it would make you wish for snow!
-
1 pointI've been pretty lucky with using the 20-25% coupons for the Predator engines. I used a 20% onetime in the store for the 6.5 hp engine, I also bought a 13.5 hp engine (and didn't want to carry it home) used the 25% coupon online for it to be shipped. I thought for sure it wouldn't go through but it did. My advice is to try to use it. All they can say is "No."
-
1 pointThese predator motors are amazing. Ive used one for about a year and no problems. Plenty of power. I am getting the urge to try an 8 hp one.
-
1 pointI don'y know exactly what it's called, but here are some links to a couple of sources: http://www.trimlok.com/cat/Edge-Trim/Browse-All-Products_102.aspx http://www.mcmaster.com/#trim-molding/=w6vzyp
-
1 pointLooks like an old sear suburban.
-
1 pointSounds like are really good deal.
-
1 pointBlower if usable but needing work and is all there including the lift tube and flag is worth $125-150 more if nicer, the mower deck if no holes and usable about the same, if nice more I've sold VERY nice 48" decks up to $400 then a running tractor needing work is $150 or more if in good shape, so ya probably worth the asking price, but I'm cheap I'd offer $250 and see what happens
-
1 pointsounds like a good deal to me, good 48" decks usually bring 150-300, and blowers around the same if they are in nice condition. And yes the blower will fit on your c120. I'd probably go snag it if it was around me.
-
1 pointAnd you haven't bought it yet?
-
1 pointFriday and Saturday, June 26, & 27 are the official dates. Some guys come early on Thursday to set up camp and displays.
-
1 pointHere's a little update on the 400, haven't spent much time on it as I have several projects going on in the shop. Did pick up the motor from being bored today, hope to assemble it in the next week, but need to finish up some other stuff first. This ones getting a full rebuild, It was bored .010 over and had the crank turned .010 under. I also found a NOS carburetor and stator for it. This motor was built out of spare parts, but should turn out to be a very nice little engine. here's most of the new parts Also got the frame blasted, its going to need some pits filled before primer got the seat primed and ready to be sanded And all these are ready for paint, just need a scotch brite ran over a few spots I couldn't get with the sandpaper
-
1 point
-
1 pointHa. Its a 1972 1 ton 454. Used to have a 4 sp but I put in a 700r4. Dana 60 front axle corporate 14 rear. 4.88 running gear with Detroit lockers. I call it "hog leg"
-
1 pointThe Greatest Generation of Americans that ever lived.
-
1 point
-
1 pointThanks Callum, yeah lathes are great machines, it's amazing what you can do on them.. I'd love a milling machine, one would make life much faster and take a lot of use from my poor lathe.. As it happens I'm off to look at another lathe today.. No idea what make it is... Should be interesting though.. With both kingpin steering pivot thingys welded up (although in need of a little cosmetic grinding), the time had come to mount them to the front axle at an angle of 80 degrees A close up for ya all.. And at last Why Not is finally on all four wheels.. Yes the camber is a bit radical but that will be sorted when some nylock nuts arrive hopefully tomorrow. Of course now with Why Not rolling she had to be taken off the bench and wheel outside for a look at her on ground level.. But before those photo's a BIG to Nigel for helping all day Monday to get Why Not on all fours.. Thanks Mate A few photo's taken in the great out doors And for your viewing pleasure a video
-
1 pointBeen working on my daughter's 857 hoping to have it done before the mid mo meet and greet waiting on the decals and just ordered sum tri rib tires for the front she can't wait to ride it around this summer
-
1 pointGot the new tires on yesterday, a new idler pulley and drive belt and finally took it for a ride. I also put new bearings in the mule drive pulleys, when it warms up I'll replace the idlers, spindle bearings and the belt on the deck and that should make this a pretty dependable worker.
-
1 pointGrowing up in the Midwest, I can manage the cold; you just put another layer on. The problem here in MD is the sweltering Summer. I gauge the heat by number of T-shirts worn for the day. Reminds me of being back in B2 Engineroom. I better not move any further south!
-
1 pointThanks Bob, it's good to know I'm not making it too boring a read Good progress has been made made today, both steel blocks have been bored out to take the lengths of steel that pivot in the rose joints.. Jumping slightly forward here as I forgot to take photo's of all the stages.. Both pivot thingys have been drilled and a thread tapped to keep the rose joints in position, and both pivot thingys were press fitted into the block.. a nice tight fit they were too You may of also noted from the above photo that the whole thing has been put in the lathe so I can cut a few tapers... If your wondering it span quite straight only a 1mm out of true.. Quite chuffed with that Stub axle installed, another tight pressure fit.. I still need to weld it all together, and yes the bearing will be coming off before the hot sparks fly.. I'm rather happy with how this front end lark is coming together
-
1 pointAs Martin and Kelly said, sheet steel needs to be repaired with sheet steel, if you use anything else the finished product will not perform well. When an improperly repaired piece of sheet metal is painted it will look great; then you will take it out into the sunshine and the repair will react differently than the rest of the piece and stick out like a sore thumb! Different thickness of the same metal, or dissimilar materials will expand and contract at different rates and show through the paint. Back up the small hole with copper, weld it and file it to the same thickness as the rest of the metal. If you grind it be sure to not overheat it or it WILL warp. Larger holes can be welded up using a patch the same size as the hole and welded using the copper backer. You will want to stitch weld larger patches, weld a spot move around to the other side and weld a spot, go half way between and weld a spot, etc. Stitching will spread the heat around and reduce warping. If you do it right the first time you won't be disappointed. Good luck and keep us posted.
-
1 pointThere are lots of how to's on the internet including videos. Just ask Mr. Google. Google something like: "filling a small hole in sheet metal" These are from Eastwood: http://www.eastwood.com/blog/project-pilehouse/how-to-shave-unused-holes/
-
1 pointAn other way to fill holes in sheet metal is to use a wire feed welder to fill the hole and grind off to finish. Works fine lasts a long time! I do like the lead, but do not breath the fumes. Then you have a lead horse sled.
-
1 pointI guess, depending on skill level and resources available any of the above maybe ok for most people. For me though, if the hole is sheet metal, that is what I'm putting back there, either by welding up with the mig, or if it's a big hole, cutting a blank the same thickness as the surrounding material and mig welding it in. I've never been happy with bondo filled holes in sheet metal, looks terrible from the back and unless you dish the repair area, it won't be an invisible repair from the good side. Sent from my iPhone using Tapatalk I guess, depending on skill level and resources available any of the above maybe ok for most people. For me though, if the hole is sheet metal, that is what I'm putting back there, either by welding up with the mig, or if it's a big hole, cutting a blank the same thickness as the surrounding material and mig welding it in. I've never been happy with bondo filled holes in sheet metal, looks terrible from the back and unless you dish the repair area, it won't be an invisible repair from the good side. Sent from my iPhone using Tapatalk
-
1 pointA copper welding spoon from Harbor Freight works for me. Less than $10 with a coupon. See it in action here: http://www.weldingtipsandtricks.com/harbor-freight-welding-spoon.html. It's in the first part of the video. The guy is using it clamped for TIG, but you can hold it in place with one hand and MIG with the other.
-
1 pointI've had this Cub for years and never really did much with it other than drive the kids around. A few weeks ago I decided it needed a new look. Aside from the new rims and tires, I modified an aftermarket front drop axle to rake the nose 2.5 inches. I added the front plate under the grill to give it a smoother look too. The skinnier front rims are from a 49 Baird Beaver.
-
1 pointSo how did the block at an angle look spinning around on the lathe??? Blurred! So I thought I'd better turn the camera flash on which has the power to stop time for a split second The boring drill bit wasn't quite big enough so I had to use a boring bar to take the hole out to the right size.. Anyway, have a photo of a spindle stuck in a steel block at just the right angle A quick bit of reassembly to check block to disc clearance.. There be plenty I will be tapering both ends of the block to make it look nice, but also to give a bit more space allowing me to get the block a bit closer to the wheel.. Mounting the calipers should be easy, just make a bracket to bolt on the caliper and weld the other side to the block A bit of mass production, all machined to length. Turned down to the right diameter and one notched.. The notch is for fitting a rose joint.. This will sit about here... I need to bore a 3/4 inch deep hole in the block to sink the steel bar into.. Which will get the rose joint sitting about here... And that folks is this thread up to date once again... Making my own front end (steering and brakes) is certainly a lot of work and lot's of thinking is involved, but I'm really enjoying the challenge.. Your never too old to learn
-
1 pointI hope you all like lot's of photo's as there's quite a few I've turned my attention back to the front end, it would be nice to get it rolling so it can be taken off the bench and wheeled outside for a good look... Anyway, I did a little tweak to the disc hub thingy to create a bit more caliper space inside the wheel.. I'm happy there's plenty of clearance now.. My front end design came from http://www.ronsbits.co.uk a place that sells mower racing parts to... Well, mower racers My starting point is this lot.. A block of steel that need cutting in half, a length of steel bar that needs cutting in four, and four rather large rose joints, here's two of them.. Steel block sliced in two, one half has been faced off in the lathe to make sure it's square.. Or even rectangular The trailer spindles I'm using need a little trim in the lathe, here's Nigel trimming one of the spindles.. Ta Daa.. Now for the fun bit.. The block needs a hole bored through it at a 6 degree angle to give me some good steering geometry.. If I had of had a big enough drill bit I could of just set the bed on my pillar drill to the right angle and drilled the hole.. But as I don't have a big enough drill bit I had to work out how to do it on the lathe.. After a lot of thought I came up with a simple solution using a bit of cardboard and something that looks like a tuning fork but minus the handle! Plonk the block (making sure it's the right way round) in the rectangle conveniently marked out on the cardboard.. Line the ruler up with the other line which just happens to be at the correct 6' degree's to the block.. And add the half of tuning fork until it lines up with the ruler. The end of the fork tips (I need to think of a better name for it ) also has the correct angle to make it line up right... Clamp everything down firmly (there was a 8mm thick plate under the cardboard for firm clamping), and weld the fork to the block..
-
1 pointThe is an item Chuck "Wheel-Mule" will be raffling off at the swap meet. He will be selling chances to win this item to help raise money for supporting Mentone Swap Meet expenses. He will be donating all proceeds from the raffle. Thanks for looking.
-
1 pointFor next year's video effort, we'll certainly kick it up a notch. Most importantly, the live feeds are great BUT we need to publish a schedule of events a week or so prior to the show and be ready for the video effort. This year was awkward for me as what now appears to be a hard disk cable failure put my Macbook out of operation and I used an unfamiliar computer to get the recordings going. I really like the idea of the training class, but what I think would be really cool is to follow YOU around Bill as you tour the grounds and work the crowd. You're very active in the show, not shy and I think that the "WHCC Wild Bill Tour" would be a nice segment.
-
1 pointI got this finished up today, overall I'm pretty happy with how it turned out considering I painted this one myself.


.JPG.9f2ecb26065c66527b0730084ab7fc7a.thumb.jpg.7dc8a04d9a53d44ee2b23f26ee94496f.jpg)


This leaderboard is set to New York/GMT-04:00