
Leaderboard


Popular Content
Showing content with the highest reputation on 02/02/2015 in Posts
-
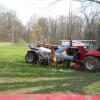
9 pointsThey are saying it is a record snow in Chicago land...the 702 did great...bring it on. Some channels are saying it is the 5th biggest snow on record. This video was taken at the 1/2 way point of the storm.
-
5 pointsI don't need a cab. I need a driver so I can watch it all happen from my window!
-
4 pointsthanks to Cable (Bruce) for his latest file download. A WH Dealer catalog from 1988/89 with WH promotional items. But look ! Steve running in the lake surf!
-
4 pointsOh, you meant the tractor! I was like: "Wait a second! Steve is like 68 or 72 yrs (or something) old!"
-
4 pointsYou didn't do any harm. There's a long dogpoint setscrew that hopefully is still partially screwed into the front of the collar where the shifter goes. First, make sure the shifter forks are as shown. Move them with a screw driver if needed. Put the shifter into the tranny in the neutral position. There's a hole in the front of the ring that's welded to the shifter. The setscrew goes in there. Use a 1/8" allen wrench and run the screw into that hole until it seats. Make sure the jam nut is backed off far enough. It may take some fiddling to get it in the hole but you'll feel it when it goes. Back off just a fuzz until the shifter feels right. Then, holding the screw in place with the allen tighten the jam nut with a 7/16" wrench. Check it out again and fine tune as needed. Note that my picture doesn't show the jam nut.
-
4 points18 degrees 20/30 mph wind and 5 inches of new snow with more coming. Why don't I have a cab yet?
-
4 pointsJake, looking at your work both on the forum and in person, i got to disagree with that statement you made on the details. I think you are right up there with the details on your work as much as anyone on the forum who goes the extra mile on these tractors. Don't ever think that any of us who like to go all out can't see the work and effort you put into your builds. You should be very proud of your accomplishments, especially since you are still of a young age. I put that last line in the quote as it just reinforces what I'm trying to get across, normally you wouldn't look at work like this that is the result of somebody still in school. You also floor me with your knowledge on the round hood tractors. I just thought i needed to mention all of the above as it is truly not the norm for somebody your age to be at the level you are. I think it is very refreshing these days to see such a passion for a hobby from somebody your age.
-
3 pointsHe didn't spin the tires once! No socks, no chains, no problem!
-
3 pointsIts amazing to see a 53 year old machine still doing exactly what it was built for ! Great video. Mike.......
-
3 pointsIf your set screw is broken...it is hardened steel...hard to drill. It may turn out by hand if you can get a hold of it. You can buy them on line, but in lots of 25. If you need one send me a PM and I can mail you one.
-
3 pointsThat's cold Craig. ( get it ? ) That's cold
-
3 pointsOH MAN! Looks like the poster child for the Original Cab Company.
-
2 pointsWHO SAYS YOU CAN'T HAVE FUN ON RED SQUARE??????
-
2 pointsI don't mind saying that I really miss playing in the snow. Three more years and just maybe it's "Back Home Again in Indiana"!
-
2 pointsDamn it Steve -- How do you do that without any socks on -- I froze watching that video
-
2 pointsIn sitting in the eye doctor's chair with my eyes dilated for my annual exam. Can't see s**t. But I think it looks good to me. [emoji41] [emoji102] I'll take another look when I get home cause I can probably use one of those Terry.
-
2 pointsWow, warm welcome. Makes this tractor lark even more exciting - cheers lads. Ok, so here it is... and here's the deck. Will practice on that first!
-
2 pointsMe too. Sent from my tractor seat.
-
2 pointsKiotiken: What you need is an RJ or Suburban "ball burner"/ "nut roaster" ! The heat off the motor will run right up to your beard~! Probably easier and cheaper to find than a CAB too! Plus - it's just a lot more fun!
-
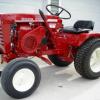
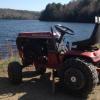
2 pointsThese are the two big additions I will be making to this 1961 Wheel Horse 701: A Hein-Werner hydraulic pump and cylinder setup for the lift and rear hitch. And a headlight bar with led lights and a rear taillight and light switch.
-
2 pointsWell said Martin, i agree totally. Great job Jake!
-
2 pointsEd: The best solution is to drill holes through both sides of the rear hitch on the lock pieces and hitch frame so you can place a push pin cotter key through to lock in place. That should take care of it ! This was a change in the later plows from the early short frame plow I sold you ! This photo shows the push pins placed thru the locks on the rear hitch to lock the plow frame in place!
-
2 pointsI will try to answer everything one at a time Steve. I know there are a lot of questions out there. I didn't build the site to enhance my business. I built it so whoever bought something from me could get help when they needed it from people that could help, especially when I'm not around. When warm weather hits I will be gone a lot. That's why the decal has the site and phone on it and doesn't even mention sales or service. If you concentrate solely on service the sales will follow. I've never advertised in my lifetime, ever. My business has never even had a sign, a name on the building, or the mailbox. It's even pretty much hidden with trees on a hill, and people here who have been to my shop will tell you that it is hard to find even though it's on a main 4 lane highway. I have always said if you treat people right they will beat the door down to get to you. Seems like someone who retired at 52 to play with the Horses has proven that point pretty well. It took me 2 weeks to get the board the way I wanted it, then I wanted about 2 more weeks with the mods to find the obvious bugs, run it through some paces, and do moderator training. Being the Admin, I couldn't even see what other groups could see. It is still member and my customers only now to give it a better shakedown and I'm finding a few more things I have to fix. I'm not new to this board thing either, I owned one over 12 years ago with 60K members. If things stay the way they have been I may never even mention what I have for sale on my site, like I never did here. It's hard to mention what's for sale when I have 14 on a waiting list right now. I can't get them restored fast enough. My CL ad even says the ones pictured are sold and we are getting others ready because we can't keep up... That is what I'm up to as far as sales go, but there is a whole lot more coming. We are also turning a part of the shop it into a fabrication area and going to get much deeper into parts this year We have a shear, roller and brake on the way now. You guys should know by now when I do something I don't mess around...
-
2 pointsToday's update... Beside the new headlight unit, I have braved the cold to just about finish the wiring. Which whilst it's my strongpoint, I get zero enjoyment from! Wired the lower dash panel and used a PC style connector so it's removable. Tested it.... It works! Plus I now have switch on and off able lights
-
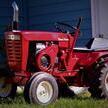
2 pointsA change of colour, this came in to have a snow cutter fitted
-
1 pointAny of you folks play with photographing wildlife when outdoors ? Here's a couple of mine : ( Watch the crappy vid closely ) These bottom ones were taken while wheelin' in West Virginia .
-
1 pointOne last thing to add to this thread . It's good to find a good tire guy/shop that deals in all tires (ag type to) . I recently had all my 42 yr old WH tries changed over to refurbished wheels & new tubes . they had & sold me the correct tubes for less than TSC or Rural King . They did a fine job , even putting rim sealant on ? And didn't tear up the paint. I now have tire guy ( again) : ) Cheers
-
1 point"Is this a strong/solid unit?" You are talking about a Wheel Horse right. Strongest tractor out there.
-
1 pointI ordered 10' of #40 roller chain from amazon along with a breaker and a few master links. We got another foot of snow, and it is snowing till late tonight. When that is done, and the chain is here, I'll examine the sprockets.. I am fairly sure they are not pointed. Maybe I can take some pictures and post them.. Thanks for all your help.
-
1 pointCool pics. Glad it went well for you. Thanks for sharing.
-
1 pointSooo I was changing a fuel pump on a k-341..... Somehow I managed to drop one of the screws. As if it were played out in slow motion it went right into the engine via the fuel pump hole. I drained the oil picked the rear of the tractor up w an engine lift. Nothing! Finally I went to a friend w my tail between my legs and borrowed his Snap On scope. After he finished laughing there was no hesitation in loaning it out. Pulled the cam gear cover inserted scope and found it almost immediately.
-
1 pointWork is continuing on the HC. Wheels have been bead blasted and painted, wire harness is installed with a new 9 pin connector. Other covers and guards bead blasted and painted as shown. Some decals installed as shown, thanks Terry for the kit. Cleat
-
1 pointI need to make a path so the dog will go out. She is crossing her legs
-
1 pointYou wont gain enough oomph to make it worth your time
-
1 pointI think you "pushed" me in the right direction. I was debating adding pin holes and you've convinced me. Thanks
-
1 pointMark, I just sold my two stage, but I have plenty experience with them. Not sure why the collars on the bearings would crack, are you sure the eccentric locking rings were tight when the bearings were last installed? The fan does not really turn all that fast, so unless you can really see that it is plain bent, I don't think that you are going to get a good vibration from it. You state that it is vibrating like crazy, would you say that the vibration frequency is pretty fast, or is it slow. If it is fast, I would be more suspect of the chain drive and its related components. Check that the bearings in the sprockets are free and well greased. These are not sealed bearings, and you can force some grease into them. The chain also needs to be well lubricated, and the links need to freely bend. If the chain is not good, replace it. You can get a 10 foot length of #40 chain at the hardware store. The length of my chain was 46 links, not counting the master link. Each link was counted as one full dog bone. I aligned the sprockets by using a straight edge across the face of two sprockets at a time to make sure that they are all on the same plane. The chain tension can really create a wicked vibration if not correct, plus it will give you an audible roar if incorrectly tensioned. The following is from the operator manual, copy is attached. Verify the Drive Chain Tension Verify that the drive chain has between 1/8†and 1/2†deflection in the area shown in Figure 4. If the chain is too tight or too loose, adjust it; refer to Adjusting Drive Chain Tension, page 21. If everything rotates freely by hand, and there are no noises when rotating by hand, I would check the sprocket alignment, chain quality, and then play with the chain tension to see if you can get rid of the vibration. Also check the bearings in the four V-belt pulleys in the carrier. Let us know what you find, and if you have any more questions. I'm looking to see if I have some additional pictures I can send you. Rick 522xi Snow Blower Operator Manual.pdf
-
1 pointI'm not sure if you have a single-stage or two-stage unit. I had to replace the outside bearing on my new-to-me single stage snowthrower this year. There was a lot of vertical movement inside the flanges on the chain side with the outer case of the bearing actually turning. I assumed that the bearing had gone bad. It also appeared as if it had been taken apart previously. After pulling it apart, I found that the bearing actually was bad (dry and gravelly) - but the flanges had been assembled wrong. Logic has it that the flanges would go on either side of of the housing. But that is not correct. Both flanges need to go on the same side and are bolted to only one side of the housing. The bearing on the belt side had been assembled the same way. I ended up pulling the whole jackshaft out and reassembling it. The only thing I changed is the location of the flange with the zerk fitting is now outside contrary to the parts drawing. Before I pulled it apart I did notice that the chain was not running true to the auger. I replaced the chain and idler pulley at the same time. Now everything running is in line. That may be why you chain has wear on one side. The last picture is the old and new chain with the same number of links but showing how the old has stretched. Before with just one flange. You can see the grease bath it was running in. After showing the two flanges on the same side. Chain comparison:
-
1 pointIs it a single or 2 stage? With the high revs of that blower it sounds to me you put it back together "without" really fixing the problem. Stuff bent and now its literally shaking itself apart. No good. Straight and balance are 2 very important parts of that blower. Lets here how others chime in,,,,dam shame on something with so few hours. One step at a time. Fwiw,,,,I would not run it anymore till its repaired. Glenn
-
1 point...or start a Youtube channel.
-
1 pointJoin a forum and in less than 12 months as a member start advertising your own forum.
-
1 pointI'm pretty sure I've seen... other RS mods already signed up there.
-
1 pointwheelhorse logo I made in woodshop
-
1 pointjust some pic's we took at the house Brian
-
1 pointWheel Horse / Sopwith Camel bird feeder with Snoopy at the controls.
-
1 pointI bought some bushings from my local Toro dealer but ordered most from http://www.mowerpartpros.com/p/Wheel-Horse-Parts#/Toro_Consumer/31-20OE01%2c_520-H_Garden_Tractor%2c_1988/SEAT/31-20OE01-2550-1988/810623R1-23R10072-00033 The little plastic ones for the motion control, PTO, and hydraulic control are fairly cheap. I made my own front axle pivot pin. For the steering block I drilled and pressed in brass bushings. For the steering upper shaft I drilled out the bushing holder to accept a wheel bearing from an early 520-H so I now have a ball bearing upper support so the steering is easier but still nice and tight. I did replace the motion control block pivot pin because mine was just too worn to give proper justice to Matt's kit. Near as I can tell, the front wheel bearings are just 1" trailer bearings. I bought a new ignition switch from ebay because mine was bad just on this machine, the other two are fine so your may be as well. For the hood pivot, I drilled from the 3/8" rod to a 1/2" rod and now it will be nice and tight. I have not installed it yet because the hood still needs to be painted. Cleat
-
1 pointFinally got about 2 hours of seat time in the 520.. that's in, not on. WE only got 3" here so I did mine and 4 neighbors.... 3"X5 = 15" The heated cab is the only way to go....26F outside and check it out
-
1 pointI've sat in those chairs, very comfy. Tried to sneak them in the truck but Bob kept watching me.
-
1 pointHere's one of the 'ol crusty, rusty seat pan that came on my Commando... decided, got nothing to lose, so I hand painted it with the WH logo.
-
1 pointYou need to re-read....HIS EXPERIENCE has been poor with the Sunstrand, which is totally different then Eaton 1100, which is what you are talking about. Yes there is going to be some abused 1100's, that will no longer function properly as with anything. I have had a fair share of them over time and never a bad one. I suggest reading more then one opinion before worrying about fixing or not fixing your tractor.
-
1 pointGonna give this one a go for the light duty stuff.


This leaderboard is set to New York/GMT-04:00