
Leaderboard


.thumb.JPG.1b2a1a39cdcedb1e001571713350b32c.JPG)
Popular Content
Showing content with the highest reputation on 02/02/2015 in Posts
-
9 pointsThey are saying it is a record snow in Chicago land...the 702 did great...bring it on. Some channels are saying it is the 5th biggest snow on record. This video was taken at the 1/2 way point of the storm.
-
5 pointsI don't need a cab. I need a driver so I can watch it all happen from my window!
-
4 pointsthanks to Cable (Bruce) for his latest file download. A WH Dealer catalog from 1988/89 with WH promotional items. But look ! Steve running in the lake surf!
-
4 pointsOh, you meant the tractor! I was like: "Wait a second! Steve is like 68 or 72 yrs (or something) old!"
-
4 pointsYou didn't do any harm. There's a long dogpoint setscrew that hopefully is still partially screwed into the front of the collar where the shifter goes. First, make sure the shifter forks are as shown. Move them with a screw driver if needed. Put the shifter into the tranny in the neutral position. There's a hole in the front of the ring that's welded to the shifter. The setscrew goes in there. Use a 1/8" allen wrench and run the screw into that hole until it seats. Make sure the jam nut is backed off far enough. It may take some fiddling to get it in the hole but you'll feel it when it goes. Back off just a fuzz until the shifter feels right. Then, holding the screw in place with the allen tighten the jam nut with a 7/16" wrench. Check it out again and fine tune as needed. Note that my picture doesn't show the jam nut.
-
4 points18 degrees 20/30 mph wind and 5 inches of new snow with more coming. Why don't I have a cab yet?
-
4 pointsJake, looking at your work both on the forum and in person, i got to disagree with that statement you made on the details. I think you are right up there with the details on your work as much as anyone on the forum who goes the extra mile on these tractors. Don't ever think that any of us who like to go all out can't see the work and effort you put into your builds. You should be very proud of your accomplishments, especially since you are still of a young age. I put that last line in the quote as it just reinforces what I'm trying to get across, normally you wouldn't look at work like this that is the result of somebody still in school. You also floor me with your knowledge on the round hood tractors. I just thought i needed to mention all of the above as it is truly not the norm for somebody your age to be at the level you are. I think it is very refreshing these days to see such a passion for a hobby from somebody your age.
-
3 pointsHe didn't spin the tires once! No socks, no chains, no problem!
-
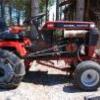
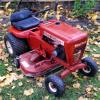
3 pointsIts amazing to see a 53 year old machine still doing exactly what it was built for ! Great video. Mike.......
-
3 pointsIf your set screw is broken...it is hardened steel...hard to drill. It may turn out by hand if you can get a hold of it. You can buy them on line, but in lots of 25. If you need one send me a PM and I can mail you one.
-
3 pointsThat's cold Craig. ( get it ? ) That's cold
-
3 pointsOH MAN! Looks like the poster child for the Original Cab Company.
-
2 pointsWHO SAYS YOU CAN'T HAVE FUN ON RED SQUARE??????
-
2 pointsI don't mind saying that I really miss playing in the snow. Three more years and just maybe it's "Back Home Again in Indiana"!
-
2 pointsDamn it Steve -- How do you do that without any socks on -- I froze watching that video
-
2 pointsIn sitting in the eye doctor's chair with my eyes dilated for my annual exam. Can't see s**t. But I think it looks good to me. [emoji41] [emoji102] I'll take another look when I get home cause I can probably use one of those Terry.
-
2 pointsWow, warm welcome. Makes this tractor lark even more exciting - cheers lads. Ok, so here it is... and here's the deck. Will practice on that first!
-
2 pointsMe too. Sent from my tractor seat.
-
2 pointsKiotiken: What you need is an RJ or Suburban "ball burner"/ "nut roaster" ! The heat off the motor will run right up to your beard~! Probably easier and cheaper to find than a CAB too! Plus - it's just a lot more fun!
-
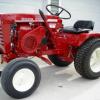
2 pointsThese are the two big additions I will be making to this 1961 Wheel Horse 701: A Hein-Werner hydraulic pump and cylinder setup for the lift and rear hitch. And a headlight bar with led lights and a rear taillight and light switch.
-
2 pointsWell said Martin, i agree totally. Great job Jake!
-
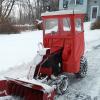
2 pointsEd: The best solution is to drill holes through both sides of the rear hitch on the lock pieces and hitch frame so you can place a push pin cotter key through to lock in place. That should take care of it ! This was a change in the later plows from the early short frame plow I sold you ! This photo shows the push pins placed thru the locks on the rear hitch to lock the plow frame in place!
-
2 pointsI will try to answer everything one at a time Steve. I know there are a lot of questions out there. I didn't build the site to enhance my business. I built it so whoever bought something from me could get help when they needed it from people that could help, especially when I'm not around. When warm weather hits I will be gone a lot. That's why the decal has the site and phone on it and doesn't even mention sales or service. If you concentrate solely on service the sales will follow. I've never advertised in my lifetime, ever. My business has never even had a sign, a name on the building, or the mailbox. It's even pretty much hidden with trees on a hill, and people here who have been to my shop will tell you that it is hard to find even though it's on a main 4 lane highway. I have always said if you treat people right they will beat the door down to get to you. Seems like someone who retired at 52 to play with the Horses has proven that point pretty well. It took me 2 weeks to get the board the way I wanted it, then I wanted about 2 more weeks with the mods to find the obvious bugs, run it through some paces, and do moderator training. Being the Admin, I couldn't even see what other groups could see. It is still member and my customers only now to give it a better shakedown and I'm finding a few more things I have to fix. I'm not new to this board thing either, I owned one over 12 years ago with 60K members. If things stay the way they have been I may never even mention what I have for sale on my site, like I never did here. It's hard to mention what's for sale when I have 14 on a waiting list right now. I can't get them restored fast enough. My CL ad even says the ones pictured are sold and we are getting others ready because we can't keep up... That is what I'm up to as far as sales go, but there is a whole lot more coming. We are also turning a part of the shop it into a fabrication area and going to get much deeper into parts this year We have a shear, roller and brake on the way now. You guys should know by now when I do something I don't mess around...
-
2 pointsToday's update... Beside the new headlight unit, I have braved the cold to just about finish the wiring. Which whilst it's my strongpoint, I get zero enjoyment from! Wired the lower dash panel and used a PC style connector so it's removable. Tested it.... It works! Plus I now have switch on and off able lights
-
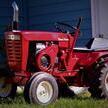
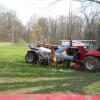
2 pointsA change of colour, this came in to have a snow cutter fitted
-
1 pointWell, I finally got started on my project tractor (I have a name picked out but for now we'll just call it CLASSIFIED). I started with a L-155 lawn ranger frame and an 8 speed rear end. The transaxle was split, cleaned, I replaced one outer axle bearing and have new seals that will get installed before final assembly. Because this tractor is being fabricated with parts I had laying around, I thought It best to blast and prime parts before assembly, to keep things clean, then I will tear down, paint and reassemble. So here it is the start: I then took a hood stand/tunnel from a 1257 and decided to modify it so I can install a toolbox , Here is where the cutting begins of course I needed to shorten it Then to make the profile meet the toolbox Then I took the triangle pieces I cut off of the tunnel and welded them into the inside so I can achieve a factory look. and added the tab across the back of the tower so I can tie the tool box to the tower . of course I modified a stock gas tank dash to mount on top of the tower but I forgot to take pictures of that process so I will just take pics of It mounted when I am update my post. I have done some blasting of other parts to get things ready for the next stage, I will be working on the steering setup, I need to shorten a long frame fan gear to fit this short frame. along with moving the steering block back a couple inches. as you can see in the pictures I have moved the tower back further than the stock location, this of course will be to shoe-horn in a 14hp kohler that I will rebuild. I will be using a c- series axle, but I am on the hunt for a swept axle, unfortunately all are expensive, and I am wanting one cheap.
-
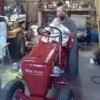
1 pointAfternoon guys and gals, just wanting to say hello and get my Wheel Horse ball rolling. I'm getting quite "in to" outdoor toys and wanted to buy another tractor to run alongside my Westwood mower. I wanted something as a garden tractor, not a mower and soon realised I MUST have a Wheel Horse!! I went through this same scenario about 18 months ago and ended up buying a Grizzly 600 instead. Realising the error of my ways this has now been sold with a tidy £250 profit, hence the search started. Having two young children and running two cars blah blah blah, it's hard to justify expensive projects and hobbies so had a limited starting budget. This meant I couldn't really get the one I wanted, more a case of getting one I can afford, and £200 later I have ended up with a B-165 with 42" Deck. It's pretty tidy, and the Briggs twin cylinder is sweet. But it's green!! I'm pretty pleased with it but of course need to repaint it. And the other thing I have realised is the small rear wheels. They are bigger than those up front, but I'm hankering over the real big rear wheels. So that will be next of the list... Anyway, really looking forward to getting things underway (slowly no doubt) and any advice/tips/suggestions are welcomed with open arms. Adam
-
1 pointShould be counter but i could be wrong. Just do it slowly tho. You shouldn't hurt anything.
-
1 pointluv the onans. but depending on the hrs and how much maintenance the po did you might want to pull the engine tins and clean the fins real good. adj the valves is not a bad idea either. over half of my herd is onan powered. and i have quite a few motors sitting around. the ones that i bought for parts with blown rods almost always have the block fins all cruded up and were very poorly maintained. i have found several tractors and motors that had loose oil filters. just a couple of thing to look out for. good luck i will double the price you payed for it eric j
-
1 pointHopefully he doesn't bring those shorty-shorts to the big show this summer !! Mike...........
-
1 pointThis is why I love this site, the announcement for the new girl is a 753, she hasn't any fins at the exhaust port and I compared her to the 876 in the shed which has obvious thick fins. Thank you so much everyone! Now to decide what to do with her?!?
-
1 pointShould be a simple fix as long as the screw isn't broken off. On the front of the lip, where the shifter sits in the trans, is a dog point set screw or should be one which holds the shfter in place. The tip of the screw goes into the little indent on the ball of the shfter and holds it in place and also allows the shfter to pivot.
-
1 pointYour sprockets should have broad clearly machined tips. If they have sharp ice pick like tips they're shot. My blower is on a 314h. Same blower different mounts. It has a nylon block for chain tension. Some members have replaced that with an idler sprocket. It's also on my list .
-
1 pointHad a little over an hour of playing
-
1 pointI have added a custom engine flywheel cover. I do need some stainless bolts, they are ordered. I have 1/2" spacers behind the cover to allow more air flow.
-
1 pointThe compression ratio is just not there to make use of 93 octane. Increasing fuel octane would be very little difference if any at all. Good air flow, such as minor porting (machting gasket surfaces and deburring). Strong compression( which major milling on head on worn out rings is not the best). Suggest honing the cylinder and new rings at the least before milling head to far. Good spark to burn the fuel properly. And then maybe you would have the need to increase fuel octane..... But even after all this, dont expect big twin power. But will very much be an improvement. My suggestion would be minor porting as stated above. Decarb of combustion chamber. Check cylinder for signs of wear while you are at it. Also great time to clean up valves and make sure you are seeing nice even wear on the seats. Set valves per manual. Mill the head to make true and flat again ( mill a little more if you feel its nessicary). New gasket and copper spray for best seal. Good clean carb, air filter, points, and condesor for good measure. Now , proper tuning is key. Make sure engine is reaching full RPM. Good fuel mixture on high end for sure. Possibly, slight advance of timing. DO NOT OVER DUE THIS. Good non ethonal fuel. Now you have a sweet running k301 which will out perform most due to just proper care and tuning. Won't get much more out of it without spending more money. At that point , switching to larger motor would make way more sense for blowing and daily use. These things are simple and all but most are recommended in manual. It may surprize you. But milling without picking up the slack every where else could result in less the satifactory performance. I am no engine builder but know a little to get in trouble....
-
1 pointWell add me to the list of nice tractor posters Lane cause she's a beauty. I had a 753 that someone had hinged the hood on and I liked it too. Easy access to maintenance the engine without having to remove the hood and put it somewhere it wouldn't get beat up. If I had a round hood without a hinged hood I probably wouldn't modify it myself though.
-
1 pointis your lever on the steering column ?
-
1 pointSorry you took it that way Steve. It's not ego, it's my attitude that I can do anything. It's what makes everything from Olymic champions to what has made me come so far in life. If that is the way you feel and don't care to listen to me or others that know me personally and can testify to it, then you have made the right decision and thank you.
-
1 pointRule of thumb for metal...the larger the hole, the slower the drill speed.
-
1 pointYOUR DRILL IS TO FAST. USE A SLOW SPEED DRILL.
-
1 pointAnd I think that pretty much sums that up... Coffee anyone?
-
1 pointthere is a neutral safety switch under the steering wheel. take the bottom dash plate off and you should be able to see it though i doubt that you would have knocked the wires off of it, but it is possible or the little metal tab might have broken off. but it sounds like you knocked wires off some were along the line causing the no start problem. down load the onan service manual , it will tell you how to check for spark and other short cuts to eliminate possible problems. also you might want to down load the manual for your tractor witch will have a wiring diagram that should help you check it out further. eric j
-
1 pointI think total plus 23! 2 1958 RJ's, 1 -1959 RJ, 1961-701, 1963-633, 2-1963-953's, 3-1964 -1054's, 1-1965-1054-A, 1965-Lawn Ranger, 1968-Raider 9, 800 Special (I think 1971), 3 - B-80's, C. 160, 2-1979' C-121's, 1991- 312-8 and 1993 -314-8.
-
1 pointYeah post some pics Geno, we all want to see the brand new shop!
-
1 pointIs this going to be the pre-show to the Big Show?? Shall we say warm up!!
-
1 pointMy Wheel Horse refrigerator, won at a tractor show, still has not been used. Tom
-
1 pointill be using this because I cant find a snow blade close to were I live
-
1 pointI've got these crazy chairs I painted..... Never got to it yet but I want to paint a logo on this UDS too
-
1 pointI had a bit of spare time one day and a few tiles left over and came up with this tile mosaic


This leaderboard is set to New York/GMT-04:00