
Leaderboard


Popular Content
Showing content with the highest reputation on 01/11/2015 in Posts
-
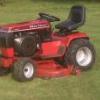
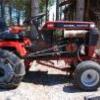
10 pointsWell another one heading to a new home, I gave this to my son and wife for a wedding present, I gave them a deck, plow weights and chains and a larger set of turf tires for summer, it runs like a top, only has 2 rust spots, no hour meter but I think it is very low hours, carb even has almost no wear on it, I've had it for a few years needing TLC but no one would give me $300 for the tractor, and I could see it was to nice to part out, well now it has a good home, I put the TLC into it, that it needed, and like I said runs like a top now, plowed with it for 20 min. before loading it to head to it's new house. gotta love a nice 312 8 speed
-
9 pointsI purchased this from our very own Scotty, right on RS. his grandfather delivered it today. super clean and tight. very happy. I have been unable to find a running round hood local so this is awesome, starts drives, even the parking brake works.
-
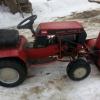
7 pointsWell,went to look at / buy another 312-8.The owner also had a Case 446.Being a good salesman,he convinced me that I also needed the case.Two 40 minute trips later,I have them both home.The Case has a 48 inch left discharge mower and a 16 horse Onan.I know.Some folks here hate Onans.It runs great.I'd like to find a snowblower or snow plow for it.That Case is a beast of a tractor.It's in my shop now next to a WH 520H.The 520 looks pretty small next to it.What's on the hood of the 312,I don't know if it was the previous owners nick name or the name of the horse.Enjoy the pics.
-
5 pointsEveryone loved the idea, better than handing them a few hundred $$ to spend, he takes care of it, it can serve him for years, and I know a guy that has lots of parts to keep it going.
-
4 pointsNote to Kelly... I'm currently up for adoption.
-
3 pointsWhat else does a retired guy hafta do with his time but make movies! We Got slammed w 18" last night Chucked this morn and probably will later this Eve. Nothing like more seat time! https://www.youtube.com/watch?v=jQKNiU3fOD4&list=UU7wuEBq4kYyHz0ytg3WDv2g
-
3 pointsMorning all, more progress has been made but once again things are happening much slower than I'd like.. But such is life eh.. Both rear wheels have now been converted to the 4 bolt Reliant pattern which is a big step forward.. With both rear wheel bolted on I could finally get an idea on wide Why Not's rear end is.. Best have a look at the front end now.. as I plan to fit disc brakes to the front I need a pair of wheel hubs and wheels that will fit.... So out came the grinder to cut the centers out of a pair of wheels that Doug kindly sent me.. The wheel centers came with a handy strengthener plate welded inside.. A very handy strengthener plate as it turned out as it's the perfect fit inside the front wheel.. But it was only when I put the wheel center in the lathe that I noticed quite how much the manufacturing process had warped the wheel around the center and bolt holes.. No matter how much I tried it would just not sit right/central in the lathe! Time for plan B.... Make my own wheel centers.. Here we go again, more time at the lathe... It's a good job I find it relaxing
-
3 pointsHere are a few more pics
-
2 pointsHello everyone! Very excited to be joining this community! ive spent some time reading on here and trying to learn about my newly acquired 211-5SB wheel horse lawn tractor. My wife and i just bought our first house last july from the nicest old couple who we still stay in contact with. the property is just under a half acre at .42 acres. small house 1000 sq ft and an over sized detached 2 car garage, the couple liked us so much they decided to sell us pretty much the entire contents of the garage and two garden sheds for $200. Best deal of my life id have to say. just to name the bigger items that came with this purchase, the wheel horse tractor of course! a craftsman roto tiller, pressure washer, self propelled push mower, two chain saws, an old roll around craftsman tool box, and tons of tools and odds and ends, iv already put to use lots of the left over wood, built a dog house and other things with it. And im still finding treasures every time i clean out another corner. anyways that being said i am a gardener, but i only had one garden bed before. barley enough for a decent tomato crop. i always ended up overcrowding my plants. but now i have all this land and this great tractor. the old man took good care of it. regular oil changes and left me a spare belt somewhere according to him as well as the manual. I have yet to find them. The thing runs like a champ and carries my 260 lb self like nothing. I want to learn as much as i can about this thing and keep it in good working condition as i would love to be able to use it in my effort to build my dream garden and feed my family. i plan on having way more than i need so i can sell some at the local farmers market and donate the rest to charity. I'm hoping i can sell enough to sustain the garden and keep a decent donation while still feeding at least my wife and I. This may take some years to get right but its kind of a dream/goal of mine to accomplish and hope this tractor will help me get the job done! well thats my wheel horse story, so far. if anyone can point me in the right direction about my 211-5SB and what i can learn. I really don't know much about it but i know i can handle taking good care of it. just need an education on the damn thing! I am an apprentice mechanic by trade so im pretty handy. as far as maintenance i dont know what to put in the thing or how often to change it or common things to look for. I'm also super interested in implements for gardening that might help with my project. sorry for the long post just so excited for this to get going. I cant wait for the spring time!
-
2 pointsOut of my garage and into a work space where I don't park cars. It's got heat and air plus lots of light and lots of electrical outlets. Still needs paint, landscaping, entrance ramp and a whole lot inside.Here's a few photos.
-
2 pointsHere's a new twist in loading ramps , They convert from a tongue mounted carrier to a set of loading ramps . Wish I would have thought of this . For $200.00 they're about the same price as a good set of aluminum ramps ( with added benefits ) When mine finally wear out , you can bet I'll be calling these guys . They look a lot more secure too . Mods can move this if they want as I could not find a specific category for these .
-
2 pointsHoly crap ! You wanna be MY dad ?
-
2 pointsKelly, very nice, thoughtfull and more important, usefull. Great idea. Glenn
-
2 pointsGot my needle and thread out right now fixing sum tears in the seat I will post pics soon
-
2 pointsHaha, wouldnt that have been nice! no that was mine. My dad got that for me for my first car. Im going to be trying to get it back on the road once it warms up.
-
2 pointsThey going to paint it all at once? Will there be unpainted surfaces mated to other unpainted surfaces? I see the beginning of rust at those areas..
-
2 pointsYes this is a RJ35 but, the steering set up is exactly the same as your RJ58...
-
2 pointsThe blade I have has the teeth to break up the hard pack and a rack area to weigh it down with cinder blocks. A WH cultivator is light and will just bounce on the ground
-
2 pointsOn my C-175, way back in the mid 90's I was STUPID enough to spray silicone on the throttle lever. S T U P I D ! I had to hold the lever up with a bungee cord for years until I used a needle nose vice grip to squeeze the rivets but it still loses some RPM to this day. It was just a little tight way back then.
-
2 pointsThanks to all you experts for the input. Hopefully I can work out a fair deal with the guy. Beside my little Lawn Ranger L-157, the only round hood I have is the 603 I picked up last summer so I have zero experience with any of the round hoods. I haven't done a thing to the 603 other than power wash it. Haven't even tried to start it yet. That will change today as I'm finally caught up with all my home and barn projects and can get back to playing, I mean working on the horses [emoji4] Sent from my tractor seat.
-
2 pointsTo follow up my plough conversion, here's the lift assembly needed. Firstly the beefy bar to run from the deck lift arm. Then two bushes for the rocker shaft Then a piece of 18mm bar for the shaft with the ends threaded to retain it. It all fits nicely with the fuel tank in place. And the view from above with the link bar in place. And with the plough fitted.
-
2 pointsI saw this and watched the video several months ago. I did not buy one but for $299.00 and made in USA (Pennsylvania) the All Terrain Rake (ATR) looks pretty good. I think this is a pretty good buy for a product designed to do some of the things you are asking about. Looks like it would be an easy attachemetn to your Wheel Horse too! http://www.ratchetrake.com/
-
2 pointsIf all those lights and gadgets weren't on there you would have ripped that baby right out of the ground!
-
2 pointsSent from my tractor seat.
-
2 pointsRevenge of the Onan Refurbisher Alliance.
-
1 pointSeveral folks have asked about where to buy 2 inch sickle bar knives/blades for their Wheel Horse sickle bar mowers. Webb's makes them and supplies them. The Wheel Horse blades are two inches apart and the holes are centers at 1 and 3/8 inches. They have single serrated in two styles but no flat 2 inch blades at this time. If Red Square members use this company as a source for blades I think they will be able to supply them. *************************** From their website: We want to hear from you! If you have any questions or comments about Webb's Sickle Services, our products or this web site, please feel free to contact us. Webb's Sickle Service, Inc. 204 South Claude Road Grand Island, NE 68803 1-800-578-1480 308-381-7090 FAX: 308-398-1966
-
1 pointDo any of you folks by chance make wooden camping signs? I'm looking to buy a a custom sign something like this: ]
-
1 pointFINALLY!! After three years, I've picked up a second horse for my small stable ... I've been lurking for the last few months searching for one of the larger units. I really wanted to find a 520 with the big 60" Deck but just ... the price...That much be GOLD under that red paint!! Ended up settling for a 418-A. I think I'll feel better sticking with a Kohler. I'm working on uploading the auction pic(s) now .. There is a missing Decal I'll have to get, and the light buckets are Spray bombed white ... it needs a seat, and I'm sure a very thorough tune up! Any Tips/Tricks/Need to know info?? Pictures! Enjoy!
-
1 pointIt's a pain in the A**!!! No better way to put it. One thing you can do is buy spare clips. Bend the clip 30 degrees so you have a chance of grabbing it. That bend makes it much easier to install and remove with a quality set of needle nose pliers. On a side note I have a 16x24 insulated garage. Purchased a 4000w forced air heater. Even on the sub zero days last week no problem maintaining 50 inside. Think it was about $150.
-
1 pointThe shell was erected in one day, had the electrician for four hours the next day. It sure is nice to have juice when working inside a building. Now I can take my time with the bench, shelves, painting, etc.. The guys that put it up have been with the company 8 years so they know what to do. Time is money, so they say.
-
1 pointNice score Will. PM my brother Dave. Jimmyz. He should be able to hook you up.. Little bit of a ride though. He lives in Wolcott CT.
-
1 pointCongratulations! Knew you could do it!
-
1 pointHere is a pulverizer I built for sowing grass, that is why the roller is on the back. It's really to heavy to lift with a manual lift. It would loosen the gravel drive.
-
1 pointNot to highjack this thread but can we check the Site suggestions forum and try to get something acomplished here?
-
1 point...In a steel brassiere! I remember hearing that from my neighbor's dad as a kid. He would also tell me I was only "knee high to a grasshopper". Sent from my iPhone using Tapatalk
-
1 pointMy 416's fuse block looked like a remnant from someone's burn barrel. It also decided to rewire itself to the point that it didn't require both relays anymore though both were wired up! I wired it with individual fuse holders connecting the bridge between them as they would be in the factory fuse holder. I also found where a past PM re-wired a broken 9 pin connection wrong. It took care of the issues including the no start feature on 1 out of 5 tries. All Toro needed to do was mount the fuse block horizontally and it would have saved a lot of grief to thousands. Just keeping the minuscule grass dust and small clippings out of the bottom of the fuse block would have kept a majority of the electrical issues from ever happening on the 400 and 500 series tractors. Amazing what aging a tractor in working conditions can do to expose engineering and parts design flaws. Maybe they didn't expect anyone keeping them for 25+ years. Trouble is some of the early C-series tractors were already aged to that point when they created the 300, 400 & 500 series. I wonder if the Chinese made lawn & garden tractors/parts have any thought in them to last this long? Short answer..................I'll take Toro's little goofs any day compared to a Murry/MTD/Craftsman/Storebrand/Newer Cub/Newer JD/newer Husqvarna/newer etc./etc) Just follow the schematic for the year/model machine you have and wire the block as it is laid out and you'll be good to go and have the biggest issue electrically with your tractor a distant memory!
-
1 pointGood fix. I've had that happen a few times. It's great when the fix is the simple things.
-
1 pointThank you everyone for all of the birthday wishes! Had a great day yesterday with my family and a amazing dinner prepared by my wife! Glad to know I have so many friends all around the world!
-
1 pointNice work Mark, much stronger than a lift cable.. I'm guessing you can get plenty of down force with that
-
1 pointI got it started today it was the first time I got to hear it run and I was very happy and someone has gotten rid of the points though which is fine I suppose the transmission work good I'm not real familiar with these sunstrands transmissions I have a few but they are on non running parts tractors so I guess it will be a learning experience and the hydraulic deck lift seems to work good so I am a happy guy only problem I had is a fuel leak at the pump
-
1 pointGo here and download the "IPL #A7136" file which shows all the parts. http://www.wheelhorseforum.com/files/download/1880-tractor-1958-1959-rj-58-rj-59-da-om-iplpdf/ It will also show you the correct place for each part. looks like you have the tie rod #12) and the steering block (#67) on upside down. The steering link (#78) is hitting the frame Did you ever straighten the tie rod (#12) if it's bent, that will cause the alignment issue. I can't believe you posted a pic of muddy tires
-
1 pointWell I think you guys have most of the "do's" covered. I'll elaborate on the "don't". My parts tractor is a D200 that was purchased from a guy that had inherited it from his grandfather. He ran it out of gas about 100 yards from his house and towed it back to his house with his truck. Problem is he didn't know anything about the tow valve and left it closed when towing and after getting it fueled up and running it wouldn't move. After learning a bit about the tractor he tore into it to find the problem. He found the transaxle drive motor a mess. Broke several parts including several slippers.
-
1 pointGreat vid Duke old buddy Jo and I thought MJ was driving at first you'd think someone with nutin to do would have time to get his hair cut Brian
-
1 pointYou are the man! Now I know who to call when I get in trouble.
-
1 pointI just completed schematics in DipTrace last week for the 2nd gen 418 and the 1st gen 416 pcb's. I can post the schematics here and see if they are readable. The pcb design violates nearly every sensible rule known to sound EE principles. No voltage regulation, running TTL chips directly from 12 vdc, placing + and ground leads next to one another in a "molex meets manure" outdoor environment, no base current limiting on low hfe lamp driver transistors - the parade goes on....... I will look forward to your critique on the design.
-
1 pointI am but I have to wait on a few small pieces I overlooked when I ordered my parts. So I can't go any further until I get them in a few weeks. Very much looking forward to hearing... Hope it runs! Haha
-
1 pointMike, an excellent question that snuggles up rather closely to the theory a racing stripe makes your car go faster and I can get more horsepower from my 12Hp Kohler if I increase the fuel line diameter from 1/4 to 3/8 inch!! All sounds great until you have to "prove it". By calculation, 2 awg has a resistance of about 0.0001563 ohms / ft 6 awg has a resistance of about 0.0003951 ohms / ft So a little Ohms law here to calculate the voltage drop across the starter wire at a 50 amp draw. E = I x R E = 50amps x 0.0001563ohms (2 awg) = 0.007815 which means your fully charged (if it is fully charged) battery at 12.6 volts will now deliver only 12.592185 volts to the starter (if the rest of the starter has has resistance - which it does) So now lets be an "average, no user serviceable parts inside type of guy" and use 6awg wire. E = 50amps x 0.0003951 ohms (6awg ohms per foot) = 0.019755 volts dropped leaving a mere 12.580 volts available from the battery. 12.59 vs 12.58 volts - open your wallet and choose what makes you feel better. But wait , why does the cranking voltage drop almost to 10 volts across the battery terminals when you crank the engine ?? Isn't that a whole heck of a lot more important than the gain of a fraction of volt from bigger battery cables? You betcha !! But why are we dropping so much voltage even with shiny new big honking battery cables hooked to a 12 Hp engine? Because the internal resistance of even the best lead acid battery is about 0.01 ohms WHEN FULLY CHARGED. So right off the bat, the internal resistance of the battery is almost 100 times greater than the 2awg cable and 25 to 30 times greater than the 6 awg cable. Those numbers are the result of the physical properties of the material used to create the battery and the characteristics of the chemical reaction taking place within the battery. You and I are not going to change those properties. Weakest link in the battery current chain is ..... ding ding, you got it right on the first guess ...... the battery itself. If its my wallet, I'm saving up to increase the aerodynamics of my tractor by putting hubcaps on the wheels. With the decrease of wind resistance and turbulence , I'll expect to get at least 3 or 4 more feet of travel out of a full tank of gas! Maybe 5 feet if I increase my fuel line diameter to 3/8 of an inch instead of 1/4 inch. But of course this is only a scientific analysis, people do what people do for all kinds of reasons. An explanation of those reasons will cost you extra.
-
1 pointJust by finger pressure alone, I was able to push away this much of the 6 AWG copper strands. Engine turning a little slower than normal or having more "hard starting" issues ? And whats up with all those dent marks in the top of the terminal connector ? As I said before, makes you wonder why someone even bothered to "camouflage" the strands that were totally useless in carrying any current to the battery. Those who help others, be aware. There are folks out there who might think this wiring is just fine to start an engine.
-
1 pointMike, good point and the positive cable was just as bad electrically, but not as interesting to look at. Thanks for your contribution here. Mike, here is a pic of the positive cable from the same tractor. again, not quite as visually interesting. Just a side note on why (I believe) this topic is important to discuss. In the short time I have been on the RS site, I have attempted to help many people thru some rather tough electrical issues with tractors. On many occasions, I have been side tracked in my troubleshooting efforts by making assumptions on the physical condition of several simple but critical components on these tractors. I ASS - U - ME d others would naturally see how bad connections like this where and I failed to ask questions regarding the condition of these components. Hopefully this post will allow us all to gain a better understanding of the pitfalls of poor wiring and how to recognize the signs of poor wiring techniques.
-
1 pointa few links regarding the fuse holder corrosion issues - check out the fuse holder pics at the top of the post http://www.wheelhorseforum.com/index.php?...t=0entry95748 good luck :scratchead:


This leaderboard is set to New York/GMT-04:00