
Leaderboard


Popular Content
Showing content with the highest reputation on 09/13/2014 in Posts
-
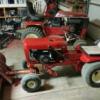
7 pointsAs promised, all my Horses lined up at home waiting for drivers for our towns 155th birthday. Left to right: 654, Work Horse 700, 875, B-80, B-100, Raider 12, GT-14, C-160, D-200 Some implements: Waiting for the parade to start: 1st place trophy for Agriculture entry:
-
5 points...and my tombstone saga continues.
-
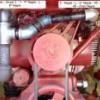
4 pointsFinally finished the chicken plucker implement. Okay, it ain't purdy, but it's going to be put to use tomorrow. Will take video of it in action. It's a bit on the heavy side, but it attaches in two parts. The primary frame attaches to the tach-a-matic. The secondary frame slides from left to right into a receiver on the primary frame. The secondary belt is installed at this point, the secondary frame is then slid left to take up the slack in the belt. A hand knob on the bottom is tightened to secure the secondary frame and secondary belt. The primary belt is the tiller belt, repurposed, threaded from pto to the mule drive to the 10" pulley on the primary frame. The secondary belt further reduces the rpm 5:1. I designed the gear reduction to be approximately 12:1. For the C-125, that should result in variable speed of the feather plate between about 175 to 280 rpm. I put a photo tach to it and got a reading of about 100 rpm at idle. At WOT it was about 275 rpm. Low end was out of line. Either the engine is idling too slow or I've got some slippage. I'll have to check it more thoroughly as the numbers were jumping around quite a bit. I may not have had the best conditions for accurate measurement. Anyway... here it is! After I use it tomorrow, maybe I'll knock off some of that rust and give it a paint job. Or, maybe I'll just start the next project!
-
4 pointsHappiness is... a mirror full of rainy daze and sunshine.
-
4 pointsWT-EFF? Chicken plucker you say?
-
4 pointsSpent a little time with my tombstone this afternoon.
-
3 pointsJust thought I would post a pic of my latest creation...a homemade small engine dyno built real cheap. Its actually somewhat accurate too. Not really interested in 100% calibration but it will tell me if what I do makes an engine better or worse. And let me know where my peak torque is. Also works good for breaking/breaking in new engines! Haha
-
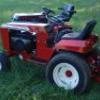
3 pointsLast weekend I sold the 108-5 rear engine rider and got a classic. I found a complete, running and mowing 655 on CL. The deck needed to be attached and it was missing the belt to the mower deck. Got a replacement battery tray with the connecting bar. Do I leave it as-is, or do I do a restore? I'm so happy! Greg
-
3 pointsTried out my spike tooth harrow today works good separating the rocks and grass from the dirt
-
3 pointsFriendly reminder. This thread often bleeds out to the shout box. Sometimes something happens here and without the shout box reference appears to be provoking another member which is against the forum rules. I've hidden a few posts which seem to fit the above so please remember to keep things civil and contained to this thread so they're not taken out of perspective.
-
3 pointsYes Geno, I have been there and done that too. How about when you are looking for one of your several drills and can't find it. You look and look and suddenly there it is right out in plain sight. You have spent half an hour looking for it and probably saw it half a dozen times, it just didn't register. So then the rest of them pop up too.
-
2 pointsJust got this 416h and its in good shape except the bottom of the hood where it attaches to frame has rust. Not just rust but rusted out with holes. Thought this was odd since the rest of it is very nice other then a few scratches. Everything works and I was suprised at how smooth this motor is. Never had a Onan before. Is this an issue with these models? Are other spots rust trouble areas that I should know about? My guess is that it filled up with wet grass and the owner never cleaned it out. I bought it anyway and may have paid to much but other then the rust spot its really clean and cuts well too. Have 3 Wheel Horse tractors now and a Cub Cadet 169 that I may sell. Getting hard to explain all of these when my lawn only takes me 20 minites to cut with a push mower. Sorry to anyone who responded to my last post that I did not get back too. Had a internet provider problem.
-
2 pointsPLUS 57 YEARS. RUSS
-
2 pointsSo are we gonna get a video of it in action (with a chicken!!) Very cool one-of-a-kind attachment ! Mike...........
-
2 pointsI bought an LED outdoor floodlight last year. I needed a light in the basement so I mounted it in the ceiling. Now everyone says "why is it so dark down here?". It's really bright to look at but very little illumination 8 feet away. Same thing when I put LED backup lights in the van ... they looked "cool" .... but didn't light-up anything. I knew the ones I got for the GT14 would be the same but I got 'em for the COOL factor. YEAH! It is a 70's tractor!!!!!!
-
2 pointsI need some quick attach foot rests though... my RJ's belt guard got a work out today...listen to that belt slap.
-
2 pointsI didn't think that little girl was ever going to get off that tractor, she had the time of her life!
-
2 pointsJust got home from the Mentone show. Had a great time. Enjoy talking to everyone and I bought lots of stuff. Really love the moldboard plow I picked up it will look great on the back of my tractors. Can't decide which one it looks the best on. Also enjoyed that "Chops Fire Pit". That is some good BBQ.
-
2 pointsWell... I really only got a couple good ones.
-
2 pointsNo...no Geno...don't leave. Come in, have a seat on the couch.
-
2 pointsJust picked up this cart. Not sure if it's a 1955 or 1958 Utility cart.
-
2 pointsThat and 5 lbs of flour will make one hell of a biscuit. Really cool.
-
2 pointsWell, that didn't take long. Now I just have to make a 9 hour trip one way to meet Bob!
-
2 pointsI signed up for Daily Motion, don't care much for Google's spying and privacy policy. Gonna try it again. <iframe frameborder="0" width="480" height="270" src="//www.dailymotion.com/embed/video/x25vp42" allowfullscreen></iframe><br /><a href="http://www.dailymotion.com/video/x25vp42_417a-exhaust_auto" target="_blank">417A Exhaust</a> <i>by <a href="http://www.dailymotion.com/Wheelhorses" target="_blank">Wheelhorses</a></i> http://www.dailymotion.com/video/x25vp42_417a-exhaust_auto Well crap. Maybe someday.
-
2 pointsI would take that to the engravers and get the inscriptions on that ASAP! You want to make sure it's correct before it's "Too Late!"
-
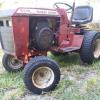
2 pointsWell I dont have a lot intresting things to talk about so far on this project. Ive only had a few minutes a day to work on it so im still just taking a couple parts at a time off when I walk past it to "take out the trash" or whatever else I can come up with to walk through the garage... so here is my progress for the night. While I was "sweeping out the garage" Over all It seems to be in pretty good shape just a little dirty. So the parts needed list so far includes.. thumb screws for the hood, front wheel bearings, eventually front tires, and a motor..
-
1 pointWe have collected paint recommendations for Wheel Horse Tractors. The color changed in 1990. 1955-1989 Wheel Horse Red - Valspar Restoration Series International Harvester Red (paint code: 3344) - GM #81 matched at an auto paint store - Rustoleum Regal Red (paint code: 7765-830) - Krylon Cherry Red (paint code: 2101) available at Wal-Mart - PPG Paint code --- PPG Wheel Horse Red DAR 4021 ALT H ---- DMR 478 149.4 ---- DMR 490 7.0 ---- DMR 451 286.6 ---- DMR 474 533.4 ---- DMR 475 507.8 ---- DXR 495 40.0 ---- DMR 499 536.4 Wheel Horse Linen - Duplicolor Wimbledon White (paint code: T205) (Autoparts stores) - Valspar anti-rust Gloss almond (Paint code: 21935) - Sherwin Williams - Controls Rust - Antique White (paint code 140-2486) - Rustoleum gloss Ivory (paint code: 249110) - PPG Wheel Horse Linen Beige DAR 8799 ---- DMR 486 8.0 ---- DMR 490 3.0 ---- DMR 487 19.0 ---- DMR 400 200.0 ---- DXR 495 20.0 ---- DMR 499 870.0 1990-2007 Wheel Horse Red - Toro Red - New (eBay and Toro Dealers) Wheel Horse Black Wheel Horse Silver (Pewter)
-
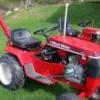
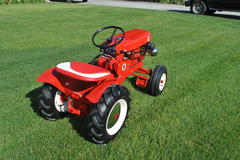
1 pointHi Im Vincent, i'm 27yo and i breed roses for a living. Since a few days i'm the proud owner of a wheel horse 800 3speed. Originally i was planning on restoring it to factory fresh conditions, but then when i went to see it, it was a lot nicer than i expected and as i'm a big fan of "justified" patina i think i'll leave it as it is, and just source a good mowing deck. pics as it stands So now i'm searching for a deck, if anyone can point me in the right direction it'd be much appreciated
-
1 point3M weather strip adhesive ..works great. .......Wayne
-
1 pointMan this is going to hit the news one way or another! Good, bad or indifferent -necessity is the mother of invention!
-
1 pointWhen I was a boy ..... we had to do this by hand, and burn off the pin feathers over a saucer of burning alcohol ! You kids with your new-fangled contraptions !!
-
1 pointI don't have a power king but heard their amazing but I do have a d-160 with a 56" blade and is a beast that will push 8" of snow on a straight push and will push 6" of wet snow with ag tires
-
1 pointGot a few smiles letting the kids ride the RJ. Might generate a few new members.
-
1 pointDUKE!! yOU dIDN'T capITALIzE ALL of tCu! Don'T YOU haTE cEllPHOnEs!!!!
-
1 pointSound like either the diaphragm is ruptured, or one of the one-way valves is stuck.
-
1 pointCalling first dibs over here... let me know when you're ready to sell it.
-
1 pointDry capacity is in the lube chart Garry
-
1 pointGeno you need to build yourself storage racks at your shop, I cant see you slowing down in the near future.
-
1 pointWheel horses Live on thru Craig Alan
-
1 pointCarlisle, PA.....about 15 miles from me.....want it???
-
1 pointThis happens more to me the older I get Nick. What stinks is when you go to the box for another and they're all gone.
-
1 pointNow that...would be pretty unique. REST IN PEACE
-
1 pointHey AJ, thanks but my Little Phillie wants to try do it. I hate to email you all the time asking you to do 10 more. Ok Steve, here goes. It's not right I don't think but it works. The engine is actually as loud as the exhaust. http://vid1052.photobucket.com/albums/s457/gsauto1/Wheel%20Horse/417AExhaust_zps252bbae1.mp4
-
1 pointLOL I guess I should check threads more often. Here I am commenting on my younger days with muscle cars then see AMC RULES and my heart jumped! 69, 73 and 74 Dodge Chargers, then went AMC 68 AMX 390 4spd, 69 AMX 390 auto, 71 Javelin 6cyl 3spd, 71 Javelin SST 304 auto, 71 AMX 360 3spd, 72 Javelin SST 360 auto, (2) 72 AMX both 360 4spd, 73 Javelin 360 auto, 73 AMX 360 auto, and a 74 AMX 360 4spd. I LOVED my AMXs and wish I had em all or even one of them now! Never was lucky enough to come across a 401. It sucks getting old!
-
1 pointI knew those tractors had potential with the right person, unfortunately it wasnt me. I am so glad they went to a good home! Geno and his wife are wonderful people, and he has a passion for Horses like no one I have ever seen LOL. I have always been impressed with Horses I just keep getting ones that need way too much work! That, combined with the difficulty in finding parts and knowledge around here has really soured my interest in owning them. If anybody is interested right now on Craigslist in Columbus OH there is a 520H with mower in "decent" shape for $700 and another on the Cleveland list with a deck and plow for $800! Both are a FAR cry (in price) from the one I saw yesterday listed for $2900! Years ago when I was big into muscle cars I learned something very important ... you cant restore it AND use it as a daily driver! I mowed with that 520 for 3 years and my time and money went into maintaining it and I couldnt strip it down and rebuild it because I needed to mow with it next week. Winter was out due to my lack of a heated shop, garage, or even a basement to put it in. Now to mow with I bought a Cub Cadet 2135 for $250 and a 2186 for $280 they both run and mow great and when they die I will just scrap them and buy another one. So glad you are happy Geno and I cant wait to see my old 520 the way it SHOULD look! The way it DESERVES to look!
-
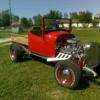
1 pointHeres pics of the frame done in black...I was nervous but after see in it, I think its going to look great. I have chosen a color for the tins too. International Harvester Red #50. Its a bit more deep red instead of the lighter tint Wheel Horse red has. Hope to have red flowing this weekend.
-
1 pointLots of variables on torques and guns but for all around work I like my Ingersoll- Rand IR231.
-
1 pointHaving worked in a shop where I used a mike and calipers, always ued the mike to check diameters. A caliper is not accurate enough to detect the variations in diameter. We only used them to check length of our parts.
-
1 pointPutzed around the house mounting up the RJ plow and tombstone today.
-
1 pointUse what ya want everybody makes the best out there by their tests. We use Cenpeco as it's worked the best for our application


This leaderboard is set to New York/GMT-04:00