
Leaderboard


Popular Content
Showing content with the highest reputation on 09/03/2014 in Posts
-
7 pointsI was doing some random Google searches this evening and found this nice woodruff key size chart and a pdf link to another one. I thought it might be of interest to all you members who are delving into these transmissions to repair them. It could help you identify what size new keys you need to replace. It's even Stevasaurus Approved! And the pdf link.. http://www.stdsteel.com/wk.pdf You can print this out to have on hand if you want also. I hope this will be of some help to you all. Jim
-
7 pointsJust got my new decal set for my 310-8 from the vinyl guy. Wow!!!! Very nice job Terry, You are awesome to say the least. Thank You!!!!
-
6 pointsWell there is one thing about it, Yesterday I told MJ YOU JUST WATCH The Ole Dino is gonna get pissed cause I dint post his Team yet! Well sure enuff he didn't Disappoint. So I made him up one special I was thinking this Is Perfect. It will be blasted Tonight!
-
4 pointsHere's a couple I wouldn't mind seeing!
-
4 pointsWhat...no Illinois stuff. WTF, I would think that would be the first things you would come up with...many more Illini fans out there then Michigan.
-
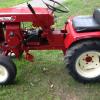
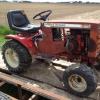
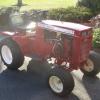
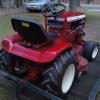
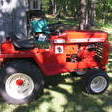
3 pointsSeveral years ago I bought this Squire Applegate Lambert and shortly thereafter sold it. Last year I tried to track it down to no avail. A month or so ago it amazingly popped up on CL in Rhode Island. The funny thing is, a guy I know in Kansas sent me the link. He had no idea what the tractor was - he thought I might be interested. I couldn't hook the trailer up fast enough. Originally they came with 6x12's on the rear but I've since put 23x8.5x12's on it, fixed the seat and a few odds and ends. The Tech H60 is the best running, smoothest H60 I have ever seen. Coincidentally, I got a lead on the red one last week in Wisconsin and just bought that one too. I want to stuff 23x10.5x12's in the red one. The crusty, orange-ish one pictured is not mine, but illustrates the fit of the 10.5's.
-
3 pointsThis thread is cracking me up.
-
3 pointsI'm thinkin a nice mug with a Cigar Store Indian?
-
3 pointsI am sorry I stirred up so much discussion on this topic. I reacted a little too strongly. I will try to get a few more photos this afternoon and post them. If I still get an error that they are too large, I will reach out to one of several of you who offered to help.
-
2 pointsIt will prob be worth every Penney lets see..... Geno is a salesman I got messages to prove it lol
-
2 pointsI cleaned the housing and made the lens .... total "$0.00". Total invested in tractor so far is $65.00. I had to buy some bushings and a belt and ignition switch. BUT... I sold an extra part for $14 so invested is now only $51.
-
2 pointsWow, Really nice stuff there. I'm just a few miles to the east. When I have a hole burning in my pocket can I come shopping. Im sure I could burn through most of it at your place!!
-
2 pointsWell guys here are some Pics of some of the GOOD STUFF. We aren't taking orders yet, as we have only been doing this for a little over two weeks, and we are still in the experimental stages and are still learning. I am sure over time like anything we will get better and more efficient at it. Once she start's selling we will let you all know. All I can tell you is that she is a SLAVE DRIVER and this week I have been off on vacation hasen't been much of a vacation. Ya see I am the Computer Graphics and cutter guy. I design and Cut what she tells me she wants and she pretty much takes it from there. These long hours are taking a toll on me. Anyways tell us what you think. Thanks Duke & MJ
-
2 pointsI wouldn't trust that. Mine showed green on the charger as well... was still shorted out. No matter what it ends up being, you know you're in good hands to get it sorted out with the forum.
-
2 pointsso you replace the module, hook it back up together and it still doesn't spark. so now you think, well must be something else, hey? and you go on to looking at other components. at this point, are you calling the module you pulled out good and you now have a spare? what if the module and coil are bad? what if either one are still good? you will never know if you don't test the parts, thats why i go to the trouble of finding the relevant parts of the manuals to help out. if you don't test them how do you know they are good or bad? just because you replace with new, doesn't mean the new parts are good, doesn't happen very often but new parts sometimes don't work for any particular reason. the service manuals are very simple to understand and with basic tools all these parts are able to be tested, good or bad. also its rare, but if the rotor was bad, you didn't replace it, you got everything back together and then the ignition doesn't work, it will all have to come back off again. please do yourself a favor and test the individual components you have, even though you bought a module, keep it on the shelf and use the old one if it tests good. check out this thread on testing, it adds to what i already provided you with above.....
-
2 pointsThanks for the help everyone. Remarkable wasn't a great choice of words although it is to me. I thought it was going to be dust.
-
2 pointsAnother beauty there Gary.... Craig, you sure that's the best plan? I always thought skinny, hungry dogs make the best guards?
-
2 pointsI am going to put the plow on the RJ 58 again and have it ready this year for the early snows! I used this a lot two years ago and not much last winter . I really always like the way this tractor and snowplow performed in moving snow and having fun doing it! The 1967 Lawn Ranger with the STR-324 Snowthrower will be the backup !
-
2 pointsNothing custom or fancy about mine. They get used, generally hauling precious cargo.
-
2 pointsMember posts are celebrated in 1K intervals here Geno... we'll see you in a couple weeks, OK?
-
1 pointI AM NEW TO THE WHEEL HORSE. BUT I PICKED UP TWO C-175 BACK IN JULY ONE RAN AND THE OTHER NEED A COIL. ANYWAY I USE A COIL OFF A GM CAR AND TWO CONDENSERS AND A BALLIST RESISTER, WORKS GET. I HAD TO MAKE A FEW PARTS FOR THE TRACTOR LIKE THE BELT GUARD ,FOOT REST AND THE REAR FENDERS. THE PICTURES WILL HAVE TO COME IN SPIRTS BECAUSE OUR INTERNET IS TOUCHY.
-
1 pointYesterday my son and I put the Charger 12 to work out in the back woods. First we used it to pull 3 oak logs out of the woods to where we could use the chain saw to cut them up. The log chain hooked to the hitch did the trick with those logs. Next we had to take care of a second oak tree that had fallen down last year. There was a nasty stump maybe 300++ pounds to remove, not too bad a job because the tree fell over and most of the stump came out of the ground. We wrapped the log chain around it and with a lot of coaxing and prying with the shovel, it came out of the hole. But with a bigger Horse that job would have been easier. The Horse dragged it down hill to the burn pile, for it's final resting place. G.
-
1 pointAll due respect to those who run less than full throttle, but every small engine manufacture states in their literature that it is to be operated at full throttle at all times. Many of these engines do not have oil pumps and get lubrication from a splash. The faster the splash the more lubrication. The faster the flywheel turns the more air circulates to cool the engine. When you turn three blades as fast enough to cut grass it takes a lot of horsepower. Remember that the blades have an upward curve which uses energy and causes air resistance.
-
1 pointWide open. Remember, you are not just cutting grass, you are cooling the engine as well. These engines are designed to operate at WOT.
-
1 pointI say start at $2500 just sold a tractor with loader and that's in real good shape had a Johnson loader too
-
1 pointI have a 32" earlier model blower that has been converted over to an attach-a-matic setup. I used it on my C-81 last year and it worked really well. I am going to make some extensions for the side wings to extend it out to a 40 inch or so cut and put it on my SK486 this winter. If we get hammered with deep snow like we did last winter I will much rather use the Kohler 16 than the 8. I have thrown a lot of snow with a C160 in the past. I am sure the SK486 should work just as well.
-
1 pointWell I get to update one of my Dad's threads. For those of you who were not familiar with my Dad, he posted this back in 2010 but never got a chance to enjoy the fruits of his labor. The gentleman that he fixed up the C175 for passed away four months prior to my dad. His wife had been cleaning up around the house and remembered that they had promised dad the tractor if something happened to her husband. She had no idea that dad passed away also. So one and a half years later, she found my dad's phone number and called for him only to find out she was too late. So I ended up calling her to find out if she would sell me the tractor and she said no. She said she would give it to me as she had promised dad. So, today I brought her home. As of right now all I know is it is a C175 auto with the KT17 series one motor and a Sunstrand 90 rear axle assy. Dad had posted it being "rough" so I had plans on using the rear axle setup in my ratitude tractor. When I got there and saw it, those plans changed. It needs some tlc but it is all there. She even has the original paperwork somewhere that she will give me when she finds it. She also has all the pics and emails my dad and her husband sent back and forth during dad's "restoration". Kind of a happy ending, just wish dad was here to share in it. Thanks, Richie
-
1 pointThanks Jason, can't tell you how many times I have tried to figure out what is going on in this chart.. this will save us a lot of time.
-
1 pointHa nylyon - the sentimental value is, of course, priceless. My husband LOVED, LOVED, LOVED this Wheelhorse! I don't think there is a mower deck or rototiller but will check. But I don't think so because.....I didn't want to mention this, but I have two other wheelhorses and one is a mower. (Just taking one thing at a time.)
-
1 pointThis is excellent and about time...this needs to be pinned..
-
1 pointI've been out mowing for cryin out loud. Don't make me ignore you.
-
1 pointMake sure you try to start it with the meter attached and see what it says.
-
1 pointWait a second... So this is why Steve and Geno never answer me!! You guys ignore me!!
-
1 pointVery nice, very classy indeed.
-
1 pointThis is one of the best points in here, what is it going to be used for, especially the ease of touch up part. We have been building this Wheel Horse trailer if you've seen it on here and almost powder coated the 4' Horse head logo until I thought, what if I drag something across it (accidents happen). Touch up would be impossible, recoating would be costly.
-
1 pointYes indeed. Sweet as can be. Terrys decals are top notch. Glenn
-
1 pointWhen it comes to painting, there are lots of opinions on what's best, and "how-to's", but nothing beats a post with pictures. There are some members on here who paint for a living, while others work in body shops and are surrounded by painting professionals. Still others are not painters or body men by trade, but still do a fantastic job. I am amazed at some of the work that I have seen on this forum. But the thing that helped me the most is the guy that puts his money where his mouth is. In other words, if you are going to tell someone how to paint, back it up with actual pictures of your tractors that you have painted. That way, the person that is looking for advice can see that what you are telling them actually works. It's easy to go out on the internet and "cut and paste" someone elses advice, but that's not the same as actual experience. Some examples of what I am talking about follow: Kelly - works for a body shop, has posted much advice and pictures. Here is one example Suburban 550 - Ray has worked for a body shop and has personally given me painting advice. Here's one of his. buckrancher - Brian isn't a body shop guy, but has always been free with advice, and does great documentation with pictures. Here is one of his. There are many more members who's advice and pictures could take up pages and pages, but I can't list them all. These are just a few who's advice I value because they back up what they say with proof.
-
1 pointPiece of cake became a support delete this please
-
1 pointThose two panels cover exactly the places I was talking about. No matter how well you wash or blow out the fins, you can't clean that area unless you pull the blower housing off and that area is where everything packs in.
-
1 pointOh cool, thanks for the link!
-
1 pointAt least you can like it, I run out of likes every single day!
-
1 pointWhen I ordered paint from my PPG jobber, I specified Wheel Horse red. That is a stock color. The PPG number is 72034. That's all you need. That code can be mixed in their OMNI or Shop-Line series. As stated before, I used a 1.4 tip for both primer and top coat. Here is my Commando painted with single-stage acrylic urethane.
-
1 pointHodge, don't concern yourself with the meaning of the numbers they represent the "recipe" for the color you want this info is the color and quantity for each tint in the final mix - how much red, purple, black, etc goes into the can.
-
1 pointThe skinny is supposed to be better, more lbs per square inch of weight hitting the ground, I just can't get past the looks.
-
1 pointJust got my snow machine finished yesterday. This is the 520 junker I started on last March. Bring it on Ole man winter, I'll be warm and dry.
-
1 pointI thin only to the ratio printed on the data sheet. For enamel it's 8 parts paint, 1 part hardener, 1 part thinner. Paint should be applied in several thin coats. 1.4 seems to do fine.
-
1 pointGot her back this AM, runs smooth and quiet. The noise was coming from an out of round crank. They attempted to get a smaller rod but said that the one needed was no longer available, so lapped the crank to the rod and that silenced the noises ( I can't afford a new crank). They also adjusted the governor and carb, all at no charge, however to show my appreciation I gave a generous tip. There will be very little touch up required, apparently they were very careful to leave as few scars as possible. I am completely satisfied.
-
1 pointDo I carry ramps all the time??????????? Yes, in the van but not in the Geo Metro! The van has hauled a B80, Commando 800, 416-8, 520HC, GT1200, GT14, RanchKing, Husqvarna and a MTD. And a few others.
-
1 pointIf you're around the horses for very long you'll hear of the very scarce 1533 differential carriage bearing in the stick shift transmissions. The obvious reason for this is simple - they havent been made for many, many years and what few are around are dwindling at an alarming rate. I had heard of guys "machining" a case to fit an oversize bearing but never knew any details, so being a fairly decent home shop machinist with a nice large Bridgeport type mill and lathe I thought I'd see what I could come up with. With member Groundhog44 having a couple sets of cases the 2 of us started looking. The original 1533 bearing is/was 1-1/2 x 2-1/2 x 1/2" - the nearest thing to that (that I could find!) was a R24-2 rs or zz with its diminsions being 1-1/2 x 2-5/8 x 9/16". With only adding 1/8" diameter and 1/16" thickness the case appeared to have ample 'meat' to handle machining out this amount. This size bearing is very common and is relatively inexpensive, so I got 4 of them to see. The first puzzle was to get the case 'fixtured' on the mill to do the boring - this was stumping me til I called my "machinist by trade" buddy and with his years of experience quickly pointed me in the right direction. He was also able to furnish the 2 heavy steel bars needed to 'hang' the case off the mill table. Let me pause here and state the rather obvious fact - this is not a repair that can be done in most of your shops, but I would think many of you know of, or have friends that have the necessary equipment - and its very possible in the not to far future that a visit to a machine shop may have to be done. In order to get a grasp of what we did, I tried to get enough pics to see the set-up... This is the 2 heavy bars mounted to the table with the mills head swiveled around in order to reach the case that will be mounted off the right front of the table to clear the mills knee. This is the case mounted in the fixture where I am about to locate center of the existing bearing bore in preparation for the boring Here I am starting enlarging the hole. The depth of the hole needed to be increased from the original 1/2" to the 9/16" which is only .0625, but has to be done. I finished this step before enlarging the hole the extra 1/8" (this is only 1/16" off each side) And this is the new bearing sitting in its new home - this is a R24 rs bearing meaning it is a sealed unit, its only necessary to 'pop' out the rubber seal to allow oil to flow through, which I have done here (this same bearing in zz designation is a shielded bearing and doesnt require anything)
-
1 pointTake a look at this post (hope it works) http://www.wheelhorseforum.com/index.php?...ndpost&p=212504


This leaderboard is set to New York/GMT-04:00