
Leaderboard


Popular Content
Showing content with the highest reputation on 07/11/2014 in Posts
-
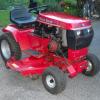
7 pointsHave had a busy week. Anyway here are a few pic I got a couple out last weekend.
-
3 pointsThanks Glenn sorry to say she is still up on Jack Stands patiently waiting her turn to go under the knife. Thanks Neil, as stated above w/ Glenn, that will be a little while yet. Quite a story on the Pedal Tractor believe it or not my daughter found that at a garage sale a few years back for $5.00 she bought it to merely resale. I gave her a 10 dollar bill for it, she wanted more so I had to remind her that she better not TISSS ME OFF or that would jeopardize her inheritance. it didn't take long after that for her to see it my way. Rob, funny you should mention that, I have a back up Camera & 7" screen layin in a box on my workbench. An audible back up beeper and also a miniature video recorder (something like the cops have) I plan to install before winter. Stay tuned.
-
2 pointsHello can of worms. Just my . Yes, it is a rare WH. But to who? Only those who know what it is. It is not like it is a COPO, Baldwin or sYc, chevy... If you have the money and want it, get it, otherwise look for something else and stop making this WH out to be the "idle" of WH garden tractors..... ! To anyone else outside of the ring of WH/Toro garden tractors noone else knows what they are. I had someone walking by the other day stop and ask me if I had purchased my 518 at Lowes..... I had to chuckle at that one. WH people are a select group. He has something that others have thought about. Weather or not anyone thinks it is high or low, it is his rights, to put a price on it that he feels comfortable with. If it sells great, then someone thought the price was right. If it does not sell, then he only has himself to blame for putting the price he did on it...... Pay the price or let it go... I'm not a collector, but if I wanted to blow $4k on something that very few had, I would jump on it. Heck I paid a premium for NITEMARE #27.. There were only 100 of those made... Rob
-
2 pointsHere's the teaser until I can shoot some photos tomorrow.
-
2 pointsYears ago I heard similar things about Pennsylvania oils. But on the other had I also heard it had more sulfur in it and left deposits. I never took any of it seriously. I got hooked on Valvoline in a bit of an odd way. Back in the early 70's they had cool rebates. Stuff like tackle boxes, etc. So I started buying it because of the rebates. Over the years I learned that it was doing a great job protecting my motors. For example, I had a straight 6 in a Ford pickup that I had bought new. At 160k miles I had to replace the rocker arm cover gasket. The rocker arms, springs, etc. all looked brand new after all those miles. In reality it was probably because of the meticulous care I give my vehicles and it would have been the same with most any oil. But I had used Valvoline for all those miles so I knew it was doing as well as any brand could have. The bottom line is that proper maintenance is far more important than oil brand. The quality of motor these days far surpasses anything that you could get when the majority of the Wheel Horses discussed here were new.
-
2 pointsWhen I hear "inventory", the first thing that comes to mind is: I've got too much! Sold 6 tractors, 3 mowing decks and other parts and pieces at the show. Wish I could have brought more but didn't have room. Already got another tractor to add to my "inventory". Hopefully it will leave soon with some other bits and pieces. I think Wheel Horses are addicted to me. That's my story and I'm sticking to it.
-
2 pointsGot around to putting some paint on this tractor. Wanted something a little different from stock so I made a few changed when painted the hood. Going to paint the wheels back to the right color as soon as I get some paint. This is a worker and looks pretty good from 25 feet even better if you are going by a 40 MPH . Not sure as to the year as all the ID tags were removed or painted over.
-
1 pointKenb and I got out on the lake today for a little cruising and a few cigars. Got a few action shots of Ken driving my boat...
-
1 pointThis was posted on another GT forum this morning......... There was a group of three fifth wheel trailers pull in with twenty-four G.T.'s. They had the Olivers(5), Springfeilds, Wheel Horse, Allis Chalmers, John Deere, and David Bradley's.
-
1 pointI got one of these many years ago and the tiller never had gas in it. I eventually found a C-120 and someone had added a manual Roper 3-point to it. The 5/8" bar the lower arms go on is 12" off the ground and it is about 1/2" farther ahead than the pin for the top link. What I can't measure at the moment is how far the lower rod is below the top link pin. This tiller has a 8hp B&S and there is a flat belt idler to tension the matched pair of drive belts. The lift would not go high enough so the tines would often tear out sod in the lawn when turning around to make another pass. I tighten up the linkage to the belt idler so it would not go past center and lock. I added a spring to the linkage to apply the clutch. I then added a cable from the original lever to a small pulley at the bottom left of the lift plate similar to yours, back to another pulley on the tiller and the cable ends at the right bottom side of the lift plate. When I lift the tiller out of the ground now the cable pulls on the belt idler and the tines stop. Problem solved. I do have to keep the top link extended a bit more than ideal so it does not go past center when the tiller is down working at maximum depth. The 23" tires on the tractor are the limiting factor. The tractor is too low for an ideal setup. Have now added a 100 lb. front weight to the tractor frame and about 24" to the manual lift handle and it is a decent setup. Garry
-
1 pointSo far this year I've bought suburban 551 its repainted it and gave to my dad still looking for a deck for it so he can mowe his yard with it bought and sold a 314-8 416-8 c-121 c-85 and a pending sale of a b-60 and bought a 552 with a front mount sickle the mower was for parts going to take the sickle to the mid mo meet and great and almost for got about a 704 I got from bowtie guy that's awaiting a resto its been a fun year so far
-
1 pointDave is correct. The only thing I would add, is that you should NOT go cheap on a pin punch set. Get good quality. Some roll pins fit quite tight, and there isn't many things more frustrating than bending a cheap pin punch into a pretzel try to get one out.
-
1 pointMy God guys! All I have gotten is one 312-8 this year. I feel deprived!!!! Seriously though, this has been a great year for me. Finally bought a Horse after many years of waiting, and have spent many enjoyable hours dressing it up, and doing repairs. Went to the Big Shoe too, and met Neil and other great folks.
-
1 pointIf that is the same trans as a B-111...don't scrap it if it is good. A few members on here lately are dealing with the B-111 trannys. I could look, but do you know what trans is on this??
-
1 pointThe wisdom behind flushing...I am not a big fan of flushing. If you think you have something in your trans that you think should be out of there, then open up the trans and clean it out...check the bearings...change the seals...check the gears...put it back together. Now you absolutely know how your transmission is inside. All that is not hard to do. That being said...flushing with diesel will definitely loosen and clean everything that is in there...and "most" of it will drain out (including water and milky oil). I like to flush a trans before I open it up, it really cuts down on the mess. I don't think flushing would have worked on this trans...and a lot of them that I have opened have looked like this. or this one... or this one... This one was flushed first... With what you said with the milky oil, I would at least flush it. Now add clean oil...and maybe check to see what the oil looks like next spring...drain and put in fresh oil then. Make sure you have a good boot over the shifter, and remember you can still get some condensation moisture in the trans during the winter months. Hope that answers your question.
-
1 pointPartially off topic, but an interesting factoid from back when WHP was still young. Back in the 50's and prior Pennsylvania motor oil was considered to be better than oil from other parts of the USA. This was the reason that "Quaker State" and "Penzoil" chose those names. My father always got the cheapest Pennsylvania oil he could find (back then he had real beaters some of which need a half-quart or more of oil at every filllup! I just did some digging on wikipedia and find nothing definite there. It may have simply been marketing hype by the older oil companies when sources in Texas and other areas became available.
-
1 pointYou could run a 42" or a 48" deck. I would recommend the 42" only because it wont tax your 34-ish year old machine. Mike..........
-
1 pointFor over 35 years I've used Valvoline products in all my motors with zero issues. Conventional in the tractors and now using Syn Power in the truck. Tractor transmissions get Valvoline too. I don't have any hydros.
-
1 pointNo, he doesn't enjoy the attentiom. I'm sure he doesn't even know he is getting it. His price is fair, he only wants what he was selling them for when new. After seeing Brian's 420 I now know they are a bit more than lipstick on a 400. Yes ,the 420 was meant to be a special tractor from day one, they cut no corners when building them and they totally nailed it. You need to see an NOS 420 like Brian's to fully appreciate them, that is what did it for me. We all have our favorites, some guys would spend 4 k on a Senior while there are others that would rather spend it on an NOS 420, if they can find one at that price.
-
1 pointJust waiting to see what additional options got installed on the "snow chucker" this summer. The suspense is just plain painfull. Rob
-
1 pointGreat collection Bob, I just love the pedal tractor. , can't wait to see the senior in the collection.
-
1 pointEngines Rotella 30 W Hydros Mobil 1 and gear drives Valvoline 80/90 synethetic
-
1 pointVery nice looking line-up. Thanks for the photos.
-
1 pointI promised you some pics on troubleshooting connections and my first attempt is the one below. The important take away from this pic is any area in red represents the possibility of corrosion and a bad electrical contact. A poor electrical contact that will prevent your lights, ignition, starter. etc from functioning as you expect. The above pic could represent your negative battery lead connected to your hoodstand metal and then onto your frame. Corroded sheet metal, loose sheet-metal bolts, corrosion on the inside of your battery cable terminals, all represent areas of possible failure. In this picture alone, 11 red areas are present, each a potential issue due to corrosion. All this is just to get a good ground connection thru the hoodstand to the frame!
-
1 pointI like rotella T1 for engine oil and hydro fluid I use Hy-tran
-
1 pointI think I burnt it out while welding on the belt cover i tested the stator no problems. I ordered one from stens for fifty bucks. Thanks for all the replies
-
1 pointAre you doing to speed up the plow tractor so you can throw snow up on the side of your neighbors house.
-
1 pointWell... it's not bad yard art.
-
1 pointSteve, sense Bob is on the east coast, his post counts first because he is in the earlier time zone. ​ If you walk around your block counter clockwise enough you can make your time go backwards! Agree about the fuel oil in the grass. We had to use food grade grease on the golf course to keep from leaving dead grass streaks.
-
1 pointi made a rear lift cable which was pretty simple as I got the measurements from dennist and then cut to length
-
1 pointHe should have sold it ages ago because he's been losing money ever since. He's obviously never heard of inflation. $6000 in 1986 = $13,023.72 today Bureau of Labor Statistics inflation calculator http://www.bls.gov/data/inflation_calculator.htm
-
1 pointGolf cart ...that is. Complete with beverage holder, foot control (permits drinking while driving), and heater for the cold weather duffers.
-
1 pointEvening all, a bit of an update for you though I'm a bit limited on what I can do at the mo due to no welding rods.. Fingers crossed they will turn up tomorrow.. I should be getting on with my 6x6 but can't, so had a play with "Why Not" today instead Starting with a strip down to the bare bones.. The hood and a spare front axle went on so I could take some measurements.. The chassis all marked out ready for slicing. All the above actually happened yesterday, the measuring and marking out took quite a while, as I only have the one chassis and didn't want to mes it up! So today the grinder came out, off came the front.. And a bit came off the back.. I'm sure you can guess what's coming next.. Yep the front was fitted to the back Due to a lack of welding rods still I had to dig out my Mig welder which is ok on sheet metal, but not much good at thicker stuff as you can tell by the blobs of weld! Not convinced that the blob of Mig weld would hold any kind of weight I had a dig about on the shack floor and the bench and found a few little bit's of welding rod like this one! More blobs of weld, only this time much stronger.. It will be fully welded up when I can. The front hitch/axle mount was next for the chop..
-
1 pointyes it is leather I had the contents of my pouch in a 24x36 frame on display at the wheel horse show this year with the tractor Brian
-
1 pointReverse would be nice to have.. Toying with the idea of an electric reverse using the motor from a mobility scooter.. If it can be made to work remains to be seen! So with the drive train plan now changed a bit I needed the swing arm and mountings from the Honda's frame.. So I chopped this large lump of metal from the frame which also has the engine mounts making life a little easier er.. Mounting the engine While I was in the shed lookiing for a cardboard box I found a pair of "deep dish" late C series front wheels.. These should widen the front wheel base a bit Some more mocking-up, but this time a bit more serious so I could start taking lot's of measurements.. The front of the chassis is 4 inches off the deck, the rear 4 1/2 which gives it a nice little bit of stance. Throw it in a pile and work it out from there I also had a flash of inspiration about the steering.. With a new mounting plate made this right angled drive box thingy that was going to be used as part of the drive train, can be bolted to the chassis and run the steering shaft under the engine.. The UJ's will come in handy for connecting it to the steering coloum And then just as I thought the plan was coming along quite well I hit rather a large problem.... I just could not find a kart axle or the like that was A - Strong enough.. B - Within my price range... And C - Not hollow! I even started looking into using a car IRS setup, at least the axles could be narrowed to get the with I wanted!! And then while looking through Fleabay I found the answer... A shaft drive Qwackasaki quad rear end It solves a lot of problems in one hit as it comes with brakes built in and as an added bonus it also has a diff lock So currently somewhere between Scotland and Hawkhurst, Kent is a truck with a large parcel containing the back half of a quad including prop shaft Once the parcel arrives I can really get into this build rather than just piling bits together on the bench and grinning at the beast I will be creating To give you a few more photo's to look at I went in search of metal to use as chassis extensions etc.. Buried in nettles and only on one wheel was the filming trailer I built quite a while ago! As it has never been used since it was built, I decided it's time was up... And I needed the steel I might have a use for the wheel hubs as well. Now available in kit form
-
1 pointAnd then Mark who has been kind enough and also has the maths brain power that I'm lacking came back with a few calculations for me! It's the final number that hit home!! That sort of top speed from a 48hp V twin would just be embarrassing, and could be got from a 10hp Kohler with a lot less work!! Looking at the final drive on the end of that shaft did get me thinking though.. If the final drive was bit further back to line up with the Wh trans axles then maybe it could be used to drive a cart axle!! Yes it's the same photo again So, off to the shed I trundled and grabbed the Honda's rear wheel to unbolt this bit.. It shouldn't be too hard to get a sprocket to fit that And that bit happens to slide onto the final drive Sooo, the new plan is to use the Honda's swing arm and final drive then take power back from there via chain and sprocket to a rather strong kart axle.. I can even use the Honda's rear brake which is more than up to the job and very easy to fit The new plan kinda moves this build up a few levels as it could be very easily geared to reach the bikes level of top speed or even more should the suicidal urge take me!! I'm happy to gear it for a bit less top speed but certainly more than 14.20422 MPH Oh, and while the front axle was off I lowered the front end quite a bit to see how it looked
-
1 pointThe angled drive thingy from Nigel (thanks mate) was cracked open to see what needed freeing up... Dry as a bone inside other than a quick squirt of WD40! So I filled it up with stuff that smelt like diesel, though it was a funny colour! An hour later it had freed up This is where I had a length problem! The angled drive is near as as I could wedge it in it's new position, and the prop shaft that slides onto the bike gearbox splines is full on!! Not enough space to cut and shut the shafts together! There is enough space to move the engine forward and tuck in the front of the hood, but.... The front axle would be in the way!! I don't want to lengthen the hood, but maybe I could move the front axle to in front of the hood to make the space!.. I'm feeling a bit unsteady today, so rather then start using tools that produce hot sparks I'd have a gentle potter in the shack and move a few bit's about on "Why Not" to create a bit more drive shaft space.. The front axle moved forward of the hood and the engine slid forward as much as it could. The engine will go even more forward once the front axle mount is out the way.. But it gave enough space to show the two prop shafts could be lined up and made into one.. While I had the Honda's final drive to hand I stuck it on the end of the drive shaft to have a look... It almost lines up with the Wh trans pulley But due to the final drives gearing it would give a very slow top speed... Oh, and a lot more reverse gears than forward
-
1 pointAs if proof was need that I'm doing the right thing with this build, while sitting down with a coffee having a look at the beast from a different angle I noticed a couple of words on one of the front tire's. A close up for you After watching the mower racing on Sunday and seeing how low all the machine were I knew I had to lower "Why Not" a bit to help it stay on all four wheels. As I want to be able to use this machine for also pulling a trailer once in a while and go for the odd drive around the fields, I don't want to go too low, so out came the ruler.. The chassis will be chopped and dropped by 2 1/2 inches, making the chassis 4 1/2 inches off the ground, where the blue mark is on the ruler. The front will also get chopped and dropped just behind the front axle mounting. The body tub will also be chopped and dropped but only by 2 inches. The extra 1/2 inch space created should just be enough to fit a standard Raider fuel tank in it's original place under the hood The back of the body tub will also get a bit more trimming to get the seat as low as possible.. This big old lump is the Honda's final drive unit.. Which I had been thinking of using backwards to get the drive from the bike gearbox to the WH gearbox... Until another part arrived, freshly dug out from Nigel's parts store (thanks Nigel), and thank you to Garry for picking it up for me.. The part in question is this right angled drive thingy from a rotovator I wasn't sure what the gear ratio was as it needed a bit of freeing off, but I'm guessing at a 1 to 1 ratio or very close.. The prop shaft will come in very handy as it allows me to mount the drive thingy where I want and get the output drive lined up with the WH trans
-
1 pointAs we say here in Georgia, "somedody's fixin' to get hurt"
-
1 pointWell Martin , I can see that you don't need much of my guidence any more , I can kind of turn you loose on your own. Boy, that is sure looking miiighty fiiine. Appreciate putting the story with the pictures. Rick
-
1 pointtook the steering wheel off #1 and cleaned it up to use on #3. out of the three i have this was the nicest one. came up nice enough, few spots where the wheel is worn and a few little nicks from use over the years. seat came today as well. i went round and round about what seat i would use on this one. i really wanted an original year seat, but i also wanted something new as well. i have had a few different styles of seat, the michigan ones I've used for a few years now, the v3500 is my favorite of them..... and this one i used on the c125, a KM 160 unipro seat...... for the 416 though i wanted some thing that looked a little more 'modern'. i liked the look of the mid height toro seats on the new zero turns, but the price at $175.00 was a little out of my budget. KM manufacturing make a seat the same but without the toro branding on them, this one also has a drain that the toro one doesn't. i liked the mid height seat (15" high) more than the 18-20" high seats that you sometimes see used on these tractors. the mid height seat is a KM 123 unipro and was a more reasonable $91.00 shipped from www.turfseats.com (KM manufacturing web store) i fitted the seat today, it has multiple fitment including the 7.5 x 8 that the later WH tractors have. its getting harder to find that bolt pattern, the 7 x 7.5 is far easier, and i didn't want to be messing around to fit it. the only down side that i can see is all of this style seat is a plastic base. we will see how durable it is. heres how it looks on the 416.... KM seat but Milsco branding....... i cleaned up the shifter knobs as well. the surface was well weathered and the smooth finish was long gone. i rubbed them down with 220, 400 and 600 and clear coated them with some rattle can rustoleum. came out nice and the speckled finish they had from weathering seemed to disappear once the clear went on. i thought i would try it and see how they turned out, i think they will stay for a while....... before..... after....
-
1 pointbeen working on some more small stuff and will gather a few pics together and report later, but for now i want to report about a find...... was needing to replace the hood latches on this one as well as a couple of other of the later ones and needed to find latches at a more reasonably price than the average $15 or more each that toro wants for them. so i looked at one closely and found they were made by Addco in MN. a google search brings up Actus (they supply them now) and was pleasantly surprised they sell the exact same latches on the 80s up tractors. you can get them in stainless or clear zinc or black zinc as the 90s tractors had. the part number for the black is A-089-0118. they cost $6.97 each, but the kicker is the shipping at $15.59. since i needed them for a few tractors i bought 10 at a cost of $6.29 and the added shipping of $15.59 spread out over the 10 pcs added $1.55 to each giving a total of $7.84 each, less than half the toro cost....... heres the link for anyone interested...... http://www.actusinc.com/latches/a-089-0118.html heres how they look. after you rub off the chalky surface on the rubber, nice new flexible rubber underneath and at a much better deal than the alternative for exactly the same thing. the ones i bought from toro for the c125 last year have the same markings and moulding as these.......
-
1 pointfinally painted some parts today. footrests, pto, some misc brackets and two seat pans, one was nice and the other had a lot of rust. the rusty one i had been layering primer on it (powder coat) and let it sit for a week or two between coats and da sanding with 220. finally had it ready for red about a month ago, but it has sat for a bit at work. scuffed it up with some fine scotch brite when i was doing the other parts today.... you can never have enough seat pans i say.........
-
1 pointI just brought home my first (keeper) Wheel Horse a 1991 520-H. Read your thread a-z. Amazing attention to details and so many good tips THANKS! Your work would make the folks at the Barrett Jackson Auction proud... On the brake band friction material I would try windshield urethane (used to glue in late model auto windshields). It is made to with stand the impact of air bag explosions and keep the glass held firmly in place. **** My first (Late 80's) wheel horse find back in 2007 went to my wife's aunt where it has been providing flawless service ever since.
-
1 pointmore progress.... clutch, brake pedals and linkages on and got the brake band lining stuck in the brake band....... heres how i did the brake band....... brake band ready to have lining glued on. it was previously blasted and yellow zinc plated. lining purchased through mcmaster carr, http://www.mcmaster.com/#6175k813/=r94hwf the lining needs to have two holes put in one end to clearance the rivet heads in the band... hole positions marked. the lining was easy enough to drill with a drill bit so thats how i made the holes. i picked a drill size just slightly larger than the heads of the rivets. holes look positioned ok around rivet heads..... then i needed to cut the lining to length, i marked the side of the band where the old lining ended and then marked the new lining the same. squared of mark and cut to length. the lining cut easy with a large sharp pair of scissors.... i used the brake drum as a mandrel to clamp the lining tight to the band. i smeared black silicone on the lining and using a battery clamp bolt and spacer, drew the band together tight around the drum. the band and lining needed a couple bar clamps as well to keep pressure all the way around. i will leave it for a good 24 hours and see how it worked out. i haven't done one of these before but heard others on here use silicone to glue the lining. i guess i will find out how well it sticks.....
-
1 pointLooking good Martin!!!! Wish we lived close by. I would keep you busy powedercoating stuff for me
-
1 pointThat looks like both of the brinly cultivators I have. Why not make a adaptor to fit your slot hitch? Here's some pic's of one I built. Only took a couple of hours to figure out my size's, and weld it up from some scrap steel I had in the pile.


.JPG.9f2ecb26065c66527b0730084ab7fc7a.thumb.jpg.7dc8a04d9a53d44ee2b23f26ee94496f.jpg)


This leaderboard is set to New York/GMT-04:00