
Leaderboard


Popular Content
Showing content with the highest reputation on 06/08/2014 in Posts
-
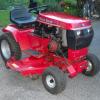
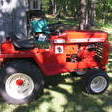
4 pointsIt's a 1998 314-8 with 957 hrs. One owner, bought on 10/14/98 for $4171.93. She is beautiful! It came with all the receipts and original paperwork, including the paperwork for the 42" RD bought on 7/28/12 for $1402.92! I really lucked out with this one. It showed up at my local dealer about 20 minutes before I got there. I am really surprised at how quiet the Command is. Are the Commands as good (or almost) as the old cast kohlers? Any things that I should be on the lookout regarding the engine? The tractor runs very well, no smoke from the motor, and looks real nice. Oil change, tranny change, and tune up is on tap for tomorrow. Something that I need to address is the steering is skipping teeth when I crank her hard to the left. Other than tightening the nut with the cotter pin thru it, is there another way to remedy this? Almost forgot to ask: is there an easy way to access the eye bolt on the middle rock shaft? When I lift the deck there is about a half inch between the rubbers on the deck and the frame. Also the front wheel on the deck barely lift of the ground. I am thinking that the eye bolt needs to be adjusted.
-
3 pointsOver Memorial Day weekend, I took a road trip into Iowa with my Dad and we had a blast. We visited relatives, ate too many pieces of pie, and brought home a nice tractor. The trip had been on our radar for over a year and we finally achieved mission accomplished. This week, I dissembled the tractor and the engine, and I found two parts that I need to locate. First, the camshaft on the k161 is in two pieces and one rear hub is cracked. Before I replace the camshaft, I was wondering if old age was the culprit or if I need to give attention to another matter that might have caused the camshaft to fail? I know about enough of rebuilding a kohler to get me in trouble. If someone would have these parts for sale, I am interested. Also, I do have a square wheel horse seat and I was wondering if a 753 originally had a square seat? Thanks, Scott
-
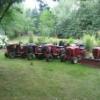
3 pointsI moved everything out to clean the garage today so I circled some of my collection for a quick pic.
-
2 pointsSnagged this tiller up today that was advertised on Craigslist. '97 36" tiller, barely used. Seller called me today to say the bracket was still attached to the tractor and today wasnt a good day to remove it. I happily brought my own tools to remove the axle hitch to make sure I got that thing today. $100!!!
-
2 pointsFor the record...I have never had a white belt or a leisure suit...or white loafers. I still listen to the DOORS though. That guy in the picture was probably listening to Smooth Jazz. :)
-
2 pointsI didn't need this tractor at all, but the sickness reared it's ugly(?) head and BAM!!!! What do you know? Wheel Horse number 7. I just couldn't let the tractor go because it was so nice. I see this tractor replacing the C-165 and B-80 in the stable. The neutral safety is kind of strange as well as the gas shock on the clutch. I forgot about these 90's tractors having that. Time for a spring. The eyebolt is in great shape, just needs to be adjusted. I like having all of the original paperwork. It's kind of like history to me and makes the tractor "complete" to me. Here is a pic of the original receipt.
-
2 pointsMan, I do love that gearbox internals pict... could you install your pulley, a belt, and put it in motion for us to watch? Seems it would be almost as interesting as Steve's paint drying video.
-
2 pointsNot much time this weekend to play with this. I assembled the transmission with threaded rod like Steve did in his video. Prior to disassembling the thing to do this I measured between the side plates. 6 1/8" dead on. It was still binding when I snugged up the side plate bolts but freed up just by loosening them. One thought was that a bolt could be hitting something but nope, there's plenty of clearance. So I put it together like this. My first 'setting' was 6 1/16" between the plates, just a bit tighter than they would be on the case. I was thinking this would compensate in case there was any gasket compression when I torqued them down tight. The thing is spinning just fine. This should eliminate any possibility of something getting pinched when it's all assembled. I don't see any marks where it could be hitting the case. I'm thinking I should try again with the differential removed. If it spins fine then do it again with just the differential installed. I've already tried this once and it indicated the differential was the problem but my work always needs to be double checked . if I just slightly relieve the sideplate bolts just so it turns but still rubs just maybe it will leave a mark to give me divine guidance. I doubt that I'll have time to mess with it more today but I'd like to hear if anybody has any suggestions on what to look for.
-
2 pointsCD's and DVD's fail too, and they are SLOW and do not hold a lot of data. Take my laptop for example. I have a 1TB hard drive, it would take roughly 110 DVD's to back it up (assuming it were full) and several days to do so. With today's capacities the only viable home option is an external hard drive. Yes they fail, but the key is to use it as backup ONLY, not to archive. Again, let's take my Macbook. I never delete anything. When I get to the limits of the drive, I will either need to replace that drive or get a new computer. Either way, I never delete data and the external disk is just for backup purposes. When you start to archive data, you run the risk of the media becoming obsolete (think floppy disk, home use tape backup's etc). CD's, DVD's and such will be gone in a couple of years and many new computers sold today do not have those drives (almost all of the Mac line). The likely hood of your computers HDD failing AND your backup failing at the same time are low. To reduce it even more, backup on multiple external drives. My Mac Mini holds all the backups for the other computers. There's right around 12TB of disk JUST for backups. So, keep everything on your hard disk, keep your hard disk current technology and backup and you'll be fine.
-
2 pointsI wouldn't have it any other way Martin! By the way, your the first person I've ever seen polish galvanized pipe! Thats just going to far! Matt
-
2 pointstidied up some more things today, its at the stage where i could throw gas in the tank and fire it up, but not so fast. i want to go over everything and check bolts etc. i always find something i missed tightening, either got interrupted or left for another part to go on first. So that will get taken care of next. but today i got a fuel filter on, oil drain for the engine was installed, 2 qts of GL-5 gear oil in the unidrive and 1.75 qts 10W30 Rotella T5 synthetic blend in the engine, tidied up some carb stuff that needed doing including choke cable install, initial adjustments on the mixture and finishing off the throttle linkage. the fuel line was re routed a bit because of the filter install. was having so much fun the only pic i took early on was this one of the oil drain parts.. even the galvanized stuff can look good with a little polish. one last look at the top of the engine before the air cleaner is installed.... then i tackled the lower dash plate and shifter plate. these were powder coated yesterday at work and today i applied some of the decals Terry has already done for me. i had a voltmeter that i got some time ago, so i used that instead of the oem one that was hard to get looking good, had dust inside the lens and i also noticed it wasn't reading voltage correctly when i hooked it up the other day. installed the original to this tractor hour meter with 585 hours on it and the light and ignition switches. the shifter plate got a new microswitch for the parking brake light and some decals. still need the large warning decal and the shifter decal will be changed for a more accurate size 1995 one.
-
2 pointsCode??? In Pawnee? My brother's the mayor, think I should call him and raise heck?
-
2 pointsGunny, be careful regarding applying "cosmetic" products like those mentioned above. These are great products to fancy up a show queen but may be disappointing for long term preservation. Google is your friend here. Here is an answer of how and WHY of tire preservation from the Tire Rack webiste regarding storage. Avoid heat, Ozone exposure, lack of regular use, and application of "dress up" products. from the website Since heat and exposure to the elements are the important factors that influence a tire's aging process, drivers can prolong their tire's life by minimizing their impact. Here are some tips for storing tires that will not be used continuously. • Don't store a vehicle with weight on its tires for extended periods of time. Long-term inactivity is more harmful to tires than weekly drives that flex the tires and help maintain oil dispersion within the rubber compounds. • Keep the tires out of direct sunlight whenever possible. The sun's ultraviolet rays and radiant heat are detrimental to rubber. We have used a pyrometer to measure tires that were simply sitting in direct sunlight on a parked vehicle. Surprisingly those tires' temperatures measured 135° Fahrenheit on their surface. • Before storing, use a tire brush to clean each tire with soap and water to remove brake dust, dirt and grime. If the tires are still mounted on wheels, use a wheel brush to clean the wheels with an approved cleaner as well. Dry with a towel and let any remaining moisture thoroughly evaporate. DO NOT APPLY ANY TIRE DRESSINGS. Tire compounds are formulated to resist ozone cracking or weather checking. • Place each clean and dry tire in its own large, opaque, airtight plastic bag (such as lawn and garden bags) for storing. Avoid allowing any moisture to remain and remove as much air as practical (some drivers even use a vacuum cleaner to draw out as much as possible). Close the bag tightly and tape it shut. This places the tire in its own personal mini-atmosphere to help reduce oil evaporation. • While Seasonal Tire Totes make it neater to store tires, easier to carry tires and reduce the possibility of depositing brake dust, dirt and grime in the trunk or on the back seat during transportation, Seasonal Tire Totes are not airtight nor designed to prevent exposure to the atmosphere. The recommended solution would be to place each clean tire and wheel into the airtight plastic bag and then cover the sealed bag with a Tire Tote. • If you choose not to store white letter/white stripe tires in plastic bags, it is important they be stored or stacked white-to-white and black-to-black to prevent staining the white rubber. The black rubber used on the tires' white letter/white stripe side is compounded differently then the black rubber used on the opposite side. A layer of non-staining black rubber covers the white rubber on the tire's white side to prevent oils in the tire from migrating into the exposed white rubber and discoloring it, however the black sidewall uses standard rubber. Stacking all tires white sidewall up will allow the oils from each tire's black sidewall to migrate into the white rubber of the tire below it. • Place the tires in a cool, dry location. It is better to store tires in a dry basement or climate-controlled workshop than in a standard garage, storage shed, hot attic or outdoors. While basement and shop surroundings tend to remain cool and dry, conditions found in typical garage, shed, attic and outdoor locations often include a wide range of hot and cold temperatures, as well as seasonal precipitation and humidity. • Keep the tires away from sources of ozone. Electric motors that use contact brushes generate ozone. Keep your tires away from the furnace, sump pump, etc. While tires will age somewhat regardless of what precautions are taken, these procedures will help slow the process compared to taking no precautions at all.
-
1 pointAnyone have recommendations for lodging at the Big Show? Am seriously thinking of going, really want to get out of Indiana for a few days. Kinda wanting to go on the cheap, but don't feel like camping. Am also considering a side trip to Gettysburg on Sunday.
-
1 pointif you decide,,,,,this tractor is not for you........ i will take off work....without notice......run most red lights.....skip lunch.......... casually walk up to you,,,,,give you the 2100.00 you spend........ load and speed off,,,no looking back..... i think.............you did great........30 year + investment
-
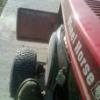
1 pointFound this 414-8 suffering out in the weather with the hood up and no rear rubber. Stopped knocked and wrote a check, ran home got trailer. Worked on her for about 30 minutes and threw on some rubber. Then yes I mowed the yard. Im still not sure what was wrong with her, I threw on a push button to start it. Not a good idea I know but well I just had to see her run. I gave $250 for her she runs and mowed decent. Also put on a new choke cable the old one was rusted up and frozen. More pictures
-
1 pointThat could be a work horse gt-1642 or gt-1600 repaint. I can tell from the transaxle sticker, and twin stickers.
-
1 pointMy son in law's Mother just dropped this off at the house for me. Her husband's Father recently passed away and this brochure was found in his files.
-
1 pointnice tractor,in regaurds to the steering skipping it could also be the lock collar on the steering shaft under the dash panel,behind the battery,thats if toro didn't change the design since 1990,thats the newest horse ive wrenched on,but if the steering wheel lifts up out of the column a bit it will allow the gears to slip
-
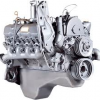
1 pointThe 16 HP Kohler in my Ford cranked over hard and it turned out to be the compression release tab on the camshaft was bent down effectively disabling the compression release.. This made the engine crank over with full compression which it seems the K-341 does not like. I bent this tab back up as per the engine manual and it cranks over fine summer and winter and has now for over 12 years since. Cleat
-
1 pointGot it Mike. The parts list shows it on the right side connected to the idler arm. That's where my damper was. But you're looking at your tractor so you know where it is. I also wrote that my 'normal' spring was on the right but I meant left like most all are. I agree with you on your dealer relationship. When you find a good one it's always good to take care of them.
-
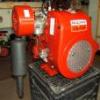
1 pointI decided to check out the governor. With Martin's generous help, I got the shroud off. The right puller got the flywheel off. I just spent a hour cleaning off 25+ years of gunk from the entire area. That's it for today. I'll post back when I get the sator and cover off. Thanks everyone.
-
1 point+1 And you would not want your 16HP engine to blow, as they are among the most rare of the K series. A 12Hp can be had just about anywhere, a 16Hp on the other hand..............
-
1 pointGreat! Now you can tear that engine off that tractor, bring it to the show and give to me. I could use a 16 Horser!
-
1 pointNiccceee.... guess we should all visit our local dealers more often.
-
1 pointBob, I have had problems with that bearing pinching before...it was the first thing I thought of when we started talking about the pinching. Is it possible that the differential bull gear is making it tight when the side plates are tightened?? Check the bearing at the top of the mushroom gear also for the correct seating...almost has to be where you are having the problem. Maybe try it without the shim. Is it possible that the axle tubes are not square to the plates?? Take a good look at the welds.
-
1 pointthats great it was an easy fix, Van.......... sometimes just taking a step back and some youtube research (or google in general) can save you a bunch of time. better than tearing into it and finding out it was a simple adjustment to fix!!!
-
1 pointOK when all else fails, look up how to do it on YOUTUBE. Crazy4WheelHorses has a video of how to adjust a kohler governor on YouTube. I recommend this to alll the members of Red Square. I thought I had followed the manual on how to make this simple adjustment but must have missed a step (or did something stupid). The governor works just as it should now. Thank you Craig for your reply to my question.
-
1 pointThat's the bearing where the welded ring on the case side was out of round. I 'fixed' it but that's not saying I got it right. Yes, it's got a shim under it and I ended up putting the shim back in after I made the oval round. I'll check it out again. Prior to putting it together with the rod I tried all the gears less the differential in the case and it was fine. Then I took all the gears out and tried the differential only and that's when it bound up again. Tomorrow I'll check out that bearing again and try all the combinations of parts installed in the case. Sooner or later the issue has got to expose itself...............doesn't it? . Ya know, a hundred years from now I'll be laughing about this problem.
-
1 pointI and a few of us now are staying at the Comfort Inn in Scottland, PA. It is about 4 miles north of Chambersburg on the freeway. The rates are good, places to eat, about 20 minutes to the show. The address is 3301 Blackgap Rd, Scottland, Pa...phone # 717-263-6655. I think they still had some openings. This is a nice, clean motel...be the 5th year there for us.
-
1 pointBoy that is a really nice tractor,.. really nice good luck with it , Jeff
-
1 pointNot exactly Craig. Just what I can download. I'm thinking its time to get inside the engine but I hope to be wrong about that.
-
1 pointThats a nice tractor, and definetly a keeper! Congragulations
-
1 pointMike, nice find on a real good looking horse. the paperwork is a bonus as well, like you say, 'completes the tractor'.......
-
1 pointThanks for the info Martin. I think my Sunday afternoon will be spent reading the Onan manual. Better than working in the garden in the hot sun.
-
1 pointTried JB weld only once on bolt holes ...didn't work AT ALL it wont take any torque from the threads. your only choice may be removing the engine and doin it right
-
1 pointVery true Don. Plus that reverse to mow switch on the side of the seat but I'm not sure if that's on a 98. I set mine up the way I want it as far as safety switches but do not recommend to others to do that. They are there for a reason. I haven't noticed the grass accumulation on my Command but I've only had the shroud off a couple times. The whole tractor is getting a complete clean up and waxing this coming week and that's something I'll check.
-
1 pointNice tractor. It sure looks well cared for. You might want to check the transport stops too. I had to play with those as well as the eyebolt adjustment to get mine to lift properly. On one of my 48" decks up north I replaced the transport spacers with a larger diameter to get it the way I wanted it. Maybe not the proper technique but it worked great for me. As far as the Command goes, I'm happy with my 15. I think the K's and Magnums will probably last longer but the Command is smooth and quiet.
-
1 pointNice Horsey! Did you need it? Or, your Wheel Horse Addiction acting up? Remove panel from tower front, when replacing I use 1/4-20 SS Phillips head screws and Never-Seeze. Your new Stallion looks great!
-
1 pointTypically I stay in Chambersburg. If you want to tour the Gettysburg battle sites, lots of lodging here.
-
1 pointThanks chazm, I can do those rates, and not break the bank. At that price, I may ask my youngest daughter if she wants to go, that way I can drag our 17 month-old granddaughter with us. Thanks to all you folks. Trying to put something together that won't break me. Haven't had a true vacation in about 20 years.
-
1 pointThanks Jeremy. The 416 is doing real well! Thanks Glen. It is a tear but they sure are crowding my barn up.......need to make room.
-
1 pointThe square seat would be correct.
-
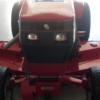
1 pointI've seen those radios somewhere. I think Duke has one. WH # 8-6911
-
1 pointRunning out of space in the garage (yes, need a shed). Dad's B-80 is retired from chores, just taking it out to run around. garage dolly's are big buck and over kill, as I'm not pushing around a car. Got these dolly's from Harbor Fright. were on sale at $9.00 a piece with Gold Customer (not sure how I got that ranking) coupon. limit 4. I did lube them up with bearing grease and removed the deck and bungeed it against the wall. I wouldn't try this with a heavy D or such. Better than a Hover Round!
-
1 pointWhat? you guys don't have a white belt? Probably don't have a double knit leisure suit either.
-
1 pointBeen using 6 blades on a 42 and 48 deck works grt cuts the grass finer also the extra blades gives it a higher lift. I also have a zero turn Kabota with a 60 in deck by taking out the fat washer I was able to put 6 blades on it. It made a great difference in cutting and lift. I've had this setup for 2 1/2 years now no problem.
-
1 pointIf you're around the horses for very long you'll hear of the very scarce 1533 differential carriage bearing in the stick shift transmissions. The obvious reason for this is simple - they havent been made for many, many years and what few are around are dwindling at an alarming rate. I had heard of guys "machining" a case to fit an oversize bearing but never knew any details, so being a fairly decent home shop machinist with a nice large Bridgeport type mill and lathe I thought I'd see what I could come up with. With member Groundhog44 having a couple sets of cases the 2 of us started looking. The original 1533 bearing is/was 1-1/2 x 2-1/2 x 1/2" - the nearest thing to that (that I could find!) was a R24-2 rs or zz with its diminsions being 1-1/2 x 2-5/8 x 9/16". With only adding 1/8" diameter and 1/16" thickness the case appeared to have ample 'meat' to handle machining out this amount. This size bearing is very common and is relatively inexpensive, so I got 4 of them to see. The first puzzle was to get the case 'fixtured' on the mill to do the boring - this was stumping me til I called my "machinist by trade" buddy and with his years of experience quickly pointed me in the right direction. He was also able to furnish the 2 heavy steel bars needed to 'hang' the case off the mill table. Let me pause here and state the rather obvious fact - this is not a repair that can be done in most of your shops, but I would think many of you know of, or have friends that have the necessary equipment - and its very possible in the not to far future that a visit to a machine shop may have to be done. In order to get a grasp of what we did, I tried to get enough pics to see the set-up... This is the 2 heavy bars mounted to the table with the mills head swiveled around in order to reach the case that will be mounted off the right front of the table to clear the mills knee. This is the case mounted in the fixture where I am about to locate center of the existing bearing bore in preparation for the boring Here I am starting enlarging the hole. The depth of the hole needed to be increased from the original 1/2" to the 9/16" which is only .0625, but has to be done. I finished this step before enlarging the hole the extra 1/8" (this is only 1/16" off each side) And this is the new bearing sitting in its new home - this is a R24 rs bearing meaning it is a sealed unit, its only necessary to 'pop' out the rubber seal to allow oil to flow through, which I have done here (this same bearing in zz designation is a shielded bearing and doesnt require anything)
-
1 pointBest picture of them all Future red square member No but I would love to have one
-
1 pointSo what you're saying is that I can't do this with my Dremel and my DeWalt drill? Nice tutorial. Sent from my Moto G using Tapatalk


.JPG.9f2ecb26065c66527b0730084ab7fc7a.thumb.jpg.7dc8a04d9a53d44ee2b23f26ee94496f.jpg)

This leaderboard is set to New York/GMT-04:00