
Leaderboard


Popular Content
Showing content with the highest reputation on 06/04/2014 in Posts
-
5 pointsI declare the David Bradley finished today, which happens to be my fourth anniversary on Red Square. For a project I expected to last a week it took two months. Now it's time to get back to the Wheel Horses. Here is how it all started.
-
5 pointsHere's an update pic of the little feller! Thanks for all of your nice comments! Proud of our great hobby! Keith
-
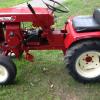
2 pointsI had several of my Wheel Horse's at the Centerburg Farming Festival last September when a family came along and were asking if i did work on any WH's for other people. I said yes and gave them my business card. They called me a few weeks later and I met up with them at their house to check out their 10 year old son's WH's. They had 3 or 4 around in various stages of disrepair. Seems the boy can take stuff apart but not too good at putting it back together! Lol! Well they finally got around to dropping off one of the kids WH's, a 1964 job. It had a bunch of stuff wrong with it and a junky Briggs motor that the previous owner had installed. A bunch of parts were wrong and a bunch more were missing. So they wanted me to see if I could get it running and fix it up a bit. Well my buddy and I fixed the motor and got it running but the governor was messed up. It ran ok but it searched up and down rather fast. We tweaked the carb and that helped a little. Mean while I did a bunch of painting and scrounged up the missing parts. It also had a ton of cross threaded bolts from the boys lack of wrenching talent. So I had to tap out that stuff and replace alot of bolts. We pretty much left some stuff like he had it, like the rims and muffler pipe, he said he put some bling on it! But the paint turned out pretty good and everything works as it should now with the correct WH parts. I even installed a nice 704 decal from the famed but hard to get ahold of Ed Mayhew. I finished it up this weekend after 2 weeks of wrenching. I parked it in my driveway when they were due to show up so they could see it right away. They pulled in and saw it and they didn't even know it was their tractor! The boy was freaking out when he saw his bling muffler on it and he told his dad that it IS our tractor Dad! The dad was freaking out too and they were talking back and forth about how awesome it looked! That was the desired effect I wanted! We talked about what all we did to it and finally the kid got on it to start it up for the first time! It ran well and he took off and rode all over my yard playing with the choke and throttle's. As he cruised it around his Dad was grinning from ear to ear as well as the kid too! He asked about the amount owed and he didn't mind paying the $235.00 at all and said he has another tractor he wants me to fix up. It is a 1969 Model 700 with a Kohler engine. So he dropped it off the next day! I gave them a big price reduction just to get the kid more into Wheel Horse's and to be a nice guy as well. So here is the finished product! A pretty descent little 704 with an electric start Briggs motor! Hopefully the kid don't take nuttin apart on it this time around!
-
2 pointsMy first car was a 1960 Chevy Bisquane (sp)...2 speed slush box trans with a 235 straight 6...but this what I used to learned how to drive...wore out a few pair of shoes trying to stop this in time.
-
2 pointsLet us know if this cuts your cell phone bill in half.
-
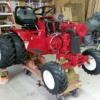
2 pointsI like your thinking on the shifter knob, E tank it is The plan for yesterday was to get as much of the paint and rust stripped off of Project ZIT, but instead I spent most of the day mouse hunting, trying to keep very young (just worked out how to fly sort of young) black caps out of the shack, and chopping a phone in half! Which is why the build bench ended up looking like this when I entered the shack this morning! A little while later the bench was a lot tidier and I could actually see what I was going to work on Well, not all the parts as some are stashed under the bench. As I was stripping the last remaining parts off the hood stand I noticed more rust that needs a bit of work.. The hood stand is now stewing in the E tank. I did make a start on cleaning up the chassis, but I didn't get that much cleaned up as the shack was filling up with rust dust and it was raining so I couldn't do this part outside! A much dryer and warmer day is forecast for tomorrow, so fingers crossed for some rust stripping action in the sun And for your viewing delight, here's part 1 of Project Zero-ish turn.
-
2 pointsGunny, be careful regarding applying "cosmetic" products like those mentioned above. These are great products to fancy up a show queen but may be disappointing for long term preservation. Google is your friend here. Here is an answer of how and WHY of tire preservation from the Tire Rack webiste regarding storage. Avoid heat, Ozone exposure, lack of regular use, and application of "dress up" products. from the website Since heat and exposure to the elements are the important factors that influence a tire's aging process, drivers can prolong their tire's life by minimizing their impact. Here are some tips for storing tires that will not be used continuously. • Don't store a vehicle with weight on its tires for extended periods of time. Long-term inactivity is more harmful to tires than weekly drives that flex the tires and help maintain oil dispersion within the rubber compounds. • Keep the tires out of direct sunlight whenever possible. The sun's ultraviolet rays and radiant heat are detrimental to rubber. We have used a pyrometer to measure tires that were simply sitting in direct sunlight on a parked vehicle. Surprisingly those tires' temperatures measured 135° Fahrenheit on their surface. • Before storing, use a tire brush to clean each tire with soap and water to remove brake dust, dirt and grime. If the tires are still mounted on wheels, use a wheel brush to clean the wheels with an approved cleaner as well. Dry with a towel and let any remaining moisture thoroughly evaporate. DO NOT APPLY ANY TIRE DRESSINGS. Tire compounds are formulated to resist ozone cracking or weather checking. • Place each clean and dry tire in its own large, opaque, airtight plastic bag (such as lawn and garden bags) for storing. Avoid allowing any moisture to remain and remove as much air as practical (some drivers even use a vacuum cleaner to draw out as much as possible). Close the bag tightly and tape it shut. This places the tire in its own personal mini-atmosphere to help reduce oil evaporation. • While Seasonal Tire Totes make it neater to store tires, easier to carry tires and reduce the possibility of depositing brake dust, dirt and grime in the trunk or on the back seat during transportation, Seasonal Tire Totes are not airtight nor designed to prevent exposure to the atmosphere. The recommended solution would be to place each clean tire and wheel into the airtight plastic bag and then cover the sealed bag with a Tire Tote. • If you choose not to store white letter/white stripe tires in plastic bags, it is important they be stored or stacked white-to-white and black-to-black to prevent staining the white rubber. The black rubber used on the tires' white letter/white stripe side is compounded differently then the black rubber used on the opposite side. A layer of non-staining black rubber covers the white rubber on the tire's white side to prevent oils in the tire from migrating into the exposed white rubber and discoloring it, however the black sidewall uses standard rubber. Stacking all tires white sidewall up will allow the oils from each tire's black sidewall to migrate into the white rubber of the tire below it. • Place the tires in a cool, dry location. It is better to store tires in a dry basement or climate-controlled workshop than in a standard garage, storage shed, hot attic or outdoors. While basement and shop surroundings tend to remain cool and dry, conditions found in typical garage, shed, attic and outdoor locations often include a wide range of hot and cold temperatures, as well as seasonal precipitation and humidity. • Keep the tires away from sources of ozone. Electric motors that use contact brushes generate ozone. Keep your tires away from the furnace, sump pump, etc. While tires will age somewhat regardless of what precautions are taken, these procedures will help slow the process compared to taking no precautions at all.
-
2 pointsthey already are
-
2 pointsI'll be there, don't know if it's a solo shot or not. We'll see, to be continued!
-
1 pointIt's amazing what you end up doing when you know you should be doing something else
-
1 pointDoesn't it just frost you when you see all these posts about how excited everyone is about going to the show? Well this is another year of that right? Everyone's going but me.... So you going to do what you did last year? Yeah you remember, you came here, right here to waiting anxiously for....... pictures... Yep the generous guys who take the pictures. When those first pictures start to roll in, how do ya feel? Well a little better right, but still wishing there was more so you wait for the next one and the next one..... This year in conjunction with Terry from ReDoYourHorse.com will be streaming LIVE from the show! There will be at least one web cam established at the show which will be broadcasting live right here on RedSquare the show. Miss the parade? Not this year, we'll be streaming it live to you! Now don't get too excited, this is a first time trial effort, and we'll certainly do our best to get your show urges satisfied, but it will be the first time that the WHCC show is brought to you live!
-
1 pointMade a really nice find today, so I took a little ride and picked up a few new horses.
-
1 pointSo I know what some of you are thinking... Yeah... BIG DEAL, I'm working no way I can watch anyway.... Well... part of the inspiration comes from Ian. Now, Ian is an interesting chap. He seems all rough and mechanical (and he really is a master crafter) but this guy is incredibly brilliant with video (and everything he touches), and if you haven't seen them, you are missing something. So anyway, Ian was messing around with YouTube and live streaming with the added effect that the video is retained for later viewing. So work... rubbish, watch when you come home, fast forward like Tivo, but most of all enjoy like you're there! I really hope that this works well, other wise I got some explaining to do!
-
1 pointI've got a nice set of 6-12 turfs on rims John. Looking for a chrome air cleaner for a KT-175... another set of 6-12 ags to replace the one's I sold last year... and maybe a nice lighted sign. Still thinkin' about selling a tractor, or two? See a tractor in my signature you're interested in... shoot me a PM...never can tell, maybe we can make a deal, and I'll deliver it to the show. May sell the 1958-'60, LMR-30 reel mower off my 401, if anyone's interested in RJ/Suburban attachments.
-
1 pointThanks for the laugh... ! Mike........
-
1 pointWell, they say, if you can't laugh at yourself, then who can you laugh at? Let's just chalk that one up on pure laziness. I would have needed to look at the "XI" for the serial number anyway, so while I was taking out the trash, I decided to just write down the model number. WHAT DO YOU KNOW, the serial number is right below the model number..... Laughs are on me tonight.
-
1 pointSpeaking of oldish Chrysler Products, I worked in an auto shop about 25 yrs. ago. I was entrusted to work on one customers old cars which had been his parents cars. a 64 Dart with the good old push button auto trans and a 65 Coronet Wagon. All I remember was all that chrome in the interior and that wagon you could park that thing using 1 finger. The wagon's radiator was bigger than today's car's engines!
-
1 pointThe 3 different ignition systems are described in this manual Section 6 If you follow the light colored wire that is connected to the condenser back to it's origin does it go to a terminal on the ignition switch identified with an M for magneto? Garry
-
1 pointi would really wonder about some other kind of issue with that - grass clippings won't ignite from radiated heat until above 550 F and even then are not able to substain an open flame without being fanned. I think you are barking up the right tree with recall information. there shouldn't be any external parts on a mower except the exhaust that is reaching temperatures above 550 F.
-
1 pointNo there is not. Pulling the head is super easy. However, start by chekcing the point gap, it should be .018 - .020 After that, you may need to adjust the throttle cable mount on the engine to allow for more full throttle. Living in 2014 you should have the capability of shooting a video for us, demonstrating the problems you are having. We will be able to see and hear what is going on.
-
1 pointHe's already got stainless stakes, Craig. I noticed 'em at Charlotte a couple years ago.
-
1 pointIf it's the same as a B-80 4-speed, I have one. PM me or email rmaynard@qis.net. Just checked the parts list and it appears to be a #3901, the same as the B-80 4-speed. I can bring it to the Wheel Horse show to save you shipping.
-
1 pointScott, You might want to take another look underneath. I have two older push mowers, both with essentially the same B&S engine. The book says to tip the entire mower on its side to drain the oil, but there IS a drain plug underneath. It has a 3/8" square recessed hole -- Stens makes a special tool to wrench this off (kind of like an Allen wrench, except with square ends), but you can also use a 3/8" drive socket wrench handle, with an extension if necessary. Works like a charm. I'm trying to think of something else to say that would respond to Steve's comment, but I can't think of anything appropriate that my daughter could safely read.
-
1 pointBelts. I get great service from Huskee Kevlar belts. Off the shelf at Tractor Supply. Around $20 each. I've been using the Huskee Kevlar belts on my mower decks, PTO and drive. Been using them for four or five years now. http://www.tractorsupply.com/webapp/wcs/stores/servlet/SearchDisplay?storeId=10151&catalogId=10051&langId=-1&pageSize=20&beginIndex=0&searchSource=Q&sType=SimpleSearch&resultCatEntryType=2&showResultsPage=true&pageView=image&searchType=1002&autoSuggestURL=AutoSuggestView%3FcoreName%3DMC_10001_CatalogEntry_en_US%26serverURL%3Dhttp%253a%252f%252ftsc-prod-lb01.crossview.inc%253a3737%252fsolr%252fMC_10001_CatalogEntry_en_US&searchTerm=belts
-
1 pointNavig8r, yes and yes. Forest Road I have considered Matts pedal and i want one on at least one of my horses, maybe more?
-
1 pointone of the most important aspects of dealing with an intermittent problem is to take every advantage of the opportunity to LOGICALLY TROUBLESHOOT the problem while the problem exists. If you start with "pushing this and pulling on that" style of troubleshooting, you may just mask the problem until next week when your getting ready for vaction, have to cut 8 inch tall grass and the problem comes back !! ARRRGGHHHH My suggestion would be to take a test light or multimeter and check for voltage at each major component in the 12 volt delivery wiring. Start by placing the testor on the battery + terminal - lite comes on - you know the testor is good move the testor to the inlet of the fuse holder - light on ? power is good to fuse light off ? wiring is suspect up to the fuse if fuse inlet has pwer then move testor to the fuse outlet - no light ? fuse or fuse holder is bad light is on ? then fuse holder may be good proceed in this fashion until the 12 volt power disappears. that is the problem area (or one of the problem areas) - fix the issue and proceed on witht the troubleshooting until all issues are addressed. again, I would take the opportunity to use the testor or multimeter while the problem is present and avoid troubleshooting soley by random parts replacement.
-
1 pointBuckrancher is the luckiest guy when it comes to canopies. His has lasted since 2010 I think. He does a lot of shows. The Little Guys Show this year was so windy Friday night that I don't know how the canopy stayed up. Brian must be one of those guys with a horseshoe up his tailpipe. Edit: My new canopy arrived today.
-
1 pointLove what you are doing, I would think if you pull the shifter and "E"tank the knob end it will come apart. Look forwart to your project.
-
1 pointScott...you are a chick magnet!! She was just waiting for you to be outside with 2 cycle oil in her hand. Oldest trick in the book.
-
1 pointPulled the trigger on the 1973 tiller today. Got more info on it as well.....Used about 4 times and has sat covered in the back corner of the garage since 1977. He can't find the pulley set up or the belt... he is going to look tonight and the price for it all was decent....FREE!!!! Well not really as I dickered with him and I'm going to stain his brand new 25'x15' pressure treated deck for him. He's probably 70 or so and neither he or his wife can do it so we made a deal....I stain the deck...I get a free tiller.... nothing wrong with a little sweat equity!! Hope to pick it up tomorrow!!!
-
1 pointUpdate: Filled my trash can root cellar with potatoes at the end of August. Today is May 11, 2014 after a real cold long hard winter, the potatoes are almost gone but still real fresh with no eyes or rot after 7 months! Making a Mother's Day potato salad with them today too. Here's a video of this morning's potato haul; I will grow and store even more this summer.
-
1 pointIf you are mixing paint and dont like to spill thinner from those hard to pour from metal cans I have a solution. I took a plastic quart oil container and cut a 2" hole in the side, cut out the bottom and sliped an o ring over the spout. Presto, hands free operation of funnel and no mess!!
-
1 pointMmm, mmm, the best part Van brought tasted just like homemade peach candy.
-
1 pointin the process of restoration


This leaderboard is set to New York/GMT-04:00