
Leaderboard
.JPG.9f2ecb26065c66527b0730084ab7fc7a.thumb.jpg.7dc8a04d9a53d44ee2b23f26ee94496f.jpg)


Popular Content
Showing content with the highest reputation on 03/31/2014 in Posts
-
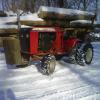
5 pointsHey all is there anyway any of you can help me identify this horse. I want to restore one like he had. I am the fourth generation wheel horse owner.
-
5 pointsWell I spent Sunday afternoon getting my tiller (Model No. 79370 -Serial No. 3900513 - a 1993 Wheel Horse Tiller) attached to the 1978 Wheel Horse C-121 8 speed tractor I bought three years ago. This tractor has not been run a lot in last three years as a 3000 Watt Wheel Horse Generator was on it during that time. I had to installl the rear lift hitch on the transmission (and make the special clevis pins for locking the hitch on the tiller bar) , bellcrank, lift cable, Spring assist and chain at the top of the tiller to the bellcrank. I attached the Mid-Attach pulleys, the belt for the tiller, checked it out with a short run (not in the soil). I followed and re-read continuously the Tiller Operating and Parts Manual to make sure I was doing things as recommended. I have three different bellcranks and setups for the lift for tractors from 1976 thru later models. We have some of each and the B-100 -1976 Model was the other choice to se the tiller on -but I went with the C-121! For you longtime tiller users, I have a couple questions. How do you know if the tiller has enough gear oil in it? Is there a way to know if the gear oil level is where it should be? Have you ever sharpened the tiller blades for better cutting into the soil? What is the best way to know how deep the tiller should ride in the soil? I know that is the tiller is pushing the tractor forward (according to the manual) that you should raise the tiller out of the ground a bit more until it does not push forward. I am going to have a big vegetable garden this year and probably will have most of the rows in between the size of the rear tiller -so I can limit the hand weeding, etc. Any "lessons learned" from tilling experienced Wheel Horse owners would be appreciated!
-
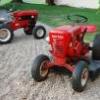
4 pointsI just got back from picking up this nice little all original, one owner 753. From my understanding this was only used to plow. The carb needs to be cleaned, paint up the wheels, free up the cables, find a new square seat and maybe wet sand to see if I can find the original layer of red....Then I will call her done. The steering it tight and tranny shifts nice with no noises. My son claimed it as his already....
-
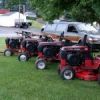
4 pointsThe snow melted and temp was 60F this afternoon, so I turned the 520H loose for her first real workout. This is the 520 that you all helped me reconditioned in the New ? Find thread. I want to take this opportunity to again thank Motox 25,G Man, Aussie, Jackhammer, Theroundhousernr, boovuc, and especially Martin for leading me through this effort to the finish. I hooked her to the roller for about two hours and she performed perfectly. I was amazed at the power... she didn't seem to loose any RPM even when I took that roller up the steepest hills I have. Gotta love that steering and the bigger tractor feel. Really like the hydro control when holding up a tongue and moving the tractor in position to drop the pin. The only negative I saw was some speed increase on the downhill. It wasn't excessive, but takes some getting used to. One of my Sundstrands does the same thing, but I was not expecting it from the Eaton. It is definitely a keeper, and will be my snow mover. I may even put a clevis hitch and plow on and turn my lawn into a garden. She still has a lot of wiring issues that need corrected. I just need to decide how many of the goodies I need to get working.
-
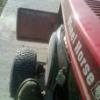
2 pointsI normally jinx myself by starting build threads because I never finish anything.But I thought I would try it again and see what happens.This is a rough 1056 my dad had that was one of his parts tractors.I figured I would turn it into a two seater similar to Wallfish's that he built.My wife wants something we can ride together on at the shows down here.So,here is were I am as of today.I flipped the frame over to lower it and probably will be lengthening the front of the frame.Anyone make drop spindles?I know I have a lot of working out the details with the steering but I have some ideas in the works.I plan on using one of my rusted plow blades for the rear fenders but also using a golf cart style seat and frame work over the motor with a small bed on back..It will be a little bit longer but should work.Any ideas would be appreciated as I get a little further into it.Sorry for the cell pics as they are all I have at the moment.
-
2 pointsreal nice lookin tractor,the tiller will kinda find its own depth,soil conditions are every thing,once its worked good she tears through it,full depth,when breaking virgin ground it takes a few passes,sometimes I backup with it,this realy digs,but you need to use the lift when doing this,you will really enjoy the tiller
-
2 pointsYou guys realize that this years brackets were all messed up because of Global Warming and the fact that our solar system is passing through the plane of the Milky Way Galaxy. It's all about gravity...and oil.
-
2 pointsSay Cheese!!! Wisconsin takes it home! Big Ten all the way!
-
2 pointsIt should be admired and apreciatted that there are people in all corners of the world that can see and realize that the machinery and tools produced at a certain time in this country were of such high quality that many of them over 50 years later are still usable and will still outlast whatever is built anywhere today. We should treat it as a compliment and not be upset by it. It should instead awaken us, not only to preserve what we have, but to also strive to still be able to produce such quality and craftmanship. I have countless times been with people overseas which proudly take me to their barns or garages to proudly show me their American made tractors and machinery and boast how great they still work. Coming from generations of woodworkers in Europe I remember my grandfather having a few American made tools and the reverence with which he treated them.Not everyone was allowed to handle or use them. Well, they have come home!I have inhereted them and so will my children.
-
2 pointsAlthough I really admire and apreciatte many of the incredible restorations seen here by many members in my opinion unless tractor is a total basket case I would not restore it. Many of these old machines have incredible character which can only be achieved with time and use.When looking at a perfect restoration one usually is not admiring it for what it is but in my opinion we are really admiring the care and craftmanship that went into it. However when admiring one with the so called patina which includes the effects of time and usage one really is thinking more of the tractor and of all the great service it has provided to owners. I can say that i actually look at them with respect and admire them rather than one's work put into it. Many of these things actually have "soul" . Keep in mind that after restoring a tractor its usefullness is greatly diminished since one is always going to be hesitant in using for many tasks for the fear of damaging it. Take care of it, preserve it ,use it to its full potential and purpose and everytime you look at it it will grow on you more and more.
-
2 pointsAs it came off the truck today. Had to remove the bucket to fit it into the shed...you know...gettin' kinda tight in there. http://www.youtube.com/watch?v=QkhSC52S8Nk&list=UUd_ptV1TUpPlW1VhCjxez_Q
-
1 pointWe are happy to announce the forum support member discount has been raised to 30% from 25% At this time I have 77 support members registered. there are many more who have not contacted me. or registered. If you are a forum support member and have not registered on my site you can REGISTER HERE make sure to enter your forum username when creating your account so i can verify your support status. Also this year we are offering free shipping on all decal orders to anywhere in the US If you would like to take advantage of this discount and many other benefits of being a forum support member simply go to the forum STORE and pick a support plan that works for you. Thank you all for your support and we look forward to seeing you at the BIG SHOW this year. Sincerely Terry, Lola & Buddy
-
1 pointTonight I removed the second front rim and then demounted the tires. I took them over to my Pal's Brian's Shop And the MASTER BLASTER gave them a blast from the past. The two fronts came out beautiful the rears were a different story. One of the rims will need a WHOLE LOTTA LOVIN to bring it back. I will need to love it real good with the tig welder, then I'm gonna love it real good with Some Lab Metal. All I can say is there is gonna be a whole lotta lovin going on over at the Duke's Place. Here's some pic's of the Master Blaster at work and the rims. ~Duke LAB METAL LINK BELOW
-
1 pointDon't forget the lift assist spring
-
1 pointTiller and tractor look great! Just keep in mind that if you go to deep, you might find yourself being propelled by the tiller! Good luck, Bill
-
1 pointThanks for sharing the link.
-
1 pointnice find Craig....Wayne
-
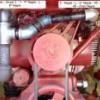
1 pointhere's a pic of the inside of my tiller after hitting something soils as you can see it's a chain and sprockets and two gears it would probably last for a long time with no oil I meant soilded
-
1 pointbelow is a link to the owners manual for a tiller they are all pretty close oil level, is in the manual depth, this is a feel thing, if the tiller jumps a lot take shallower passes and make subsequent ones Virgin soil can be difficult I never sharpened the tines, they will sharpen themselves over time you may want to consider front weights, I have a c160 and the front is light without weight
-
1 pointLooks cool Lane..you have any pics of them on your tractors?
-
1 pointLooking good Lane! We had over 1 1/2" of rain late last week, so no tilling around here!
-
1 pointSunday paper? I think a piece of Saran Wrap wii do the trick!
-
1 pointCan we at least put a sunday paper under you to measure how high you jump?
-
1 pointActually, the force of gravity is changing every day as we pass through the plane...that is why no team shoots good in the first half. It takes a while to get used to the gravity for the day....not to mention....that the gravity is different in the Midwest then it would be on the East Coast or in the West, or in the South for that matter. The teams that are playing closer to home...have an advantage in that regard...it is more of a minor change to get used to the space/time concept. With all that being said...the final 4 is played in Texas...(Texas has it's own gravity)...the closest team to Texas (Kentucky) has the inside road here. Obviously, I am pulling for Wisconsin...but when was the last time any of us has beat gravity?? On a side note...my vertical leap has suffered greatly in the last 2 years...I blame gravity for this. It is NOT my fault.
-
1 pointSorry for the drama, but not for the humor... but if you give me a little time, I can answer that question. I do not have the time at the moment to answer it in depth...it is something that Mike and I have been working on for years. As you know...TT and a few other guys have been messing with this also. Give me a couple of days, and I will share what I know...just know that I do not know everything.
-
1 pointTo accumulate some natural patina Steve... just keep the tins wet, and leave 'em sit out in the weather for awhile. Interesting idea here too.
-
1 pointsteve how about the polar vortex caused it also lol
-
1 pointif you are going to swap everything you are talking about i say swap the tranny and the steering over into a 300 or 400 series tractor, it would be less work that way. no need to change dash tower, wiring, and guages. just my take on it. it's your tractor do what ever you want to do in the long run eric j
-
1 pointJust my opinion, but if you need to service the points and/or condenser replace them as a set, they are relatively cheap and considered consumable parts along with sparkplugs air filters belts and engine oil. If you need to file or clean the points to get running until you can get new parts consider it a temporary repair .
-
1 pointeveryone should have a loading dock like that in their front yard, then it would be easier to bring home more horses and attachments.
-
1 point
-
1 pointIt is not just garden tractors that end up heading south of the border. Many 2 cycle Detroit diesel engines went south in the last 20 years. No emission control equipment down in Mexico or South America. The company I work for sells off 10 of our older ready mix trucks each year and Mexican and South American companies are always here to pick them up. Some smaller American ready mix outfits will take a couple as well. But, the lions share usually go south. These companies always want all of the pusher axles and bridgemaster axles removed as they don't have weight restrictions down there either. If they go to Mexico, they are generally driven there. The ones that go to South America are driven to Florida or someplace like that and loaded on ships. I don't even want to know what it costs to ship a half a dozen or so 30,000# concrete mixers by boat. But, I suppose that if you could buy the trucks for around $50,000.00 and pay the shipping? It would still be alot cheaper than $170,000.00 for new ones. Neil, you can buy all of the old iron you want IMO. Having running WH's in all 4 corners of the world is fine with me.
-
1 pointYou lucky Turd Craig! :notworthy: I Been wanting one of those since MOSES was A pup! Good 4 You! ~Duke
-
1 pointI'm really happy! we found the sn plate for this tractor today, It is a 1968.
-
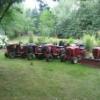
1 pointThat shed is a damn portal to another Wheel Horse universe...Its like a clown car for tractors!!!!
-
1 pointWhere Do Old Bumper Cars Go? The ones in Westview Park or Kennywood Park in Pittsburgh or many other amusement parks from around the country in the 50's & 60's. They ran on electric . Had a pole on the back going to a metal electrical charged overhead cage. Remember driving the bumper cars at amusement parks or on the Boardwalk, don't you? They were so much fun. Well, now what do you do with old Bumper Cars? (and check out the license plates!) WHO KNEW? Yes, you read that right; these little beauties are street legal. They run on either Kawasaki or Honda motorcycle engines and co-opt vintage bumper car bodies into the most awesome form of mini-car we've seen in too long. There are seven of these little monsters floating around California and they're all the creation of one man, Tom Wright, a builder in the outskirts of San Diego who figured the leftovers of the Long Beach Pike Amusement Park needed a more dignified end than the trash heap. They were originally powered by two cylinder Harley Davidson Motorcycle engines but they rattled like heck because of the two cylinder Vibration and Tom replaces them with four cylinder Honda or Kawasaki 750's And a couple have been measured as capable of 160 MPH, which is terrifyingly fast in machines with such a short wheelbase. By the way, they are almost indestructible in accidents!
-
1 pointLooks like a nice loader/tractor. Thanks for the video.
-
1 pointLooks good, Craig!
-
1 pointWell, if that is not a keeper, then I have no idea what would be!!!!!
-
1 pointThere was a new soldier added to the frontlines here here today.
-
1 pointAfter Apr. 15th the heck with it! Blade and blower are coming off!!!!
-
1 pointNow ,if that Rj 35 is anything to go buy I am sooooooooooooooo looking forward to seeing this finished , infact so much so that i may even ship my RS83 back to US so that you can do mine . Looking forward to having a chat in June at the big show , Hope you manage to save those rims .
-
1 pointLots of good information here. When I selected the 520-H to take on the responsibility of becoming the next SNOW CHUCKER II I had heard all the stories and knew what I was up against. For many hours I studied this and talked to many people. The Conclusion is that a lot of these failures were caused from HEAT. Being a 35 year HVAC contractor if there is one thing I know it is heat transfer and airflow as I have delt with it my entire life. I sat on a bucket and ran my newly acquired 520-H that came from Steve WH500Special in O fallen, Ill. I sat there with a digital Infrared temp gauge and shot everything on the engine and wrote down the readings. The highest temp readings of course were from the exhaust! Now look how they have the exhaust all jammed up half way under the hood. Right there above the rear head, right there by the FUSE HOLDER and all those brittle charred wires! Yep it didn't take me long to figure that one out! During the resto of this tractor I ended up just about rewireing the whole tractor. I knew right then and there the exhaust had to GO! There was too much heat back in that area and it didn't need anymore so that's what I did.I welded and fabricated an exhaust manifold and "Y" branched the exhaust into a Farmall Muffler out towards the front of the tractor. After much research I installed a remote Oil Filter which removed the restriction of air across the rear head. My opinion the following are problems of the valve seat problem and other heat related problems with the wiring not necessarily in order. Many of these problems have been listed above by others. Grass & Dirt Packed In Head Fins Causing Air Flow Restriction Causing No Heat Transfer To Cool Engine. Oil Filter Blocking Air Flow. Swinging a 60" Mower Deck (High Strain On Engine). No Cool Down Time After Mowing Shutting Tractor Off Abruptly After Mowing Or Straining Engine. Mowing Or Working Tractor In High Heat Conditions. Exhaust Heat Buildup And Restricted Ventilation In Rear Quadrant Above Rear Head. Blocked Ventilation From PTO Belt Guard. I love my Kohler Engines, But the Onan Just doesn't give up. If the valve seats were an inherent problem then how come the front head doesn't have this problem? Simple the problem is cause by heat. Take many of these condition I have listed above and combine them you are in for rear valve seat and wiring and fuse block problems. I guess this is my two cents on the subject. ~Duke
-
1 pointposifour11 we are happy for you and will live through your garden until we can get ours going.
-
1 pointWell to clarify, the 603 Specials are made to be a cheaper priced economy tractor. The WH factory had a lot of older style parts sitting in their inventory so they were smart about it and put all different types of older parts in this particular machine. So they used up the old parts such as footrest's from as early as 1960/61 as noted by the early production straight shoe sole type of footrests that dropped down some for a boot heel to fit into and were only made for a short time before they switched to later shoe sole type that are angled outward like the 1961 WH's and didn't step down for the heel but were flat. There is a few 603's around that have the step down type and even more were sold with the flat shoe sole type. But once WH got rid of their older footrests which may not take long, they installed their new stirrup type of footrest's on the 603. They came out in 1962 and they used them for quite a few years. The hood stand on these machines were a 1964 Model year item but it was put on the late production Special Model 603 to start the new style. So the front axles, steering parts, front tires and rims were old style parts too. Some 603's have older style Suburban front rims with no holes in them for Wheel Weights like all the other 1964 WH's had. I had one 603 that I sold to a friend on this site, it has a old style 1950's and 60's tool box on it with no fenders mounted to it and the early step down shoe sole footrests too. It had a low Serial Number on it. The hood is also a 1964 style of hood. So you can virtually have a 603 with a lot of different combinations of parts. That is why I like them and have so many of them. They are all different from each other. As far as the hood goes, it didn't come with the indented part where the 2 inch square WH decal resides on one of my 603's pictured. That hood was repainted years ago by a WH dealer that repowered the tractor and placed the decals on there according to the original owner, a 90 year old woman who I got it from, a Miss Clara Bell Valentine! Seems she couldn't pull the original recoil starter anymore so they popped on a new electric start motor a 6 hp Tecumseh. So that 603 was converted to an electric start model and they spruced it up for her too. She kept the original motor as well! I left it as is to keep the story going in her memory. The new for 1964 hoods came with the decal there but just not indented anymore like the 1962 and 1963 hoods. The stripes that are on mine and Ken's new 603 are not correct, but they kind of look cool, mine is a double pinstripe. I think Ken's is a rubber piece of door trim from Napa or The Walmart. So I hope this clears up some of the questions on the 603. I am sure I don't know everything about the 603 so feel free to chime in. The 1045 was another inventory reducing machine that was produced late in the 1964 year and cleared out a lot of old fenders, tool box assemblies and square seats from the earlier Models. I have never heard the 1045's referred to as an Economy Tractor for a reduced price like the 603 was advertised to be. WH did it a few more times over their history and it worked out quite well for them financially. I thought most of this info was common knowledge to most WH collectors but maybe not. Nuff said...
-
1 point, and Here is my 875. I paid $80 for mine from a kid at a yard sale!
-
1 pointUse a punch on the pin...If you hit directly on the pin, it will mushroom and you will never get it out! Keep putting a penetrating fluid on it and let it set.....drive the pin 1 direction, then the other direction, spraying more penetrant on the newly exposed part of the pin. I just removed one a few weeks ago. Mine was already mushroomed, so I had to use an angle grinder to remove the mashed ends. It takes a little time and patients....you don't want to break anything!
-
1 pointthere are snap rings on either side that you remove. however, removing those rings are usually the least of the issues. The pin is usually seized to the transmission housing or lift hitch its self. if thats the case, i usually find it easiest to just cut the pin between the transmission and the hitch on both sides, remove the hitch and pound the pins out, then carefully pound the pin out of the transmission housing. All you need then is a 3/4 farm hitch pin or a even a bolt with a long enough shaft will work, make sure to grease it or put some never seize on it. hope that helps
-
1 pointWell it's not a mirror shot but out the back window......
-
1 pointYup just add a factory fixed hitch, you will need a longer pin, but i use a farm hitch pin from TSC, I have fixed hitches also,if you need one.


This leaderboard is set to New York/GMT-04:00