
Leaderboard


Popular Content
Showing content with the highest reputation on 02/23/2014 in Posts
-
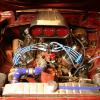
7 pointsHi All, Well ive finally managed to finish my latest fun video on building my snow plow, not that ill get to use till next winter, but its done:) Hope you enjoy it! Now i need to find time to get the charging system tested. cheers, Daniel
-
3 pointsI made my decision yesterday on my new chainsaw with a 20" bar. Although I have bought Stihl products for the last few years, after reading other forums specific to timber I decided to buy a Dolmar. I had initially thought of the next model up from what I bought which is their PS-6400. The Dolmar dealer, after lengthy discussion, led me to rethink my actual needs. I rarely fell a tree (I have large trees and will go to a pro for that) so do more limbing and bucking. The Stihl MS 261 C-M was what I compared the Dolmar PS-5105 to. To start, the Stihl was $180.00 more than the Dolmar. The horsepower is lower on the Stihl by .15 and the Dolmar's weight is .3 pounds heavier. The Dolmar is easier to maintain the top end as the cover is one piece covering the filter and cylinder head. This Dolmar model also has a one-touch lever by the right thumb similar to the Stihl. This last item is actually better than the Stihl as "Stop" is actually a downward movement. Both can take a 20" bar. Bottom line though is that the Dolmar has nice balance and "feels" right to me. So I bought the PS-5105. This is considered a "Pro" saw as the crankcase is made from magnesium instead of aluminum. This lightens the saw (powerhead) by .4 pounds and has an increase of .6 horsepower over their PS-510. Later on into the two-year warranty and just to make sure that there are no problems, I plan on replacing the muffler with a non-cat type plus doing some port work as well. That should bump the performance a bit more. It also helps that it is red and the dome is black! I plan on using it today.
-
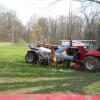
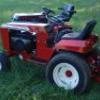
3 pointsPic of the tractor with the decals on and a link to the loader build
-
3 pointsI think it is time to throw in the towel and just send my C160 over to Martin's for a Magic Carpet Ride!
-
3 pointsI wired an old 120V. thermostat up to a light bulb in one of the cabinets under my bench. When it gets real cold the light keeps things stored in the cabinet from freezing.
-
2 pointsThat's ok...I was planning on transplanting a new 302 in the spring...going to have to cut a little sheet metal away though to make room for the headers!
-
2 pointsJust change the filter when you get a chance. Maybe a blown head gasket and seeping antifreeze
-
2 pointsDidn't have a lot of time today but did get the bucket built. Just need to weld the inside and make new attachment plates to mount it to the loader.
-
2 pointsDoes that threadlocker release with heat, or do you need to use EXLAX ? I can't help myself.
-
1 pointWell lets see loader project with power steering rebuilding a KT17 II for a tractor I haven't even picked up yet Install new rings in the 875 rebuild a snow cab frame for my blower tractor restore my c160 repair the back lip of my bathtub trailer refresh the engine on my 417 v blade tractor and on and on with what ever comes next LOL
-
1 pointA bit of trivia for you Dolmar fans. A gentleman by the name of Emil Lerp, the founder of Dolmar, developed the worlds first gasoline engine powered chainsaw in 1927.
-
1 pointPersonally, the side discharge deck works better for launching unseen objects. They are also better for blasting holes in vinyl siding, with even the smallest of those objects. Rear discharge decks, on the other hand, don't score nearly as high in this feature. Still, as a counter-point, the rear disch decks leave most of the object exactly where it was found, or just a few feet away.
-
1 pointA week ago, I was just finishing cleaning up the latest 12 inch snowfall with my single stage blower on the 416, when things started flopping around in the PTO area. I quickly disengaged and determined that the thrust bearing on the PTO had finally given up. It took me about 15 minutes to remove the PTO pulley, remove the snap ring, and drive out the old bearing. It took about another 15 minutes to clean things up, go to my stash and get a new bearing, some new snap rings for the stub-shaft, and re-install everything. 30 minutes later, my machine and I are good to go back to work. Try that on a Cub-Cadet.
-
1 pointSnuck out to get a few more hours on the loader today. I got my surplus center order last Monday. Started to cut the ends off. And weld the old ends back on the new cylinders Mounted them on the loader for a test fit Made up some brackets to mount the bucket to the loader Just need to Make 4 of the holes in the plates square to fit the factory grease able carriage bolts. Then I can weld them on.
-
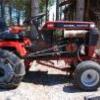
1 pointThanks very much for all the very prompt and detailed replies. Much appreciated. It appears that photos are in demand, so two taken by the prior owner are posted. I will be following the recommended troubleshooting steps next weekend. The loader operated fine, good speed and capacity. There is a hydraulic leak on one of the hoses or reservoir connection and a slight leak from the transaxle. So fluid level is a good suspect. I looked through the manual postings, but the designations are a bit of a mystery for a newbie. Is there a basic manual for the D-180? And again, apologies from a newbie, but where is the tractor id plate located? Thanks very much.
-
1 pointJust got finished clearing away the rest of the problem trunk. It was on a slope and I needed to make sure I had sound footing with each cut because there is quite a bit of weight involved. The Dolmar was great for being a new saw out of the box and had plenty of power. My "real" Blackhood also helped out, and then a shot of 2/3rds of my timber arsenal. This should all be nicely seasoned for next fall.
-
1 pointI figured it out, so now you can view the pics. Thanks JimD for the IMG hint! Thanks for looking and your comments are welcome....Keith
-
1 pointno worries a friend of mine makes new main mounts just take all your hard wear off and install on the new one email me if interested
-
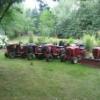
1 pointTime for another SUPPORT MEMBER raffle. The following 15 inch neon clock will be raffled off and all you have to do is go to the raffle area and grab a free ticket. Drawing to be held March 15th but don't wait too long as there can be an instant popup mystery prize drawn at any time till this raffle ends. NOTICE! We will not ship these clocks out of country so if one of our international wheel Horse brothers should win they will rec a $75 store credit at redoyourhorse.com Which can be used when purchasing any decals I have listed. I can ship decals first class international. If the winner is in the US they can choose this option if they so desire. Basically you could trade for whats behind door # 2. the winner of the clock can contact me and let me know how they want there clock to look. A picture of your favorite tractor or what ever you want. well almost what ever you want. The raffle opens as soon as Coach gets it going. Thank you all again for your support of the forum. I am just using my good friend Martins C-125 as an example of what you might want on your clock. The clock will actually have hands on it when it comes. Varosd will vouch for that. Yes Don you can actually win again but it is not likely. And Bob don't worry I am bringing one for the big show raffle so you are sure to win that one.
-
1 pointUpdate.... Once I got inside, as expected, the spider gear popped off with relatively little effort. The spider looks fine, no cracks, just a little stretched. Instead of purchasing a new or used cam gear with a better spider, I decided to Loctite Blue the old spider on. If it does not work, I will have to get a new cam gear anyway to get a better spider, so I'll just replace the whole cam gear along with the crank gear if I have to go back in. The spider does not move now; not at all. Also, I did the job with the engine on the tractor. Surprisingly easy job over all. I used wheel bearing grease to hold the three bottom steel balls in place. Checked their position in the cup with a flashlight to be sure. The rest of the governor parts look real good and the governor pin is right on spec. I'm just waiting for a new gear cover seal and gear cover gasket from onanparts and I'll button it up. Thanks again, Martin. I'm pretty confident this will fix things the rpm spikes..
-
1 pointNice looking saw. I have never heard of DOLMAR, but I am not in the market for a saw, therefore not active looking at them. I have had a Stihl 028 with 20" bar for 25+ years, but do not use it very often. The ex got the fireplace, and I got the saw!
-
1 pointWe have a rinnai unit at home also. Awesome, and never looked back...for sure. Ours hangs on the wall directly under the bathroom. (right next to the Bridgeport miller)
-
1 pointTrust me, them 520's will blow some snow. http://www.youtube.com/watch?v=PX4qUILtQ1Y
-
1 pointThat's one good lookin' Lane.
-
1 pointYou do know Ed, after you get it running... you won't want to let it go, right?
-
1 pointWelcome Jim! answer(opinion) to #1...............The 520 will throw it furthest! answer(opinion) to #2...............Size does matter! At least on a two-stage blower. You require a 16 horse minimum motor and the overwhelming majority will stand with the Onan 20HP in the 520 model. The 518 comes with a different hydro trannie that you want to avoid if possible! (Eaton 1100 verses the Eaton 700). All 520's have the Eaton 1100! 2cyl better than a single for a 2-stage blower! Other options are a 417A and a C-175 though these are older tractors than the 520's. The 520 is best period. Answer(opinion) to #3...............See Answer(opinion) #1 Answer(opinion) to #4...............As stated above, the 520's are higher in price. A low hour great shape 520H in the US East will run between 800 to 1500 bucks with a mower deck. The good deals go quickly. Add to that a two-stage thrower at 700 to 1200 bucks and some weights, chains, and your total rig should cost out average between say 1500 to 2700 bucks for a decent deal. Answer(opinion) to #5...............Looks good. Make sure you run any automatic tractor while test driving it until it is completely warmed up and try to push something or drive a hill looking for a weakening unit! Also look at a package deal for a WheelHorse/Toro Xi series tractor. They are newer, heavier and actually better in many respects than the 520 series including some equipped with power steering. An Xi package is more $$$ buck may well be worth it to you! Good Luck!
-
1 pointyour pics do not show the main frame mount with the correct angle. the diff between the 953/1054/gt14 and the 1257 is the the main frame mount. The 953 style has a 1" off set and the 1257 style both side are straight and the attachmatic mount is wider also for the 953 style
-
1 pointmaybe at idle its borderline too low oil pressure and the light is working fine,maybe the filter you used doesn't flow quite as good as the oem,and the light is sensing this?
-
1 pointThis is what I use I insert the valve in the block like this I spin the valve while slowly grinding material away You can take off too much very fast if your not careful
-
1 pointfor all those complaining about no updates, heres one........ got the wiring harness all sorted this morning. it had the typical problems for these models, burnt terminals in molex connectors and the 30 amp fuse terminals were also burnt into the plastic fuse block. so purchased a new fuse block (del city part #73895 $4.14ea) and i used a few molex connectors from the kit i purchased earlier on for 416#1. i went through one area at a time, pulling and cleaning all the terminals or replacing if they were corroded or burnt. the ignition switch plug was also changed out for a good one as it wasn't holding the terminals correctly. all the wiring and plugs that were reused were given a good scrub to get them looking better...... heres a typical problem with the fuse blocks, too much electrical heat causes the terminals to burn or melt into the holder. I've had fuses welded to the terminals as well. new fuse block i used just about all the standard harness, cutting off the terminals that were bad and crimping new ones on. here the old fuse terminals have been removed and replaced with new, pushed home into fuse block. the factory fuse holder has the same bridged terminals as the replacement. the 30 and 25 amp fuses are both fed by a bridged terminal with one wire from the starter. i thought it would be better to run two independent wires from the starter to each fused circuit rather than run all through the one. the 1995 416-8 harness only runs one wire oem, but i noticed that my 1991 416H has two wires....so they did do it at one stage. i just think that running all the current for these 2 circuits through one wire is why this area has a problem in the first place.... this is the two wire fuse bridged terminals, the single wire bridged terminal fell apart from corrosion and being burnt. these are the replacement ones, they come in a strip of 4 but i already cut them for this application. since i changed my mind and went with single terminals, these weren't needed anymore. the strip also makes it impossible to crimp with the tool i have so the two wire single method worked better for me. since i wanted to run two wires to feed two circuits here i needed to use a circuit through the engine harness connector.... there are two spare so that is no problem. i picked the one that the engine harness side of the plug has the white wire that runs to the starter. this wire isn't needed on this model, so i will leave this one out and replace with a red power wire. the empty position is in the middle. this is the tractor side of the harness and not the engine side..... the engine side has a white wire from this center position. so this plug was swapped out, terminals cleaned or replaced and the red wire added..... this is the white wire at the starter end of the engine harness..... typical reason why checking these terminals can avoid future problems..... harness getting there. made up the pto safety switch assembly, two new switches and replated bracket with new fasteners..... harness taking shape on hood stand. also started to clean up the engine ready to go back together. also got some more parts painted.....
-
1 point• I put colored electrical tape on every-other size socket; like Green for 1/2", orange for 3/8", blue for 5/8", and the in-between sizes I can guess when they are all lying there in order. The tape does get nicked up and needs to be replaced every few years. • Stopped at a print shop and got a damaged box of big paper, 23x35"; always keep a 2-3" pile of it on the work bench and I work on that, it's whitish, can write notes on it, it's coated but reasonably soft and absorbs spills. When messed up, just discard it and have a clean new area to work on. • Mounted a small $10 fan near the ceiling, blowing down on my work bench, warm air down in the Winter, a breeze in the Summer and dries & moves fumes away, turn on-off by plugging in-out the plug, low speed, just noticeable, not fast.. • Mounted several of those 2' magnetic strips, on the wall in front to hold tools temporarily while I'm working, rather than leaving them on the bench and in my way, then they're put away when I'm all done. Also use a bunch of those magnetic trays to hold screws & small parts while working. • Got a adjustable pull-out 30" work-light mounted on the wall behind the workbench, with a bright 100w bulb, great for angling to look horizontal into something. • Put some electrical outlets just under and in front of the workbench, keeps the cords of my tools off the workbench & out-of-the-way, can leave them plugged in and just under the bench for quick access anytime. (Got 4 cheap $10 small 4x4" sanders, one for each grit that I most use). • We use the large heavy-duty Wastebasket on wheels, and put a 3/4" board on it with a triangle hole (dust pan just fits in it, to dump), the board is the same height as my workbench and the whole thing is very mobile and still a handy wastebasket 'right there" (board lifts off to empty). RL] • And then, my Hoist. Securely bolted on 24' of square Barn Door square Track into the ceiling joists, hung a '$79 Harbor Freight' electric hoist on a bar with the barn door wheel hangers, and for electricity, used a ceiling mount re-coil cord (just cut the light off). It can lift 750# easily, for engine onto bench, tractor up, or hanging anything heavy.
-
1 pointUh, who came home with a nice B-100 from the 2010 WHCC raffle, hmmm?
-
1 pointThe enema bulb is used for Turkeys!
-
1 pointBuckasaurus? Bobasaurus? Better stick with what you got.
-
1 pointTerry, if everyone bows out, I may stand a chance. I was at a union meeting one night, and they used to raffle off things. They had 50 prizes and 51 members present...and you could only win once...guess who went home with nothing. I'm in...Thanks Mate. I was thinking of changing my name, but "rmaynard" is already taken. BTW...so is "Buckrancher".
-
1 pointDon't worry, I can make a couple of trips. However, I can't seem to find the raffle page using Tapatalk. I'm away from my computer this morning.how am I supposed to win???
-
1 pointWhen changing any fluid that my run down my arm I take an old sock and tie it around my wrist. It keeps fluid from running past my wrist down to my elbow!
-
1 pointI replaced my original wood tensioner. I made a new one out of locust which over time will get hard as woodpecker lips. After several hours of use shows only very slite ware. It is very simple to make and I definitely would not pay $50.00 for a plastic one. Just my two cents , thanks.
-
1 pointSounds like a great deal! To help put things in perspective that little tractor was approx $4000 when new plus deck $1000-1500 and plow. They easily run 2000+ hours. Certainly wont cut as fast as a zero turn but she'll run dam near forever. Congratulations and good luck!
-
1 pointWell when it comes to Toro Wheel Horse parts seems like the price has gone through the roof. I personally thinks it's nothing but a way to stick it to Wheel Horse people. That in it self is a whole other subject. I myself have been getting my Wheel Horse items only from Pat's Small Engine. There prices have been the lowest I have found. I stop going to my dealer because he has been 20% to 40% higher. As far as engine parts I use Pat's again a couple of others engine only places on-line. Anything that can be bought from other than Toro I do that. I gave my local dealer a chance to match what I get it on the net for but he refused. So I told him nothing personnel but business is business. I have dealt with him for several years.
-
1 pointSomething like this? http://www.vertikal.net/en/news/story/9095/
-
1 pointI have an incredible basement if your into dungeons and spiders
-
1 pointI would much rather have a XI series than the 520. Sold my last two 520's last year
-
1 pointTake the bracket off of the tractor and drill a 1/4" hole thru the locking lever(s) and the bracket, WITH THE LEVER CLOSED onto a 3/4" bar or bolt. This pic shows the locking lever with 1/4" hole drilled. Then use a 1/4" clevis pin with a hair pin in it to keep the lever from releasing.
-
1 pointHere you go, Glen! http://smllengns.tripod.com/
-
1 pointTried to upload some new pics on the latest project on the Horse but it says "you have exceeded your allotted disk space for attachments"... Is this something new? Do i need to erase my old pics to upload new ones?
-
1 pointI really appreciated viewing this entire thread and the work you are doing Actonhorse! This is also going to help other Red Square Wheel Horse members!
-
1 pointWhats up everybody, alot of you guys kind of already know a little bit about this project. There comes a time of when you can do things and finally its has come to life as we know it. It moves, runs fantastic. Kind of like excited if you know what I mean. Anyways I am not computer oriented so if I don't succeed at this I am pretty sure that Bob will get it straightened out. Well here goes.
-
1 pointMy tractor is 37 years old and still shifts fine. Couple of things to mention. All gear changes must be made with the tractor stopped. There are no synchronizers in the transmission, so shifting on the fly is a no-no. If the belt guard is removed, the input gear never fully stops making shifting impossible or difficult at best. So with that in mind, I don't think you are using the tractor without the guard, but a tab or guide wire may be bent or missing, causing the same effect. If it is not grinding, but just hard to shift, I would again check the dog-point set screw for adjustment. If that is okay, it may be time to check for low fluid, or water in the oil again.
-
1 pointMost of the bolts will be 1/4"-20, 5/16"-18, and 3/8"-16. There may be some other oddball sizes. I think there are a couple of 7/16"-14. The sticker on the Raider is correct. When that one came out, they called the 3 forward and 1 reverse with Hi/Lo a 6-speed. In later models it was referred to as an 8-speed when they decided to include reverse as one of the speeds. And Until you decide to become a supporter, where you will be able to load larger files, you can get a free account at Photobucket.com and upload your pictures there. Then copy the link to the location on Photobucket, click the "image" button in the tool bar here, and paste the URL


.thumb.JPG.1b2a1a39cdcedb1e001571713350b32c.JPG)

This leaderboard is set to New York/GMT-04:00