
Leaderboard


Popular Content
Showing content with the highest reputation on 12/11/2013 in Posts
-
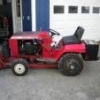
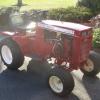
4 pointsHi All, In Vermont, all we need is snow Here's our fleet of snow equipment, we're ready for anything! I just repainted the hood on the C-85 and I'm really happy how it turned out. I used PPG paint with a hardener. The Vinyl Guy was a super help in getting the decals. I plan on doing more painting in the spring after it warms up some. C-85
-
4 pointsLots of hammering and pounding on this one... the entire build is on YouTube (link in signature)... the ultimate goal was to clone the RJ tractor on the cover of Straight From a Horse's Mouth Second Edition and the original 1955 RJ advertisement. The sad thing about the project... my computer took a dump about a month ago and I lost every pic and vid of this project... at least most of the vids are on YouTube and the project its done, LOL!
-
3 pointsI suggestion is a little different. Go and buy some new 4 ply tires and have them put on by the dealer. I had problems with the 2 ply tires on my Wheel Horse. I got stuck and ripped the side out of the old 2 ply that solved my problems. Bought a set if 4 ply Carlisle 23 x 1050 X 12, that was 24 years ago and they still look almost new.
-
3 pointsWhy on earth would you guys suggest remedies that don't include finding the cause of the problem? Yep tube it.... and if it's a small nail or screw that got picked up, it'll puncture that too. Find the cause. Could be a nail, thorn or sharp stick, could be weather cracks, could be a loose valve stem... could just be a leaking bead that all you need to do is re-seat. Why buy a solution to a problem you don't understand?
-
3 pointswell I also have this little ditty my 701 with stainless frame I started with this and after 5 months Brian
-
2 pointsThe 2014 RedSquare Calendar is available to I would to like to publicly thank Justin (JUSS10) for putting together the calendar once again. I know that it is a time consuming task, and being newly married, I am certain you have other things to focus your time on, but the effort is very appreciated and Thank You! Since 2008 the release of the calendar has been a highly anticipated event. For the past several years Justin has taken care of this for us. He begins the topic, solicited the pictures and makes the difficult final selection. So if you enjoy the calendar too, please take a moment to thank Justin here!
-
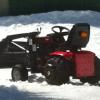
2 pointsWheel horse Snow Team 2013
-
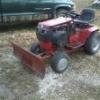
2 pointsThis One Used To Do It. But Now It's My Back Up. This Chucker Took Over The Duty.
-
2 pointsI sell on eBay and have Power Seller status, but was just told that I am not meeting the criteria to keep it. I AM ONE ITEM OFF (99 instead of 100 items sold). My dollar value is twice what it needs to be ($3,000) for Power Seller status, but I am missing that one sale! On the other hand of unfairness with eBay, I just bought from a big seller a cover for my Gravely (same as Ariens) log splitter. It was advertised with an Ariens part number as well. It arrives but it is a generic Classic Industries cover. I opened a case on it and the response was to ship it back at my expense of almost $9.00. This seller does over 3,000 sales a month with almost 300 negatives - and yet is allowed to keep selling! Definitely a scam. Where are the seller standards for them. It is a shame that there is no competition in the marketplace for eBay.
-
2 points
-
2 pointsGet at tube from a place like Tractor Supply or garden tractor dealer. Take the wheel off and bring it to the nearest tire shop. Pay $10.00, put the wheel back on and you will be good to go. Doing it yourself is not worth the time and aggravation. jmho
-
2 pointsThat looks excellent Matt! The new ag and tri rib tires are going to put it over the top. Gary is just about as proud as can be right now! He'll be with you every time you take that tractor for a ride with a smile on his face. A few months before my best friend passed he gave me his vintage roll away tool box. He inherited it from his father many yrs. ago and it meant a lot to him. I love that tool box, I always admired it. It is smack dab in the middle of my garage and I will always have it.
-
2 pointsInteresting, I'm the exact opposite. Rear if the grass is long and side if mow often. There are pluses and minuses to both but here's my take. RD Pro's Doesn't clog with long wet grass Doesn't eject clippings out the front of the deck to get sucked in by a powerful Onan Can tow a sweeper to pick up clippings Trim mow on both sides without getting clippings in the flower bedss Easier to maneuver in tight places Able to accept recycler adapter RD Cons: Cut not as clean as SD can't blow leaves / clippings onto neighbors lawn When trimming leaves clippings right against the wall Your back can get messier with clippings ejecting out the back onto your shirt SD Pro's: Cleaner cut Can blow leaves and clippings onto neighbors lawn for him / her to clean up SD Cons: Has tendency to eject clippings at the left front and into the fan of the machines (Serious problem for Onan owners) Can not trim on both sides Far wider, making it less maneuverable Can not use a sweeper at same time Clogs with long wet grass (at least mine does!) Not as cool looking as a RD
-
2 pointsWell I know he won't post it up, so I will do the honors for him. I am proud to have this machine in my collection, even though I am not the creator of it. Many kudos goes out to TT for this custom build which has provided much fun and enjoyment to our family. The infamous "Drags-tor" (the black beauty)
-
2 pointsThis is my dog..i don't have any pictures of him from christmas He is a 7 year old Collie.
-
2 pointshere's my RJ58 custom stainless Brian
-
2 pointshttp://www.youtube.com/watch?v=Roz22ku5OuY http://www.youtube.com/watch?v=pu48aGgLkzw
-
2 pointsI'll use a 74 B-100 Automatic, with a 37" snowthrower. Also I'm going to use a 75 B-80 4spd. with a 42" blade as a backup.
-
1 pointEbay is absolutely ruthless in evaluating their sellers these days. I have been a user since 2008 and in July I was permanently banned from selling. Their reasoning was my shipping speed was below par even though I stated in my listing it would take up to 5 days to send items! I had several sellers evaluate me as slow shipping speed mainly because what they bought was a heavy, cast iron part that I have to drive an hour to ship. I had a feedback of 98.5 percent which isn't exactly awesome but I had excellent ratings in item description and shipping charges. I guess buyers expect Ebay to be like Amazon where the item will show up in two days. I must say, when you have other commitments and not a full time job on Ebay, it is hard to get a package out in the mail that was auctioned off an hour ago LOL. Not to forget I'm somewhat old school like my dad where we don't use online postage. My father has been with Ebay for 14 years and I'm waiting to see where they beat him up next time he wants to sell some Mopar parts. Sellers, do yourselves a favor and check your seller dashboard. DSRs will kill you. Also, as a buyer, remember how harsh they are on sellers so when you fill out the DSR (Detailed Seller Rating), giving less than 5 stars may cripple them. Ebay won't even take 4 stars as good enough. For those of you who want to see the examples I found of others in my situation: http://community.ebay.co.uk/t5/Trust-Safety/SELLING-ACCOUNT-RESTRICTED-All-my-listings-are-removed-and-eBay/qaq-p/1283347 Ebay is just ridiculous these days, check this out: http://www.ecommercebytes.com/C/blog/blog.pl?/pl/2013/8/1377220683.html Pretty much sums it up. I'm not even going to bother calling them for further explanation or a resolution. I GREATLY miss the times when buying was at your own risk and people had to read discriptions so they didn't get pulled around by a seller. I'm not implying I would pull a buyer around and take advantage of him but it seems NOTHING these days is something that is assumed at your own risk. I can still remember sitting with my dad after Kindergarten was let out and he had to work for 2 more hours so he would stick me on the computer next to him and I would browse on ebay. He would just say, don't buy anything from someone with less than 95% feedback. Seemed to make perfect sense and was a much better way for a buyer to evaluate the decency of a seller rather than cling to the shirt of ebay when the item they received was not what they wanted. Also, think of this, next time you are buying a tractor part, look at the number of feedback transactions the seller has. I guarantee most of the people we buy tractor parts from have a feedback of less than 5000 transactions. These are the people Ebay obiviously doesn't care much for if you read the second link. Ebay behaves as if you were driving 5mph over with no other violations and your drivers license gets permanently suspended. Please spread the word! This kind of nonsense won't last long as the sellers are what make Ebay the place that it is! Charlie
-
1 pointTurning out sweet matt! :bow-blue: makes me miss my 155 again lol....
-
1 pointI have been restricted in my selling due to low DSR ratings (4.6 out of 5 starts) on shipping it has lasted about a year. I started a new account but when they found out they quit letting me sell from that account so now I am working at building my account rating back up so I watch my DSR ratings very closely so I know which buyer gives me a low rating....they get put on the blocked bidder list. Some people don't realize that ebay is a hobby for some of us and we have other obligations. Anything less than positive feedback and 5 stars is considered bad according to ebay standards. My next evaluation is Dec.20th and I am hoping the restrictions are dropped cause I have a ton of stuff that needs to be listed.
-
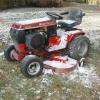
1 pointThanks Ken! I got to ride it today!! The K301 runs fantastic, and tractor feels great as well. I still have to paint the grill black, and install the headlights. I still haven't started on the mower deck either, but I'll get on that soon. I'm very happy with the way its tuning out, and I know Gary would love it! Matt
-
1 pointWhen I pulled the wheel of my 78 C141 a few months ago, it was on pretty securely. I sprayed the snot out of it with Kroil. A day later, I tapped out the spirol pin. Still the wheel would not budge. So I sprayed some more and waited a day. When I came back, all I did was turn the wheel and there was enough resistance between the tires and the garage floor that the wheel spun freely off. I used lots of neverseeze when I reinstalled it. With regard to the disintegrating collar. If you cannot get the steering wheel off, get a piece of schedule 40 or schedule 80 PVC pipe of as a close a diameter as you can find. Cut it to length and slice it longitudinally. Using regular PVC solvent cement, cement the two halves together around the steering shaft. Sand off any excess solvent cemnet and paint it black. If you can get the steering wheel off, just cut the PVC to length, roughen the surface and paint it black.
-
1 pointI will be moving snow with my 1990 jeep wrangler equipped with a snoway plow My 15 year old murray 10hp. snowblower my just the other day aquired 416-8 and,,,,I just got back from a 402 mile round trip from carlisle, Pa. where i just picked up a 42 inch wide single stage , short chute snow blower. the original owner had it with manuals. and he showed me that snowblower was $799.oo dollars way back then. That son of a gun is some heavy guage steel. Cant wait to mount it. Dont ask for pics, cant do that yet. Glenn
-
1 pointThe first measurable snow the other day in two years and Oke' is pestering to go out - to do this! After that it was time to play. Who says only reindeer can fly. This guy is 11 years old and took the stairs in the background in one bound!
-
1 pointI was so excited it moved I don't remember, but prob did. Will check the clips. I glanced to see if they were warped/cupped from all the pounding outward on the hub. Feared would pull axle out of differential. The clip and axle groove seemed ok and still have left side in/on diff case end. Found my "lost" detent ball in the sludge along with a bunch of the needles from the input shaft gears.
-
1 pointA neat trick that works, put in or take out a little air from the back tires to level out the blade...have to do it to the back tires. You can turn that scrapper bar over to use what is the top edge, if it has not been done already. I also set my blade height a touch off the concrete, with the star wheel, this saves some wear on that edge by taking the weight off the blade. BTW Welcome to Red Square...
-
1 pointFantastic Gerry...did you jump when it went BOOM??? I know I would have. I think you have it by the short hairs now. Take a look at your "C" clips. I think they have a flat (sharp) side and the other side is like rounded....the flat side faces away from the axle gear on each axle when you put it back together. It is a good idea to replace the nuts on the differential bolts also.
-
1 pointUpdate 2: finally got the right hub off, separated cas and removed what could, disassembled differential, removed right axel snap ring, and worked it out of case. Placed axel and hub in 20 ton press and pumped till wouldn't, nothing moved. Applied high heat and sounded like a shotgun went off. Thought hub broke/cracked, nope, moved about 1/16". After 5 or 6 more booms it sated easing and came out. Now at least I can finish starting to clean and inspect for what ails the ole boy. Whewy, what a mess.
-
1 pointThanks Steve have two b-107 and couldn't find what they fit, and huh, guess what I needed. Will be looking forward to a cross page for the eights. Found a site that gives dimensions of some of the needles and ball bearings and they had the B-107 but not the B-108! REALLY APPRECIATE THE HARD WORK!
-
1 pointTube it, enough said! Are you keeping the tractor? Is it your favorite? Myself I would tube it without asking questions. #1-Smart way tube it! #2 lazy way- slime it. End of my story same as everyone else's
-
1 pointI don't think this question has been asked, but how old are the tires? I had a tire that was leaking through the sidewall. Tiny cracks finally penetrated the tire and started to leak. Having asked that, I would also suggest that the area of the rim where the tire bead seats has gotten rusty, and the bead is not sealing. The water test as described above will show leaks wherever they happen to be.
-
1 pointThank you Justin!! Looking forward to this year's calendar. Let's not forget about the money-taker and distributor as well.
-
1 pointChains are superior, but Ag's hold their own pretty well. Deflating your tires, then tightening up the chains really good, helps with the slack as well. (don't forget to re-inflate)
-
1 pointThanks for the kind words Van, and a really big thanks for keeping the Seaton family in your prayers. They really need it right now. Matt
-
1 pointI like the rear discharge best. But there is pros & cons. Never had the grass & dirt on my back. My only con that I can thing of is I like to blow grass off the drive with the mower. Doesn't work well with rear discharge. the thing I like best. no grass in flower beds, car tires, & even dist. grass. Hope this helps
-
1 pointHey Mark, make sure and post that here next year because I know of a another bendy twisty thing coming to light in the near future. See ya next year! Calendar wise that is.
-
1 pointSounds like a broken record in here!!! Someone please go over and bash the Wurlitzer some!
-
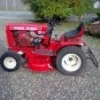
1 pointThank you RMCIII, Craig, and Jake for the encouraging words! Thanks to my amazing wife, I had a new set of shoes show up for the Case today. They are Deestone 23x10.50-12 6ply tires for the rear, and two Firestone 16x6.50-8 Tri Ribs for the front. These are my early Christmas prestent, and I must say she has fantastic taste in tires!
-
1 pointme and my boys
-
1 pointI am a certified car nut. Hot rods, muscle cars, street rods, trucks, classics, I like 'em all. I have owned many over the years and still have a few, which is why the WH space is a little limited. I have seen the car hobby change a lot over the last 40 years or so, but the only thing that drives me crazy is the trend to over restore. This in turn leads to cars that are not even trailer queens, they are way past that! I personally like to enjoy my vehicles. They are kept in good condition, and I take pride in them, however, the Trans Am pictured in my avatar currently has rubber stuck to the lower quarter panels! That means it occasionally gets run the way it was made to be run. My point is, I will never care about a benchmark for restoration of my WH tractors. I refuse to take away all the enjoyment of working on them, and using the tractor the way they were meant to be used. By the way, if you see my car in a show, it will have a "Do Not Judge" sign in the window. Just Sayin' Wally
-
1 pointThanks to everyone who voted! This could be one that I do again since there may be enough spare parts around. It did get lots of attention at the shows and apparently people like the style of it. It's just getting tougher and tougher to come up with new ideas for something that hasn't already been done.
-
1 pointGerry, I thought your reverse idler gear looked alright...it is supposed to have a bevel on the teeth on one side and should face the same way when you put it back together. Send a PM to racinfool40 (Mike)...he will have any parts that you need to replace. You could power wash it,but you may lose a few needles in those bearings and have to replace them. Nice mess isn't it??? Way too much fun. This will not be easy, but I"ll bet you can get an open end wrench on the head of the bolts holding the differential together. You will have to wrap the threads of the bolt to hold it up, after you get the nut off, so you can turn the differential to get to the next one. You can then unwrap the bolt threads, lift out the left axle and left differential housing, then the pinions and bull gear, you can then get at the "C" clip holding the axle gear on the axle. The axle and hub will come out the bottom side after that. Great pictures...they show why I am not a huge fan of flushing a transmission...and thinking you have it cleaned out.
-
1 point
-
1 point520H with 44" two stage blower if it get's real bad a kubota L3400 with bucket loader Brian
-
1 pointI don't know how to add pictures to an existing thread but I have the charger 12 with a blade unless it gets bad. If its bad I have a 1940 Ford 9N with a back blade that I pull it out of the driveway with.
-
1 pointI'm using these. Already. In October. If I ever find a good deal, I'm going to add another horse for the plow!
-
1 point72 Sno Pup with a 2 cycle Tecky! Marvin with the tall shoot! The spirit of 76 C-160 and Elvis
-
1 pointIt seems, I can't have a freaking hobby that the hipsters won't try to destroy.
-
1 pointSince this thread has been revived and several new posts have been made, I thought that I would return and comment further. I am not here to disagree with any of the opinions expressed. Each of you obviously have your own criteria and motives. The hobby is still rather young but it is gaining momentum annually because it is AFFORDABLE. Lawn and garden tractors do not need very much real estate compared to other alternatives. Currently, they are fairly affordable BUT.... I see prices beginning to escalate. I also see enthusiasts getting into the after-market parts business because of the growing demand for items that have not been in production for decades. I see old manuals being re-printed or converted to DVD's. Attendance at tractor shows is also increasing even though the cost of showing the tractors is rising. All of this tells me that changes are in the wind for the hobby and those changes will come about as a direct result of the higher costs involved. I think it fair to say that if one has to pay a high price to purchase a restorable tractor and then pay high prices for after-market parts, then the quality of the restoration work will rise accordingly. Eventually, we will see judging take place for those who wish to enter their tractors. At some shows, judging is already taking place whether the entrants realize it or not. Ballots are handed out to the paying public and they are asked to vote for "Favourite Tractor", "Best Display", "Best Restoration" and so forth. I deem this to be the proverbial thin edge of the wedge. Competitions have a way of feeding on themselves and tractor shows themselves are in competition with one another. I have seen tractors for sale on E-Bay and C/L and the Seller has used the words "Fully Restored" when it is blatantly obvious that a proper restoration was never done. Telltale signs are overspray, missing parts, improperly installed parts, wrong parts, poor quality paint, evidence of dirt and rust in places could not be addressed without dismantling the tractor. The experienced eye sees all these things and knows that in order to correct all these deficiencies, the tractor must be stripped to the bare frame and any work performed by the former "restorer" will have to be done over. So who in their right mind is going to pay big bucks for such a tractor? You are far better off searching for an untouched barn find and doing that one up instead. Ken B has it right. The OEM often turned out a product that was rather inferior in fit and finish. Most serious restorers will produce a much superior product. But let's set aside the paint issue for a moment. To me, there are other considerations if one is trying to duplicate how a tractor was when it left the factory. Choosing the correct hardware is one aspect. Painting nuts and bolts that received paint on the assembly line should be done but installing fresh zinc plated hardware where the factory used it is also important. Duplicating the wiring harness using the correct gauge and colours along with the correct terminal ends for authenticity. These are small things but they do make a difference to the end product. Trying to find the correct tire sizes and tread patterns can be frustrating and one might have to install tubes in order to save the old rubber, even though the tires were originally tubeless. That is a small but necessary concession in some instances. The thing about this hobby is that it is an ongoing learning experience and to many, that is a large part of the enjoyment. Rarely does one turn out a near perfect product the first time around but as you continue to perform restorations, your skill level should increase and you will learn from your mistakes. For me, there is a difference between doing the very best you can and just saying that "it's good enough".


This leaderboard is set to New York/GMT-04:00