
Leaderboard


Popular Content
Showing content with the highest reputation on 08/04/2013 in Posts
-
5 pointsI joined Redsquare a few years ago & every day since then i visit the site to catch up on what is going on in the world of wheel Horse tractors . In the few years that i have joined i have made some good friends & some REALLY GOOD FRIENDS . & most of these people i have never even met in person. As well as making some friends, Redsquare has given me the chance of owning some particular tractors that would never been available in my own country . I have also joined other online forums & there isnt a single one of them that gives back as much FREE & INTERESTING & HELPFUL information as Redsqure does. I am not a particularly mechanically minded person so would struggle with mechanical problems that can arise with these tractors but its oh so reassuring that when something does go wrong i have on hand the best FREE manual that anyone could buy. Redsquare has now grown to have many members all who can bring their good or bad experiences & what a great place to be able to share those experiences & also Knowledge. Since i become the owner of my first Wheel Horse Tractor one of the BEST investments that i made was spending just a few $$ on becomeing a supporter of what has to be the best online forum there is So if i could give any bit of advice to anyone that visits this Forum , Do yourself favour & become a Redsquare supporter as it will be the best tractor Manual you will ever own
-
5 points...well, some of it at least...just to sweep the floor. Needed to reorganize, so I can squeeze a little more in there.
-
3 pointsDid you know that ONLY 2% of the forum members pay 100% of the expenses for RedSquare? Like what you see, thank a supporter. Really like it? Become one.
-
3 pointsHi guys, Had a pretty nice weekend! I ended up only being able to stay at charlotte for half the show....but still had lots of fun and was able to make some nice purchases! I just brought my 702 to the show this year. Also, today stevasaurus stopped by our place and picked up some blueberries so he can make wine....had a nice visit with him. Lonny(otrelwood) and his son also stopped by later in the day to pick up a parts tractor. Had a great visit with them as well. At the show I ended up bringing home two nice tub carts from whlpny...one is really nice and the other one is nice, but not as nice as the other. The nicest one is a 78 and the other is a 81. Also got some clintons from smoreau, a k90 oil bath air cleaner from new2horses, a nice k91 shroud from kelly for my rj58 project, and some other small parts. Stevasaurus also gave me most of a 3 piece trans to learn on. I might need a couple parts for it, but it is mostly there. Here's some pictures of what I bought.
-
3 pointsHow can you even fit all that in there!
-
2 pointsWhat Reo would this Headlight lens fit its just like the wheel horse lens but says REO. Ive done some searching and cant find anyting. thanks
-
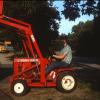
2 pointsAlways wanted a Steiner & come across a Turf Master model. Not sure of the year, but it's an 18HP model with a 48" front mount mower deck & blade, it's all wheel drive, center steer & the dump bed raises hydraulically with a tail gate release. The Briggs twin runs a little ruff yet & the tractor leaks a little at one of the valves, but otherwise runs out pretty well & it's pretty handy for hauling stuff around the property. My son Tay thinks it's the coolest tractor I've had yet.
-
2 pointsI finally got the small parts back from the painter this morning and I was able to get a little more put back together. All that's left to paint is the engine and the motor generator, those get dropped off in the morning. With any luck, I'll have those back this week. I know one thing, it takes me a lot longer to put one of these together than it does to take it apart.
-
2 pointsAnd I swapped some front red logo hub caps for 10# the best and largest blueberries ever. I'm very happy with my trade. I believe Jake said they have harvested something like 189,000 pounds of Blueberries this year on their farm in South Haven, MI. WOW!
-
2 pointsRedSquare has become my vice along with my collection of Wheel Horse tractors. I too look here at least once a day, and more often on the weekend. I love to see and hear the trials and tribulations and success of others, as it has helped me many times. I try to add help & support when I can, but some may think I am "cocky" all the time. I have thought about being a supporting member many times, and think it is high time I do so. Thank you for posting this, as it has caused me (and others) to step up. RedSquare can't have "pledge week" like PBS! Oh, I like PBS too!
-
2 pointsThan You again Kelly & family for all your hard work you put into this show , Had a great time as always & the weather was perfect . good seeing you'all again .....
-
2 pointsThank you Neil. I've moved this post as it had originated in the supporter exclusive area of the forum. Neil don't forget what you've given to the forum either. You've helped grow our European section, shown us how the makers of Stonehenge would have used their machines, enticed us with the prospect that your daughter would have helped with the Olympics, proven that a hero is born every day by defending others at the expense of self injury .... and oh yeah, then there's the Wheel Horse thing too!
-
2 pointsalright, pulled the c125 out for some seat time today and snapped a few pics for this nomination........ out of all my tractors this is my favorite ride, its not a perfect rebuild, doesnt look perfect, didnt cost me a bunch of money to rebuild, and it got done in record time for me....... i pulled this one apart on the 5th july and by the 24th august it was basically done and the decals were going on.was working 50 hour weeks at work as well, so it was hectic to say the least....... i rebuilt nearly all of it except the engine and trans, more of a cosmetic and worn out rebuild, sheetmetal got the most attention as it had a hard life.....and repainted everything in that time. it was meant to be a quickie and i wanted to get it done asap. along the way it got a few small mods here and there..... since finishing it i have added the 520 tach, big rear wheels, scott moreau hitch and new tires all round. all the sheetmetal is powder coat and the engine and trans cast iron were done with rattle cans....... enjoy the pics and if you want to see the rebuild thread here it is...... heres a few pics of how it was back when i got it and from today....... the pics will go big if you click on them and want to look closer....... and a video thrown in too.......
-
2 pointsIf you can't afford to be a supporter, you can't afford to own a Wheel Horse.
-
2 pointsjust renewed my membership, well worth the money . Its the best wheel horse manual you will ever buy .
-
1 pointHeres the process of tearing down a hydro pump from a D. I will do my best to describe everything in detail so that anyone can handle it. I must say with Paul Frederis help we tore it down, cleaned and rebuilt it in 4 hours including tearing it down a second time because of MAJOR rust issues causing binding of the pistons. I will do this in chronological order as best as I can Step #1 Here is the pump before tear down. You need to remove the four 12 point bolts using a 3/8 12 point socket wrench in order to seperate the aluminum housing from the cast steel valve body STEP # 2 shows the bolts out and the pump housings seperated. Be ready to struggle slightly if your pump was never opened. It was necessary for us to put the aluminum part in a vice and hit the steel end with a dead blow hammer and brass punch to get it to sperate from the gasket/adhesive. You must rest the pump on its side or you will lose slippers and other items if you do it in the upright position. Upon opening it a large quantity of rust was found inside formed on the steel end suggesting water infiltration. Step #3 In this photo you can see the rusty liquid on the slippers and the general shape of them. They were scratched but the corners were square and not rounded over, which is very important Step #4In this pic Paul is trying to clean the rust off of the oil pump housing. As you can tell it was pretty rough. The 4 bolts here are 12 point also, you need to use a 5/16 12 point socket socket to remove these. this is another pic of the pump housing and the rust and bolts. Also pay attention to the orientation of the small pin location on the oil pump housing. Its on the botton of the pic and must be that way for reassembly. It is very important for reassembly that this faces the same way. Step #5 Here is the oil pump gear in the housing. You must mark this on the housing and impeller before you take it apart. Every lobe only fits its mating surface 1 way. If you screw it up the pump will bind and not pump oil to feed the cylinder, slippers and swash plate. The o-rings are the same set up as the manifold with a square backer ring and a regular o-ring on top to seal. Step #6 In this step you need to remove the charge valves. They are 5/8 standard socket. It is an O.R.B.( O Ring Boss). These were pretty tight but did come loose. Here are some close ups of the charge valve. We made a legal notebook map so we could be sure it all went back together well. one side has a spring and a ball, the other side has a small tapered shaft and spring. Later models of this pump had balls and springs in both sides. One thing to note is that occasionally you will find shims between the spring and ORB fitting. These were installed when the pumps didnt make enough pressure during testing. The shim increased tension on the spring and therefore raises the oil pressure just like it would in an oil pump for an engine. Step #7Next pics are a close up of the housing showing the accelerator valve removed. There are 2 of these. 1 on each side. They are the large straight head screwdriver tip recessed into the block. They are ORB also but damn were they tight. We needed to use an impact driver to break them loose. All thats inside is a ball and spring. Step #7Next pic is of the push valve. Remove it and check to be sure there are no gouges in the tapered area. If there are, oil will leak by and cause speed to slow and pump to overheat eventually during use. Step #8This is the inside of the aluminum housing. It shows the direction control where the swash plate sits. The can be removed if needed by removing the spring clip on the shaft where it comes through the outside of the housing on the flush side, not the long side that the direction linkage attaches. You then pull the shaft out and the swash plate resting surface will clunk into the bottom of the housing for you to pull out. The only reason to do this would be to replace a bad bearing. Step #9 Here is a close up of the swash plate during polishing. I started with 800 grit, moved to 1200 and then to the crocus cloth as the final step. DO NOT use water to lubricate the crocus cloth. it causes the adhesive to melt and the cloth to become junk. Use oil only for lube. This is a before of the swash plate showing severe rusting from the water that was inside this pump. this is after the three step polishing sequence. As you can see its a mirror now Step #10Here is the brass direction control valve plate showing scratches and oxidation. This also goes throught the 3 step process of polishing. This is the same peice after polishing Step #11 is the polishing of the slippers themselves. We made a diagram so that we could install them back in the bores they came from. After all that work we ended up with my original cylinder too rusty to be used. The slippers bound up and we had to take the pump all apart again and use a different cylinder after we got it all back together and it wouldnt budge. Step #12 is the installation of the slippers back into the cylinder. Be sure to install the slipper retainer BEFORE you install the slippers. They wont fit if you dont. Step #13 is the installation of the swash plate back into the direction control section. This pic shows it cleaned This pic is right before installation of the cylinder and slippers. Use lots of oil on both sides of the swash plate so theres no galling on start up. It will suck to do all this work and wipe it out with a dry start. Step #13 Assemble with the unit on its side. If you dont, you will lose slippers from the cylinder bore as you slide it down over the shaft and then have to start over. Once the cylinder is installed on the shaft, then flip the housing to the vertical position. Step #14 is to reinstall the charge valves, accelerator valves, springs and shims where they came from. A little grease on the springs wont hurt. It will stop them from moving and going caddywhompus when you install them in the bore above the ball at the bottom Step #15 Shows the proper orientation of the oil pump impeller in the housing. Take notice to our marks to be sure we had it right. You then reinstall the pump assembly onto the housing using the four 5/16 12 point cap screws you removed at disassembly. Again be sure the pin is at the bottom when assembling. Step #16 shows the new gasket prior to assembling both halves . I made this one the same way as the motor housing in my original resto post. Using a hammer to cut the material. Step #17 its all back together and ready to go back in my 18 Auto.
-
1 pointhere's a few photos (i hope) of a 701 i'm rebuilding. got it last spring from a shed it had been in for years.
-
1 pointIs a 753 rare. I found one for sale.
-
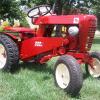
1 pointHad the herd out today for pics. 702 recently restored with my new seat cover (Fathers day gift(Love it Tricia)) Lawn ranger daily mower and 58RJ
-
1 point
-
1 pointWhat you guys think? Put this on the 854, eliminate battery/starter generator, fuel tank, choke/throttle cables etc., and go to work. Call it a BS604
-
1 pointbought this mower for my birthday 7 11 2012, sold it to a 75 yearold lady & bought my 310-8 with the money, yesterday she bought a bigger mower and sold this one back to me . now with a new battery & starter! any one want it , make me an offer!
-
1 pointYeah, do it! No BS there.
-
1 pointThe shed expands to accept every Wheel Horse you want to own. Get more. Marvin
-
1 pointMight as well drain the h2o heater while your in there!
-
1 pointMatt: With the amount of snow you get up there, the blower is a better idea than a blade. You will find a lot of items here in central NY, but you may just be out of season. I've got a blower I tried to sell, but it was in a little rough shape. Needs the lift tube & flag, but the auger spins freely. I've still got the blower and it is just taking up room. If you can't find one and are itchin' to get something hooked up, and are willing to drive about an hour south of Syracuse, then send me off an email. Jeff
-
1 pointHere is my Go-To-Tractor. It was my second Wheel Horse and is my fun tractor. It serves as my backup mower, backup snowplow, and general puller. The rear seat pan was replaced at some point and appears that the paint may have been refreshed at that time. Because the paint is still presentable, I have treated it to new decals by Terry. It also has one of Scott's 2" Receiver hitches on the rear. Last year it had all the mowing duties but this year it has been resting. I might get some additional seat time if I decide to mulch my leaves first with the rear discharge deck before using the CR. New tires and fresh paint are in the future.
-
1 pointIt's probably tightened down to the point that the engagement notches can not catch. Try loosened the nut on the brake rod until it can catch. All that does is gives peddle more travel and does not effect the braking if you have brakes now.
-
1 pointThank you for bringing up this topic. I log on to Red Square every day and i never realized what a supporter was or how to become one. I just went to the "store " and paid for two years. I am happy and proud to support this great site. Keep up the good work.
-
1 pointI've been thinking about this lately & lm glad someone brought it up. I'm pretty into the 4 wheeling thing & a diehard Can-Am owner / enthusiast. I m a mod & regular on the forum http://www.can-amtalk.com/forums/ & it's nice to log on here & see folks interested in helping each other & showing off their home brewed creations & ingenuity , instead of bickering & who has the machine that will mow the lawn or till the garden in less than 5 seconds . Thanks to all of you , YOU are the ones who make this forum a cool place to share things with those with a common interest .
-
1 pointI'm still thinkin Ken will have that in a month or two. As soon as the next Craig's List find is found!
-
1 pointYeh that is a good deal. It looks to be an 854 with the black and chrome dash decal or better yet a super rare 754. Either way you better go get it FAST!
-
1 pointMake the suggestion that he should pay you to take it since he does not know what it is>>>
-
1 pointWhere can I apply for a job like that???
-
1 pointthis is what ive used for 20 years. its a 40 in long piece of i beam with key holes for a chain to go through. you can shorten the chain on one sid or the other to pull gravel to the side. you can turn it over for more down presure. you can put cement blocks on it for more weight. & with no weight it bounces enough to loosen the packed gravel. works great & i have built 5 or 6 for other people who are happy with them too ! Jay
-
1 pointI suggest that once a persons status goes beyone that of a " Newbie " they should also have a banner labeling them as a "Non-Supporting Member" below their avatar. That will encourage those who are not just users to do the right thing and help fund the operating cost. I still feel bad that I waited 12 months to become a supporter.
-
1 pointWow. How much weight you carrying there? That's Shweeeet ! I did the hood Linen Beige as whell as the wheels. I patterned it after my favorite Canadian Tractor colors. Cockshutt
-
1 pointProud to be a member of the two percent-er club.
-
1 point
-
1 pointIts been awhile since I've done one but with the mower deck off you crawl under it and find the bottom of the steering box. There is a big castle type nut on the bottom, pull the pin out and tighten it. Only tighten it a wee bit, reinstall the pin and test it out. Still loose, do it again in small increments. You don't want to over tighten it! This method worked for me on both of my D series. Mike...........
-
1 pointYou're gonna use a LOT of rattle cans...lol. As for parts..... I have a 'restored' carb from a B-100 that had a K241 (10hp) engine. I did a 24-hour carb cleaner soak and put it in a box. It is clean as you see it here. The idler pulley you want is # 7451 and I have it too. No drag or wobble at all. Also have 2 NEW seats...one Hiback and the other is Loback design. Tires tires tires of many sizes. my direct email is: daveoman@windstream.net
-
1 pointHere's what's been going on.... Gauges done, sound system in, floor mats in, bumper done, working out some other bugs and then washed it off and shot some pics. Leaving for college next week and will paint the hood when I'm home next along with a tailgate.... Have about 1000 miles on it and the turbo's quite incredible. Maxes at 60PSI and 1300* on the pyro. Yesterday I sheared off 12 out of 16 axle shaft bolts on the rear on my way down to the shop. Wasn't even driving it hard so I shared the 4 bolts between the 2 sides and babied it down there. Drilled them out bigger with stronger bolts.... Notice the steering stabilizer that utilizes the original tie rod location on passenger knuckle and is mounted to the diff cover with 2 pieces I plasma'd out: My FAVORITE picture of this truck as of right now. Storm passing by, old shed and some green grass Charlie
-
1 pointBob, I checked that to make sure it was still there in place. I had the PTO apart to replace a bearing in it and was pretty sure I put it back together correctly. But I checked it anyway. The alignment is not real bad so I will run it and see how it works. Marvin
-
1 pointI found another 520H for parts which had nicer sheet metal and a few other parts I needed plus the muffler from redbovine and here is how it looks now.
-
1 pointJay, can't believe no one thought of this. why not let this young man pick out his first tractor from the herd. what could be better than helping out a beginner with a tractor that you knew was mechanically sound, making his new found hobby a positive experience. Bean, Jay AND Van offered excellent tractors to me already (including that C125 that really got me thinking hard). But due to my hardheadedness, lack of common sense, and taste for adventure, I have decided to choose the road that leads to the unknown....I am kind of wanting the challenge of taking the neglected and making it loved. From what I have read here, it seems like there is not too many items that will be really costly, and unless those bearings are shot, I think I could be terrorizing the neighborhood for under 100 bucks (not counting purchase price). Can y'all sense my confidence growing?
-
1 pointThank you. I have already done that actually. I spent the better part of 4 hours (or more, not sure...it was really late when i got done) last night researching. I found one guy, Bill, that posted his whole process with LOTS of pictures on another tractor forum. (I had no idea others existed. ) Anyway, the link to his his below. When I go and build this, if i decide to build, I will create a new thread on here and post pics and what i did just like Bill did, as well as have it all posted on my website that i'll disclose later. www.mytractorforum.com/showthread.php?t=15654&page=2 The biggest thing, I need to figure out how I will work around the blade pivot handle. The blade is a 56" off of a D-series, so the handle sticks out a little far from the tractor on the right. My tractor is a 1985 310-8....I love having the larger plow, works GREAT!...i will post pics of it in about a week when i return from vacation so you guys can get an idea of what I mean. I want to have my cab a little different than Bill's. I will use clear vinyl shower curtain(cheaper) for rear and side windows instead, and plexisglass for just the front window so that way i can use a wiper blade down the road if i want/need to(and probably will use manual wiper, no motor). Usually wind isn't much an issue ever. Also, i am not sure if Bill's door(s) open on just the one side or if both sides open....I want both sides to open for versatility for what i do and where I live. Also, for my front window/section, i want the option to easily remove it and keep it off for summer, or the ability to at least hinge upward to be able to open the hood when needed. For attaching it to the rear of my tractor, i think i will do similar to the wood on the back to attach the angle iron, but i will have to think of a way to attach the back piece to the back of the tractor...its just a tad hard for me to think and really visualize without my tractor in front of me. Will make sure i take a pic of this too for ideas. I don't need a light in the rear as i already have mounted on the back of my tractor(below fuel tank, above tranny) a light. I will want Amber strobe on top, and probably one light in front of cab, as i already have two stock headlights on front of tractor (though one of the lights [both lights are less than year old] usually burns out after a little while, i figure probably from vibration) I probably won't get or use a heater, even if i get heat from engine or not...I'm used to plowing without a cab, so i will just dress extra warm. Hopefully this gives a little more insight into what i am thinking. But i still would really like input from the Red Square family for other ideas and suggestions. Especially if someone with a WH has built a custom cab before too. I'm only 20 years young, so my budget is a fair factor. Thank everyone. Brian
-
1 pointAsk the guys over at simpletractors.com .
-
1 point...off the hook? You decide. http://www.youtube.com/watch?v=UqeMIhxVEpM&feature=youtu.be
-
1 pointI acquired my third Wheel Horse tractor yesterday to play along my other two 1962 552's. This one is a 1958 RJ-58. According to the serial number, I believe this may one of the early RJ-58 models. Does this fact make this tractor more rare than other RJ's, just curious??? It has the original Kohler K-90 3.5 hp engine which still runs. The seat and fenders are missing. Is there anything I need to look for in particular to replace these missing items? The tractor is in pretty good condition otherwise and should be a relatively easy restorable project.
-
1 pointGREAT JOB the first WH I drove was my dad's new 701 it still my favorite WH of all time that's me sitting on it in my avitar (5 year's old)


This leaderboard is set to New York/GMT-04:00