
Leaderboard


Popular Content
Showing content with the highest reputation on 07/26/2013 in Posts
-
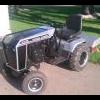
3 pointsI was lucky enough to find an original HL-5 light bar for my 701 an my wife liked it so much she wanted one for her tractor,so got to thinking about what would work to make a set up for her she didn't care if they were original or not,so was looking at some wheel Horse parts and came up with using a bow from a clutch came out pretty good....Happy Wife Happy Life!
-
2 pointsIt always happens, you buy something, then another one comes along cheaper. It made 700 quid, good old ebay.
-
2 pointsKeep in mind that the heat shield (as well as the tool box and fenders) was an option (not standard) for the RJ up until mid to later 59 production... so seeing RJ's with that style heat shield in not uncommon, as they were added on later in life. With that said, IMO its correct enough.
-
2 pointsPlease do not take any offense to this you guys. I consider this an open debate and I am learning also. My dealings with this leads me to like what Callen has said. It looks like we are talking about the hubs here at this point. I also agree with Jeffpicks with what he is saying about the torque thing. I do not like the 90 degree drill hole, tap and add another set screw idea. I know it has been talked about here before, and has worked and will work for these issues. My problem is that once you do that (add a 90 degree set screw) you have taken the integrity of the wood ruff key out of the equation. That key is meant to give way before you do damage to the internal gears in the transmission. I think what you are trying to do is fix one problem, bypassing the real cause, and creating a larger one which could end up in more damage and cost then fixing what is wrong in the first place. Does that make any since?? I think if Gerry changes out the keys, and the set screws are not worn at the bottom...that should take care of it...see what happens and go from there.
-
1 pointI've been looking for a flail mower for quite some time. Finally found one at a local auction site, thought I was going to get it for $40. Ended up getting bid up at the last minute and paid over $500 for it but I'm happier than all get out. Now I just gotta do a little fabrication to set the mount up. John
-
1 pointMonday just gone was the day booked for me and Simon (landsurveyor) to shift a mountain of mud, from the field me and my wife are to build our house, to down the bank behind the factory next door (its ok mother in law owns it) After finally getting planning permission, long story dont ask! one of the conditions were to move this large pile of mud to create parking before we can start. So as me and Simon are both only to happy to put our Wheel Horses to work, i purchased two small tipping trailers, modified them, strengthened them lots, and of course painted them Wheel Horse red With my wife operating our Massey Ferguson 50b digger loading the trailers, me on my Electro 12 emptying a trailer and Simon on his GT14 emtying a trailer and using his dozzer blade to level out down the back. The turning area is tight but Simon just about managed it. Manual tipper im afraid, which was a challenge when the trailers got over filled! My Electro 12 did really well all day The grippy rear tyres and front weight made getting down here easy. The smaller trailer wheels made reversing over the edge more difficult. Then Simons belt slipped off his GT14, so while i fixed it he ran off with my tractor. In the end the GT14 belt fell to bits, so Simon went to get his trusty John Deere to carry on, then our digger popped a seal on a hydraulic ram, thankfully at the end of the day, so game over. We almost moved all the mud, just a few loads left, well till we start digging out the footings that is ​Unfortunately no photos of the John Deere or the dozzer blade in action A great day had by all. Thank you Simon for your help mate.
-
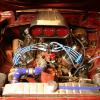
1 pointHere's pics that 55rj35jr & I took at the Plain City Show
-
1 pointare you going to this one steve? i think this one would be good to attend, i think seeing its so close, i might hook up the trailer and load 'em up........
-
1 pointMI.show here we come!KELLY family comes first and were all family here so we are with you 100%
-
1 pointThat turned out awesome! looking forward to seeing it in about a week.
-
1 pointYes sir! Going to try and do something a bit different this year, but nothing real crazy. I will post information once I approve the logo and can display it for everyone.
-
1 pointmore pics
-
1 pointGreat post! Thanks for all the information. I like the idea of speeding up WHs for racing and how it is done. But for me, I like spending time on the old tractor. I only care that my WH goes faster than the grass grows and sky snows.
-
1 pointI disagree I don't think you would ever shear an axle key. I have seen pictures on here where the key has worn the axle to double the key width. I believe in changing to a new keys and set screws every time you remove a hub. The slightest ware on the keys will let the hub move until it wares off the set screw and the key way in the hub, then you have the hub sliding when turning. The 90 degree set screw is a tried and true engineering fact, but it is not a cure for hubs that are too loose on the axle. A good tight fitting hub is the only fix then the 90 degree set screw is good insurance to keep the hub fixed in place. If a hub moves you are waring all surfaces the interior of the hub, the key way, the key, the cup point of the set screws and the axle. My experience has been with the use of a C-120 for 36 years. I had to rebuild my hubs as they got to the point that I could not keep them tight. Here is a link to the rebuild:
-
1 pointThat air cleaner mount should last a while.
-
1 pointLooks nice.
-
1 pointSpread sunshine all over the world... and put on a happy face.
-
1 pointLars, I know you are excited !!! Nothing like a brand new rebuild. Send us some pics when you get that engine bolted in.
-
1 pointIt looks like you have found yourself a good power coater! Your parts look nice and smooth. This is going to be the prettiest 606 out there when all is said and done....
-
1 point...what's on second. http://www.youtube.com/watch?v=kTcRRaXV-fg
-
1 point
-
1 pointI bite my tongue every time I see this subject come up. Many years ago I had an bare in-dash tach from a Camaro or GM 1/2 ton. Don't remember which nor do I remember if it was standard pre-1975 ignition or HEI. On the back of the circuit board was a jumper to select 4, 6 or 8 cylinders. I do remember that the vehicle it came out of was not available with all the engines listed. I know just enough about electronics to be dangerous. I studied the 2 resistors for each selection which I assumed was a voltage divider (and possibly incorrectly named) and came up with 2 resistor values that would work for a single cylinder engine. I hooked it up to a 1955 B&S 5hp cast iron engine that used magneto ignition. To my surprise it worked. Later compared it to the results of a photo tach on many different engines and it was spot on every time. Never did find a small engine it would not work on. Garry
-
1 pointActually it's pretty quiet around here. Get up at 4:00 A..M. Fix all the screw-ups and try to keep about 1200 people happy and comfortable. Get home at 5:00 P.M. Eat and spend about an hour here trying to figure out who Craig is this week and hit the sack at 8
-
1 pointI have been fighting loose hubs for 5 years or so. Noticed the right hub had slipped in about an 1", jacked up the tractor to tighten it. Checked the left side grabbed the wheel and it rocked back on the axle. I have some 2" steel I got years ago to make a couple of trailer spindles that never got made. So we bored out the hubs and press fitted sleeves and keyed them. Don't have a picture of boring the hubs. Here is a picture of turning and boring the sleeve. We left the sleeves longer than the hubs by 3/8" that was turned down, this part to extend the hub. We left 2 1/2 thousands press on the sleeves. Then they were pressed in they pulled off some metal and lacked 1/16" going flush with the out side hub. I installed the hubs with new keys and set screws and repainted the hubs with Regal Red Rustoleum. It was raining and I didn't want to wait a week for the paint to dry. I have an old 250 watt infrared heat lamp that still worked so I set it up around 2 feet from the hub and it was dry in 45 minutes. Works great on small parts I guess if you had 3 or 4 of them you could dry a hood. It didn't get too hot to hold but it got real warm. I cut some disk out of PVC siding and pressed in the 1/16" off set before drying the paint hope they will stay in. If not I'll make some more and glue them in. The paint drying work so good I used it when I made a new bracket for the vacuum to fit in the receiver hitch. I didn't have any more 2" tubing so I bolted it on trailer hitch.


This leaderboard is set to New York/GMT-04:00