
Leaderboard


Popular Content
Showing content with the highest reputation on 05/04/2013 in Posts
-
2 pointsDid Dino start a new business??....
-
2 pointsDegrees is just how nails are bound together, less degrees the flatter magazine normaly it is 17-21-34.. and if u buy a gun that is 21 degrees you need to use 21 degrees nails in it etc..
-
2 pointsGood luck selling your Wh's. I thin we all hate having to part with Wh's, but sometimes it just has to be done.. I'm still mourning the loss of my Raider 10!
-
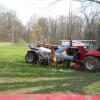
1 pointI used my dad's 1964 Wheel Horse tractor yesterday with my Wheel Horse disc attachment to break up a small garden plot my mother wanted. The disc is about 40 years old and I greased it up (about 5 or 6 fittings on this) and sharpened the discs for cutting the soil. Anyway I thought some photos were in order. It is amazing to see how the hydraulic lift lifts the disc with two cement blocks on the tractor with no problems after each pass in the garden. Here is a photo looking down at the rear hitch and disc. The disc angles can be changed by sliding the sleeve on the lift hitch arm and securing with a pin or bolt.
-
1 pointWow you got a house Dino.... i thought you had a cave!!!!!!!!
-
1 pointAs far as a compressor, the round yellow ones (I think from Home Depot) (Dewalt???) are plenty for the finish nail gun, and will work for the framing nail gun also. You may have to wait for the pressure to build if you are doing rapid nailing with 20 penny nails (3 1/2)...but will handle home projects with ease. I think full head is better, especially with plywood, chipboard, etc. One thing to watch is the gauge of the nails with the finish nail guns. I have an 18 ga. Botsch which I like very much...but I would buy a larger gauge if I had to do it over...the difference between shooting a wire and a nail with substance. Nail guns are the way to go with trim, especially Oak...no need to pre-drill and no hammer marks. I do not know what the degrees you are talking about mean. One other thing...check to make sure that it will shoot different makers of nails. It is no good if you have to drive to only one outlet to get nails...and they stopped carrying them. Buy a good name.
-
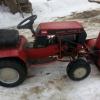
1 pointHi guys/gals As stated in the introduction section, I am a new member here. I just took ownership (in the form of a hand me down) of a relic Wheel Horse garden tractor. Dad THINKS it's a 704, but I am hoping with your help, I can put a model number, and even a production year to this beast. It originally came with a Cast Iron 7 Horse Kohler Magnum for a power plant. It seized, and dad put an old Briggs on it. That engine too bit the dust, and now it has a chineese knockoff honda on it, that fires first pull every time. It has a 3 speed with reverse, cast transmission. Serial number is 32829 Any insight would be awesome! Jay
-
1 pointSo steve knows how to fix transmissions, lawns and apparently raffles! LOL!!!
-
1 pointI finally got a chance to put the plow on the 704 and do a little plowing. I hope its ok to put a You tube link up.Now I need to find a Disc.
-
1 pointJim, you really need to get out more and away from that computer.
-
1 pointLooks good Bill. Don't forget to put the backing bolts in the hitch to keep the plow straight. I have never broken a boss plowing. I believe there is a better chance of breaking the crosspin or the hitch instead. But that won't happen either. I pull a wheelhorse 12 inch plow with a land wheel on it. I pull it with either the 520 or the 165 neither of which have any trouble with it. My ground is clay/gumbo and usually wet. I plow about 3/4 of an acre every year with no trouble. If it ever stops snowing here, I will be plowing soon as well. If there is a weak area on this setup? It is the hitch on the plow itself. Where the flat iron is welded to the hitch itself tends to bend. I welded a brace on mine. But outside if that? No problems. On the C-165? I plow in high range 2nd gear and she handles it with no complaints. With the 520h I just try to go approximately the same speed. I don't use lug tires (although it would probably work better). I am stubborn and as both tractors get lawn duty as well, I don't want to tear up the grass ( my wife thinks I am just a bit whiney about that, she may be right). I do put 50 to 100 pounds of suitcase weights on the front ends, so I can keep them on the ground and steer (it does tend to get "light" if the going gets tough) and stay in the furrow.For me? Spring plowing works the best. I end up with a relatively weed free garden as all of the weed seeds end up too deep to germinate. Moldboard plowing IS way more fun than snowplowing. There is just something about green/brown weeds and trash from last years garden in front of you when driving, Turning black behind you when plowing. Its just Too Much Fun . Enjoy.....
-
1 pointHere are the pics I couldn't send you in the PM Gerry. Matt
-
1 pointMarvin, I bet you will see more than just the one terminal needs replacement once you note the difference between the old and the new terminals. Check out the terminals inside the ignition switch connector too. When all is said and done, you have the option of selling the crimpers in the classifieds. Dollar wise, the crimper I pointed out was the best $$ to performance value I ran across. Other crimpers run from $70 to $120 and don't really offer any distinct advantages other than they are made in the USA. I don't bash the USA thing but I have some made in the USA grandkids that need made in the USA sneakers every 6 months. So import tools can and do find their way into my (imported) tool chest. Also, this is a double crimper which crimps both the wire AND insulation into the terminal at the same time. When you look into the "teeth" of the crimper, you will notice each pair of teeth has 2 "levels", one shallow set and one deep set. The shallow set will produce more crush on the terminal tabs and is intended for the section of the terminal that crimps the wire. The deeper set will produce less crush and is intended for the tabs on the terminal which will crush around the insulation of the wire. Another issue which will require some experience is how far to insert the terminal into the jaws of the crimper. If the terminal is inserted too far, the jaws of the crimper can come down on the section of the terminal that expands out to form the push on part of the terminal. If you crimp with parts of the widened area in the crimper jaws, you will mangle the terminal and have to recrimp another new terminal. I will post a pic later to illustrate what I'm talking about. For now, here is a link describing good / bad crimping techniques http://www.customclassictrucks.com/techarticles/0808cct_1953_chevy_truck_ron_francis_wiring_kit_upgrade/photo_30.html
-
1 pointMy choice is rustoleum appliance paint.....really thick and fills imperfections nicely..... I bought some bearings I think about a dozen for around 25 bucks....that was 3 years ago.....sealed bearings.....cleaned the wheels, put them in and never greased them. If they go I'll stick another set in. I really dislike grease on my front wheels.
-
1 pointCan't wait to see your Dad's
-
1 pointWelcome, glad to see a horse stay in the family! You will find that this is a great group.
-
1 pointWatch your step, I'm setting bear traps out by the Hostas next spring.
-
1 pointSo, after the ADDAMS family moved out? You decide to get rid of the flora? Just some useful advice for you Steve. The Rabbits and Deer really like to trim up those burning bushes very close. Little b#$%^&ds. Don't ask me how I know. I haven't told my wife yet. But, the 5 new ones I planted last spring ain't gonna be green for spring. If you know what I mean.
-
1 pointThe problem your having with the start lever not disengaging is a simple fix. Its just the aluminum engage clutch there on the front of the engine. Remove the allen head set screw, and pull the clutch off. On the back of the clutch is an internal snap ring, remove it and clean the the inside of the clutch. There are 4 5/16 steel balls in it, that have just gotten dirty over the years. Clean it up, and make sure to assemble it dry, no lubrication, as it would lead to them getting gumed up again. Most the time this is all thats ever wrong with these old Briggs start clutches. Once in awhile, I run into one where the balls are excessively worn or rusty, in which case I just pick up some new 5/16 steel balls, and it as good as new. The carb, and intake you need were also used on the Briggs model N, and they come up on ebay very frequentley. The carb part no. is #99876 Matt
-
1 pointOne thing to consider when replacing the seals is if the axle bearings/bushings are worn. This can cause wobble in the axle shaft which will cause the seals to wear prematurely. Most of the time they are worn if the tranny hasn't been rebuilt. The good news is those parts are not very expensive. The better news is Stevasaurus can guide you through the process of replacing them with his videos and advice, plus you'll end up with really nice tranny.. So far I just live with the leaks but have all the parts to do 3 or 4 of them. It's just another thing to get to "when I get around too it".
-
1 pointYou know Ryan...there is a joke about the guy walking next to his wagon because he &%$*ed himself out of a seat. Sorry...cracks me up. Hopefully, you can hang on to your collection...I think you will need it in the long run. We all know that they store very well. If you do sell some of them let me know, I know you were referring to me above...of course I will help if I can.
-
1 pointI like it!!!...and ya put the ole WH to work too....didn't see a "mug holder" on it but did notice a comfeeeee boat seat!!..is that your office chair?
-
1 pointI remove the battery tray,beadblast it,then paint it with POR-15 paint.They NEVER rust again.
-
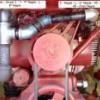
1 pointThat is a Briggs Model I, 2in. bore. 1.5in. stroke. That is the wrong carb, and intake. I have this exact same engine. Here are a few pics, and a video. Any questions you have, just ask. Matt http://youtu.be/_8seuvAD3Xo
-
1 pointturned out very nice Steve looks great Brian
-
1 pointNow see there...isn't that much better than risking life and limb, climbing your own ladders?
-
1 pointGreat website. I bought a Raider 12 last week, my first Wheel Horse. I stumbled on it by accident while looking for a rear tine tiller. It came with a tiller,bottom plow, grader blade, 48" snow plow, mower deck and leaf vacumm and a bucket full of parts and pulleys for the implements. The guy bought it new in 71'. I am real happy with it. I turned over some miserable rocky unplanted ground last week and tilled it yesterday. The little machine is a bear. Since finding this website I can know what is what in the bucket for hooking up the other stuff. Thank You!
-
1 pointYou ought to tell the wife you need to buy another tractor and make sure this was only a fluke of nature! lol
-
1 pointYou could make a bracket and hang some luggage on it!
-
1 pointI have a very clean 1995 520 with 400 hours on it that I just went trough last winter (no paint), it is very nice lots of new little stuff, synthetic trans oil, new 9 pin connector, new fues box, batt. seat, drive belt and more I'd sell for $1250, or a clean 97 520 with 700 hours not as nice but still nice for $1000, no decks but I have a nice 42" SD that if you buy a tractor I will sell for a good price, and snow blowers. And both hour meters work.
-
1 pointWe also use SAFETY-KLEEN. They bring full drums of virgin 150 solvent (flash point of 150), and we send back full spent product. This service is cheaper than the local petro dealer charges for delivering bulk 142 solvent (142 flash point). Anything above the flash point of 140 is safer and less "red tape". Kerosene or mineral spirits...which is what the 142 & 150 solvent really is.
-
1 pointI finally got around to uploading a video shot a couple of weeks ago of me tilling the garden with my 520 and 36" tiller. Man, I loooovvvve that tiller!! You have to peer through the asparagus in the foreground. Wade


This leaderboard is set to New York/GMT-04:00