
Leaderboard


Popular Content
Showing content with the highest reputation on 03/21/2013 in Posts
-
3 pointsI've got a few pieces back from the paint shop over the last few days, I should get the frame back tomorrow. I know you guys like pics so here ya go.
-
2 pointsThese guys all missed the best way. Go out and buy another tractor just like whatever your restoring so you'll have a tractor to refer to ! Its a perfect excuse to buy another tractor right?? Mike...........
-
2 pointsRaider 14 was only produced in '72. How many? As noted above, WH knows. Picture attached is my '68 Raider 12. A great "can do it all" Stallion! Decals (shown incomplete) products from www.redoyourhorse,com ~ very nice, excellent products! Product Details List (courtesy of Yahoo Groups) Model Number 1-0320 Model Year 1972 Beginning Serial None Ending Serial None Product Name Raider 14 Tractor Product Brand Wheel Horse Product Type Riding Products Product Series Garden Tractor, Pre '74 Swath Deck Optional Discharge Deck Optional Engine/Motor Manufacturer Kohler Engine/Motor Model K321S-60137A Engine/Motor Size 14 hp Engine/Motor Type 4 Cycle Engine Starter Electric Transmission Manufacturer Wheel Horse Transmission Model 5073 Transmission Speeds 8 Speed Transmission Type Gear Tractor 1972 Raider 14 1-0320 OM Download Long frame 45-1/2" wheelbase Uses 5073 8-speed transmission with 10-pinion limited slip differential and 1-1/8" axles Uses Kohler K321S-60137A with electric start, starter solenoid, 15 amp stator, ammeter and battery ignition [uses (~101917 5-terminal 4-position S-R-B-I-A) replaced by 92-6785 5-terminal 4-position S-R-B-I-L ignition switch] (PSB# 338B in the Files of Group 8 states Item 11-23 P/N not shown. The electric clutch switch is P/N 102138, same as light switch)
-
2 pointsFound this on a search for wire rope clips Garry
-
2 pointsNote how Dr Clark has his clamps installed..... Are your clamps the same way. There was a rule someone used a few years back, I forget it, but I do remember that the live side of the cable goes on the nut side of the clamp and the looped end under the U side.
-
2 pointsKeith, Do a search on "rock shaft" in the forums. There are some nice fabrications. You can check out the one I built here- go to post 106.
-
2 points
-
2 pointsI posted two pics of the same fender, this is the pic I wanted to load.
-
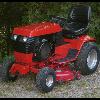
2 pointsHere is my little custom. Home made front slot rims, homemade foot throttle, dual pipes, raised an inch in front, custom lights, and some other custom touches.
-
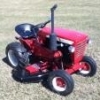
2 pointsHere are a couple pics of my custom C161
-
2 pointsHere are 2 of mine.
-
1 pointI was just watching the weather report for the upcoming snowstorm and I saw a Wheel Horse plowing snow. It was cool seeing one on the local news out of Cleveland. The reporter was in Chardon, Ohio where they got quite a it last night and today. They gave a name but I won't say it here. Maybe we have a Redsquare member that made the news.
-
1 pointJust bought a new "high" back seat from Rural King today. It was on sale for $39.99....regular price was $45.99. I think it looks pretty good on the GT-14!
-
1 pointI found the video http://www.19actionnews.com/category/240218/video-landing-page?clipId=8669718&autostart=true then click on the video ( the snow just keeps coming) to watch the vidio
-
1 pointWell, we decided to go ahead with a full restore on this one. I couldn't stand the condition that the frame was in on this tractor. and when you got the tractor out in the sun it looked pink! (which is cool for a chicks tractor) Some hack took a grinder to the frame back in the day and ground half of it away in spots. Why? The frame and all the tins were pitted something fierce. You name it, it was pitted! I had to get out my mig welder and build the frame up where it was ground down and then smooth it out. I sandblasted everything and then filled all the pitting. Quite a bit of hrs into this one. I've been working on this one a few weeks now. Body work isn't as easy as it used to be for me, I have carpal tunnel pretty bad and doing body work and sanding makes my hands numb the whole time. The tires and rims are temps. I think I might splurge for some new meats. Cole DOES want black rims. Another few weeks and it'll be done.
-
1 pointThe old 416-8, Should be shot for selling this one. The Onan had so much torque you would have sworn it was a diesel!!!
-
1 pointSo, the storm is over. And I got out and got the link. I believe this is the factory link. Here's some pictures;
-
1 pointThe guy responded to my cl ad, and I inquired. The guy was an ass. The tractor is beat, and won't budge from 500 for just the tractor. Sent from my 416-8
-
1 pointYeah, we don't need no stinkin' directions.
-
1 pointI would agree with ILLINILEFTTACKLE. Make lots of notes, and take plenty of pictures....even a video of some really difficult disassemblies may be in order. That way you can show us the pictures & videos!
-
1 pointIt would be BANK of MOM and DAD in our house!
-
1 pointIn reality, you may end up with at least two. One for mowing, the other for dirt/snow digging/plowing. Okay, but just one. Here is a list, in order: 416-8, C-160 8-speed: Kohler magnum or K341. No Onans or Briggs. 414-8, C-140, Again, Kohler. 314-8 312-8, C-120 310-8, C-100 The 400 series has a bit beefier tranny. More HP is always better, but fuel usage needs to be considered. So, no Onans, Kohler are easy to find replacement parts and engines. The 310, 312, C100, C120 may not have quite the power for heavy tilling. Some newer 314s, if I'm not mistaken, have the same beefier drivetrain as the 400 series. Do what you can to find a tractor with attachments. If the tractor is not the one you want, sell it and get another. Jeff
-
1 pointWant a great reader for cheap? Get the Android Torque app and an inexpensive Bluetooth OBDII adapter. For a total of $20, my phone reads the codes on my Powerstroke 6.0 where more expensive readers couldn't. You can also program some specific monitors to get real time diagnostic information.
-
1 pointThanks, Ken. It's doesn't always look like that, it's a mess more than it's organized .... The safe came from an old grocery store here in town, I had the local lumber yard bring it to my house with their forklift. If I ever move, it stays with the house.
-
1 pointI second that! I am lovin' this 520-8 even before I've used it. The 520-8 must be a rare bird, I found this one sittin', wasn't used in two years. Previous owner had problems, all worked out now. The 414-8 or 416-8 are both fine Stallions too! A lot easier to find and purchase too. I have been working on this Horse for a couple of months. Just applied the decals that Terry made, a beautiful job I might add. Next up SS muffler shield, deck and Attach-A-Matic decals.
-
1 pointI think we need to have a ground hog hunt!! Spring sure isn't coming early!
-
1 pointWell I was looking for a transaxle for a D200 that I have that is cracked (bolt in diff came out). I came across this find for a reasonable price and figured that would get me going and extra parts to boot. With the only problem being a shredded motor from the tractor being towed I may try to get it up and running as well : ) The tractor came with some good extras - front cast weights, pto shaft, three point and tire chains - cant beat that! The interesting thing was what was mounted on the rear fender. The PO inherited the tractor from his grandfather and he has fabbed up a "guide" to tell him the elevation of the 3 PT. As the lift is raised or lowered the aluminum indicator (with marks on it) will slide forward and backward. Take a look at the pics and tell me what you think. I know he had the rear lift pinned so he would have down pressure and this would indicate just how deep he was plowing, tilling, etc... I have never used a three point but I can see how it would be nice to lower the impliment down to the same height every time. Also note the aluminum fuel tank. I have never seen one like this so I guess it is a custom built tank. Builder did a pretty good job!
-
1 pointI believe you pretty much need the rock shaft to lift the tiller, due to its weight.
-
1 pointWhmaverick, Not having hooked my tiller up yet, I don't really have much to offer. But, these tillers are very heavy as you know, and ANY advantage that the rock shaft will give in lifting them is going to be a plus. Same for the spring. I would build or find a rockshaft and try again. In another month or so, I will report back with my results using a homemade cable and rockshaft. David
-
1 pointThe seat that sold for $400.00 had 25 bids from 6 different bidders. The other 3-piece seat auction has been ended saying that the item is "no longer available".
-
1 pointIf you are coming up Interstate 81 Just look for the Big Show Exit.
-
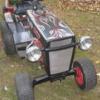
1 pointhere is my one ond only totally custom horse.frame streched lots of custom machined parts and geared for speed.even with the throttle at idle it will still stand straight up.
-
1 pointThat C-161 looks great Thanks Charlie.
-
1 pointHere's one I did from a few years ago.
-
1 pointRoto tillers and other attachments are harder to come by than tractors. Find a set of attachments. if the tractor they come with is no good, You can always find another tractor to fit your attachments. Joe
-
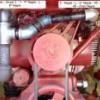
1 pointExamining the picture below of an AMSOIL cutaway most filters have the same Basic construction Nick (I like my diagram better cause it names the parts!) Anyway lets first look at how the oil flows, The oil enters the small outer holes then has to open the Anti Drain Valve which opens like an umbrella the oil then enters the filter chamber goes thru the filter through that Tube screen that keeps the filter from colapsing and out the center hole. If the filter is plugged then it pushes against the bypass valve applying pressure to the end spring opening the bypass valve and out the return hole same as before. Now I'm not an enginner but I am a Pipe fitter, and I know damn well anytime a substance (any substance) flows thru anything there is friction. In this case the pressure that it takes to open that Anti Drain Valve. I'm not arguing with you Nick, but rather the Idiots who wrote that misleading incorrect data for WIX, They need to go see the WIZARD OF OZ and get a brain cause the Ole' Duke aint buying it. Everything has friction even air flowing thru ductwork when I had my HVAC buisness when designing a furnace system air flowing thru ducts and pipes were measured in Static normally .01 in a residential system. This is how we determin the pipe or duct size and number of outlets for a certain amount of CFM.
-
1 pointThanks,Travis. The pictures were the key to a trouble free assembly for me. Between Partstree and the info provided by the members of the forum,I don't think you'll have any problem on your resto. Gonna try to play catch up with this post ,but will probably finish in the morning. Finished painting and assembling the Kohler .Mounted the hood after getting the black painted. I modified the hood brackets so I could use some grommets that I got at the Home Depot. It really firmed up the hood and I can get replacements easily. Had a lot of items to finish up. Needed to make a rockshaft before I put the fender pan on. Remember the old hitch pin? I used it and the brass bushings from my brake pedal in the new lift arm. I bought new 3/4" ID bushings at TSC for the pedal. All I had to fab was the arm itself and just weld it to the shaft. The shaft and bushings fit like they were made for it. Burnt it in with .035 flux core at the highest setting on the Lincoln 135. Took care to tack it so that it was straight when doing the final welding. The rock shaft fit and works great. Still need to put the tiller on to give it a real test. Also need to make the mid mount pulleys. I'd like to thank Lost Pup for his posts on making his tiller parts. By reading how he did his I was able to figure out what I wanted. Got the fender pan on and mounted the seat. I took the original springs and coated them with Plasti Dip spray. Built up a nice coat too. I'm looking for a set of seat bumpers to replace mine as the are pretty worn out. Finally installed the engine with the help of my son Matt. We used the hardtop hoist that we built for his Jeep TJ to muscle in the Kohler. What an easy way to do it! That left one final part to install before moving on to the transmission oil.Had to weld up some pinholes and paint it first, More to follow......The Road to Redemption is getting shorter :ROTF:
-
1 point


This leaderboard is set to New York/GMT-04:00