
Leaderboard


Popular Content
Showing content with the highest reputation on 02/25/2013 in Posts
-
3 pointsAhhhh, life is going so smoothly at times it gets scary. The crack SOI University crew of nature's A students had the department running like a fine watch. Clean work areas, great quality posts and top shelf quality assistance going out daily to tractor forums all over the net. Along comes the dreaded knock on the office door and in walks the inspectors and auditors looking for evidence of our compliance to current day "diversity and sensitivity requirements". Long story short, we will need to hire a few more "diverse" characters to help out with electrical issues in the tractor world. With the frequency of battery related issues this time of year, we figured it would be of value to have folks "badgered" a little more into checking their battery capacity before doing any further electrical troubleshooting. We were sending this guy down to help out Tankman do a battery load test on his 520H. I hope he makes it without falling over into the gutter again.
-
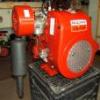
3 pointsI would lean strongly toward the K-301 / M-12 engines. 20 years from now when those china diesels are beer cans and seamless gutters, those old iron Kohler singles will still be chugging away.
-
2 pointsI hope you meant to type $750.00! and.........
-
2 pointsHere's an easy trick for you to use to check you plows plumb (for a lack of a better word). The tractor will be in a furrow on the right side while plowing (except for the initial cut). So figuring that furrow will be an average of about 4" deep, Put the plow on the tractor and drive the left rear up on a 4"x 4". Then drop the plow and it should look fairly plumb. On a side note, this also works to set your hitch depth as well. Good luck.
-
1 pointAny body ever get a WH blower throwing snow over power lines? I had a neighbor when I was a kid with an old gravely "dog eater blower and he used to throw snow over the power lines and across a main highway.I finally found a video of a Gravely tossing the snow high enough. Those old gravely blowers were impressive.
-
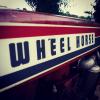
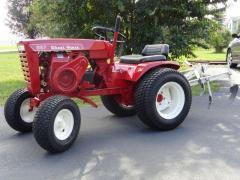
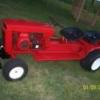
1 pointHello All. Just a few pictures of one of the tractors I've helped restore. Sadly this isn't mine but will be one day it's currently my granddads.... When he first brought it.. She never run. Everything was rusted shut... She even had a tree growing out of her. Had been stood for some years... Still not finished due to health issues with my granddad and he wanted to be the one to do the finishing touches which is fair enough.. She wasn't sprayed. She was hand painted.. But still looks rather amazing,. It's the wrong shade of red we think. Only slightly tad bright, and the wheels are too white.... but here's some pictures...
-
1 pointI've been wanting a space to display my Wheel Horse stuff for awhile. So my son came over today and we got a good start. Most of my stuff is in the Horse Hauler and its in the barn for the winter so will have to wait till I get down there. Was disapointed theres only room for 3 tractors but it will work. Got the Pond, B 145 Elec-Trac with fork lift & RJ 58 in there for now.
-
1 pointUnevenness or warp in the gasket sealing surface of a cylinder head may cause vacuum or pressure leaks in the combustion chamber. If left unchecked, cylinder head distortion may result in less than optimum engine performance and visible symptoms including oil leaks around the head area and possible blowout of the head gasket material. If hot combustion gases are allowed to continue to leak past the aluminum head, erosion of the aluminum gasket sealing surface can occur and render the cylinder head useless. The procedure below explains how to renew a flat(ter) surface on the cylinder head gasket sealing area to prevent defects in the gasket surface from destroying additional head gaskets or the cylinder head itself. Float glass is certainly not the end all argument for a perfectly flat surface but can easily provide sufficient flatness for the purpose of improving the sealing capability of a LGT tractor cylinder head. In preparation for renewing the cylinder head, a few common items will need to be obtained from local suppliers. The surface of an ordinary pane of glass makes a very suitable flat surface to perform this procedure. Several sheets of Wet/Dry 220 grit waterproof paper will be required. Water in a spray bottle will be needed to wet the abrasive paper to keep aluminum debris from collecting on the abrasive paper and clogging the grit prematurely. Wetting the glass pane slightly will allow the paper to "suction cup" itself to the glass pane when the cylinder head squeegees the water from underneath the paper. The cylinder head pictured below will be used for this process. This is a high compression head from a Cub Cadet 10HP Kohler engine. To observe the progression of material removed from the head, I apply a very light "guide coat" of black spray paint to the gasket sealing area of the cylinder head. Complete removal of the guide coat will signal the completion of the flattening process. First, establish a stable and flat surface on which to lay the glass pane. The float glass I used was 1/4" thick - pretty stout stuff. Edges of the glass were beveled for safety. Make certain the glass surface is clean. Any detectable residue such a grease, dirt or stickers on the glass will cause a dimple in the abrasive paper and prevent the cylinder head from renewing perfectly flat. I usually run a single edge razor blade across the surface of the glass pane to assure no residue is present. and onto the back of the abrasive paper. Allow the paper to soften somewhat so when flipped over, it will lay flat on the glass pane and hold the paper in place with "stiction" Flip over the abrasive sheet and wet the top side to allow aluminum particles removed from the cylinder head to float away from the abrasive and not clog the sheet prematurely Place the cylinder head gasket surface side down on the abrasive paper. I leave the spark plug in the head to allow for a better grip on the head throughout the process. Move the head in an even figure 8 motion across the abrasive paper. Apply a slight downward pressure on the head and inspect the progress every 20 or so figure 8 rotations. The downward pressure applied to the head is approximately what you would use if you were applying polishing compound to car paint. No need for excessive pressure here, let the tools do the work. After the first 20 swipes, inspect the head to check your progress. Notice the black guide coat is being abraded away on the "high spots" on the cylinder head. Another 10 to 20 swipes on the abrasive paper and inspect the progress. The blacked areas are the guide coat still present in low spots between the areas polished by the abrasive paper. Another 20 or so swipes and note how the shiny portion of the gasket area is increasing in size. Another 20 swipes And the final 20 swipes produces a gasket seal area without any evidence of guide coat left The head material removed during the process . The slurry produced from this process is also highly abrasive. You may want to keep the slurry away from any nearby hand tools or power tools. The final step is to gently wash away any silicon carbide material from the glass pane. Rinse the pane prior to wiping it down so as not to rub any abrasive into the glass surface.
-
1 pointI love the looks of that body style as does my middle daughter who has her eye on '95 Powerstroke F250. Very nice truck!
-
1 pointBeing a bit 'butt ugly' is, dare I say, part of the D's charm - it's a strange kind of beauty that kind of grows on you. Anyhow, thanks for the interest and comments guys - it's what I like about RS. I'm also grateful for the help and advice I received from cyber friends across the pond while I was restoring the first 'D' and there's no doubt I'll be picking your brains again and seeking help with sourcing and shipping bits with this one. I'll answer a few points raised generically. I found a bit of time today and topped up the tranny as it was off the dipstick. Fixed the headlamp, tweaked the carb as it was running way too rich and reconnected the rectifier regulator but looks like I'll have to swap it out for a spare tomorrow. I was going to give it a run about the place but noticed the front axle is very loose. Had the same with the last D - oil from the engine lubes up the bolts which loosen up, a job for tomorrow. Pleased with it so far though and yes, this one goes backwards as well as forwards (bonus!). To clarify the meaning of 'caravan' in English (UK) which clearly doesn't directly translate into English (US)....... Here trailers are pretty much anything you tow behind a vehicle e.g. horse trailers, automobile trailers, box trailers etc but not if its something for living in whilst at a show, touring on vacation etc - that's a 'caravan' (don't ask why) The bigger ones that you can live in full time but can't be towed other than into final postion on a site are 'mobile homes' but these have no suspension and are too large to tow on the highway. I'm not certain what you'd call a caravan (perhaps someone would enlighten me) travel trailer? So, people who can't store their caravns where they live tend to strore them at a secure caravan park (trailer park in US?) It's at one of these that the 'D' was used to move them about and into their storage positions. And now the muffler solution devised by the PO. These are pit bike mufflers to explain how I think they were adapted to fit here's a more detailed view (click either image to enlarge) The solution is ingenious but needs developing a little further i.e. tail pipes added so that the exhaust discharges below the grille frame. I'll give the PO a call to check that I'm right but here's how I think he did it. The elbow fittings have been changed to a smaller size. How? Well I think he cut slots into the threaded ends of the nipples from the engine then squashed the pipe to the smaller diameter and threaded on the elbows. (This is what I need to check so don't go trying it yet.) The nipples leading down to the muffler were put in a lathe and the threaded part turned down till it fitted into the end of the muffler. There's a stock securing screw on the muffler to secure it to the pipe and it's been sealed with a bit of paste. The stock muffler mounting clamps have been braced by a bit of flat bar. As far as I can see tail pipes in the style of the originals could be added. These are straight through mufflers but no too loud and give a pleasing 'bark' as the engine opens up under the governor. I'm guessing they'd be quieter with D style tail pipes with the side holes for discharge but I like the sound they make as they are and I don't think they'll attract any complaints from neighbors. Credit for this solution goes to the PO but it's an idea that some of you may wish to try and develop. Despite their size, pit bike mufflers are intended for smaller engines but they've got a large straight through bore so I doubt there's any power loss. I'm both pleased and impressed. What do you think? Andy
-
1 pointThats exactly what was going thru my mind Jeff. Dang fuel costs screwing up our hobby! Mike...........
-
1 pointTom/Charlie, 23 x 10.50 x 12s may fit ok, but check . They are fitted to my standard Rims (7x12) on my C-120 as in the pic below. A small price paid in the Diameter reduction due to the Tyre wall overhanging the rims. These are New Old Stock Duros, picked them up after a listed pair on Auction were sold, but found in the description that they had more. Got them for £75.00 a pair. If you go Tubeless, your Tyre Fitter needs to be pretty adept to seat the Beads on the rims.
-
1 pointThat is a good tip! A good tip I have is to use a drill press.I use a piece of brake line sized for the O/D of the hole and then use a tapered reamer to make a cutting edge.Put it in the drill press,back up your gasket with a piece of wood and make perfect holes. Tomorrow I hope to pick up the two seals I need and I will try and find a piece of 1144 stress proof steel to make new axles from......I know,just use the old ones,what fun is that?
-
1 pointWOW! I figure at best 15 mpg towing the trailer x $4.00 a gallon average is like $320 in gas. The days of horse hunting any long distances are over for me. I'm glad I have been there done that a few years ago when gas was just over $2.30 a gallon. It better be a Senior or a NOS tractor for me to go that far!!! Good luck with them!
-
1 pointMy Grandsons like our Raider 12 muffler orientation.
-
1 pointIs that a mug of Guiness he,s got ??? That'll smooth out any spikes.
-
1 pointCongratulations Ryan and dont worry I'll take good care of the wagon
-
1 pointThe day he had the sale my wife was due to have our second child so I was not able to make it to the sale. I had my eye on the Nos ranger 700 that was going to be sold. I was not able to go to the sale but about one or two weeks after the sale it showed up on ebay for a buy it now and I could not hit the button fast enough. I feel it was a good deal for 550 bucks. It came with a snow plow and deck.
-
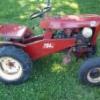
1 pointHere is my little custom. Home made front slot rims, homemade foot throttle, dual pipes, raised an inch in front, custom lights, and some other custom touches.
-
1 pointCongratulations Ryan .I think I see alot of this and this oh yeah, and this too .And less of this . Good luck. Your little ones are cute. Maybe I "WILL" finally be able to make it to LeSeur this summer. We don't have to do the off sight events any more for the Eagles. So that will free me up that weekend.... And, after so many years I can't wait.... So, hopefully I will see you all there..
-
1 pointCongratulations Ryan and family...I think a few BEARS JERSEYS are in order. This should be fun to watch at LaSueur this year.
-
1 pointThe last time I "had" to really run was back several years ago when I saw a cub and a Momma bear and I just made sure she heard me because I was closer to her cub than she was. Then I ran. I too fealt a "pop" but all I had to do was change my underwear and everything was fine after that! Nice tractor! Hope you heal fast!
-
1 pointSound like your battery is weak, the best way to find out is with a Load Tester.
-
1 pointKeep it, you will thank your self later
-
1 pointhere is my one ond only totally custom horse.frame streched lots of custom machined parts and geared for speed.even with the throttle at idle it will still stand straight up.
-
1 pointBecause this post has suffered from apparent "site upgrade issues". the pic of the plate glass thickness has not yet made it into the post. The plate glass used in this post is 1/4" thick with beveled edges to protect the user from cuts and scratches. Don't let this process scare you away. You are not "milling" the head, the last time I looked, 220 grit paper is not a good substitute for a Bridgeport milling machine. The process I described abrades off less than 0.002 inch in most cases. The pressure needed to accomplish this is equivalent to compounding a new paint job. Don't rush, let the tools do the work. Just use the common sense any first year 9th grade shop class noob would use. If you do attempt to gorilla the process, the abrasive paper would simply push off the glass before the glass plate would crack. If you trip and fall on any tools laying around your shop, that one's on you!! A table saw surface is certainly an option. For those who believe all table saw surfaces are flat because they are "machined" probably have never checked theirs. Most manufacturers find it "acceptable" if their machined tops are within 0.003 inches these days (less than what we are trying to achieve on the finished cylinder head). I included a picture of the residue from this procedure to confirm this is a very "dirty" process with abrasive material released from the wet dry paper. I personally will not take responsibility to recommend using a fine tablesaw to accept the residue off this process. Right tool for the right job, etc. In the end, your tools, your choice. Finally, a piece of plate glass is much easier than a table saw to carry to a neighbor's house to help with an engine. And all said and done, plate glass is squirrel proof and after your are finished, it can be easily stored in your shop. I'll be happy to address any further concerns about this process. Chuck
-
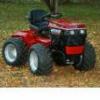
1 pointMy two non standard Wh's.. 312-8 fitted with 26x26x12 Kubota tires at the back on widened rims, roll bar, ag tires on the front and a battery/weight box on the front... It's looks have changed a little over the past few days, but it will return to this set-up in a month or two.. And of course
-
1 pointMy Black raider 12
-
1 pointMY stretched B80
-
1 pointThanks Mark. Ta muchly. The belt tensioner is working very well, despite all the hard driving it's had of late the belt has shown no sign of jumping off Thanks Don. Thanks Richard, it's getting there.. Thank Matt, not sure about a true craftsman though, but thanks. The saga of the fenders continues... As the fender was only tack welded together it came back off the beast for a lot of welding. The bit of box should keep things nice and straight.. Before creating some serious sparks about the place I needed to sort the front of the fender out and give it some curves.. As there was no way of beating the curves into it with it tack welded on, it came off again.. Shaped around a hammer in a vice... Hi-tech or what Tacked back on. And quite a while later it had all been seam welded and ground down. A quick squirt of red stuff.. And it was tried on for size. Me happy Not quite finished with it yet though.. Back off it came to have a few bit's welded up that I missed, and to weld up the tail light holes at the front.... Yes you did read that right A lot of the welds were hand finished.. Using this monster file!! Much bigger than a normal size file.. Another quick squirt of red stuff and that will do for now for the right fender.. I still need to trim the front down a bit and drill some bolt holes, but that can wait a while.. Because I've started on the left side... Marked out for cutting. The top panel came out really well.. The inside panel didn't.... Too much curve and in the wrong place! So it was beaten straight again, and with the help of a new template to get the angle right... It came out much better.. For those of you who like a Stigeo fix, here's making the fenders part 1 and 2..
-
1 pointLast project of 2012
-
1 pointI love my lift. My back loves my lift. The ramps adjust side to side for width. I found this on CL in PA last summer. I have never seen another one like it. It appears to either factory made or by a true craftsman. Paid $300 and spent a weekend cleaning, sanding, and re-painting. If anyone is interested, here is a set of plans for a snowmobile lift. You can easily put a top on it and use it for a tractor. Looks very simple to build: I also have a set of plans in PDF for a motorcycle lift which will work fine for a tractor. If anyone is interested I can email you them.
-
1 pointEvening Guy's, the good news is today's update has no lathe work in it... The bad new's is it's a very short update. No lathe work but a bit of welding as i decided to get the hood stand looking a bit better, or less "cut'n'shut" First job was to cut off the bend out bit's and then hammer what was left back in line. For a dolly I used the first bearing block I machined too big for the bearing shell to stay in. I knew it would come in handy one day Lot's of welding (I'm quite enjoying ARC welding this thinner metal) and grinding later.. The other side, yes I missed a bit of grinding


This leaderboard is set to New York/GMT-04:00