
Leaderboard


Popular Content
Showing content with the highest reputation on 02/19/2013 in Posts
-
2 pointsDID SOMEONE SAY PALLET WOOD?
-
2 pointsCheck for the head gasket sealing surface being flat in all directions. If you have access to a small pane of glass (known flat surface), wet the surface of the glass with water and lay a single sheet of wet dry 220 sand paper onto the wet glass. The paper will stick to the glass and allow you to place the head onto the wet paper and move the head in a figure 8 motion over the wet / dry paper. After a minute or so of the figure 8 motion, flip over the head and inspect the gasket sealing surface. You may find some spots on the gasket surface are shiny and some still rough and dull. The rough and dull areas sit lower than the shiny areas, indicating the head gasket surface is not completely flat. Any low spots present on the head gasket area will not receive a proper amount of "squish" and be susceptible to the pressure of the exhaust gases bypassing the gasket or eventually blowing out the section of the gasket. One other frequently over-looked item is the "fire ring" or lack of the fire ring on a new head gasket. The head gasket is a sandwich-like construction with several layers of different material built up to form the thickness of the gasket. Some after market supplier do not put a "fire ring" on the sandwich and exhaust gasses can delaminate or peel apart the unprotected area of the gasket in areas of low "squish".
-
1 pointIf your multimeter has a HZ or FREQ function, with the right amount of fussing and experimentation, you may be able to calculate engine RPM's from the HZ or FREQ readout. A few wraps of wire around the spark plug cable may act as enough of an antenna to pickup the high voltage pulse emission from the spark wire and allow the multimeter to see the interference / emission as a stream of pulses that can be interpreted as RPM. View the slides below. Depending on the engine, the spark plug is either fired once per 2 crank revolutions (coil based system) or once every crank rotation (magneto fired off the flywheel.) The difference is important to know as you will need a different mathematical multiplier to calculate engine RPM. I know, I know. Buy a $20 optical tachometer. I post his because the question was asked and understanding the principle behind this measurement allows for understanding on how all of the new "maintenance meters" function. All these $30 maintenance meters read RPM and calculate hours off detection of the electrical emissions from the spark plug wire. First, consider the coil based ignition system with a spark produced every other crankshaft revolution. Note the multiplier used is 120 to calculate RPM. Next is the magneto system with a spark produced every crankshaft rotation. Note the multiplier here is 60. It is also very import to note the orange wire does not make any electrical contact with the spark plug wire. DO NOT CONNECT THE ORANGE WIRE DIRECTLY TO THE SPARK PLUG OR THE CONDUCTOR IN THE SPARK PLUG WIRE. You could receive a high voltage electrical shock and your meter could be destroyed if connected directly to the spark plug or spark plug wire conductors.
-
1 pointWell, I have been thinking about making something like this for quite some time, and after buying one of Scott Moreau's custom receiver hitches, the time has come. I wanted to make a sleeve type hitch that would work with the 2' square receiver. So far it is coming along pretty well. I actually have no real use for it at this time, as I have no plow or other attachments to hook it to. YET! Today, I went to the garage to weld some of the pieces together as in the mock-up, but my drive gear on my wire feed welder gave up the ghost, so I will have to wait until the replacement parts show up to finish it. I have ground down most of the welds to go over them again prior to finishing. I also have been fabricating a rockshaft and have that already to fit to the tractor, but again, the welding issue. By the time the parts show up I will have everything measured and cut and ready to weld. Now I have to work out a cable arrangement.
-
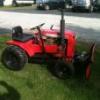
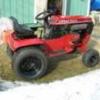
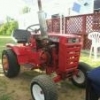
1 pointI picked up this 633 from Charles this past fall. All I have really done since I got it is change the rear diff. fluid and add an 8hp Kohler under the hood. I do have the original 6hp Kohler for it but I haven't been able to find a coil for it yet. It has been sitting in the storage tent not being used very much. I had a little extra energy so I decided to do a little refurb on it. The only part of the tractor that really had any paint left on it was the hood. If the hood matched the rest of the tractor I might have left it alone but it was looking pretty sad. I spent three days tearing it down cleaning, sanding and painting it. I use the tractor for light snow and I plan to cut grass and tow a small cart for firewood so she is a worker and not any type of show tractor. With that said it does look pretty good. I used Rustoleum Regal red on it. Total investment for paint, six pack of Coors and a few cigars was less than 75 bucks. All work was done in my little 8x8 workshop off the side of my garage. I'm going to do a little redo on the snow blade as well.
-
1 pointPicking this 03 Toyota 4 Runner upon Wednesday. 104,000 mi. Just broke in. Runs and drives like a Caddy. Get the front end up when you tromp on it. Moon roof, tow package and more leg room than my 05 Colorado crew cab . Black to match my Horse Hauler Trailer.
-
1 pointThanks! It's a hatz two cylinder diesel. I forgot the model number, but it's 22 Hp so it's probably a powerhouse. Thanks again.
-
1 pointNice little project Jake. I reckon you'll need pad on the 'Butt Rest' ..look's pretty flat. Any space planned for a Bull Horn like on your B80?. Man , I bet your neighbours love you when you let that Snort. Look forward to the progress/pics
-
1 pointI have known about this machine for awhile and never thought it would be sold...But for the asking price...In my opinion not to bad in todays standards...Look at the machines out there today...something comparable to this will cost you 5-8,000.00 anyways and would never last as long as this unit would..But I could never use it!
-
1 pointLook at that horn!
-
1 pointWhile you had the screwdriver stuck down into the tranny, did you try to maniplate the shifter forks? Your should be able to move the shifter forks back and forth with the screwdriver. May need to rock the tractor just a bit if they're bound up gainst the gears. If my memory serves me right (and don't bank on it - I'm getting old!), if both forks are lined up to form a small square opening, that shoudl be neutral. If there are offset little square holes, then I think the tranny is in gear. That might tell us something.... Duff
-
1 pointIf something is clicking when you manually turn flywheel, check and see if anything is behind it, rock, broken bolt, something loose wedging itself with centrifigal force,be a good time to check flywheel key and nut, Loose magnets condition of charging coils, Since tractor has a charging problem could be same thing causing both issues.
-
1 pointCongrats, and thanks for making it happen Karl.
-
1 pointHere's an easy trick for you to use to check you plows plumb (for a lack of a better word). The tractor will be in a furrow on the right side while plowing (except for the initial cut). So figuring that furrow will be an average of about 4" deep, Put the plow on the tractor and drive the left rear up on a 4"x 4". Then drop the plow and it should look fairly plumb. On a side note, this also works to set your hitch depth as well. Good luck.
-
1 pointWell today is my 20 year anniversary, at the body shop, not sure if it makes me happy or sad?? most body men only stay at one shop 5 years or so and move on, I make pretty good money but it is hard labor for the most part, I've been doing body work for near 30 years now, and it's taking it's toll on my body, I'm only 46 but there are days I feel 90, my hands don't work as good as they did years ago, I've been pushing my kids to get a good education and get good jobs so they don't have to do the hard manual labor, save that for the hobbies and such, heck I've been at this shop longer than any thing else I've ever done.
-
1 pointthis is the only pic i have of it i cant get the vin number untill the weekend hopefully this helps its kinda vauge though
-
1 pointBlowin stuff up !!! It can be used, but be careful. Other than that, cleanining old grease off parts.
-
1 pointI have rebuilt many engines in my liftime and you couldn't pay me enough to use SF If an engine is set up right and won't run on a fine mist of the fuel it is designed for there is something drasticly wrong.
-
1 pointThat is a gorgeous old Javelin Craig! One of my close friends has a 69 AMX with a mildly built 390 that runs consistant 11.90's. One of my uncles had a Rebel Machine when I was growing up, and I loved that car! I say you aught to drive your old AMC more often, and pick up one of those fullsize Jeep Wagoneer Pickups, and stuff a built 401 in it, to use when you need a truck! Matt
-
1 pointThanks Mark. Ta muchly. The belt tensioner is working very well, despite all the hard driving it's had of late the belt has shown no sign of jumping off Thanks Don. Thanks Richard, it's getting there.. Thank Matt, not sure about a true craftsman though, but thanks. The saga of the fenders continues... As the fender was only tack welded together it came back off the beast for a lot of welding. The bit of box should keep things nice and straight.. Before creating some serious sparks about the place I needed to sort the front of the fender out and give it some curves.. As there was no way of beating the curves into it with it tack welded on, it came off again.. Shaped around a hammer in a vice... Hi-tech or what Tacked back on. And quite a while later it had all been seam welded and ground down. A quick squirt of red stuff.. And it was tried on for size. Me happy Not quite finished with it yet though.. Back off it came to have a few bit's welded up that I missed, and to weld up the tail light holes at the front.... Yes you did read that right A lot of the welds were hand finished.. Using this monster file!! Much bigger than a normal size file.. Another quick squirt of red stuff and that will do for now for the right fender.. I still need to trim the front down a bit and drill some bolt holes, but that can wait a while.. Because I've started on the left side... Marked out for cutting. The top panel came out really well.. The inside panel didn't.... Too much curve and in the wrong place! So it was beaten straight again, and with the help of a new template to get the angle right... It came out much better.. For those of you who like a Stigeo fix, here's making the fenders part 1 and 2..
-
1 pointBout time you got that pile running right!!!!!!! LOL
-
1 pointfinally got around to getting with terry to create the front hood decal. weve got the layout where i like it, but terry was having trouble getting the laminating right on it. this is the result, its just a test run so theres some bubbles and defects in it. the final decals will be better but this one is good enough for me for this tractor.........
-
1 pointYep....go big or go home . Mike............


This leaderboard is set to New York/GMT-04:00