
Leaderboard


Popular Content
Showing content with the highest reputation on 02/13/2013 in Posts
-
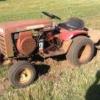
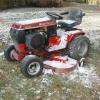
3 pointsuntil I get the muffler done here's some eye candy needs to be welded but here it is I like a little Bing on my tractor kinda makes it stand out in a crowd Brian
-
2 pointsUpdate! I installed the used coil ($30 eBay) tested for spark. Spark looked good on both cylinders. So I buttoned everything back up. Opened the fuel shutoff valve gave it a few cranks and it fired right off! It's in my shed, so I only ran it a few seconds. But it sounded good! Thanks for all the help guys! Joe
-
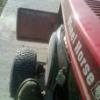
2 pointsMake sure you re use that muffler!! :ychain:
-
2 pointsMy pup Rusty would do the same thing Mike. I'd play ball with him every night for about an hr. When he wore me out he'd kick the ball around himself and then chase it over and over. He was only 9 months old but he was at least 3 times smarter than Emma. He was 2 months old when I got him and within a week he learned to sit, stay and give his paw before he ate his chow. Not Emma! oh my gosh you'd think she wasn't fed for a week every time its chow time she is so outta control. Its funny how dogs can be so different.
-
2 pointsI cut two small squares of sheet rubber material like many people use on the footrests (300/400/500's) and glue them onto the seat pans under where the springs land. Not terribly unattractive and very effective! Duff :thumbs:
-
1 pointA little time saver to confirm an Onan ignition module is functional prior to installing it, reassembling the engine and keeping your fingers crossed. The diagram below shows how to wire up a standard tail lamp assembly and a few alligator clips to complete the testing. All the wiring and testing can be accomplished on the bench. One Caution - DO NOT TOUCH THE BLACK MODULE LEAD TO 12 VOLT POWER AT ANY TIME. IF NO LOAD (lamp or ign coil) IS PRESENT IN THIS LEAD THE MODULE WILL BE DESTROYED. The modules I have tested so far power have all powered up with the tail light on. When the trigger ring is rotated near the "nose" of the module, one of the two magnets embedded in the trigger ring will turn off the lamp and continued rotation of the ring will pass the second magnet over the "nose" and once again turn on the lamp. An ignition coil puts about a 3 - 4 amp load on the ignition module. A standard automotive tail light will also put the module under approximately the same load and provide a good simulation of the ignition coil load. This post has been promoted to an article
-
1 pointHere is a quick post of a mid mount grader I just made. Couldn't justify the $350 for a 50in. so here is what I wanted anyway. A 5ft er. The blade started out as a 40in. I cut it in half a welded wings on each side to get my 60in length. For the lift spot I drilled into the main pivot bolt and threaded the hole to fit the bolt I use to lift it with. Any ? just ask. I'm sure there are plenty of you wanting a blade without the cost. Cost of this project minus welding rod and electricity .... $0. Still need to make a release handle to make it moveable from the seat.
-
1 pointHere it is on the job. Doesn't look so big now.
-
1 pointConsider changing out the drain plug with a regular pipe plug of the same thread. I drill the pipe plug all most through and insert a cylindrical magnet. It seems to collect ferrous material that the filer misses.
-
1 pointGeez Brian. Only stainless steel? I thought by now you'd have moved on to Titanium.
-
1 pointI believe if it came with a tecumseh it should be a c120 special
-
1 pointNice find, you can keep warm and split wood! I want to get a super split log splitter, they are not cheap but have a 3 second cycle time, you can get them gas powered and with electric motors. Im with Ken on the Fiskars X27, works great, I split half a cord of red oak with it in 45 minutes goofing off with friends. Works great until you get to the big pieces like the one in the picture below. It only weighs 4.5lbs so its light but very effective. However I use my trusty Stihl 460 Magnum that I got from Ken and noodle them (cut them from the side down the diameter with the grain creating a pile of noodles).
-
1 pointTo answer the original question where to draw the line between keeping my tractors or kicking any of them out, I wouldn't know... haven't reached that point yet. I have acquired five Wheel Horses in the past year and a half and would take in more given the right circumstances. In reference to Stevasaurus' reply, I am that "someone" that never thought once about Wheel Horse tractors for at least 30 some years. My dad originally purchased a new 552 WH in 1962 then sold it sometime in the '70s. My uncle found it a year and a half ago and gave it to me. The previous owner pretty much let it outside to rot. Most people would have sent this tractor to the scrap yard or parted it out but I was dang lucky to have the opportunity now in my life to restore it. Nearly 75% done, I am planning on riding my dad's 552 tractor this summer after what will be a two year project. The time, money, and sentimental attachment I have in this particular tractor is far more than anyone else can ever come close else to imagining. I have also rescued a 551 Suburban last summer from a wooded lot where it was left to rot... making a rat rod out of this one. I also have an RJ58 that runs but needed some TLC... doing a full blown original restore for this one. I would imagine that a lot of really nice WH tractors either get scrapped or parted out because their previous or current owners have no clue that there are serious WH collectors out there who would love to have them in their collections. As for me, in just the past couple of years, I have great enjoyment in saving a few tractors that someone else didn't want and bringing them back to life once again. Happy Wheel Horse collecting y'all!!!
-
1 pointI think it will stay as it is. I will be painting the chassis semi gloss with the chassis paint. I agree with everyone who likes things simple. For me putting the wheel simulators is enough bling. I am big on keeping it original and clean. Now I am giving serious thought to painting the 6x12 enclosed the same color white... I may add some custom touches to the trailer ie diamond plate fenders.gravel guards and maybe a 2 tone paint. Grey coating on top and truck white on the sides. We shall see. I am thinking the gray and white theme on the trailer will work..
-
1 pointYou da man Perry! That Briggs sounds real good and she looks like new. Lets see that bad boy split some wood! You have motivated me to fire the splitter up this weekend and maybe make a video. Maybe I'll even fire up the old Homelite XL-12 and wake the neighbors up bright n early.
-
1 pointI'd like to see a video as well. Most that I have seen are so dreadfully slow, and I'm pretty impatient. The 4 way attachment looks pretty cool. I agree, with the electric you can split right down in your basement if you want to and ya can't beat that! I have been using a big ole gas splitter but my go to splitter is my new Fiskars X27 splitting ax. If you are in the market check them out, best damn splitting ax you will ever buy.
-
1 pointcongratulations kelly, definitely a milestone to make it to 20 years in one company..... i moved around a little back home in the construction industry, but still managed nearly 8 or so years at one place. will have 13 years in may at the place im at now. not quite 20 years yet, but quite an achievement with the turnover we have......... theres a few that have stuck it out and have 30+ years there. dont know whether my body can handle another 17 years. cant see myself giving up and doing something physically easier though, hard manual labor is all i have ever done.......
-
1 pointA member here does masterful work reproducing decals check here http://www.redoyourhorse.com/servlet/StoreFront
-
1 pointGene, I can't think of a good reason not to if you are using it in the snow at all. What I used was a chap transfer pump with one end in a bucket of windshield wash, and the other pushed on over the valve stem, after removing the valve core. I got about 5.5 gallons in each of my 23 X 8.5 ag tires.
-
1 pointOne of the most talked about areas in the transaxle is the HI LO shift fork area. The metal shifter fork can snap off the shifter arm. If you inspect the HI LO shifter area of the trans with a strong flashlight and a magnetic retriever, you may find this area damaged or broken. Stray metal bits in the gearing may be the root cause of your "clicking". To allow closeup inspection of the HI LO area, both the R / 1 and the 2 / 3 shifter forks will need to be removed. Both shifters are detented and indexed by 2 spring loaded ball bearings held within the boss BETWEEN the shifter forks. The 2 ball bearings, compression spring and shift pin (held within the body of the spring) are not captured in the boss. The ball bearings will fly from their home when the shift levers are pulled from the boss. In your travels this week, pick up 2 or 3 spare 1/4" ball bearings for possible replacement in the shifter mechanisms. There are 2 in the speed selector forks and 1 in the HI LO range shifter. If you prefer to obtain parts from the dealer - this will help. Pick up a magnetic retriever and a standard 1 or 2 inch kitchen refrigerator magnet. Once you remove the sealing plug in this access port, place a kitchen magnet over the port or insert a magnetic retriever into the port before extracting the shifter forks. The ball bearing will retained in the magnet and not end up under a pile of oil stained wine crates on your work room floor. Just saying. If you do not extract 2 balls from the shifter arrangement, they may have fallen into the case. Find them, they need to be accounted for. From this point on, the gear stacks are easily disassembled and damage - if any - will be obvious.
-
1 pointcongrats on sticking with it for 20yrs. that seems like a dying business. heck they total out more cars than they fix dont they ?. fender bender , total it , flat tire , total it ...LOL my last place i worked the owners ( husband & wife) were killed on thier harley. they were good friends as well. they were just wonderfull people who went above and beyond for their employees. son took over and went down hill from there. i still feel so bad for the two young boys who had to go through that and had a business dumped on thier shoulders the next day. we all did our best but the economy took us down . the old man was the heart and sole of it all.
-
1 pointThe hot rod in whlpny's post looks like Bat Man's lawn mower.
-
1 pointwow mike, morgan looks alot like our lab, teddy........
-
1 pointgood eye your going to see alot more before she's done
-
1 pointI'm grabbing it up tomorrow after work. I'll slap some pics on here after I roll her off the trailer! :greetings-clappingyellow:
-
1 pointUse Rustoleum Regal Red, rattle cans. I've painted six 's usin' this paint. After it dries for a few weeks, I let it dry for a long time, I then coat using Rustoleum's Crystal Clear. This I spray over decals, bolts, wherever. I did try Crystal Clear one time, coated too soon, it bubbled. That's why I wait substantial time 'tween the Regal Red and the final Crystal Clear coat. Sanded it off, repainted Regal Red, later (much) coated with Crystal Clear. Wheels (if silver) Duplicolor Silver Wheel Paint, applies very easily. If you miss a spot or two, doubt anyone would notice. I use self-sticking skateboard coarse grip tape for the runnin' boards (geeze I'z gettin' old, runnin' boards?). You might check out pic's in my gallery album. My '90 520-8, Onan 2-cyl, that I'm rebuilding.
-
1 pointI had a Schnoodle...great dog. One day, my brother in law comes over to the house. I had a small garden, and I was growing banana peppers. My brother in law likes hot stuff. I picked one for him to taste and was holding it in my hand. Frisky jumps up and takes a big bite of the pepper in my hand. HEHEHE...all of a sudden the dog starts trying to cough up the pepper and is wiping his tongue on the grass. I thought he was going to die. I ran down into the basement grabbed his bowl and a beer and went back out and poured the beer into his bowl. He drank the whole beer and then went over by the garage and laid on his back with his feet up. What a riot...we were bent over. That dog never jumped up and took anything out of my hand again...with out sniffing it first. Martin...great pictures of the bad Beagle...they just look so guilty. :)
-
1 pointwhatever engine you have fitted, if it is electric start and has a coil you will need a battery. If you have a battery you need a charge system, on a Kohler there should be a cable from the side of the block behind the flywheel that should connect to the regulator. There are several type of regulator body, but generally all perform the same function.
-
1 pointOK - wasn't thinking clearly when I started this thread. Why would I post such a topic on this forum - YOU GUYS DON'T THROW AWAY ANYTHING!!!!!!! :laughing-rofl:
-
1 pointMy Beagle Mollie has managed to force us to put a bungee on the refrigerator door so she can't open it. We also have one on our freezer. The cat food is in a secure place along with the box of instant mashed potatoes. There several holes in my back yard where she goes foraging for bugs ( mostly crickets). We can't keep napkins on the kitchen table for some reason either. She's getting up in years now so she demands a sweater for cold days and roads made in the yard for snow over 4".She's stubborn. We named her after my Grandmother!
-
1 pointI guess I have to chalk that comment up to an easy mistake to make - since I didn't hack it out with a chainsaw or gouge it out with a screwdriver it may have been easy to miss. Some may be wondering about the the holes in the base - these are not "mistakes". They are holes to for the indexing pins to allow the case halves to lie flat when pushing in the bearings / seals. My days of working on on a cold floor or laying on a stack of wood piled in the the mud are over. The time has arrived when I choose to pursue my hobbies in a more gentlemen-like manner, whenever possible.
-
1 pointWe like Green Mountains Dark Magic Blend
-
1 pointSteve. You still using the wine crate for your tranny holder?
-
1 pointgetting back on this it's been awhile the tractor has been sand blasted all replacment parts have been purchased transmission cases have been painted and new bearings and seals installed hope to assemble transmission this week Brian
-
1 pointI have found using a three point homemade stand works well. Simple supplies laying around the house will yield a very stable and secure platform to work from. No slipping off a Jenga like stack of wood blocks or tires or thru workmate clamps and no damage to paint or castings on the transmission. It projects a level of professionalism and "give a shoot" that inspires confidence in the person you are doing the rebuild for. The three point suspension will allow you to level the casting making all shafts sit square in their bores and bearing. This avoids undo stress on the needle bearings by "wagging" shafts into the needle bearings. All components true allows to you test the final assembly by rotating the input shaft by hand without splayed / tilted shafts causing the bearing stacks to lock up from misalignment. As you can see in the third image, the transaxle isn't all that complicated. In this image, the axles and pinion assy are obviously not present. This particular transaxle was disassembled after sitting for 2+ years. All shifter functions were jammed or VERY stiff. A good cleaning of the shifter assemblies resolved all the issues. The entire trans cleaned up quite nicely with a minimum of effort. Go for it. There are plenty of folks here willing to help those who go outside their "comfort zone". In your case with a "clicking noise", when you first open the case. probe around with a magnetic retriever to see what (if anything) pops out from between or underneath the gears. From there, take pictures with a digital camera as you disassemble the individual pieces. Just an afterthought - remember the shifter rod develops a very large mechanical advantage thru a long shifter handle pivoted on a dog point setscrew in the transmission case. The shift forks will not change positions just by simply pushing with a screwdriver. You will need to lever the screwdriver off the case near the shift forks and lightly bump the screwdriver handle with a dead blow hammer. To lower the shift fork once moved upward, a slight tap from the same deadblow hammer will start the shifter fork on its movement to the next detent. Be aware the gears are not "synchronized" and will not automatically align with each other. If the shift fork seems stubborn, check the alignment of the gears you expect to mesh together when you shift. A slight shuffle of the gear teeth will allow the two gears to align and engage. Developing the experience to determine right "feel" of the shifter comes with time. The HI LO speed assy should be able to be switched by inserting a 3 or 4 inch long allen wrench into the shaft on top of the trans case. Any force considerably LESS or GREATER could indicate breakage or need for a cleaning.
-
1 pointwe have one of the naughty ones too... hes being good here though. (maybe a thread on naughty beagles and their conquests are in order)
-
1 pointLike only 3 minutes I just shake it everyone before I pull the trigger lol *everytime
-
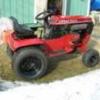
1 pointwell i'll take a stab at it. This is my 400 suburban. I bought it cheap from my local dealer, it was out behind his shop covered completely in vines. I pulled the vines back and knew I had to have it. It looked like crap. some would have left it there to rot. Took dad and I 4 years or parts gathering, E-tanking, sand blasting, priming and painting to make it look the way it does now. I do have a plow blade, sickle and a mower deck that need work for it they should be done this summer!! thanks for looking.
-
1 pointI agree totally that the whole saving the planet/global warming thing is a money/powering grab farce. Like posifour, I read about it in Farmshow and wondered if it would give my old Kohler a boost and/or improve idling. We can do a lot more to save the planet by cleaning out our mess in Washington than saving fuel in out Wheel Horses! Thanks for all the replies. Keep them coming.
-
1 pointI have nothing against saving fuel and money, but when anyone starts telling me this crap about global warming and saving the planet, I find it hard to believe any thing he says. They say the ice is melting in the Northern hemisphere, I have also heard it is build up in the Southern. Changes yes, but don't sound like global warming. When some one starts talking about global warming my first though is the take a tight grip on my billfold as some one want my money.
-
1 pointTime to repair and paint the leaking gas tank After the tank was taken apart I sandblasted both halves inside and out I wanted the inside done just in case I might need to use some tank sealer and the sandblasted surface would give it good adhesion The first thing was too remove a broken bolt You can't see the threads in this pic but I got the bolt out and didn't hurt the threads I also chased all the holes with a 8-32 press form tap New stainless 8-32x1/2" screws I'am using self threading because they have a built in washer 1/4 nut driver And the secret ingredient YAMAHABOND #4 also have new tank gasket #4452 from toro flat file all mating edge's check for burr's and besure tank bottom sits flat on tank top apply yamahabond to all mating surface's (tank top,tank bottom and both sides of gasket All bolted together I like using the nutdriver because I can feel what I'am doing better And tight is tight and to tight is broke 24 hour leak test half full of gas NO LEAKS primed for paint Done and Painted


.JPG.9f2ecb26065c66527b0730084ab7fc7a.thumb.jpg.7dc8a04d9a53d44ee2b23f26ee94496f.jpg)


This leaderboard is set to New York/GMT-04:00