
Leaderboard


Popular Content
Showing content with the highest reputation on 12/30/2012 in Posts
-
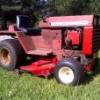
6 pointsI have been loving all the seat time the past few days. This is my first winter with the horse and I can't say how impressed I am with it. The plow has been more then capable with several feet of old snow on my dirt driveway. Makes me wonder if I even need to bother fixing up the snowblower. Not sure how much higher ill be able to push up the piles though!
-
4 pointsP'Chop working his first snow removal account. He was all :happy-jumpeveryone:
-
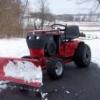
4 pointsHad a Piddley Snow Last Night So This Morning I Piddled a Bit and Broke in My Grand Daughter Henny as My New Camera Man errrr um I mean (lady) Some Snow Is Better than None I Guess. And at least heres a few pictures of it doin what its suppose to do, than getting pictures of it in the Shop. This Rebuilt 520-SC (snow chucker) has been itchin fer a fight for a month now and still hasn't got the competition it deserves, Oh well maybe next year. Cheers ~Duke
-
3 pointsPoor man's tri-rib. $20 worth of #40 roller chain and you won't have any problems with the front tires drifting. Deflate the tires and remove them in the spring.
-
3 pointsMore pics from the 6-8" plus drifting that we got yesterday: All lined up and idling. I love the rain cap on Elvis at idle TINK TINK TINK! Horse Power! A little back blade action Elvis ready to dig in Elvis loves the Horses. They make nice piles to move!
-
3 pointsWe ended up with 10"-12"s by the time it was over.....nice and fluffy! My GT was a bit overwelmed by the amount of snow. She coulda done it with half passes but I decided to give my old Gilson walk behind a workout since it only was used once last year. The Gilson (8hp Briggs / 26" cut) handled it with ease. Its nice to have a big old all steel heavy-duty snowblower. My dad has one of those newer Ariens and its so light that it wont dig in....it actually starts to ride up over the snow. Mike............
-
2 pointsDon1977 got me thinking about this again so I decided too do it as the 1533 bearing is no longer available from toro My fix needs some machine work to beable to do this replacement the standard 1533 bearing dim. are 1 1/2" ID x 2 1/2" OD x 1/2" W the new R22 bearing I'm replacing it with is 1 3/8" ID x 2 1/2" OD x 7/16" W so this requires I remove .0625 from the differential hubs Since we don't have a manual lathe at work I setup my vertical lathe turned the dia. to 1.375 plus 0 minus .0005 1533 bearing is on the left and the R22 bearing is on the right notice the R22 is a heavier bearing and should work just fine as the original 1533 bearing is 1/2" wide and the R22 is 7/16" wide I use a .0625 shim to make up the differance shim in place on diff. hub R22 bearing installed with shim this should work fine for the old transmissions that use the 1533 bearing with 1" axles Brian
-
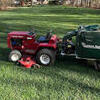
2 pointsSo it's safe to say we all love using our garden tractors for my snow removal. It is something I actually look forward to (until about mid to late March ). This years line line up: 416H with cab and single stage blower - love the cab - no snow in the face! C-160 Hydro with 508QM ARK loader 314-8 with 54" snow blade (D series) with front wheel weights to help stay on course with an angled blade. And in case all else fails a 22" MTD blower and my favorite shovel I think it is going to be a big year for snow...not even January yet!
-
2 pointsWe got 12" last night. Here's a video of me snow blowing the driveway with my 520 & 2-stg blower:
-
2 pointsgot it running did a few things really not sure of root cause if i had to guess it was the ammeter wire the new battery had no charge thanks to all
-
2 pointsNice one copperhead, that gets my vote for the December, 2014 calendar.
-
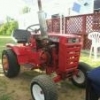
2 pointsNo, that is a 1974 C-160 Auto. It was the 1st restoration I ever done (about 11 years ago). My wife's grandpa passed away and I bought it at his estate auction for $200. The motor had a broken rod and I decided to restore the tractor and rebuild the motor. Learned at lot about Wheelhorses during that project. Gave it back to my mother-in-law, which in-turn my son, now 8, mows and pushes snow when he is at grandparents house. Funny how the world goes round. I didn't live in Chillicothe until 2004. I don't even live in the city limits, about 7 minutes north of town right next to the Vocational school. Grew up in a small town of Adelphi, about 20 minutes north east of Chillicothe. Thad (Ohio)
-
2 pointsI can't afford a tractor that I can't use. My 704 looks nice and I take it to shows,but I can't justify having if if it doesn't do at least a little work like pulling a wagon,roller,lawn sweeper or delivering pizza's in the rain at the Steam Pageant! :)
-
1 pointOk, here is my way of installing tire chains start by laying out the chain, making sure the cross chain tie links are facing down(see pic 1 ,2 and 3) Set tire on chains(remove air from tire, as much as possible) and wrap chain around tire and loosly attach tighting bar.(see pic # 5) Flip tire over and connect oposite site as tight as possible.(see pic # 6) Now flip tire back over and tighten other side as tight as possible.(pic # 7) Now adjust cross links so they are straight across from each other.(pic #8) Now air up tire and your done, well mount back on tractor, then your done. Pix # 9 and # 10 are of tires mounted with weights(home made brackets)
-
1 pointHeres the process of tearing down a hydro pump from a D. I will do my best to describe everything in detail so that anyone can handle it. I must say with Paul Frederis help we tore it down, cleaned and rebuilt it in 4 hours including tearing it down a second time because of MAJOR rust issues causing binding of the pistons. I will do this in chronological order as best as I can Step #1 Here is the pump before tear down. You need to remove the four 12 point bolts using a 3/8 12 point socket wrench in order to seperate the aluminum housing from the cast steel valve body STEP # 2 shows the bolts out and the pump housings seperated. Be ready to struggle slightly if your pump was never opened. It was necessary for us to put the aluminum part in a vice and hit the steel end with a dead blow hammer and brass punch to get it to sperate from the gasket/adhesive. You must rest the pump on its side or you will lose slippers and other items if you do it in the upright position. Upon opening it a large quantity of rust was found inside formed on the steel end suggesting water infiltration. Step #3 In this photo you can see the rusty liquid on the slippers and the general shape of them. They were scratched but the corners were square and not rounded over, which is very important Step #4In this pic Paul is trying to clean the rust off of the oil pump housing. As you can tell it was pretty rough. The 4 bolts here are 12 point also, you need to use a 5/16 12 point socket socket to remove these. this is another pic of the pump housing and the rust and bolts. Also pay attention to the orientation of the small pin location on the oil pump housing. Its on the botton of the pic and must be that way for reassembly. It is very important for reassembly that this faces the same way. Step #5 Here is the oil pump gear in the housing. You must mark this on the housing and impeller before you take it apart. Every lobe only fits its mating surface 1 way. If you screw it up the pump will bind and not pump oil to feed the cylinder, slippers and swash plate. The o-rings are the same set up as the manifold with a square backer ring and a regular o-ring on top to seal. Step #6 In this step you need to remove the charge valves. They are 5/8 standard socket. It is an O.R.B.( O Ring Boss). These were pretty tight but did come loose. Here are some close ups of the charge valve. We made a legal notebook map so we could be sure it all went back together well. one side has a spring and a ball, the other side has a small tapered shaft and spring. Later models of this pump had balls and springs in both sides. One thing to note is that occasionally you will find shims between the spring and ORB fitting. These were installed when the pumps didnt make enough pressure during testing. The shim increased tension on the spring and therefore raises the oil pressure just like it would in an oil pump for an engine. Step #7Next pics are a close up of the housing showing the accelerator valve removed. There are 2 of these. 1 on each side. They are the large straight head screwdriver tip recessed into the block. They are ORB also but damn were they tight. We needed to use an impact driver to break them loose. All thats inside is a ball and spring. Step #7Next pic is of the push valve. Remove it and check to be sure there are no gouges in the tapered area. If there are, oil will leak by and cause speed to slow and pump to overheat eventually during use. Step #8This is the inside of the aluminum housing. It shows the direction control where the swash plate sits. The can be removed if needed by removing the spring clip on the shaft where it comes through the outside of the housing on the flush side, not the long side that the direction linkage attaches. You then pull the shaft out and the swash plate resting surface will clunk into the bottom of the housing for you to pull out. The only reason to do this would be to replace a bad bearing. Step #9 Here is a close up of the swash plate during polishing. I started with 800 grit, moved to 1200 and then to the crocus cloth as the final step. DO NOT use water to lubricate the crocus cloth. it causes the adhesive to melt and the cloth to become junk. Use oil only for lube. This is a before of the swash plate showing severe rusting from the water that was inside this pump. this is after the three step polishing sequence. As you can see its a mirror now Step #10Here is the brass direction control valve plate showing scratches and oxidation. This also goes throught the 3 step process of polishing. This is the same peice after polishing Step #11 is the polishing of the slippers themselves. We made a diagram so that we could install them back in the bores they came from. After all that work we ended up with my original cylinder too rusty to be used. The slippers bound up and we had to take the pump all apart again and use a different cylinder after we got it all back together and it wouldnt budge. Step #12 is the installation of the slippers back into the cylinder. Be sure to install the slipper retainer BEFORE you install the slippers. They wont fit if you dont. Step #13 is the installation of the swash plate back into the direction control section. This pic shows it cleaned This pic is right before installation of the cylinder and slippers. Use lots of oil on both sides of the swash plate so theres no galling on start up. It will suck to do all this work and wipe it out with a dry start. Step #13 Assemble with the unit on its side. If you dont, you will lose slippers from the cylinder bore as you slide it down over the shaft and then have to start over. Once the cylinder is installed on the shaft, then flip the housing to the vertical position. Step #14 is to reinstall the charge valves, accelerator valves, springs and shims where they came from. A little grease on the springs wont hurt. It will stop them from moving and going caddywhompus when you install them in the bore above the ball at the bottom Step #15 Shows the proper orientation of the oil pump impeller in the housing. Take notice to our marks to be sure we had it right. You then reinstall the pump assembly onto the housing using the four 5/16 12 point cap screws you removed at disassembly. Again be sure the pin is at the bottom when assembling. Step #16 shows the new gasket prior to assembling both halves . I made this one the same way as the motor housing in my original resto post. Using a hammer to cut the material. Step #17 its all back together and ready to go back in my 18 Auto.
-
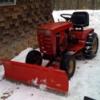
1 pointDon't know if you can push more than this ....but I was pretty impressed plowing my mother's sidewalk. Thad (Ohio)
-
1 pointThis year She gets sidewalk and loading dock and some parking lot clean up . Will get some action shots this year and even a video !!
-
1 pointGot to play today, we got about 5" of fluffy snow. Started using my black hood with a 14hp and a 48" blade. It was doing great until the right rear tire bead popped off. Switched over to the C160 with a blower and it ate up the stuff the town left. Then took out my C161 with a 42" blade to clean up everything. Couldn't let my comando 800 sit so I took it out and tried the plow. It needs weight and chains but its fun to play with. Hope everyone had fun playing in the snow, I know I did. Gene..
-
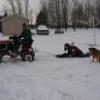
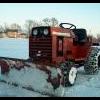
1 pointhere are 1 pict from morning 29th dec and here is a pict 24 hrs later. We had a lot of rain and 37 to 43 degrees F.. last 24 hrs and it looks like we going to have rain for the next 2 days.. Lars
-
1 pointOf course I shredded the drive belt. At least I was mostly done with the removal
-
1 pointThat is a nice clean specimen. Just a note for you. The factory set up for the dozer blade used a foot pedal that connects to the pin with a small chain to pull it when angling the blade. A small rope like clothes line is used that hooks to each top corner of the blade with S hooks and drapes around the steering wheel. Push the pedal to release the pin and use the rope to pull the blade for changing the angle from the seat.
-
1 point"T" stands for Tractor. You're either seeing yours wrong, or someone at the factory used the wrong stamp. The letter prefix was used to identify the type of equipment and the following numbers often denoted horsepower, swath / width / size, model year, etc. A few quick examples would be..... RM-366 = Rotary Mower / 36" width of cut / 1966 ST-376 = Snow Thrower / 37" swath / 1966 As with other Wheel Horse products, this was not a consumer-friendly (nor consistent) identification system.
-
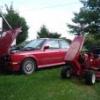
1 pointMan I can't believe how straight that hood is. It's the nicest original I've ever seen next the NOS 61' 401 hood I bought a few years back. I hope you bring that to the big show this year in PA. I'd like to see it in person.
-
1 pointHad a Piddley Snow Last Night So This Morning I Piddled a Bit and Broke in My Grand Daughter Henny as My New Camera Man errrr um I mean (lady) Some Snow Is Better than None I Guess. And at least heres a few pictures of it doin what its suppose to do, than getting pictures of it in the Shop.
-
1 pointI know thats gonna be another nice one when you finish Duke :)
-
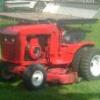
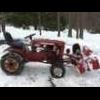
1 pointThe old GT 14 out and about
-
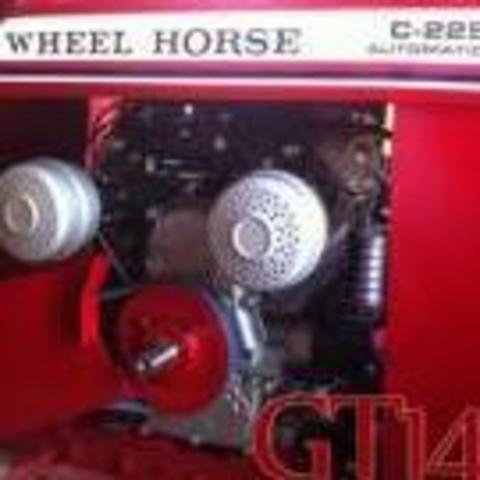
1 pointI did mean the muffler!
-
1 pointThat's one happy SIL, think the daughter will get to try the Stallion mowin' the lawns? Not much to fix up, you've already covered all the bases. Merry Christmas & Happy New Year!
-
1 pointVan - not fair. We know your son-in-law will win the $$$'s race fixing up that tractor because you are already Wheelhorse poor... ;)
-
1 pointDuke, I know I'm jumping in here a little late but I just read this thread. I was thinking with all that lighting you may want to install some limo tint on your cab so you don't burn your eyes while blowing snow. This suggestion is entirely for your own protection and is in no way intended to reduce the need for your neighbors to apply "eye bleach" while your blowing topless!
-
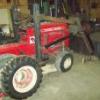
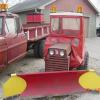
1 pointHere is a picture of the plow that off my dad's 701. It has angle iron that clamps to the frame and bolts to the A frame . The lock for the plow pivot is operated with your foot and has a smaller lever. Not sure if it's stock but I have had two frames with this set up. Now I have the plow on my Camando 800 not quite the right plow for this but it works. Hope you figure it out. Gene...
-
1 pointgreat gift to give. he looks proud of the new addition
-
1 pointGlad to see your back on it duke! This is going to be one nice tractor when your done with it! It looked great when I saw what you had primed when I stopped by this summer! Can't wait to see some more work on it. ~Jake
-
1 pointNot sure which one looks tougher, PD or the WH.
-
1 pointThough not shown on the tractor, the ol' yeller is there under the red on the belt guard, toolbox and fenders too. I think I remember reading that the yellow is actually some zinc, or cadmium type primer used back in the day under specific colors...red being one of them. Something like that.
-
1 pointUmm...excuse me, there's always the amcrules museum...right over here at my house. Will make room for an NOS tractor anytime. :handgestures-thumbsup:
-
1 pointThe Carlisle tire is called "All Trail" part # is 511505 and it is a 23x10.50-12. They are mounted on factory Wheel Horse rims, but they were from a 520H. Here is a photo of the tires without the chains....I really like them....the right balance between turf and ag tires. Easy on the lawn too. Thad (Ohio)
-
1 pointHere is a couple more photos from plowing snow today. The tire and chain combo is the best I have ever used. I have tried just about as many different things out there from turf tires, ag tires, chains, no chains, wheel weights, no wheel weights...and this tire "Carlisle HD Field Trax" with 2-link chains and 50lbs weights seems to be the best. I have about a 300 foot driveway on a very steep incline. This setup seems to just plug right along whether we have a wet snow, fine snow, ice, slush....it just works in everything. Thad (Ohio)
-
1 pointFinally got some snow worth getting the 314-H out for. Here are my photos from this morning. Thad (Ohio)
-
1 pointI could very possibly be wrong, but I believed that the mount underneath the axle didnt come out until around the 70's, prior to that I thought they were mounted in front of the axle tubes. If you look at Rollermans picture from the "Snow Plow Info" thread () and read the text, it seems that the long frame plow (designed to mount under the axle) is 8" longer than the short frame plow (which I have always believed is supposed to mount forward of the axle). Looking at the picture it seems that the pivot point for the lever is about 8" further forward as well: If we assume there is a 2" difference in the mounting bracket location, then the length of the angle mechanism rod should be 6" shorter on the short frame plow when compared to the long frame plow. Since the chassis themselves are 4" different in length, this number seems reasonable. So I'm thinking that the short frame actuating rod should be 4-6" shorter than the long frame one. If it were me, I would forget the math and set the plow angle straight ahead. Disconnect the actuating rod and set the lever to straight up and down, and measure what length the rod needs to be. Make one that length and be done with it. If need be I do have a short frame plow buried in the shed and I can get a measurement. But ask me to do it before I get too warm or have too many beers in me... EDIT: Terry beat me to it. I'd go with the measure what you need and make it method.
-
1 point
-
1 pointI don't think the problem is with the lever. I'd say the rod between the lever and the quadrant needs to be longer. Here's a picture of my 6-2111 blade: The lever is almost vertical when the blade is straight.
-
1 pointJust picked up this blower for my D180 about a month ago and spent some time doing some basic restoration to make it usable this winter. Plan to take it all the way down in the spring, but this will do to get me through this winter. Looking forward to some snow!
-
1 pointThat's the maddest/baddest looking Wh ever.. It's kind of a mix of Mad Max and Death race 2000.. Me likey a lot :handgestures-thumbup: Just don't paint it, it looks right as it is.
-
1 pointCool vids. Love the way the rear tires wrinkle just before he shuts it down.
-
1 pointThanks for the video! Thats a strong running Horse! Matt :flags-texas:
-
1 pointSweet Lars! Looks like he had a ton of fun with that smile on his face!
-
1 pointCongrats to your bro for the first place finish, can't wait for the video. Your refresh on the puller looks pretty good too Lars. :thumbs:
-
1 pointTo blacken your tires! :thumbs:
-
1 pointThe front pump seal (WH # 7877) is a CR seal # 7474. While you have the pump out, you just as well replace the trunnion shaft seal on side linkage too. (WH #103461) is a CR seal #6763. And while you've gone that far you just as well replace the manifold o-ring & the hydro valve o-rings. Look the hoses over good for cracks while you're in there. I'm am just putting mine back together. Welcome to the "D" world. Tom , Perry Ks.


This leaderboard is set to New York/GMT-04:00