
Leaderboard


Popular Content
Showing content with the highest reputation on 05/25/2012 in Posts
-
3 pointsI could'nt stall any longer I've been looking for a crankshaft for this clinton 1200 2184 motor and not having any luck So I took the old crankshaft to my local engine shop and had them remove minimum material from the rod journal some where around .0035 to true it up then I removed .015 from each side of the rod and cap then bolted and torqued the rod and rebored the hole to the correct size for the new ground crank shaft new valves lapped in and bored the cylinder .010 oversize crank back in and piston & rings new crank bearings points and condenser and coil and primed painted with valspar IH red Brian
-
2 pointsThose mover decks are hard to paint. They don't sit still for ya. But yours came out sweet. I didn't see any orange peel and it sure was shiny.
-
1 pointHeres the process of tearing down a hydro pump from a D. I will do my best to describe everything in detail so that anyone can handle it. I must say with Paul Frederis help we tore it down, cleaned and rebuilt it in 4 hours including tearing it down a second time because of MAJOR rust issues causing binding of the pistons. I will do this in chronological order as best as I can Step #1 Here is the pump before tear down. You need to remove the four 12 point bolts using a 3/8 12 point socket wrench in order to seperate the aluminum housing from the cast steel valve body STEP # 2 shows the bolts out and the pump housings seperated. Be ready to struggle slightly if your pump was never opened. It was necessary for us to put the aluminum part in a vice and hit the steel end with a dead blow hammer and brass punch to get it to sperate from the gasket/adhesive. You must rest the pump on its side or you will lose slippers and other items if you do it in the upright position. Upon opening it a large quantity of rust was found inside formed on the steel end suggesting water infiltration. Step #3 In this photo you can see the rusty liquid on the slippers and the general shape of them. They were scratched but the corners were square and not rounded over, which is very important Step #4In this pic Paul is trying to clean the rust off of the oil pump housing. As you can tell it was pretty rough. The 4 bolts here are 12 point also, you need to use a 5/16 12 point socket socket to remove these. this is another pic of the pump housing and the rust and bolts. Also pay attention to the orientation of the small pin location on the oil pump housing. Its on the botton of the pic and must be that way for reassembly. It is very important for reassembly that this faces the same way. Step #5 Here is the oil pump gear in the housing. You must mark this on the housing and impeller before you take it apart. Every lobe only fits its mating surface 1 way. If you screw it up the pump will bind and not pump oil to feed the cylinder, slippers and swash plate. The o-rings are the same set up as the manifold with a square backer ring and a regular o-ring on top to seal. Step #6 In this step you need to remove the charge valves. They are 5/8 standard socket. It is an O.R.B.( O Ring Boss). These were pretty tight but did come loose. Here are some close ups of the charge valve. We made a legal notebook map so we could be sure it all went back together well. one side has a spring and a ball, the other side has a small tapered shaft and spring. Later models of this pump had balls and springs in both sides. One thing to note is that occasionally you will find shims between the spring and ORB fitting. These were installed when the pumps didnt make enough pressure during testing. The shim increased tension on the spring and therefore raises the oil pressure just like it would in an oil pump for an engine. Step #7Next pics are a close up of the housing showing the accelerator valve removed. There are 2 of these. 1 on each side. They are the large straight head screwdriver tip recessed into the block. They are ORB also but damn were they tight. We needed to use an impact driver to break them loose. All thats inside is a ball and spring. Step #7Next pic is of the push valve. Remove it and check to be sure there are no gouges in the tapered area. If there are, oil will leak by and cause speed to slow and pump to overheat eventually during use. Step #8This is the inside of the aluminum housing. It shows the direction control where the swash plate sits. The can be removed if needed by removing the spring clip on the shaft where it comes through the outside of the housing on the flush side, not the long side that the direction linkage attaches. You then pull the shaft out and the swash plate resting surface will clunk into the bottom of the housing for you to pull out. The only reason to do this would be to replace a bad bearing. Step #9 Here is a close up of the swash plate during polishing. I started with 800 grit, moved to 1200 and then to the crocus cloth as the final step. DO NOT use water to lubricate the crocus cloth. it causes the adhesive to melt and the cloth to become junk. Use oil only for lube. This is a before of the swash plate showing severe rusting from the water that was inside this pump. this is after the three step polishing sequence. As you can see its a mirror now Step #10Here is the brass direction control valve plate showing scratches and oxidation. This also goes throught the 3 step process of polishing. This is the same peice after polishing Step #11 is the polishing of the slippers themselves. We made a diagram so that we could install them back in the bores they came from. After all that work we ended up with my original cylinder too rusty to be used. The slippers bound up and we had to take the pump all apart again and use a different cylinder after we got it all back together and it wouldnt budge. Step #12 is the installation of the slippers back into the cylinder. Be sure to install the slipper retainer BEFORE you install the slippers. They wont fit if you dont. Step #13 is the installation of the swash plate back into the direction control section. This pic shows it cleaned This pic is right before installation of the cylinder and slippers. Use lots of oil on both sides of the swash plate so theres no galling on start up. It will suck to do all this work and wipe it out with a dry start. Step #13 Assemble with the unit on its side. If you dont, you will lose slippers from the cylinder bore as you slide it down over the shaft and then have to start over. Once the cylinder is installed on the shaft, then flip the housing to the vertical position. Step #14 is to reinstall the charge valves, accelerator valves, springs and shims where they came from. A little grease on the springs wont hurt. It will stop them from moving and going caddywhompus when you install them in the bore above the ball at the bottom Step #15 Shows the proper orientation of the oil pump impeller in the housing. Take notice to our marks to be sure we had it right. You then reinstall the pump assembly onto the housing using the four 5/16 12 point cap screws you removed at disassembly. Again be sure the pin is at the bottom when assembling. Step #16 shows the new gasket prior to assembling both halves . I made this one the same way as the motor housing in my original resto post. Using a hammer to cut the material. Step #17 its all back together and ready to go back in my 18 Auto.
-
1 pointHello all. Glad someone recommended this site....lots go good info. Live in Gladys, VA. Have a 314-8 that I purchased new almost 12 years ago. Love it and won't part with it.
-
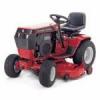
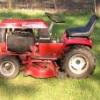
1 pointMy C121 with a K341 My GT1848 520 I finally just got running today
-
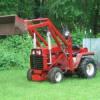
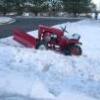
1 pointMy neighbor gave me his C-125 Automatic. It is a 1981 with a 42" deck and Hydraulics! only problem is I replaced a hydraulic hose and I need to get a new part that is cracked... Part #1108494 to be exact. Here is a diagram... It is #7 labeled on it:http://www.mowerpart...-14R10048-00022 I love the tractor and its a fun restoration project! Also is it worth money at all? Not that I am gonna sell it because I love it, but just curious! Also, I'm a new member and this seems like a good site... Pictures to come soon of the Tractor! Oh, and I also got a snow/ dirt plow for it! Cant wait for winter! Happy Memorial Day!!! :flags-waveusa:
-
1 pointGet a suicide knob for the steering wheel, I had one on my 520H made a big difference.
-
1 pointThanks guys! Pics will come once I get all the crap off it from working on the hydraulics!! haha
-
1 pointWhat an incredibly awesome neighbor you must have. :WRS:
-
1 pointi use brake clean in a areosel can kills very quick and the brake clean evaporates fast .works on any critter period . ever get a drop in your eye while spraying it to clean brakes off stings like a bitc$. :scared-ghostface:
-
1 pointAnother one bites the dust! What the heck did we all do before the internets? :confusion-scratchheadblue:
-
1 point:occasion-birthdaymulticolor: Danny!!! "HEY DAD, WHERES MY TRACTOR?"
-
1 pointWhen I got my first WH the pump motor had been giving the previous owner trouble. He tried to take it off but instead separated the aluminum case from the motor housing allowing all the fluid to drain out. Then gave up on it and it set for a long time, allowing dirt to get inside. I found a place that rebuilt the Sundstrands but they quoted me $1000 - $1400 depending on what they found when they got it. So I decided to take it apart and learn something. I found the manual online and it was really a cool learning experience figuring out how this thing worked. Many of the parts are no longer available, but the gaskets are. My understanding is that most failures are from clogged valves or from scratched or damaged thrust plates. I can’t really call it a rebuild but I was able to completely clean everything, and I sanded and polished all the scratches out of the thrust plates. When I got it all clean and put back it together it is as strong as an ox! Guess what I’m getting at is… Don’t be too intimidated by them. If you have good mechanical abilities, you can do it yourself. I actually enjoyed it.
-
1 pointSaw that, and priced not for the timid too. :scared-eek:
-
1 point:happy-wavemulticolor: Danny Can't wait to see your new tractor buddy, hope you have lot's of fun today.
-
1 pointI'm in NNJ too Forest Road. Perhaps you are not too far away from me. Can you tell me what town the deal is in? Thanx, James James, i think that if you can find a dealer who is reasonable with prices, then you can afford to pick and choose your oem stuff. im fortunate to have one that is competitive with toro pricing. i used to research and check online prices before ordering through him and he was always better priced than any online price i could find. so i stick with him. i use redsquare to research anything im doing on the tractors, work out whether oem or aftermarket is the best way to go, from experience with the members here....( ie, the bearing scenario, it would be silly to buy oem, when the identical one is 1/4 the price) then shop accordingly. sometimes i dont even bother with the shopping around for things such as nyliner bushings, seat pan bumpers, pto linings etc etc. and just go the oem route. its just less hassle and you know the stuff is going to fit.............99.9% of the time... (maybe) Well said Martin. I agree with you right down the line. I wish the two dealers that are close to me were reasonable. But they cater to the younger crowds that buy disposable machines for the cheapest price. They are doing what they have to do to stay competitive and in business. The times they are a changin! I just shopped around for an extra set of oil seals for my tiller (I found that I needed four instead of the two that I have on hand). I didn't even bother with toro. I researched it and found that they were C/R 14810, and did an internet search for the best price. Turns out that a place on ebay had them the cheapest, so I went with them.
-
1 pointhttp://www.dollargen...ductId=11786563 This stuff will make short work of 'em. Cheap, kills on contact, and works especially good to keep those rock walls clean too.
-
1 pointDang! I thought this was gonna be about Ray!!
-
1 pointIf originality isn't important I would definitely go with the solenoid much cheaper $13 for the solenoid at Lowe's and about the same for a switch. Does you Electro have the battery ignition system or the breakerless style? (Need different switches...
-
1 pointLet us know a little more about you. What tractors do you have? How old are you? What are you other interests? Post some pictures of your horses if you have any? :)
-
1 point:WRS: Greetings from the great state of PA, Home of the greatest WH show in the world. just over 30 days and counting down!!!
-
1 pointI don't have any friends either.....that is why I spend so much time on this forum!
-
1 pointSo...be careful what you ask for Jon.
-
1 pointYou now have friends from the Uk from eurosquare
-
1 pointJust to let everyone know I have been workin with Jon for quite a few months on a trans he was building for a puller and have dealt with him for parts..I don't remember if I sent him here or not..But he a good stick..Just takes time like it was for me to get to know alot of the guys on the site... MIKE!
-
1 pointNow in Minnesota, I make it to Iowa once in a while. :)
-
1 pointNow two in Ohio
-
1 pointAnd now one in Ohio! :)
-
1 pointNowhere near Iowa, but you got a friend in ! One of my good friends is from Iowa. Matt :flags-texas:
-
1 pointI am in Minnesota about 20 minutes from the Iowa border.
-
1 pointand one in the quad cities...... illinois side though..... :hide:
-
1 pointNo sweat, you've now got a friend in NY. :thumbs:
-
1 pointyou also may not want to be friends with some of us after you get to know us lol
-
1 pointyou have to ask like in the movie godfather will you be my friend!!!
-
1 pointHang out here long enough and you get to know a lot of people.


This leaderboard is set to New York/GMT-04:00