
Leaderboard


Popular Content
Showing content with the highest reputation on 01/11/2012 in Posts
-
3 pointsOK I'm gonna go the other way! If you dont have the inside and outside mics to check your numbers then I would definately use it, Don. My opinion is that the guy assembling the motor has the responsibility to check the clearances as he puts it together. I use mics to get my numbers but I have used plastigauge in the past, and I probably will use it on occasions in the future. The packet has a scale on it that you compare to the squished up "string" and will give you your clearance to 1/2 a thousandths or so. It comes in 3 different sizes for measuring .001-.003", .002-.006" and .004-.009. I dont remember the color of the packages but I'd buy a pack each of the 2 smaller sizes for checking your con-rod clearance. I measure everything when I am putting an engine together, no matter who did the machining. I've had bad days when I've screwed something up or read a mic wrong, and I know some very very good machinists that have missed the mark on a piece every now and again. And I guess I like to know what my numbers are, and also where I am taking an (educated) gamble! The following is not aimed at you in any way Don, but while we are talking about putting engines together, there is something I would like to throw out there... If you look at the "Engines" section here, and look at all the "I just rebuilt my engine, and something is not right, and it must be crappy parts" threads you will notice that in 99% of these cases people didnt check things. The manuals spell it out for you, they tell you what to check and how to check it. They give you the numbers you should see, and they tell you how to put it all back together. It seems that there are a large number of people that think that all you need to do is get a big pile of pieces and bolt them together and then you can call it a rebuilt motor. One guy in the last year had his engine get tight when he was torquing up his con rod bolts so he decided to just loosen them off until the crank was free again. Others talk about their fully rebuilt engines and then ask how to check their valve clearances. People putting engines together and not setting up (or even checking) the endfloat on the crank, or the gaps on the rings, or the side clearance of the rings in the piston, the widths of their valve seats or any other of the critical clearances. Sorry about the rant here, I am just dont understand why people dont bother to read the manual or do what it says, and then have the nerve to come to a public place (on the internet) and complain about "cheap aftermarket parts" or "bad machinists" or "badly designed engines". It's not that hard to put one of these little engines together, but there are a ton of things that can wrong as well. Maybe that mechanic down the road isnt as stupid as he looks after all. End of rant... :hide:
-
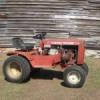
2 pointsChains on,dozer blade installed,fluids changed and full of fresh fuel!Even if it doesn't snow,i think this setup will have other uses!
-
2 pointsI have a lot more faith in precision measuring instruments than a piece of smashed plastic "string". I've never used Plastigauge in the last 30-plus years and I doubt that I will in the future - unless I run out of dental floss. :D
-
2 pointsif you put one of my wife's reproduction seat covers on your square pan seat The color won't matter brian
-
2 pointsHere is another part of the brochure
-
2 pointsI think its a great bit of history, I also was given these two other bits of info at the same time I have the full brochure but here is just the front & inside cover
-
2 pointsGreat job Scott, Just think, if that tractor is taken good care of, someday your daughter can tell her children and even grand children that you built it special for her. How neat is that? :thumbs2:
-
1 pointHeres the latest progress pics of Chris's puller. For the original thread go here.. http://www.wheelhorseforum.com/index.php?showtopic=13208 Mike.......
-
1 pointWell the project "Lady Ranger" is finally commencing. This tractor has started off as a 1966 L-156 Lawn Ranger. This tractor was picked out for my little girl who is almost 6 years old. Though she isn't ready to have her first solo, I thought it would be a good time to get this tractor started and have it ready for her to enjoy. I will try and get to work on this as soon as possible but everything is located in dad's barn 20 minutes away. I would like it to be ready for the show in Fort Wayne at the Coliseum the end of March. I am sure I will be able to have it done by then........well at least I hope. Here is what I had to start with............. It was a pretty straight tractor that is missing the seat assembly. Might go with a repro or a knock off. $$$$ talks on this one. The motor smoked like a chimney so off it came and had another Techy that was ready to go. Front rims were rusted through, thankfully we had two NOS two piece rims for the tractor. Tires were trashed as you could see the tubes through them. Somehow Santa knew that I needed a set for the tractor so he put a set of fronts under the tree for me this past year. The backs were taken off and will be replaced with a nice set of Carlisle Lug tires. After one night here is what I had and I was almost ready to head off to the sandblaster and the powder coater. So back the first week of December the tractor traveled down the road and was dropped off to get a new make up job. The powder for this tractor was tough to get at the end of the year. Every supplier seemed to be out of it. So what started off as a 2 week estimate to have it done, quickly turned in to 5 weeks to the day. I was pleasantly suprised to stop in after work today and find this very nice pile of parts. Sorry for the shadows and the sun. It truly doesn't show the color of this tractor. Well folks no need to adjust your computer screen. Your eyes are not deceiving you.........it is a pink tractor. Pretty much Pepto Bismol pink to be exact. My little girl said this past summer that she would love to have a pink tractor after she saw a big pink Farmall at the county fair. So the tractor was picked out and here is where we are. Of course Vinylguy (Terry) was kind of enough to hook me up with a one of a kind decal package for my little girls tractor. Everything is staying stock except for the color and one little twist to the decals............got rid of the Lawn and added in Lady for this personalized refurbish. Here is the copy of the decals that was sent for my approval. Now try and use your imagination and what you see as white is actually the brushed aluminum. They turned out really nice. Thanks again Terry! Well I hope to keep this updated more often than the Commando 8 refurbish. I have a lot of motivation for this one and was excited to show it to my daughter tonight. Her smile was from ear to ear........now I can only imagine what it will be when this is completed. Hope you enjoy following along with us in this next adventure.
-
1 pointI recently fabricated a solid link for my snow blade so that I could put down pressure to scrape up hard-packed snow (if we ever get any!). Here's some pics with measurements if anyone else wants to make one. I saw one that someone had made on this site before and he used angle iron which might be stronger.
-
1 pointthought I would share a few pics from one of my customers... He has done an awesome job of restoring a Commando 800 to better than new condition. Nigel - if you are reading this then say hello!!! enjoy !
-
1 pointI have just aquired an original price & specification list for an RJ 59 it is from the original dealer that sold the tractor to a customer back in Sept 1959 I thought you US guys woul;d like to see it . Im not sure what the monetry exchange rate would have been back in 1959 , Hope you enjoy the pics
-
1 pointHey Cole, I think the guys are saying to take the battery out, and hide the key from yourself before it's too late. :scratchead:
-
1 pointfood for thought plasti-gage will not check out of round Brian
-
1 pointVery cool.... from what I can find, the exchange rate for the GBP to USD was consistent at 1 GBP=$2.80 USD at that time. So, the RJ in that listing would be equivalent to $518 USD. I'd guess probably some shipping cost / import taxes raising the price compared to the US price of the time.
-
1 pointGrown men can ride them... Huffys, ruggs, Mustangs and the likes are used in the USLMRA A/p & F/X classes!
-
1 pointWelcome to Red Square Trout, I've seen bigger trees in tractors. :text-coolphotos:
-
1 pointA friend of mine from the car club did it for me.....they are all painted and free hand......cost me alot of fermented hops based beverages!!!!
-
1 pointthanks for the comments guys. alright, was an afternoon thrash to get the engine to where its at now. i couldnt help myself, even with the front wheels resting on the stubs, i had to get some pics of it on the frame. heres the progress of the engine through the afternoon. getting it together normally would only take a couple hours, but with everything looking nice, it took a little more time. i just love the looks of the kohlers, especially the curves of the flywheel shroud, i cant wait to get the smoothed over starter/generator back together and mounted with the belt guard.
-
1 pointLOL!!! Thats funny!
-
1 pointGood old American ingenuity and a Korean car. Now that is Obama,nation...LOL
-
1 pointThis is my favorite picture of him. He was amazed when we lined up virtually every model he made. Look at that smile, he was like a little kid in a candy store.


This leaderboard is set to New York/GMT-04:00