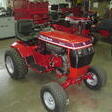
cleat 4,984 #26 Posted February 19, 2016 Blade is now fully functional. Bracket that holds handle to frame is complete except for paint Turn handle is complete. Turn rod is adjustable and complete. Handle installed and at various positions from left to right. Closeup of release lever and cable connections at blade. I also made up a little bracket to hold the turning rod when the handle is removed. Next will be to refurbish the blade itself but that will be a summertime job. 8 Share this post Link to post Share on other sites
Don1977 604 #27 Posted February 19, 2016 Looks great! Like the way you reinforced the handle. Share this post Link to post Share on other sites
cleat 4,984 #28 Posted February 19, 2016 I was afraid of the strength of the tube itself because it is fairly thin walled. Seems to work good. I may add one more cable guide to keep the cable further away from the steering components. Share this post Link to post Share on other sites
WNYPCRepair 1,875 #29 Posted February 19, 2016 Nice work, looks great! Share this post Link to post Share on other sites
cleat 4,984 #30 Posted February 20, 2016 (edited) I installed a rod to guide the cable down away from the steering as it could get caught at full lift and full turn. Edited February 20, 2016 by cleat 3 Share this post Link to post Share on other sites
can whlvr 991 #31 Posted February 21, 2016 nice fab work cleat,im surprised to put that rusty blade on that shiny 520 Share this post Link to post Share on other sites
cleat 4,984 #32 Posted February 21, 2016 Just wait until next year. Blade will match. I already have matt's decals ready to go on. I did not even try it on the last snowfall of approx 20" That made the big diesel work to clear that. Share this post Link to post Share on other sites
cleat 4,984 #33 Posted February 22, 2016 Installed a good used mower deck height grip onto turn handle. Looks better and is easier on the hand. 2 Share this post Link to post Share on other sites
cleat 4,984 #34 Posted February 25, 2016 (edited) I got to try out the blade yesterday since we got a wet snow/rain mix. No blower would like this, it was about half water and half slush. Even with the blade at full rotation, it would push a lot of snow ahead as it was so packy. 520-HC performed well however, not losing traction once even pushing this heavy wet slop with ice underneath. It even has the 4 link chains on it. Next year it will have a good set of chains. I think I will add the front stabilizer as Toro did to stop the sway of the blade under load. That must put a lot of stress on the rear axle and the axle mount. 3322-786 5xi dozer stabilizer instal instr.pdf Edited February 25, 2016 by cleat 2 Share this post Link to post Share on other sites
cleat 4,984 #35 Posted February 28, 2016 I got to try out the blade yesterday since we got a wet snow/rain mix. No blower would like this, it was about half water and half slush. Even with the blade at full rotation, it would push a lot of snow ahead as it was so packy. 520-HC performed well however, not losing traction once even pushing this heavy wet slop with ice underneath. It even has the 4 link chains on it. Next year it will have a good set of chains. You will notice the turn handle tilts in a bit at the top. I bent the tubing and the handle past 90 degrees to achieve this. Makes the handle easier to grab and use. Here are all the plans hand drawn in case anyone wants to make their own. Snow blade turn handle overview.pdf I have started making the front stabilizer and have started a new topic for this here 2 Share this post Link to post Share on other sites
kingnothing71us 108 #36 Posted February 29, 2016 On February 5, 2016 at 0:07 PM, cleat said: Thanks for the measurements. My blade has a 1/2" hole for the rod so I will use 1/2" rod for turning the blade. I will begin making the prototype on Monday when I go back in to work. Next step will be figuring out how to attach the cable at the ends. I have cable and crimp sleeves at work so will likely be figuring a way to connect eye type loops to the release handle and pin. Thanks, cleat It should be easy to make cable stops. Look at the way a bicycle has the brake line ran. All you need is a ferrel at each end of the cabke to hold the cable housing and then the cable will pull as much as the handle will let it. It's pretty simple, as long as the cable housing is held still at each end it will allow the cable to pull. You can actually drill a hole the size of the cable you're using in a bolt and when you tighten down the nut it will hold the cable tight. I planned on doing this also but haven't had the time. I also tried a coat hanger but it isn't stiff enough and wont allow the triangle mechanism to pull. So, I used a piece off of a tomato plant fence type thing, the metal is nice and stiff. It has worked great so far. Just thought I'd share. Share this post Link to post Share on other sites