Jump to content
Horse Newbie

48 inch Side Discharge Deck Restoration

Recommended Posts

cleat

They are restored but currently unused. I use another 48".


I have a 42,48, and a 60" deck all restored and ready to use if required.


I may put the 42" deck on my 312H once it is finished.


  • Excellent 1

Share this post


Link to post
Share on other sites
 
Horse Newbie
1 hour ago, cleat said:

They are restored but currently unused. I use another 48".


I have a 42,48, and a 60" deck all restored and ready to use if required.


I may put the 42" deck on my 312H once it is finished.


Far out !

Share this post


Link to post
Share on other sites
 
Horse Newbie
On 10/18/2021 at 12:00 AM, Jeff-C175 said:


I might leave that one be myself.  I don't see where it has any further to spread!


@Jeff-C175   While I was at the welding shop today I had my welder do a dye test on that place I thought was a crack and it was a crack.

You said it didn’t have any where to spread, but actually it crossed the spindle bolt hole and continued on the other side of the hole:confusion-confused:so he welded it up... I’ve never seen that!

image.jpg

  • Like 1
  • Excellent 1

Share this post


Link to post
Share on other sites
 
Horse Newbie

This project is ALMOST been put on hold... due to working on the 1984 Work Horse GT-1600 REFRESH ( please visit )

Edited by Horse Newbie

Share this post


Link to post
Share on other sites
 
Horse Newbie

I got my deflector chute spring from Lincoln at A-Z Tractors, and the “Danger” decal from Terry  @Vinylguy for the deck today.


Edited by Horse Newbie
  • Excellent 2

Share this post


Link to post
Share on other sites
 
Jeff-C175
8 hours ago, Horse Newbie said:

chute spring


That looks like it should fit!  (except I can't see it anymore!  I swear, it WAS there!) :ychain:


Edited by Jeff-C175

Share this post


Link to post
Share on other sites
 
Horse Newbie
7 hours ago, Jeff-C175 said:


That looks like it should fit!


Yeah, I believe I can deal with it now. As long as the spring doesn’t take up the whole back stud, me and my welder/ machinist guy will go to town on it...

Problem is I’ve pushed the deck restoration to the back burner to work on the Work Horse GT-1600.

Edited by Horse Newbie
  • Like 1

Share this post


Link to post
Share on other sites
 
Jeff-C175
On 10/18/2021 at 12:06 AM, Jeff-C175 said:


So it seems that the wide plate they went to didn't really 'fix' the issue.  The cracks in mine, and most of the 48" decks I've seen are exactly the same as shown.


I think that the problem is that when the deck is raised it 'twists' that rear apron and ultimately cracks develop there.

image.png.7cbc39df1a42da0042c245813ff4b68e.png


I thought of a 'gusset' to prevent the twist that causes the cracks but as mentioned in the earlier post I think this would only move the crack prone area.

In this case, the blue lines show where the stress would move to.  That gusset would pull DOWN  [ EDIT:  NO, it will push UP ]  on the top surface and probably  eventually crack there.


image.png.9ddc7256f0c5cbf336b78876f1463e8b.png


I don't know that there is any good solution to this problem!


Revisiting this thread because I've now got my deck on the sawhorses for repair of those cracks.


After carefully examining every wear pattern on the lift linkage I've come to the conclusion that the rear bracket twists the rear apron DOWNward when the deck is lifted, and NOT UPward as I previously assumed.  Seems counter-intuitive but that's what all the wear patterns are telling me.


That being said, I'm going to fashion a gusset plate out of 2" wide X 1" high X 3/16" thick "C" channel and install that on the inside of the rear apron and see if that will prevent the cracks from returning, or just move them to a different area.


Material should be here by Tuesday, after which I'll fabricate the brackets and post some pics.


Also, the round bar that WH added around the perimeter of the deck should have been continuous, all the way up and over that rear apron as well.  I'm probably going to add that myself.


image.png.70ef712691e5bb123bff82f1d5922246.png


Edited by Jeff-C175
  • Like 2

Share this post


Link to post
Share on other sites
 
Lee1977

Here is how I fixed my deck where it was breaking at the lift mounts. It isn't pretty but it works. Catches a lot of grass that I have to blow out. There are some 4" square on the inside and I added some  2" wide under the wheel brackets.

SAM-0923.jpg

Edited by Lee1977
  • Like 2

Share this post


Link to post
Share on other sites
 
Jeff-C175

Bent some steel rod this afternoon.


I think this was a jack handle from a scissor jack that I no longer have.  One of the bends was already made for me!


image.png.ba9999cbd4161c58563e81cd03ccaadf.png


Thought I had another can of weld through primer, but nooooo... so I'm at a pause point.


Edited by Jeff-C175
  • Like 1

Share this post


Link to post
Share on other sites
 
Jeff-C175

I got one of the gusset brackets started today.


The material is 2" x 1" x 3/16" "C" channel.  (Q: what's the difference between "U" channel and "C" channel?  A: The way you look at it!)

Beefy stuff.  Won't break!


image.png.3fbf582760c6fbd9fec308f61e94dfc1.png


I messed up though.  The angle of the bend is 45°.  My plan was to cut out the wedge, bend the metal to close up the cutout and weld.

Well... I totally forgot that I needed to take out HALF of the 45° !  So the pieces I cut out will have to be welded in to act as fillers.

Fortunately, Euclid was on the money with his new-fangled Geometry and the wedges fit right in there nice and tight.


Here's how it's going to be mounted.  Once I get it welded up I'll bolt it in place and drill a single hole to bolt the top of the bracket to the top of the deck.


]image.png.3320b4713e703fc0854fc0e5d50c41cc.png


The second one I make will be correct...  22.5° !  


This in addition to adding the 7/16" bar as in the previous post should prevent that point from ever cracking again.  I hope...


Edited by Jeff-C175
  • Like 5

Share this post


Link to post
Share on other sites
 
Jeff-C175

Brackets are all welded up, need paint... then on to welding the rod and installing the brackets.  Weld thru primer should be here Sunday, gives me time to prepare everything.


image.png.29fda226be88e54e92667e2897f7a3d5.png


I'm not going to drill the hole for the top bolt until I can put them in and tighten the two bracket bolts so I can get them to line up properly:


image.png.60bb98c5d5a6c80cbfedd8ad3608695e.png


  • Like 4
  • Excellent 2

Share this post


Link to post
Share on other sites
 
kpinnc

That's some nice fab work Jeff! :bow-blue:

  • Thanks 1

Share this post


Link to post
Share on other sites
 
Jeff-C175
31 minutes ago, kpinnc said:

That's some nice fab work Jeff! :bow-blue:


Thank you sir!  That's a big compliment coming from you!  


The parts are painted and on the drying rack now... (aka clothesline in utility room! :blink:)  I also made a couple 'coupons' for the top side to go between the bracket and the deck figuring that would spread the load even more.


I tweaked the 7/16" rod a little more for a better fit, and cleaned the area it will be welded to, just waiting on the primer.  Ya know, I couldn't find weld-thru primer ANYwhere locally!  OUT OF STOCK.  Amazon river boat delivering Sunday,

Share this post


Link to post
Share on other sites
 
kpinnc
Just now, Jeff-C175 said:

Thank you sir!  That's a big compliment coming from you!  


It's solid work sir! I know full well how much work goes into something like that- and to do it so it looks nice? Those skills come with practice! And maybe a scar or two.


...and the only reason my stuff sometimes looks OK is because I don't post the many previous attempts that didn't go so well! :rolleyes:

  • Haha 2

Share this post


Link to post
Share on other sites
 
Jeff-C175

Bent up some more rods for the perimeter strengthening after I got done playing with the 125 in the snow.


All the parts are cleaned up and I'm ready to melt some metal once that durn primer gets here!


  • Like 1

Share this post


Link to post
Share on other sites
 
Horse Newbie

I have noticed, very easily, that others here are making WAY MORE posts on this thread than me, and I started the thread/ topic/ post… whatever you call it.

Also let me say that I do not have the thought that this is “my topic”.

It belongs to all of us here on Red Square !

And I have not been posting on my 48 inch SD deck restoration project because I set it aside to do the “Work Horse Refresh “ project.

So keep the conversation going fellows, and I WILL add content about my deck as soon as I get back to it .

Edited by Horse Newbie

Share this post


Link to post
Share on other sites
 
Jeff-C175
1 minute ago, Horse Newbie said:

because I set it aside


That's when the 'squatters' move in!  Don't turn yer back, they'll be ripping out the copper next!

  • Haha 2

Share this post


Link to post
Share on other sites
 
kpinnc
5 hours ago, Horse Newbie said:

And I have not been posting on my 48 inch SD deck restoration project because I set it aside to do the “Work Horse Refresh “ project.


Yeah that seems to be going around. My projects are all about 80% or so complete. Seems like they all get to this point and something else takes priority. I think that is part of the sickness for me!

  • Haha 2

Share this post


Link to post
Share on other sites
 
Jeff-C175
4 minutes ago, kpinnc said:


Yeah that seems to be going around. My projects are all about 80% or so complete. Seems like they all get to this point and something else takes priority. I think that is part of the sickness for me!


In the many years that I've lived in this home I think I may have 'finished' maybe two projects total.  They all get to maybe 95%.  It's little things, like that final piece of trim molding, or something trivial, but never the less, not 100% !


  • Like 2

Share this post


Link to post
Share on other sites
 
c-series don

@Jeff-C175 What is this weld thru primer you speak of ? 

Share this post


Link to post
Share on other sites
 
Jeff-C175
5 minutes ago, c-series don said:

@Jeff-C175 What is this weld thru primer you speak of ? 


It's a zinc-rich primer that is intended to be sprayed on the parts before welding.  When you weld through it I guess the zinc must melt and form a protective rust barrier.  I normally don't use it but welding those rods onto the base of the deck and the high likeliehood that 'stuff' will find it's way between and rust the metal I wanted to have that extra protection.


Body shops use it extensively when welding panels together.


  • Like 1

Share this post


Link to post
Share on other sites
 
Jeff-C175
18 hours ago, c-series don said:

@Jeff-C175 What is this weld thru primer you speak of ? 


By the way... the term 'weld thru' is a misnomer according to 3M .


They say that it's a COATING and that it needs to be REMOVED from the immediate weld vicinity in order to not contaminate the 'weld pool'.


It apparently doesn't 'bond' real well to the metal, nor will paint bond to it.


So what you do is two light coats on the mating surfaces, then clean the spots you intend to weld, and when finished, clean any of the coating in areas that will be painted. 


SPOT welding you can leave the stuff on and just go ahead and spot weld because there is no 'weld pool' to contaminate.  That's where the stuff shines, between body panels that are spot welded. (and likely also seam sealed).


The idea is to get the sacrificial zinc into the areas that will be inaccessible after welding, such as between the 7/16" rod and the deck shell.


It's not a rust 'proofing' but a rust 'prevention'.  I don't know that it's a real good idea for what I'm doing but it's more of an experiment really.  After it's welded (and I'm not going to do a continuous weld, only 1" beads every 3" or so, top and bottom of the rod) I'm going to clean it up and try to get as much of the self-etching primer into the gap as possible and seal it as best I can with paint.  Should outlast me...


Edited by Jeff-C175

Share this post


Link to post
Share on other sites
 
Snoopy11
18 hours ago, Jeff-C175 said:


It's a zinc-rich primer that is intended to be sprayed on the parts before welding.  When you weld through it I guess the zinc must melt and form a protective rust barrier.  I normally don't use it but welding those rods onto the base of the deck and the high likeliehood that 'stuff' will find it's way between and rust the metal I wanted to have that extra protection.


Body shops use it extensively when welding panels together.


Why have I never heard of this before?


Would this work for MIG (flux core)... :scratchead:


Don

Share this post


Link to post
Share on other sites
 
Jeff-C175
4 minutes ago, Snoopy11 said:

Would this work for MIG (flux core)...


Yes, that's what I'm going to do.


3M Collision Repair has an extensive series of videos on YT.


Edited by Jeff-C175
  • Excellent 1

Share this post


Link to post
Share on other sites
 

Create an account or sign in to comment

You need to be a member in order to leave a comment

Create an account

Sign up for a new account in our community. It's easy!

Register a new account

Sign in

Already have an account? Sign in here.

Sign In Now

  • Similar Content

    • Rob R
      By Rob R
      I have a  WH 310-8 Mower Deck, Tach-a-Matic 42” Toro Model 05-42MS-05, Triple Blade (1981-83). One of the Mandel's (outer) will NOT take grease at the Zerk fitting have removed the Zerk tapped on it made sure hole and opening good etc. but to NO avail any suggestions here. Thanks 
    • Horse Newbie
      By Horse Newbie
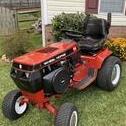
      So for the last 5 to 6 months I have been working on getting my 1994 520H up to operating condition after buying it from a friends backyard a few years ago...now that I'm 99 percent done with the tractor I want/ have to get the 48 inch SD deck that came with it up to operating condition also.
      As you can see by the pics I have a lot of work to do/ full restoration...I have a few questions before I get started...
      1. Do the two wheels on the back of the deck control the cutting height ?
      2. Where/ who is a good source for parts ?...I would like to go back with as much new parts as possible, but some of the pricier parts I will probably be willing to use used if my budget forces me to ( spindle are my main concern here).
      As you may be able to see from the pics, the front center of the deck has been knocked back quite a ways ( looks like PO centered a concrete driveway/ sidewalk edge, or one stout survey corner stob. 
      Any suggestions about straightening the front edge would be greatly appreciated.
      Also if any of you would have the center front wheel bracket on a junk deck that you would be willing to cut off and sell to me, it would be greatly appreciated.


    • woodbird007
      By woodbird007
      Thinning Herd
      2) 1974 B80 4 speeds 
      both run, one in need of rebuild
      sd 36” deck
      rd 36” deck 
      short frame dozer blade and mount
      extra wheels and tires
      $300 takes all 
      Kalamazoo, Mi area 
    • ToddA
      By ToddA
      I am Trying to find out if the Toro Deck 78353 will Fit On my 1975 C-160 Thanks For any Info Todd

    • jay1
      By jay1
      I just noticed that my b80 (1975) deck is rusting out.  Is there a replacement deck that fits the B80.  Tractor is in great shape--had the engine replace several years ago.
×
×
  • Create New...