Alan173 303 #26 Posted September 8, 2022 More work on the hood: 8 Share this post Link to post Share on other sites
Alan173 303 #27 Posted September 8, 2022 Spray bomb: 3 9 Share this post Link to post Share on other sites
Alan173 303 #28 Posted September 8, 2022 More random painted parts. Nothing like watching paint dry…. 5 Share this post Link to post Share on other sites
Alan173 303 #29 Posted September 8, 2022 So many fasteners…stripped and painted… 7 Share this post Link to post Share on other sites
Heatingman 941 #30 Posted September 9, 2022 That hood turned out really nice. You did really good work with straightening those dents. 2 Share this post Link to post Share on other sites
OoPEZoO 349 #31 Posted September 9, 2022 (edited) Very cool. I was at my Aunt's house last month and she pointed me to behind her garage where she has the exact same model is sitting. She bought it brand new in '79 and used it for years. I have no idea how long its been sitting, but she said I could have it if I wanted it. Supposedly it ran fine when it was parked there, as they had just bought a larger tractor and needed room in the garage. I've been on the fence wether or not I wanted to go back and get it as it looked pretty rough and I've never been crazy about the vertical shafts......BUT, your post and pics are inspiring. Can't wait to see how it looks when you are done. Edited September 9, 2022 by OoPEZoO 2 1 Share this post Link to post Share on other sites
SylvanLakeWH 24,079 #32 Posted September 9, 2022 (edited) Run… go… now… My favorite four letter F word - FREE!!! Edited September 9, 2022 by SylvanLakeWH 2 2 Share this post Link to post Share on other sites
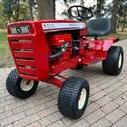
Alan173 303 #33 Posted September 9, 2022 Here is my tag…1979 as well! With the price of free…and all the parts there I would load it up! Not the most collectible Wheel Horse…but a classic for sure and will give you many years of service… 2 Share this post Link to post Share on other sites
Alan173 303 #34 Posted September 9, 2022 Oooops…silly me…here is the ‘restored version’… 😉 Much better… 1 3 Share this post Link to post Share on other sites
Alan173 303 #35 Posted September 13, 2022 (edited) Finding out as many have for Rustoleum these days to 'fully cure' it takes about 3-4 weeks. Fully cure for me means you can't indent the new paint with pressure from your fingernail. I tried many different ways of spraying the individual parts - with two coats of primer....two coats of paint within the hour....no primer and three coats within the hour....let cure for a week then apply second coat....let cure in the sun at 85 degrees out....leave inside at 75 degrees and no sun...etc....etc....etc....the results all seem to be the same. Rustoleum now takes about a month to fully cure. I'm still sitting watching paint dry...... : - / Edited September 13, 2022 by Alan173 1 2 Share this post Link to post Share on other sites
Heatingman 941 #36 Posted September 13, 2022 4 hours ago, Alan173 said: Finding out as many have for Rustoleum these days to 'fully cure' it takes about 3-4 weeks. Fully cure for me means you can't indent the new paint with pressure from your fingernail. I tried many different ways of spraying the individual parts - with two coats of primer....two coats of paint within the hour....no primer and three coats within the hour....let cure for a week then apply second coat....let cure in the sun at 85 degrees out....leave inside at 75 degrees and no sun...etc....etc....etc....the results all seem to be the same. Rustoleum now takes about a month to fully cure. I'm still sitting watching paint dry...... : - / Is this for rattle can, or from the jar oil based? 2 Share this post Link to post Share on other sites
ebinmaine 62,943 #37 Posted September 13, 2022 6 hours ago, Alan173 said: Rustoleum now takes about a month to fully cure. We use the 2X. I'd stretch that to an honest 2 full months. 1 hour ago, Heatingman said: Is this for rattle can, or from the jar oil based? Rattle cans in my case. 2 Share this post Link to post Share on other sites
Jeff-C175 7,195 #38 Posted September 13, 2022 (edited) On 11/5/2020 at 9:53 PM, Alan173 said: can't stand painted carbs...maybe it is just me... Me too! What did you use to 'de-paint' yours? I thought I was the only one who knew what a planishing hammer was! And you've got a whole set! I'm gonna guess that you've done your share of 'metal shaping' ? (aka body work) You need a 'slapper' too! Beautiful work. Edited September 13, 2022 by Jeff-C175 2 Share this post Link to post Share on other sites
Heatingman 941 #39 Posted September 14, 2022 3 hours ago, ebinmaine said: We use the 2X. I'd stretch that to an honest 2 full months. Rattle cans in my case. So I just did this finger nail test on the frame I painted Sunday. I cant leave an indentation in the paint pressing fairly hard. Yet, I have no doubt I will be able to chip it when Im not trying to during the assembly process. That particular paint was Rustoleum smoke grey, and the primer was applied last week sometime, and Im using Rustoleum implement red oxide, which I went out of my way to find locally. Both from the jar. for both I added a little Majic paints hardener, and Penetrol. I think the next project I will try an actual automotive paint, but an entry level one, for faster dry times unless price is totally out of control. 2 1 Share this post Link to post Share on other sites
Alan173 303 #40 Posted September 15, 2022 On 9/13/2022 at 3:23 PM, Heatingman said: Is this for rattle can, or from the jar oil based? Rattle cans for this restoration. I could have sprayed with my compressor but there is a ‘surprise’ at the end of this restoration and I had to match it…and it was Regal Red Rustoleum… 1 Share this post Link to post Share on other sites
Alan173 303 #41 Posted September 15, 2022 On 9/13/2022 at 4:47 PM, ebinmaine said: We use the 2X. I'd stretch that to an honest 2 full months. Rattle cans in my case. How is the 2X for cure time? But yes…I do agree 1 month is the bare minimum and this tractor unfortunately will not go into service this fall as planned…she is going to cure until next spring…. 1 Share this post Link to post Share on other sites
Alan173 303 #42 Posted September 15, 2022 On 9/13/2022 at 8:49 PM, Heatingman said: So I just did this finger nail test on the frame I painted Sunday. I cant leave an indentation in the paint pressing fairly hard. Yet, I have no doubt I will be able to chip it when Im not trying to during the assembly process. That particular paint was Rustoleum smoke grey, and the primer was applied last week sometime, and Im using Rustoleum implement red oxide, which I went out of my way to find locally. Both from the jar. for both I added a little Majic paints hardener, and Penetrol. I think the next project I will try an actual automotive paint, but an entry level one, for faster dry times unless price is totally out of control. There certainly is ‘no hurry’ in Rustoleum painted parts these days. From many years painting in the past…I never remember this long of a duration for fully cured parts with Rustoleum. Maybe it is memory loss from the fumes? Guess I need to swap out the filters on my mask! 1 Share this post Link to post Share on other sites
Alan173 303 #43 Posted September 15, 2022 On 9/13/2022 at 5:13 PM, Jeff-C175 said: Me too! What did you use to 'de-paint' yours? I thought I was the only one who knew what a planishing hammer was! And you've got a whole set! I'm gonna guess that you've done your share of 'metal shaping' ? (aka body work) You need a 'slapper' too! Beautiful work. Brake cleaner, brush and elbow grease…with all perishables removed. We are ‘a funny breed’…or maybe for me and many I’ve just rebuilt too many engines…and I don’t think I would ever say “Hold on…before we paint the block let me bolt the carb in place!”. Lol. I just can’t do it. And…I think I was using the slapper on the wife and kids earlier therefore it wasn’t in the picture! Lol. But yes…old habits…never perfect but there is pride in reshaping the metal a bit with the right tools for the job…old or new…they still work! Set was from my father…I’ll make an excuse to use them ‘one more time’… 1 2 Share this post Link to post Share on other sites
Alan173 303 #44 Posted September 15, 2022 As I still wait for paint to dry a little work on the front rims. The spindles look to be in excellent shape. Dust caps/hubs kinda in bad shape. Strip-repaint…new tires…and yes…wait forever for paint to dry. 1 Share this post Link to post Share on other sites
Alan173 303 #45 Posted September 15, 2022 On 9/8/2022 at 9:12 PM, Heatingman said: That hood turned out really nice. You did really good work with straightening those dents. Thanks! Never quite perfect but always better than what we started with. You never think there are a lot of dents until you get working on something. Then you always wonder…how come there are soooo many dents! Well loved and used I guess… 1 Share this post Link to post Share on other sites
Jeff-C175 7,195 #46 Posted September 15, 2022 14 minutes ago, Alan173 said: …before we paint the block let me bolt the carb in place!”. AND the coil ! grrrrrrr..... 3 Share this post Link to post Share on other sites
Alan173 303 #47 Posted September 15, 2022 For those of you who have done this job (tire removal of 43+ year old tires) and lived to tell your grandkids a serious ‘tip of the hat’ to you! Wow! Just braking the seal of probably 43 years of rust, dry rot and fix-a-flat which apparently in just the right combination is the strongest molecular bond known to humankind...nearly did me in. I swear the rear tires are looking back at me and laughing. Maybe there is a small machine at the local mower shop for this? Any/all tips are appreciated. 2 Share this post Link to post Share on other sites
SylvanLakeWH 24,079 #48 Posted September 15, 2022 Yup… My solution? Two words: Discount Tire. 2 Share this post Link to post Share on other sites
ebinmaine 62,943 #49 Posted September 15, 2022 A few years ago Trina bought a HF manual tire changer. I bolted it down to the shed floor right into the joists. Paid for itself the very first day because I had several tires to dismount for scrap. Even with that manual tire changer there is no way around it. It's a LOT of work. Old junk tires that I'm not trying to save have been known to get into arguments with a sawzall after I've broken the bead. 2 Share this post Link to post Share on other sites
Alan173 303 #50 Posted September 15, 2022 7 minutes ago, SylvanLakeWH said: Yup… My solution? Two words: Discount Tire. Thank you for providing me quick sanity! Jobs I learned today I never want to do again. Take off old Wheel Horse tires…add that to shingle roof…pour concrete foundation…replace power steering rack…etc…etc…etc…😉 3 2 Share this post Link to post Share on other sites