By
oliver2-44
Anyone have any Troy Bilt Pony Tiller Gear Box Experience?
So about a year ago an older neighbor gave me this Troy Bilt Pony Rear Tine tiller. Said he forgot he drained the engine oil and started it. Bore diameter was actually good, but has a bunch of large vertical scars on cylinder walls.
Fast forward, my wife has volunteered us to help a Youth Summer Camp that runs an "Outdoor School" during the 9mth school year. They had a fairly large garden for several years, but it has been neglected & overgrown for a couple of years. So she drives past this neglected garden daily!
There's some scheme emerging where we have half the garden to ourselves and help with the other half where students will plant and weed and pick their produce. I enjoy a garden, but not real keen on some of the aspects on this one...( a bunch of 6" high raised beds with paths to narrow for my big feet to turn sideways. But I've already been committed, O I mean volunteered.
So engine is shot (aluminum block) but I have a Predator or a K181 I could put on it.
The wheel shaft seals looked shot and had a bunch of play so brass wheel bushings were shot. (the other 2 shafts have tapered roller bearings).
No model number, but from the "Pxxxxx" serial number and Briggs engine I've dated it to a 1981.
MTD now owns Troy Bilt and their "on-line manuals" go back to 2000. Called their Tech Supports and got "Deer in the Headlite" comments regarding a 1981 Service Manual.
Searched online and founds lots more info on the larger "Horse" model, and a 1991 Pony service manual.
While they basically look the same, there's been several generations of re-engineering the internals to simplify manufacturing and eliminate castings it appears.
I found this parts diagram to be the close's match to what I have.
https://www.partstree.com/models/20462-troy-bilt-pony-i-rear-tine-tiller-sn-p001001-p101750/wheel-tiller-shaft-assemblies-7/
I disassembled it and I think I marked everything as to what faced the front, back or R,L side. Internals looked OK, but the wheel shaft seal area is not the greatest.
Most parts are NLA but found bearing. seals & bushings on ebay. $130
Reassembled everything and used the 1991 Service Manual as a "Guide" to shimming the 3 shafts end play.
Everything turn freely in both directions when in neutral. But when I engage the Wheel Shaft "Clutch" it binds up. The clutch lets the wheels roll freely or engages them to power. It uses belt idlers to reverse direction from a second shaft on the briggs (like a walk behind snow blower drive)
photo from phone here
This internal clutch actually works by using a pawl disc which is keyed to the shaft to engage the wheel
shaft gear which is free wheeling on the shaft.
I've loosened the bolt on the bearing end caps slightly and no change.
This uses worm gears and I know "some" worm gears are designed where they must be "power driven" in each direction (My boat lift is like this)
So the rear tine gear shaft turn freely in each direction.
The wheel shaft locks up when the clutch is engaged amd trying to turn it in what would be the forward direction. But it will turn freely with the clutch engaged if going in the backwards direction.
The wheel shaft gear cannot be turned backwards because of the clutch mechanism on the one side.
The rear tine shaft bevel gear turn freely in both direction in neutral but is bound up when the clutch on the wheel shaft is engaged.??
There is a Main Drive Shaft that has the Worm Gears on it to drive the Wheel Gear and a second worm to drive the Tines Gear.
https://www.partstree.com/models/20462-troy-bilt-pony-i-rear-tine-tiller-sn-p001001-p101750/main-drive-shaft-gear-assemblies-4/
This shaft is made up of a smooth shaft with the worms keyed to it and spacers in between them. I disassembled it (and carefully laid out each piece in order) to wire brush everything clean on the grinder as there was some rust from water in the very bottom of the gearbox.
I find it hard to believe that I could have one of the worms backwards because it seems it would not turn freely when the wheel clutch is not engaged??
To remove it I have to disassemble everything and might ruin my seals as I have to drive them out. (dumb me, I tested everything to turn freely before I installed the seals, BUT I didn't engage the clutch)
Just a note,, I didn't try to turn everything with the "clutch engaged" "Before" I disassembled it so I don't know how hard it should turn, but it had to turn via a belt drive verse's now totally locking up.
Regrettable a nonworking tiller doesn't get me out being volunteered.
Did I say I actually enjoy a garden!
Thanks for any suggestions and listening to my rant.
This is the input shaft from belt pulley
Special woodruff key
Tiller Tine Shaft
Some one was in here before me. These are threaded holes with removable set screws to drive the bearing cone out. No set screws just filled with caulk or body putty.


 By Bill Winn
 By oliver2-44
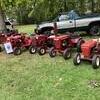 By wh315-8
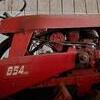 By Joe Warren