Jump to content

Recommended Posts

Geno

Have you tried any Krylon paint or are you set on the Rustoleum color?  I use the Krylon Cherry Red and it dries faster.  :)

Share this post


Link to post
Share on other sites
 
km3h

I am not set on any color as the colors of the Wheel Horses have changed slightly over the years, so who is to say what is the right one. Before I start the next tractor, I am going to do some experiments and then decide what the right paint and process is good for me.

I am leaning to the spray gun for the next one. I want something that dries fast and gets hard quickly. As it is I will have to let this hood sit for a long time before I can mask it and paint the black.

Share this post


Link to post
Share on other sites
 
gsummers

When I did my 312H, I used Ace hardware brand Banner Red, a bit brighter then RustyO, but looks great. I could spray on 5 coats in about 2 hrs and within 1 more hr I was handling the parts and bolting them back in place the next day, Never seen anyone else mention this paint before, I am happy with the way mine turned out.

post-12936-0-41228600-1411164764_thumb.j

  • Like 2

Share this post


Link to post
Share on other sites
 
km3h

That looks as much like Wheel Horse Red as anything else I have seen. Good looking job, by the way.

Share this post


Link to post
Share on other sites
 
km3h

Been scratching my head the last few days trying to figure where parts go and in which direction they go in what holes. I took a lot of photos when I tore it down and they are a valuable asset to me but nothing takes the place of see exactly how each piece fits.

Yesterday I put the Battery floor in that tractor at least 4 times before I got everything put in the right order. So I think I found a great solution.

All you need to do a perfect job of reconstructing a Wheel Horse 416-H, is to have another one just like it setting around doing nothing important. I stripped the sheet metal off and gave it a good power washing, which it needed anyway and now I won't be wondering around with my finger you know where looking for a place to put a part.

post-2564-0-73284500-1411245746_thumb.jp

I called Matt today to get a clarification of what parts I need to leave out until I install the foot pedal. He told me that he shipped the order this morning and I should get it on Tuesday. That's good because I need to take a break and watch some football tomorrow and Monday night. Go Ravens. This is going to be the year the Orioles go to the World Series and the Ravens go to the Super Bowl. Wouldn't that be something.

  • Like 1

Share this post


Link to post
Share on other sites
 
Geno

I agree Nick, everyone should have more Horses.  :text-+1:    :laughing-rolling:

  • Like 1

Share this post


Link to post
Share on other sites
 
km3h

Since I need to wait for the foot pedal from Matt, I decided to put a few decals on the old girl.

post-2564-0-25335900-1411264319_thumb.jppost-2564-0-64123600-1411264343_thumb.jppost-2564-0-19917300-1411264357_thumb.jp

I am going to get an Exacto knife tomorrow to make good clean cuts for the holes. I can't do the hood yet as I need to wait for the paint to dry and then paint the black. But I am liking what I see so far. I really like what Terry did on the decal for the gage plate. Top line says Restored by Nick Caprinolo. Nice touch and much appreciated. He does an outstanding job on these decals. I am glad I picked the Patriotic decals for this one.

  • Like 4

Share this post


Link to post
Share on other sites
 
Geno

Wow, nice work Nick.  :bow-blue:

Share this post


Link to post
Share on other sites
 
km3h

I got the foot pedal conversion kit from Matt today. Matt sent it out on Saturday and it arrived this morning. Very fast service. Tomorrow I am going to get some work done. Not sure what I will tackle first, but I am going to go at it all day. I hope!!!!!!

Share this post


Link to post
Share on other sites
 
Wishin4a416

Lookin good. Getting close now. I like those decals!

Share this post


Link to post
Share on other sites
 
km3h

Got a chance to go outside today and what a beautiful day it was. I installed the Foot Pedal I got from Matt and after a bit of fitting got everything adjusted the way I  think it should work. Of course I won't know until I get it on the floor with an engine in it. Actually was a very easy installation. If it works the way I expect it will, I will probably order three more. Unless I run into something complicated, I hope to have all the innards installed by Thursday. It will soon be ready to sit on the floor.


post-2564-0-75095100-1411516820_thumb.jppost-2564-0-22134000-1411516838_thumb.jppost-2564-0-05409900-1411516852_thumb.jppost-2564-0-18831900-1411516863_thumb.jp  

  • Like 1

Share this post


Link to post
Share on other sites
 
Geno

Looks good Nick.  :text-woo:

Share this post


Link to post
Share on other sites
 
km3h

Gino

Have you installed one of these foot pedals?

Share this post


Link to post
Share on other sites
 
Geno

Nope.  Is it easy?  :eusa-think:

Share this post


Link to post
Share on other sites
 
km3h

Yep. A lot easier than I thought. Toughest part is the final adjustment. Once I figured which way to turn things it was a piece of cake. I did have to cut about 1/4 inch of one off the rod running from the pedal to the cam bracket.

Share this post


Link to post
Share on other sites
 
Martin

Nick and Geno, the foot pedal is one of the best mods you can do to the eaton equipped tractors. i put one on one of the 416s when i was messing around with the Onan that ended up on my last 416 build........


  • Like 1

Share this post


Link to post
Share on other sites
 
km3h

Martin


It was because of watching you redo that tractor that I decided to get the foot pedal from Matt. Your description of how much fun it was to drive was the clincher for me.


I am glad you chimed in here as I keyed on the link and got another look at your installation.  After looking at your application I see that I need to go back and make a small modification to what I did. I can't believe I was that stupid I left out the auto center lever and the parts that go with it. When making the installation I did not actually read all documentation. If I had I would have realized by what it was called it was needed. As it was, I had everything working the way I thought it should and left it out. It looked like it wasn't needed.  


This entire project has been a learning experience for me and the next tractor I refurbish will be a piece of cake because of the experience of doing this one.   

  • Like 2

Share this post


Link to post
Share on other sites
 
Geno

Rule #1 Nick, if you have leftover parts then you read the directions.   :laughing-rolling:

Share this post


Link to post
Share on other sites
 
km3h

Yea I know. I even called Matt and talked to him. I told him I had a lot of parts left over and that I drilled the hole in one as instructed but didn't need to. I think I confused him a bit or maybe he thought I was nuts and didn't want to say so. Oh well, tomorrow is another day and another lesson learned. The directions are only 17 pages long and most of that is filled with illustrations and photos. So now I am studying them with due diligence.  

Share this post


Link to post
Share on other sites
 
km3h

I have the foot pedal completely and correctly installed this time. Really it is not brain surgery. I don't know what the heck I was thinking but as soon as I took a second look at it everything fell into place. The only problem I had was getting it to rest in the neutral position and keep the reverse lever from hitting the floor board. I finally had to cut about 3/4 of an inch off the rod running from the pedal to the Hydro Cam. Luckily there were plenty of threads at the foot pedal to make the proper adjustment. One more thing I have to do is drill a hole for the spring to attach to. It appears that this will be a very smooth way to operate the tractor.


post-2564-0-85505000-1411604927_thumb.jppost-2564-0-27724200-1411604943_thumb.jp   

Share this post


Link to post
Share on other sites
 
Geno

Did you have to use all the parts?   :popcorn:

Share this post


Link to post
Share on other sites
 
km3h

No parts left. Used each and every one of them.

Share this post


Link to post
Share on other sites
 
km3h

Again I have been putting parts on this tractor only to find that I have to remove them to install something else. If only there was a manual that gave step by step directions on dismantling and then putting it back together listing everything in proper order. I have put a few scratches on it and will have to try to tdo some touchup later.


I searched everywhere for these bolts. they are tapered and don't need lock washers. Anyone have a source for them. What are they called?

post-2564-0-63861600-1411856617_thumb.jp


I have searched everywhere for some missing parts. Don't know what I did with them. They must be in the garage someplace but I can't find them to save my life.


Need part number 11, Fuse holder bracket and number 18, Guard bracket.


I am going to have to tear the whole shop apart to find them and they are holding me up. I don't want to go any further because if I install the motor then I won't easy have access to install them.


post-2564-0-73671200-1411856567_thumb.jp


Steering is in and the wiring is laid out and partially installed. Not much more to do. I will be putting the wheels on soon so I can put it on the floor for finishing.


I did some tweaking on the foot pedal from Matt and now it centers perfectly when you take pressure of it. This has got to be a big improvement and a more comfortable way to operate this tractor. Now I am going to have to order three more of them.  


post-2564-0-28789000-1411856638_thumb.jppost-2564-0-23453100-1411856649_thumb.jppost-2564-0-85117900-1411856664_thumb.jp 

Share this post


Link to post
Share on other sites
 
motox25

Do you have a Toro dealer close by?  Our local Toro dealer can still get those bolts as well as almost every other bolt and screw on the tractor.  I just ordered several nuts and bolts to replace rusted out ones on mine.

Share this post


Link to post
Share on other sites
 
Martin

Nick, the taper is just to cut the initial thread at assembly, they don't need to be tapered and if you look closely it's just the first few threads. The rest is parallel, McMaster Carr carry shouldered bolts that the head is similar to these.

I like to hoard used ones and replate them, like was mentioned above they are also available new but $$$$......


Edited by Martin

Share this post


Link to post
Share on other sites
 

Create an account or sign in to comment

You need to be a member in order to leave a comment

Create an account

Sign up for a new account in our community. It's easy!

Register a new account

Sign in

Already have an account? Sign in here.

Sign In Now

  • Similar Content

    • RORY K.
      By RORY K.
      nice tractor for resto runs and operates blades need replaced.little tlc all it needs.
    • t_furl43
      By t_furl43
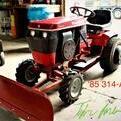
      A really nice 1995 wheelhorse 416H runs and drives great no leaks only 920 hrs, motor runs strong, starts right up, brand new back tires 23x10.5x12, has slot hitch, comes with 42” RD deck and 42” snowplow, wheel weights and all 4 hubcaps, I’ll also throw in an extra set of tires, will need a seat but that’s it, pickup in millersville pa 17551, price is negotiable, will trade for an Economy Powerking tractor or John Deere 318
    • Bill D
      By Bill D
      I picked up a low hour, (189.6) abandoned 416h yesterday.  Does anyone know what size the o-ring is that seals the carb to the air cleaner?  Mines cracked and I expected it to break in pieces when I remove it there by making it useless for sizing at the hardware store.  Also, the voltage regulator is missing.  Has anyone tried used a regulator from a Kawasaki as a replacement?  I have a couple here and thought about trying them.  Can anyone tell me if this engine has the governor spacer with the tab?  Thanks.


    • HorsePower58
      By HorsePower58
    • HorsePower58
      By HorsePower58
×
×
  • Create New...